Nuance SafeCom Controller Administrator’s Manual D60700-07 October 2012
Trademarks: Nuance, the Nuance logo, SafeCom, SafeCom Go, SafeCom P:Go, SafeCom ePay and the SafeCom logo are trademarks of Nuance Communications, Inc. or its affiliates in the United States and/or other countries. All other trademarks referred to herein are the property of their respective owners. Nuance Communications, Inc. cannot be held responsible for any technical or typographical errors and reserves the right to make changes to products and documentation without prior notification.
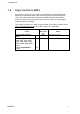
Table of contents 1 Introduction ............................................................................................5 1.1 SafeCom Controller ........................................................................ 5 1.2 Requirements ............................................................................... 5 1.3 SafeCom Controller product ............................................................. 5 1.4 SafeCom Color Front-end product ......................................................
2.10 2.11 2.9.2 Update software via Mini-FTP .......................................... 42 Monitor link to SafeCom Color Front-end ............................................ 43 SafeCom Color Front-end, Cotag ...................................................... 43 2.11.1 Initial configuration via card ........................................... 43 3 Using SafeCom Color Front-end.................................................................. 44 3.1 Login..............................................
1 Introduction 1 Introduction 1.1 SafeCom Controller The SafeCom Controller offers user authentication and Pull Printing independent of printer manufacturer. Users log in either through the attached SafeCom Color Front-end or stand-alone SafeCom ID Device. SafeCom Controller works together the SafeCom G3 Server software and is designed to help companies and organizations gain control over their printing costs and document security.
1 Introduction 1.
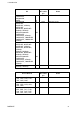
1 Introduction 1.6 Copy Control on MFPs If you wish to control the copy function on Multifunction Printers (MFPs) the MFP must be networked and in most cases you need a special SafeCom MFP cable. The tables in the following shows the MFPs that allow the SafeCom solution to control the copy function and count the number of copied pages (requires SafeCom Tracking). The number (nnn010) is the SafeCom part number of the cable. Please contact safecom_sales@nuance.com to hear about support for other MFPs.
1 Introduction AB SafeCom MFP cable p/n 965010 A A None HP HP Color LaserJet CM4540 MFP HP LaserJet M4555 HP LaserJet M3035 MFP, M4345 MFP, 4345mfp, M5035 MFP, M9040 MFP, M9050 MFP 9040mfp, 9050mfp HP Color LaserJet CM3530 MFP, CM4730 MFP, 4730mfp, CM6030 MFP, CM6040 MFP CM8050 MFP, CM8060 MFP, 9500mfp HP LaserJet M3035 MFP, M3027 MFP M4345 MFP, 4345mfp, M5025 MFP, M5035 MFP, 8150mfp, 9000mfp, 9000lmfp, M9040 MFP, M9050 MFP 9040mfp, 9050mfp HP Color LaserJet CM3530 MFP, CM4730 MFP, 4730mfp, CM6030 MFP,
1 Introduction Kyocera Mita Kyocera Mita KM-2530, KM-3035, KM-3530, KM-4035, KM-5035, KM-C850, KM-C2630 Océ Océ CS CS171, CS175, CS191, CS230 Océ CS CS163, CS173, CS193, CS231, CS240, CS250 Océ VarioPrint 2045/55/65, 2050-70, 3145E, 3155E, 3165E Panasonic Panasonic … D60700-07 C SafeCom MFP cable p/n 661010 Notes SafeCom Controller. Network interface card firmware must be up-todate, e.g. IB-21E version 1.3.3 SB-110 version 9.5.17 … SafeCom MFP cable p/n 662010 SafeCom Controller.
1 Introduction Ricoh1 MP C2050, MP C2550, MP C2800, MP C3300, MP C4000, MP C5000 MP 2550, MP 3550, MP 4000, MP 5000, MP C6000, MP C7500 MP 1100, MP 1350, MP 5500, MP 6500, MP 7500, MP 9000, MP C2500, MP C3000, MP C3500, MP C4500 MP 2510, MP 3010, MP 3500, MP 4500 2051 (DSm651), 2060 (DSm660), 2075 (DSm675), 3025 (DSm725), 3030 (DSm730), 3035 (DSm735), 3045 (DSm745), 3224C (DSc424), 3228C (DSc428), 3232C (DSc432), 3235C (DSc435), 3245C (DSc445), 3260C (DSc460), 5560C (CS555), 450, 650, 1022, 1027, 1032, 103
1 Introduction SafeCom MFP cable p/n None Sharp Sharp OSA-enabled MFPs Sharp MX MX2300N, MX2700N, MX3501, MX4501 Sharp AR Color AR-C260M Sharp AR Mono and MX-M AR-M350, AR-M450, AR-M276, AR-M351, MX-M350 D60700-07 AB Notes 663010 SafeCom Go Sharp. Sharp product key for the Sharp External Account Module (MX-AMX3) MUST be registered on the MFP. SafeCom Controller. 963010 SafeCom Controller. 665010 SafeCom Controller.
1 Introduction AB SafeCom MFP cable p/n None AB 962010 Xerox Phaser 3635 AB 962010 Xerox WorkCentre 4250, 4260 AB 962010 Xerox WorkCentre 5632, 5638, 5645, 5655, 5665, 5675, 5687 AB None AB 962010 Xerox WorkCentre 7228, 7235, 7245 AB 962010 Xerox WorkCentre 7232, 7242 AB None AB 962010 AB None AB 962010 AB None AB 962010 Xerox WorkCentre 7132, 7228, 7235, 7245 AB 962010 Xerox WorkCentre Pro 32, 35, 40, 45, 55, 65, 75, 90, 165, 175 Xerox Document Centre 212, 214, 220, 230,
1 Introduction Xerox WorkCentre Pro C2128, C2636, C3545 AB SafeCom MFP cable p/n 962010 Xerox DocuColor 12, 240, 250, 1632, 2240, 3535 Xerox WorkCentre M24, M118, M123, M128, M133 Xerox WorkCentre Pro 123, 128, 133 AB 962010 AB 962010 Xerox Notes SafeCom Controller and Xerox Foreign Interface Kit. Xerox p/n 098S04822. SafeCom Controller and Xerox Foreign Interface Kit. Xerox p/n 498K14140. SafeCom Controller and Xerox Foreign Interface Kit. Xerox p/n 497K02202.
1 Introduction 1.7 Available documentation SafeCom Smart Printing SafeCom Smart Printing Administrator’s Quick Guide D10600 How to install a SafeCom Smart Printing solution. SafeCom G3 SafeCom G3 Administrator’s Manual D60603 A comprehensive manual that the administrator should consult to make a successful SafeCom solution. The manual includes information about SafeCom Tracking, SafeCom Rule Based Printing, SafeCom Client Billing, and SafeCom Pay. 1.
1 Introduction 1.9 Document history Revision D60700-07 Cosmetic changes Added information on how to enable copy locking on Xerox WorkCentre 75xx (2.6.11) Added paragraph on Correct disposal of this product to section 5 Revision D60700-06 SafeCom Controller version S80 508.780*62. SafeCom G3 Server version S82 070.420*06 HP Future Smart devices CM4540 MPF and M4555 are now supported (1.6). Xerox Phaser 3635 is now supported (1.6).
1 Introduction Lights on SafeCom Controller (2.5). Added section: Copy Control with SafeCom MFP Cable (2.6). Possible to reference multiple SafeCom servers (2.7.3). Added details about Post Tracking support (2.7.4). Added section: Monitor link to SafeCom Color Front-end (2.10). Revision D60700-03 SafeCom Controller version S80 508.780*38. How to control FTP and TELNET access (2.8.18). Added new sections to chapter 4 Troubleshooting.
2 SafeCom Controller 2 SafeCom Controller 2.1 Overview Make sure the SafeCom G3 Server software installation has been completed as described in for example SafeCom Smart Printing Administrator’s Quick Guide D10600. 2.2 Connect hardware When powered up, the hardware automatically discovers the server software. serial port test button USB host 2 USB device 1 LAN network port power Figure 1 SafeCom Controller’s rear panel 1. 2. 3. 4a. 4b. 5. 6. Switch off the power to the printer.
2 SafeCom Controller 2.3 Setup process via SafeCom Color Front-end The SafeCom Color Front-end initiates the setup process when it is not configured (either fresh out of the box or after a restore factory default). User MUST be Technician or Administrator in the SafeCom solution. 1. 2a. 2b. 3. 4. 5. 2.4 The screen shows: Searching. Please wait… Broadcast messages are sent to find the SafeCom Server. Select SafeCom Server. Select one on the list and touch Select.
2 SafeCom Controller 8. 9. 10. 11. 12 13. 14. Information is retrieved from the SafeCom Controller. Click Next. Enter the Printer address (the device IP address or host name) and click Next. Information is then retrieved from the device. Click Next. Now select the type of device and click Next. Enter the username and password. On the Settings tab, make sure to specify the properties of the device (duplex and color supported). Click Add to register the device and save it in the database. After approx.
2 SafeCom Controller 2.5 Lights on SafeCom Controller The SafeCom Controller is equipped with four green colored lights labeled: PRINT, LOGIN2, LAN, and SESSION.
2 SafeCom Controller 2.6 Copy Control with SafeCom MFP Cable The SafeCom MFP cable is printer dependent and has the following characteristics: It is a split cable with three connectors. A blue PS2 male connector connects to the SafeCom Controller’s serial port. A black PS2 female connector connects to the SafeCom serial cable supplied with your SafeCom Color Front-end or to the cable attached to your stand-alone SafeCom Card Reader. An MFP specific FIH (Foreign Harness Interface) connector.
2 SafeCom Controller Connect SafeCom MFP Cable: 1. 3. 4. 5. Power off the MFP and the SafeCom Controller. Connect the SafeCom MFP Cable. Refer to the relevant subsections for additional instructions. Power on the MFP. Power on the SafeCom Controller. On the SafeCom Controller: 6. 7. Open the Advanced Configuration web page (2.7.2). Click Printer and change Copy Enabled to YES and change Use auto configuration to YES.
2 SafeCom Controller 2.6.3 SafeCom MFP Cable HP 9055mfp and 9065mfp The MFP’s FIH connector is located behind the MFP’s back cover. See pictures below. Remove the back cover. Remove the male connector with the two wires and connect the equivalent black connector from the supplied SafeCom MFP cable. 1. 2. 3. 4. 5. Power on the MFP under the 25 service mode. First ensure that the main power switch on the back of the MFP is turned on and the sub-power button on the front of the MFP is turned off.
2 SafeCom Controller 2.6.4 SafeCom MFP Cable Konica Minolta Locate the MFP’s FIH connector inside the MFP. Remove the male connector with the two wires and connect the equivalent black connector from the supplied SafeCom MFP cable. 1. 2. 3. 4. 5. 6. 7. 8. 9. 1. 2. On the MFP’s control panel press COPY. Press HELP. Touch Key Ope mode. Touch 3. Scanner. Touch 1. Initial Setting. Scroll to SCAN W/O key count and touch EDIT to change this setting to Not valid. Touch RETURN. Touch RETURN. Touch RETURN.
2 SafeCom Controller 2.6.6 SafeCom MFP Cable Océ On the Océ CS series: 1. 2. 3. 4. 5. 6. 7. 8. 9. On the MFP press the Func./Counter button. On the touch-screen click Details. Press the designated sequence of STOP button and digits. Touch Management Function Choice. Touch Key Counter Only. Touch Message. Touch Type2. Touch End. Touch Exit. On Océ VarioPrint series: Requires Copy Control Interface (CCI) from Océ (p/n 5583625). Install it according to the instructions provided by Océ. 1. 2. 3. 4. 5.
2 SafeCom Controller 2.6.7 SafeCom MFP Cable Ricoh Connect the SafeCom MFP Cable’s white 4-pin connector to the Ricoh MFP’s FIH connector. On newer Ricoh MFPs: 1. 2. 3. 4. 5. 6. On the MFP press the User Tools button (<>/123). On the touch-screen click System Settings and then Administrator Tools. Click Key Counter Management and select the Copier function and deselect the Printer function. Click OK. Click User Authentication Management. Select Off. Click OK.
2 SafeCom Controller 2.6.9 SafeCom MFP Cable Xerox How to install and enable copy control on Xerox MFPs depends on the model. Xerox WorkCentre Pro 35 and similar models Install the Xerox Foreign Interface Kit P/N 498K03490 on the MFP according to the instructions. Connect the SafeCom MFP Cable’s black DB-15 connector to the MFP’s FIH port. 1. 2. 3. 4. 5. 6. 7. 8. 9. 10. 11. 12. 13. 14. On the MFP press the Access button (button with key symbol). Enter your password and touch Enter. Touch Go To Tools.
2 SafeCom Controller 2.6.10 SafeCom setup with FDI instructions for Xerox PH3635 PH3635 requires a FW version 20.102.03.013 or higher and that the SafeCom controller requires a SW version *49 or higher. 1. 2. Install the foreign device interface according to the according to the manual 097N01676 (1.6). Ensure cable connections between SafeCom and PH3635 are correct. See diagram below. Setup FDI at the PH3635: 1. 2. 3. 4. 5. 6. 7. 8. 9. 10. 11. 12.
2 SafeCom Controller 1. 2. 3. 4. Open the SafeCom controller webpage by entering the controller IP address in a browser (2.7.1). Select Advanced Configuration. Select SafeCom from SafeCom Controller Administration menu. Make sure to specify the SafeCom Group Name, SafeCom Server Address, and SafeCom Server Port Number. Note: For the purpose of failover, it is possible to specify multiple SafeCom servers. The SafeCom Controller attempts to contact the servers in their order of appearance. 5.
2 SafeCom Controller 2. 3. 2.7 On the web page clear the Hold Foreign Device Interface Network Print Jobs checkbox. Click Apply. SafeCom Controller web interface The SafeCom Controller web interface consists of multiple web pages, some of which can be password-protected. Most web pages include online help. The web interface is available in English. 2.7.1 Log in to the SafeCom Controller web interface 1. 2. Open a web browser and enter the IP address of the SafeCom Controller in the address field.
2 SafeCom Controller 2.7.3 SafeCom web page The SafeCom web page can be opened from the Advanced Configuration web page (2.7.2) by clicking on SafeCom. SafeCom Group Name, SafeCom Server Address and SafeCom Server Port Number must be specified for the SafeCom Controller to work. It is possible to specify multiple SafeCom servers for the purpose of failover. The SafeCom Controller will attempt to contact the servers in their order of appearance (2.8.1). If the IP Address is 0.0.0.
2 SafeCom Controller 2.7.4 Printer web page The Printer web page can be opened from the Advanced Configuration web page (2.7.2) by clicking on Printer. Select Network – Port 9100 if the SafeCom Controller connects to the printer via the network. On the obsolete SafeCom Controller 3 Port and 1 Port select Parallel Port if the printer is connected to the SafeCom Controller’s PAR1 port. Printer IP Address must be correct if the SafeCom Controller is to control copying on any attached MFP.
2 SafeCom Controller High Speed Print Enabled should be YES if print data is to be sent directly (and unencrypted) to the printer from the SafeCom server rather than through the SafeCom Controller. The pace of high speed print is then comparable to that of printing the document directly to the printer. SafeCom G2 version S82 070.380*07 or higher can hold off Push printed documents while a user is logged in at the device.
2 SafeCom Controller 2.7.5 TCP/IP web page The TCP/IP web page can be opened from the Advanced Configuration web page (2.7.2) by clicking on TCP/IP. Select Automatic as IP Lookup Method. The SafeCom Controller can obtain its IP address and related information automatically from a DHCP, BOOTP, or RARP server in the network. Or you can choose to use the manually specified IP address.
2 SafeCom Controller 2.8 SafeCom Controller – How to 2.8.1 Specify SafeCom server and printer connection 1. 2. 3. 4. 5. Open the Advanced Configuration web page (2.7.2). Click SafeCom (2.7.3) and enter the SafeCom Server address (Hostname or IP address). It is possible to specify multiple SafeCom servers for the purpose of failover. The SafeCom Controller will attempt to contact the servers in their order of appearance.
2 SafeCom Controller 2.8.4 Select user identification 1. 2. 3. 4. Open the Advanced Configuration web page (2.7.2). Click SafeCom. Change Front End Identification. Click Save and Continue to save your settings. Select Restart. Click Restart again. You must wait approx. 1 minute while the SafeCom Controller initializes. 2.8.5 Disable the test button To prevent unauthorized users from restoring factory defaults, disable the SafeCom Controller’s test button. 1. 2. 3. 4. 5. 2.8.
2 SafeCom Controller 2.8.8 Assign IP address using arp and ping The arp command must be set on the same network segment as the SafeCom Controller. If your computer has an IP address of 194.192.134.90 and you are using a subnet mask of 255.255.255.0 then, the SafeCom Controller must have an IP address of 194.192.134.x, where x is a number between 1 and 254.
2 SafeCom Controller 2.8.10 Specify help desk contact The help desk contact is included on the OUT OF ORDER screen, which the SafeCom Front-end displays when communication is lost. 1. 2. 3. 4. 5. Open the Advanced Configuration web page (2.7.2). Click General. Enter the Contact Person (name, phone number). Click Save and Continue. Click Restart. 2.8.
2 SafeCom Controller 2.8.13 Enable Copy Control Copy Control requires installation of a SafeCom MFP Cable plus some additional configuration. Refer to 2.6 for details. On the SafeCom Controller web interface you need to: 1. 2. 3. 4. 5. Open the Advanced Configuration web page (2.7.2). Click Printer and change Copy Enabled to YES and change Use auto configuration to YES. If required you can change Copy Idle Timeout. When the MFP has been idle for this timeout the user is automatically logged out.
2 SafeCom Controller 2.8.18 Control FTP and TELNET network access By default the SafeCom Controller can be accessed via FTP to update software (2.9.1) and via TELNET to do troubleshooting if instructed to do so by support personnel. To disable these network access methods follow these steps: 1. 2. 3. 4. 5. 6. 2.9 Open the Advanced Configuration web page (2.7.2). Click General and scroll to Network Access. Change Enable FTP access to No. Change Enable TELNET access to No. Click Save and Continue.
2 SafeCom Controller 2.9.1 Update software via FTP This software update method preserves the current settings. 1. From the command prompt window, issue the ftp command. Enter: ftp The SafeCom Controller prompts you for a username and a password. Both are adm by default. 2. Put the SafeCom Controller into software update mode by downloading the software file into the codes folder. Enter: cd codes put .b80 The command prompt window displays the text "Restarting ...
2 SafeCom Controller 2.9.2 Update software via Mini-FTP This software update method clears all settings, including the IP address. Note: The SafeCom Controller does not respond to ping request while in miniFTP mode. You can bring the SafeCom Controller into mini-FTP mode by holding the test button while you power on the SafeCom Controller, or from the SafeCom Controller web interface. 1. Open the Advanced Configuration web page. 2. Click Restart to mini-FTP.
2 SafeCom Controller 8. You may wish to delete the static entry again. Enter: arp -d 194.192.134.86 Note: If you experience problems completing the software upload, we recommend isolating the SafeCom Controller and the computer being used for the upload. This should eliminate eventual network broadcast and network noise that could otherwise disturb the data being sent to the SafeCom Controller.
3 Using SafeCom Color Front-end 3 Using SafeCom Color Front-end 3.1 Login 1. D60700-07 In most cases you initiate the login sequence by using your card. However, if login is by user code you start by touching the screen, entering the user code and tap OK.
3 Using SafeCom Color Front-end 2. Enter your 4-digit PIN code. This is not required if Login without PIN code is enabled for the user. 3. Once logged in you can select an option from the touch-screen. Touch Print All to print all documents (except any retained documents). Documents are printed in chronological order (oldest first). The Copy icon is only present if copy control is enabled (2.8.13).
3 Using SafeCom Color Front-end 3.2 Pull Print – Document list Touch Documents to print individual documents. Documents appear in chronological order with the newest at the top of the list. If Print all at login is checked any documents pending collection will be printed first. In the above example the preceding R shows the document is retained. The 0.10 is the cost of the document. D60700-07 Touch Print all to print all documents, excluding any retained documents.
3 Using SafeCom Color Front-end 3.3 Copy Once logged in touch Copy on the SafeCom Color Front-end touch-screen to allow copying. The actual copy process is done as described in the MFP’s manual, typically by pressing a copy or start button. There is a configurable Copy idle timeout that defaults to 60 seconds (2.8.13). 3.4 Logout 3.5 First time login with PUK code 1. 2. Login on the SafeCom Color Front-end. Enter the 8-digit PUK code that you received by e-mail or from your Administrator.3 3.
3 Using SafeCom Color Front-end 3.6 Change PIN code Users can change their PIN code if Allow users to change PIN code is checked on the Users tab in the Server properties dialog. 1. 2. 3. 3.7 Log in on the SafeCom Color Front-end. Touch Settings and then Change PIN code. Enter the new PIN code twice. Cleaning the touch-screen 1. 2. Power off the SafeCom Color Front-end. Gently wipe the display with a dry, lint-free, soft cloth. If any stains remains: 3. 4. 5. 6.
4 Troubleshooting 4 Troubleshooting 4.1 SafeCom Help Desk Assistant We want your SafeCom solution to be one that reduces not only print costs, but is also easy to support. In the following you will find useful troubleshoot hints. The most common problems reported by end-users have been compiled into an online SafeCom Help Desk Assistant available at safecom.eu/help 4.2 At the printer: Out of order This message is displayed when communication is lost to the SafeCom server.
4 Troubleshooting 4.5 At the printer: Restricted access 4.6 At the printer: Error printing document 4.7 The user is not allowed to use the device. A Pay user is trying to log in and Pay is not checked on the License tab in the Device properties dialog. Pull Print is cleared on the License tab in the Device properties dialog. Pull Print is cleared on the Settings tab in the Device properties dialog.
4 Troubleshooting 4.12 Document is not printed 4.13 Is the print queue paused? Is the printer powered on and connected? Is the printer online? Is intervention required? Check for: 1) wrong paper size, 2) manual feed, 3) out of paper, 4) paper jam or 5) toner low. At the printer: Printer is not available The SafeCom Color Front-end displays: “Printer is not available. Please try later”. Check the following: Is the printer powered on and ready? Are the cables connected (2.
5 Regulatory information 5 Regulatory information WARNING NOTE: This equipment has been tested and found to comply with the limits for a Class A digital device, pursuant to part 15 of the FCC Rules. These limits are designed to provide reasonable protection against harmful interference in a residential installation.
6 Index 6 Index Active scripting, 51 arp, 37 Canon, 7, 8 Copy Control requirements, 7 Copy idle timeout, 39 DNS name, 38 Document history, 15 Driver names, 36 Error printing document, 50 Fixed IP address, 36 Front-end, 5 FTP SafeCom Controller, 41 Gestetner, 10 Help Desk Assistant, 49 Help desk contact, 38 High speed printing, 33, 39 Infotec, 10 JavaScript, 51 Kyocera Mita, 9 LAN speed, 38 Lanier, 10 LCD, 5 LED indicators, 20 Login denied, 49 Manuals, 14 MFP cable, 7 Mini-FTP SafeCom Controller, 42 Multi
6 Index D60700-07 54