
Specifications
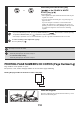
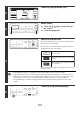
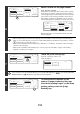
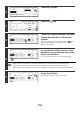

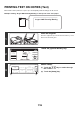

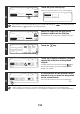
Table Of Contents
- TABLE OF CONTENTS
- ABOUT THIS MANUAL
- BASIC PROCEDURE FOR MAKING COPIES
- BASE SCREEN OF COPY MODE
- COPYING SEQUENCE
- MAKING COPIES
- AUTOMATIC 2-SIDED COPYING
- COPY COLOUR MODES
- CHANGING THE EXPOSURE AND EXPOSURE MODE
- REDUCTION/ENLARGEMENT/ZOOM
- ORIGINAL SIZES
- OUTPUT
- MAKING COPIES USING THE BYPASS TRAY (Copying on special papers)
- INTERRUPTING A COPY RUN (Interrupt copy)
- JOB STATUS SCREEN
- CONVENIENT COPY FUNCTIONS
- SPECIAL MODES
- ADDING MARGINS (Margin Shift)
- ERASING PERIPHERAL SHADOWS (Erase)
- COPYING EACH FACING PAGE OF A BOUND DOCUMENT (Dual Page Copy)
- MAKING COPIES IN PAMPHLET FORMAT (Pamphlet Copy)
- COPYING A LARGE NUMBER OF ORIGINALS AT ONCE (Job Build)
- USING TWO MACHINES TO COPY A LARGE NUMBER OF ORIGINALS (Tandem Copy)
- USING A DIFFERENT PAPER TYPE FOR COVERS (Covers/Inserts)
- ADDING INSERTS WHEN COPYING ON TRANSPARENCY FILM (Transparency Inserts)
- COPYING MULTIPLE PAGES ONTO ONE SHEET OF PAPER (Multi Shot)
- COPYING A PAMPHLET (Book Copy)
- COPYING CAPTIONS ONTO TAB PAPER (Tab Copy)
- COPYING BOTH SIDES OF A CARD ON ONE SHEET OF PAPER (Card Shot)
- PRINTING THE DATE AND A STAMP ON COPIES (Stamp)
- CHECKING THE STAMP LAYOUT (Layout)
- REPEATING PHOTOS ON A COPY (Photo Repeat)
- CREATING A LARGE POSTER (Multi-Page Enlargement)
- REVERSING THE IMAGE (Mirror Image)
- COPYING A3 (11" x 17") SIZE ORIGINAL WITHOUT CUTTING OFF THE EDGES (A3 (11x17) Full Bleed)
- COPYING IN THE CENTRE OF THE PAPER (Centring)
- REVERSING BLACK AND WHITE IN A COPY (B/W Reverse)
- ADJUSTING RED/GREEN/BLUE IN COPIES (RGB Adjust)
- ADJUSTING THE SHARPNESS OF AN IMAGE (Sharpness)
- WHITENING FAINT COLOURS IN COPIES (Suppress Background)
- ADJUSTING THE COLOUR (Colour Balance)
- ADJUSTING THE BRIGHTNESS OF A COPY (Brightness)
- ADJUSTING THE INTENSITY OF A COPY (Intensity)
- CHECKING COPIES BEFORE PRINTING (Proof Copy)
- COPYING ORIGINALS OF DIFFERENT SIZES (Mixed Size Original)
- COPYING THIN ORIGINALS (Slow Scan Mode)
- STORING COPY OPERATIONS (Job Programs)
- APPENDIX

117
4
Select the print position.
Select from 6 positions: top left, top centre, top right, bottom
left, bottom centre, bottom right.
The keys that show the print positions will appear as follows
depending on the state of the settings.
The above key is the top left key. The appearance of the keys
varies by position.
• "Text" cannot be configured in a position that already has "Date" and "Page Numbering" settings.
• If "Text" is configured without selecting a position, the text will be printed in the top left position.
5
Touch the [Text] key.
6
Touch the [Recall/Entry] key.
To store or delete a text string, touch the [Store/Delete] key.
☞ Storing, editing, and deleting text strings (page 120)
7
Specify the text to be printed.
The [Direct Entry] key can be touched to display the text entry
screen. To enter text, see "6. ENTERING TEXT" in the User's
Guide. When all characters have been entered, touch the [OK]
key.
(1) Touch the text string that you wish to
select.
The [3 6] key can be touched to switch between
3-item display and 6-item display. When 3-item display is
selected, the entire text string appears in each key.
(2) Touch the [OK] key.
Stamp
OKCancelLayout
1/2
Date
Page
Numbering
Stamp
Text
Not selected, stamp setting has not
been selected.
Selected during selection of the stamp
setting.
Not available, stamp setting has already
been allocated.
Stamp
OKCancelLayout
1/2
Date
Page
Numbering
Stamp
Text
Text
OK
Cancel
Bk(Black)
All Pages
Recall/Entry Store/Delete
Print Colour
First Page
Pre-Set
Text
OKCancel
1/5
Direct Entry
63
Recall
No.01 AAA AAA
No.02 BBB BBB
No.03
No.04
No.05
No.06
(1)
(2)