MODEL: MX-M850 MX-M950 MX-M1100 User's Guide
TABLE OF CONTENTS PERIPHERAL DEVICE TRAYS . . . . . . . . . . . . . . . . . 35 • TRAY LOCATIONS AND NAMES . . . . . . . . . . . . 35 • PAPER THAT CAN BE USED IN THE PERIPHERAL DEVICE TRAYS . . . . . . . . . . . . . . 36 • TRAY SETTINGS FOR THE LARGE CAPACITY TRAYS (MX-LCX4) . . . . . . . . . . . . . . 37 • TRAY SETTINGS FOR THE LARGE CAPACITY TRAYS (MX-LCX5) . . . . . . . . . . . . . . 40 • TRAY SETTINGS FOR THE LARGE CAPACITY TRAY (MX-LCX6) . . . . . . . . . . . . . . .
5 SYSTEM SETTINGS ACCESSING THE SYSTEM SETTINGS . . . . . . . . . . 71 SYSTEM SETTINGS LIST . . . . . . . . . . . . . . . . . . . . . 72 TOTAL COUNT . . . . . . . . . . . . . . . . . . . . . . . . . . . . . 74 • JOB COUNT. . . . . . . . . . . . . . . . . . . . . . . . . . . . . 74 • DEVICE COUNT . . . . . . . . . . . . . . . . . . . . . . . . . 74 DEFAULT SETTINGS . . . . . . . . . . . . . . . . . . . . . . . . 75 • CLOCK ADJUST . . . . . . . . . . . . . . . . . . . . . . . . . 75 • KEYBOARD SELECT. . . .
ABOUT THIS MANUAL Please note • Considerable care has been taken in preparing this manual. If you have any comments or concerns about the manual, please contact your dealer or nearest SHARP Service Department. • This product has undergone strict quality control and inspection procedures. In the unlikely event that a defect or other problem is discovered, please contact your dealer or nearest SHARP Service Department.
Operation manuals in PDF format The manuals in PDF format provide detailed explanations of the procedures for using the machine in each mode. To view the PDF manuals, download them from the hard drive in the machine. The procedure for downloading the manuals is explained in "How to download the manuals in PDF format" in the Quick Start Guide. Manual name Contents User's Guide (This manual) This manual explains the basic procedures for using the machine, such as how to load paper.
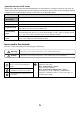
1 BEFORE USING THE MACHINE This chapter provides basic information about the machine. Please read this chapter before using the machine. PART NAMES AND FUNCTIONS EXTERIOR (1) (1) (2) (3) (4) Finisher* (5) This can be used to staple output. The optional punch module can be installed to punch holes in output. ☞ FINISHER (page 59) (2) Saddle unit* Folding unit* This folds output.
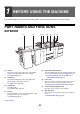
(9) (9) (10) (11) (12) (13) (14) Finisher (for MX-M850) / Saddle stitch finisher* This can be used to staple output. The punch module can be installed to punch holes in output. The saddle stitch finisher can automatically staple output at the centerline and fold the pages to create a pamphlet. ☞ FINISHER (FOR THE MX-M850) / SADDLE STITCH FINISHER (page 60) (15) (16) (17) (18) (19) (14) Tray 4 This holds paper. Transparency film, tab paper, and other special media can also be loaded.
INSIDE AND CONNECTOR (20) (21) (22) (23) (24) (25) (26) (27) (24) Service-only connector (20) Toner cartridges These contain toner for printing. When the toner runs out in the cartridge, replace the cartridge with a new cartridge. Caution This connector is for use only by service technicians. Connecting a cable to this connector may cause the machine to malfunction. (21) Main power switch This is used to power on the machine.
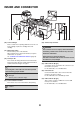
AUTOMATIC DOCUMENT FEEDER AND DOCUMENT GLASS (1) (2) (3) (4) (5) (1) Document feeding area cover (5) Open to remove a misfed original. (2) Original guides (6) Document glass Use this to scan a book or other thick original that cannot be fed through the automatic document feeder. ☞ PLACING THE ORIGINAL ON THE DOCUMENT GLASS (page 55) Document feeder tray Place originals in this tray. 1-sided originals must be placed face up.
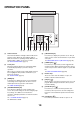
OPERATION PANEL PROOF COPY HOME SYSTEM SETTINGS JOB STATUS LOGOUT (1) (2) (1) (3) (4) (5) (6) (7) Status indicators (5) Green and red indicators will light or blink to indicate the machine's status. When the green indicator lights or blinks, the machine is operating normally. When the red indicator lights or blinks, an error has occurred. ☞ STATUS INDICATORS (page 17) (2) (6) Touch panel [LOGOUT] key ( ) Press this key to log out after you have logged in and used the machine.
PROOF COPY HOME SYSTEM SETTINGS JOB STATUS LOGOUT (11) (12) (13) (11) [STOP] key ( ) Press this key to stop a copy job or scanning of an original. (12) [START] key ( ) Press this key to copy or scan an original. This key is also used to send a fax in fax mode. PROOF COPY (13) [PROOF COPY] key ( ) Use this to make a proof copy. For information on proof copying, see "CHECKING COPIES BEFORE PRINTING (Proof Copy)" in the Copier Guide.
TOUCH PANEL The touch panel (screen) shown in this manual is a descriptive image. The actual screen is slightly different. USING THE TOUCH PANEL Example 1 (1) DOCUMENT FILING IMAGE SEND COPY MANUAL FINISHING Job status screen.
Example 4 Plain Plain 8½x11 2-Sided Copy Margin Shift Shift:Right Front:1/2inch/Back:1/2inch Erase Edge:1/2inch Center:1/2inch Covers/Inserts Front:2-Sided/Back:Insert Insertion A:10 Page/B:10 Page 5. 11x17 Exposure 1. 2. Auto Output 6. 8½x11 8½x11 11x17 3. 11x17 7. 11x17 4.
USING THE TOUCH PANEL (System Settings) This section explains special operation methods that are common to all system settings. Some of these steps are omitted in the explanations of each of the system settings, so refer to this section when configuring a setting. Example: Address book screen Address Book ABC Freq.
SYSTEM BAR The system bar appears at the bottom of the touch panel. The items that appear in the system bar are explained below. Plain Special Modes Plain Plain 8½x11 2-Sided Copy 5. 11x17 Exposure 1. 2. Output 6. 8½x11 8½x11 11x17 3. 11x17 7. 11x17 4.
PRINT/SEND STATUS (JOB STATUS) This screen appears when the [JOB STATUS] key on the operation panel is pressed. The screen shows lists of the jobs that are reserved and in progress, and jobs that have been completed. This screen is used to check jobs, move a job to the top of the job queue, or delete a job.
STATUS INDICATORS There are status indicators at the top of the operation panel. There are both red and green indicators, and these light or blink to indicate the machine's status. Green indicator Red indicator About status indicator lighting and blinking The status indicators light or blink to indicate the following conditions. Green indicator Red indicator Pattern 1 (Job status display) Pattern 2 (Machine status display) Job in progress (During paper feeding and output.
TURNING THE POWER ON AND OFF The machine has two power switches. The main power switch is at the lower left after the front cover is opened. The other power switch is the [POWER] key ( ) on the operation panel at the top right. Main power switch When the main power switch is switched on, the main power indicator on the operation panel lights up.
ENERGY SAVE FUNCTIONS This product has the following two energy save functions that conform to the Energy Star guidelines to help conserve natural resources and reduce environmental pollution. Preheat Mode (low power mode) Preheat mode automatically lowers the temperature of the fusing unit and thereby reduces power consumption if the machine remains in the standby state for the interval of time set in "Preheat Mode Setting" in the system settings (administrator).
USER AUTHENTICATION User authentication restricts the use of the machine to users that have been registered. The functions that each user is allowed to use can be specified, allowing the machine to be customized to meet the needs of your workplace. When the administrator of the machine has enabled user authentication, each user must log in to use the machine. The are different types of user authentication, and each type has a different login method.
OK User Authentication Touch the [OK] key. After the entered user number is authenticated, the user count screen will appear briefly. Usage status: Black-white : Full color : 2-color : Single color: used/remaining pages 87,654,321/12,345,678 87,654,321/12,345,678 87,654,321/12,345,678 87,654,321/12,345,678 Admin Login 2 When page limits have been set in "Pages Limit Group List" in the system settings (administrator), the number of pages remaining will appear.
AUTHENTICATION BY LOGIN NAME / PASSWORD The following procedure is used to log in using a login name and password received from the administrator of the machine or the administrator of the LDAP server. OK User Authentication Login Name User Name Password Auth to: Login Locally When controlled by login name and password (Different items will appear in the screen when LDAP authentication is used.) User Authentication Touch the [Login Name] key or the key.
Touch the [Password] key. OK User Authentication A text entry screen for entering the password will appear. Enter your password that is stored in "User List" in the system settings (administrator). Login Name User Name User 0001 Password Auth to: If you are logging in to an LDAP server, enter the password that is stored with your LDAP server login name. Each entered character will be displayed as " ". When you have finished entering the password, touch the [OK] key.
User Authentication OK After the entered login name and password are authenticated, the user count screen will appear briefly. Login Name User Name Touch the [OK] key. User 0001 Usage status: Black-white : Full color : 2-color : Single color: Password Auth to: Login Locally 4 (Different items will appear in the screen when LDAP authentication is used.
HOME SCREEN When the [HOME] key is pressed on the operation panel, the home screen appears in the touch panel. Shortcuts to functions can be registered as keys in the home screen. When a shortcut key is touched, the screen for that function appears. Register frequently used functions in the home screen to quickly and conveniently access those functions. When user authentication is used, the home screen of "Favorite Operation Group" can be displayed.
2 LOADING PAPER IMPORTANT POINTS ABOUT PAPER This section provides information that you should know before loading paper in the paper trays. Be sure to read this section before loading paper. NAMES AND LOCATIONS OF TRAYS The trays are identified by the names indicated below. For the names of the peripheral device trays, see "TRAY LOCATIONS AND NAMES" (page 35).
USEABLE PAPER Various types of paper are sold. This section explains what plain paper and what special media can be used with the machine. For detailed information on the sizes and types of paper that can be loaded in each tray of the machine, see the specifications in the Safety Guide and "PAPER TRAY SETTINGS" (page 77) in the System Settings. For information on the peripheral device trays, see "TRAY LOCATIONS AND NAMES" (page 35).
Paper that cannot be used • Thin paper less than 13 lbs. (52 g/m2) • Paper heavier than 301 g/m2. • Irregularly shaped paper • Stapled paper • Damp paper • Curled paper • Paper with a wave-like pattern due to moisture absorption • Special media for inkjet printers (fine paper, glossy paper, glossy film, etc.
TRAY SETTINGS FOR TRAY 1 AND TRAY 2 LOADING PAPER Up to 1200 sheets of 8-1/2" x 11" or A4 size paper can be loaded in tray 1. Up to 800 sheets of 8-1/2" x 11" or A4 size paper can be loaded in tray 2. For detailed information on the paper that can be loaded, see the specifications in the Safety Guide and "PAPER TRAY SETTINGS" (page 77) in the System Settings. Pull out tray 1 - tray 2. Gently pull the tray out until it stops. 1 Fan the paper. Fan the paper well before loading it.
Gently push tray 1- tray 2 into the machine. Push the tray firmly all the way into the machine. 4 If you loaded a different type of paper than was loaded previously, change the paper type setting as explained in "PAPER TRAY SETTINGS" (page 77) in the System Settings. Do not place heavy objects on the tray or press down on the tray. CHANGING THE PAPER SIZE To change the paper size of tray 1 - tray 2, follow the steps below. This section only explains how to change the paper size.
(1) (2) LT A4 A4 LT Attach the paper size guide and transparent sheet appropriately for the size of paper to be used. (1) Align the bottom of the paper size guide with the appropriate slot on the base of the tray. Align the paper size guide with the slot for the paper size to be used (indicated by the paper size mark). Transparent sheet (2) Align the holes at the top of the paper size guide with the protrusions that secure the paper size guide.
TRAY SETTINGS FOR TRAY 3 AND TRAY 4 LOADING PAPER AND CHANGING THE PAPER SIZE Up to 500 sheets of 7-1/4" x 10-1/2"R to 12" x 18" size paper (B5R to A3W size paper) can be loaded in tray 3. Up to 500 sheets of 5-1/2"x 8-1/2"R to 12"x 18" size paper (A5R to A3 size paper) can be loaded in tray 4. For detailed information on the paper that can be loaded, see the specifications in the Safety Guide and "PAPER TRAY SETTINGS" (page 77) in the System Settings. Pull out the paper tray.
Insert the paper into the tray. Load the paper with the print side face down. The stack must not be higher than the indicator line (maximum of 500 sheets). 4 Indicator line Gently push the paper tray into the machine. Push the tray firmly all the way into the machine. 5 • If you loaded a different type of paper than was loaded previously, change the paper type setting as explained in "PAPER TRAY SETTINGS" (page 77) in the System Settings.
Pull out the tray and attach the guide. Move the guide plate to the triangle mark. Next, attach the guide over the guide plate as shown. After attaching the guide, see step 2 of "LOADING PAPER AND CHANGING THE PAPER SIZE" (page 32) to attach the vertical guide. 2 Insert the tab paper into the tray. Place the tab paper with the print side face down so that the tab is to the left. 3 [Example] Make sure that the positions of the tabs correspond with the originals as shown below.
PERIPHERAL DEVICE TRAYS This section explains the large capacity trays and the large capacity tray. TRAY LOCATIONS AND NAMES The trays are identified by the names indicated below. For detailed information on the sizes and types of paper that can be loaded in each tray of the machine, see the specifications in the Safety Guide and "PAPER TRAY SETTINGS" (page 77).
PAPER THAT CAN BE USED IN THE PERIPHERAL DEVICE TRAYS This section explains what paper can be used in the peripheral devices. For detailed information on the sizes and types of paper that can be loaded in each tray of the machine, see the specifications in the Safety Guide and "PAPER TRAY SETTINGS" (page 77) in the System Settings. Plain paper, special media The same paper can be loaded in the peripheral device trays as in the machine trays. For detailed information, see "USEABLE PAPER" (page 27).
TRAY SETTINGS FOR THE LARGE CAPACITY TRAYS (MX-LCX4) Loading paper and changing the paper size Up to 1000 sheets of 5-1/2" x 8-1/2"R, 8-1/2" x 11", or 9" x 12" size paper (A4R, B5, A4, or A4W size paper) can be loaded in tray 5 and tray 6. Up to 2550 sheets of the same sizes of paper as tray 5 and tray 6 can be loaded in tray 7. For detailed information on the paper that can be loaded, see the specifications in the Safety Guide and "PAPER TRAY SETTINGS" (page 77) in the System Settings.
(D) Re-insert paper guide D at the desired paper size. 6 Adjust the paper size selector knob to the new paper size. 7 Fan the paper. 8 Fan the paper well before loading it. If the paper is not fanned, multiple sheets may feed at once and cause a misfeed. Insert the paper into the tray. 9 Load paper face up. The stack must not exceed the indicator line (up to 1000 sheets in tray 5 or tray 6, or up to 2550 sheets in tray 7). Gently push the paper tray into the machine.
Loading tab paper and transparency film In addition to plain paper, tab paper, transparency film, and other special media can be loaded in tray 5 and tray 6. To load tab paper or transparency film in tray 5 and tray 6 follow the steps below. Loading tab paper To use tab paper, the special guide must be attached as explained below. 1 Take out the tab paper guide. The guide is stored under the cover of the large capacity trays. When finished using tab paper, be sure to replace the guide.
TRAY SETTINGS FOR THE LARGE CAPACITY TRAYS (MX-LCX5) Loading paper and changing the paper size Up to 1000 sheets of 5-1/2" x 8-1/2"R to 12" x 18" size paper (A5R to A3W size paper) can be loaded in tray 5 and tray 7. Up to 2000 sheets of 5-1/2" x 8-1/2"R to 12" x 18" size paper (A5R to A3W size paper) can be loaded in tray 6. For detailed information on the paper that can be loaded, see the specifications in the Safety Guide and "PAPER TRAY SETTINGS" (page 77) in the System Settings.
Adjust the right paper guide to the paper size. (1) Release the lock lever on the paper guide and adjust the paper guide to the desired paper size. 5 (2) Push the lock lever on the paper guide down so it is horizontal to secure the paper guide. Gently push the paper tray into the machine. Push the tray firmly all the way into the machine.
Loading tab paper and transparency film In addition to plain paper, tab paper and transparency film can also be loaded in the large capacity trays (MX-LCX5). This section explains the procedures for loading tab paper and transparency film, and points to note. Loading tab paper To use tab paper, the special guide must be attached as explained below. Take out the tab paper guide. 1 The guide is stored inside the large capacity trays (MX-LCX5). Open the cover and take out the guide.
TRAY SETTINGS FOR THE LARGE CAPACITY TRAY (MX-LCX6) Loading paper Up to 3500 sheets of 8-1/2" x 11" or A4 size paper can be loaded in the large capacity tray (MX-LCX6). For detailed information on the paper that can be loaded, see the specifications in the Safety Guide and "PAPER TRAY SETTINGS" (page 77) in the System Settings. The paper size of the large capacity tray (MX-LCX6) can only be changed by a service technician.
TRAY SETTINGS FOR THE LARGE CAPACITY TRAY (MX-LCX3N) Loading paper Up to 3000 sheets of 8-1/2" x 11" to 12" x 18" (B5 to A3W) size paper can be loaded in the large capacity tray (MX-LCX3N). For detailed information on the paper that can be loaded, see the specifications in the Safety Guide and "PAPER TRAY SETTINGS" (page 77) in the System Settings. Press the operation button. The operation button indicator will blink and the tray's paper table will descend to the paper loading position.
Indicator line Place the paper in the center of the paper table. Load the paper with the print side face up. When a certain amount of paper is placed on the paper table, the paper table will automatically descend slightly and then stop. Continue loading paper in this way. The paper stack must not be higher than the indicator line. A maximum of 3000 sheets of paper can be loaded in the tray. Caution 4 When placing paper, do not insert your fingers into the openings in the paper table.
Changing the paper size To change the paper size of the large capacity tray (MX-LCX3N), follow the procedure below. This procedure only explains how to change the paper size. For the procedures for opening/closing the tray and loading paper, see "Loading paper" (page 44). Loosen the paper guide screw. 1 Slide the plate of the paper guide. Plate Slide the plate until the red line appears at the center of the size window of the plate. 2 Adjust the paper guide to the paper size that will be used.
Change the right paper guide to the paper size to be used. (1) While holding up the paper guide lock, slide the paper guide to the paper size to be used. 6 (2) Release the paper guide lock. (3) Move the paper guide slightly to the right and left so that it locks into place. You will hear a "click" when the paper guide locks. Set the paper size and paper type. 7 Be sure to change the paper size and paper type settings as explained in "PAPER TRAY SETTINGS" (page 77) in the System Settings.
LOADING PAPER IN THE BYPASS TRAY When the bypass tray is installed, plain paper, tab paper, transparency film, and other special media can be printed on. Up to 100 sheets can be loaded in the MX-MFX1, or up to 500 sheets in the MX-MFX2, to enable continuous printing like with the other trays. For detailed information on the paper that can be loaded, see the specifications in the Safety Guide and "PAPER TRAY SETTINGS" (page 77) in the System Settings.
Loading paper in the bypass tray (MX-MFX2) If you are changing the paper in the bypass tray, press the operation button and remove the previously used paper. 1 After the button is pressed, the paper table will descend. While the paper tray descends, the operation button indicator will blink. After the paper tray finishes descending, the indicator will light solidly. Do not remove the paper until the indicator stops blinking. Set the bypass tray guides to the width of the paper.
Bypass tray paper settings After loading paper in the bypass tray, configure settings for the loaded paper. Plain Special Modes Plain Plain 8½x11 Touch the [Paper Select] key. 2-Sided Copy 5. 11x17 Exposure 2. 1. Output 6. 8½x11 8½x11 11x17 3. 11x17 7. 11x17 4. 8½x14 Auto 1 File Quick File Copy Ratio Original Paper Select 100% Auto Auto 8½x11 Plain 8½x11 OK Paper Select Large Capacity Tray 5. 11x17 Paper Tray 1. 8½x11 2. 8½x11 Plain Plain 3.
Set the paper size. Example: recycled paper has been selected Paper Select OK Bypass Tray Type/Size Setting Type Recycled Size 12x18(A3W),11x17,8½x14 8½x11,5½x8½R 7¼x10½R,9x12(A4W),A3,A4,B4 A3W(12x18),A3,B4,A4,A5R,B5 B5R,A4W(9x12)11x17,8½x11 A4R Auto-Inch Auto-AB Custom Size [Auto-AB] key When the paper inserted in the bypass tray is a standard AB size (A4 size, etc.), the paper size will be detected automatically and the appropriate paper size set.
IMPORTANT POINTS WHEN USING THE BYPASS TRAY • When using plain paper other than SHARP standard paper or special media other than SHARP-recommended transparency film, or when printing on the reverse side of previously used paper, the paper must be loaded one sheet at a time. Loading more than one sheet at a time will cause misfeeds. • Before loading paper, straighten any curling in the paper.
3 ORIGINALS This chapter explains how to place originals in the automatic document feeder and on the document glass. PLACING THE ORIGINAL PLACING ORIGINALS IN THE AUTOMATIC DOCUMENT FEEDER This section explains how to place originals in the automatic document feeder.
Adjust the original guides to the size of the originals. 2 Place the original. Indicator line 3 Make sure the edges of the originals are even. Insert the originals face up all the way into the document feeder tray. Insert a number of originals that does not exceed the indicator line on the document feeder tray. Up to 250 sheets can be inserted. When placing the original, make sure that the guide is correctly adjusted to the width of the original.
PLACING THE ORIGINAL ON THE DOCUMENT GLASS This section explains how to place the original on the document glass. Allowed original sizes When a non-standard size original is placed in copy mode, see "SPECIFYING THE ORIGINAL SIZE" in the Copier Guide. When a non-standard size original is placed for fax or scanner transmission, see "IMAGE SETTINGS" in the Image Send Guide.
Placing a thick book When scanning a thick book or other thick original, follow the steps below to press the book down. (1) Push up the far side of the automatic document feeder. (1) The hinges supporting the automatic document feeder will release and the rear side of the automatic document feeder will rise. (2) (2) Slowly close the automatic document feeder. Caution • Close the automatic document feeder slowly. Abruptly closing the automatic document feeder may damage it.
4 PERIPHERAL DEVICES This chapter introduces the peripheral devices that can be used with the machine, explains the names of the output devices such as the finisher and saddle stitch finisher, and explains manual finishing, which can be used when an inserter is installed. PERIPHERAL DEVICES Peripheral devices can be installed on the machine to increase its range of functionality. The peripheral devices are generally optional, however, some models include certain peripheral devices as standard equipment.
Product name Product number Description MX-PNX3B Punches holes in copies and other output. Requires the finisher (MX-FNX5). MX-PNX4B Punches holes in copies and other output. Requires the finisher (MX-FNX6) or a saddle stitch finisher. Inserter MX-CFX2 Paper loaded in the inserter can be inserted into output as covers and inserts. Manual stapling and hole punching is also possible from the inserter. Requires a finisher (MX-FNX5). Folding unit MX-FDX1 This folds the paper in half.
NAMES AND FUNCTIONS OF THE PARTS OF THE PERIPHERAL DEVICE This section explains the names and functions of the parts of the following peripheral devices: FINISHER (page 59) SADDLE UNIT (page 60) FINISHER (FOR THE MX-M850) / SADDLE STITCH FINISHER (page 60) FOLDING UNIT (page 61) INSERTER (page 62) • Do not place heavy objects on or press down on the peripheral devices • For peripheral devices with an offset tray, note that the tray will move up and down when the power is turned on and during output.
SADDLE UNIT The saddle unit is equipped with the saddle stitch function, which automatically staples and folds each set of output at the centerline. Part names (1) Left front cover Open this cover to remove a paper misfeed. (2) Saddle stitch tray Stapled and folded output is delivered to this tray. (1) (3) (3) Cover Open this cover to remove a paper misfeed, replace the staple cartridge or remove a staple jam.
FOLDING UNIT When the paper folding unit is installed, output can be folded to reduce the paper size by a half. (1) Cover (upper) Open this cover to remove a paper misfeed. To open the cover, first pull it forward and then up. (2) Cover (lower) Open this cover to remove a paper misfeed. The cover (upper) must be opened before this cover can be opened.
INSERTER The inserter can be used to insert blank or pre-printed paper in printed output as inserts or covers without printing on the inserts/covers. In addition, the paper loaded in the inserter can be directly fed to peripheral devices such as the finisher or saddle unit for stapling or punching. ☞ MANUAL FINISHING MODE (page 65) For details on paper, see the specifications in the Safety Guide and "PAPER TRAY SETTINGS" (page 77) in the system settings.
Loading paper Follow the steps below to load paper in the inserter. Adjust the guide to the size of the paper you are loading. 1 Squeeze the guide lock lever to adjust the guide. When you have finished moving the guide, release the lever. When loading paper larger than 8-1/2" x 11"R or A4, be sure to pull the tray extension all the way out. If the extension is not pulled all the way out, the size of the loaded paper will not be detected correctly.
Paper loading orientation When loading paper in the inserter, the front side of the paper should face up When inserting covers or inserts in a copy job, load the paper in the same orientation as the originals. Loading tab paper When loading tab paper in the inserter, the front side of the tab paper should face up. The top side is inserted first. The relation of copies and tab sheets is shown below. Loaded tab paper Copies Front side Inserted first.
MANUAL FINISHING MODE When the inserter is installed, finishing operations such as stapling or punching can be performed without performing a copy or print operation. Touch the [MANUAL FINISHING] key to change modes. The following screen will appear. For information on manual finishing functions, see the following pages. Set the output function.
USING MANUAL FINISHING The procedure for using manual finishing is explained below. Before beginning the procedure, configure the paper settings in the system settings for the paper you will load in the inserter. ☞ PAPER TRAY SETTINGS (page 77) COPY Touch the [MANUAL FINISHING] key. MANUAL FINISHING DOCUMENT FILING IMAGE SEND Ready to scan for copy. 0 The base screen for manual finishing will appear. Plain Special Modes Plain Plain 8½x11 2-Sided Copy 5. 1 11x17 Exposure 1. 2. Output 6.
STAPLE FUNCTION / SADDLE STITCH FUNCTION When a finisher or saddle stitch finisher is installed, the loaded paper can be stapled into a sheaf. (Staple function) When a saddle unit or saddle stitch finisher is installed, the paper can be stapled in two places on the centerline and folded to make a pamphlet. (Saddle stitch function) For the sizes and number of paper sheets that can be stapled at once, see the specifications in the Safety Guide.
Stapling positions and stapling results Stapling result Stapling positions Vertically-oriented paper Horizontally-oriented paper Slant staple 1 staple at top left corner Slant staple 1 staple at bottom left corner 2 staples at left edge Slanted stapling can be used when one staple at the top of the paper is selected Saddle stitch function To select saddle stitch, touch the [Saddle Stitch] key in the manual finishing screen.
PUNCH FUNCTION If an optional punch module is installed, holes can be punched in output. The [2 Hole Punch] key can be touched in the manual finishing screen to selecting two-hole punching. The [3 Hole Punch] key can be touched to select three-hole punching. When the finisher is installed, 5-1/2" x 8-1/2" to 11" x 17" (16 lbs. to 65 lbs. cover) (A5 to A3 (52 g/m2 to 176 g/m2)) paper can be used. However, 12" x 18" (A3W) sized paper and special media such as transparency film and tab paper cannot be used.
PAPER FOLDING FUNCTION When the paper folding unit is installed, output can be folded to reduce the paper size by a half. Paper sizes that can be folded using the paper folding function are 8-1/2" x 11"R, 8-1/2" x 14", 11" x 17", A4R, B4, and A3. For detailed information on the sizes and types of paper that can be folded, see the specifications in the Safety Guide. When the fold function is selected, folding will take place automatically when one of the above paper sizes is loaded.
5 SYSTEM SETTINGS The system settings are used to configure a variety of parameters to suit the aims and needs of your workplace. The system settings are also used to display or print out the current settings and status of the machine. The system settings allow you to make the machine easier to use. The system settings consist of settings that are used by general users, and settings that can only be configured by an administrator of the machine.
SYSTEM SETTINGS LIST When the system settings are accessed with general rights, the following items appear. Depending on the machine specifications and peripheral devices installed, it may not be possible to use some settings.
■ Paper Tray Settings Item Factory default setting Page 77 ■ PAPER TRAY SETTINGS ● TRAY SETTINGS X Tray 1 Plain, 8-1/2" x 11" X Tray 2 Plain, 8-1/2" x 11" X Tray 3 Plain, Auto-Inch X Tray 4 X Tray 5*1 MX-LCX4: Plain, 8-1/2" x 11" MX-LCX5: Plain, Auto-Inch MX-LCX6: Plain, 8-1/2" x 11" MX-LCX3N: Plain, 11" x 17" X Tray 6*2 MX-LCX4: Plain, 8-1/2" x 11" MX-LCX5: Plain, Auto-Inch X Tray 7*2 MX-LCX4: Plain, 8-1/2" x 11" MX-LCX5: Plain, Auto-Inch X Bypass Plain, Auto-Inch X Inserter (Upper Tray)*3
TOTAL COUNT This function shows the page count in each mode. Touch the [Total Count] key to use the function. JOB COUNT This displays or prints out the counts of all jobs. • 11" x 17" (A3) size paper is counted as two sheets. • Each sheet of paper used for automatic two-sided copying is counted as two pages (11" x 17" (A3) paper is counted as four pages). • An entered paper size of 5-1/8" (384 mm) or larger is counted as two pages. (Four pages when two-sided copying is used.
DEFAULT SETTINGS The default settings for operation of the machine can be configured. Touch the [Default Settings] key and select the settings. CLOCK ADJUST Use this to set the date and time in the machine's built-in clock. Clock Adjust Set the time. Item Settings Specify Time Zone If your region is ahead of GMT (Greenwich Mean Time), select [+]. If your region is behind GMT, select [-]. Next, specify the time difference between your region and GMT in hours and minutes.
KEYBOARD SELECT The layout of the keyboard that appears in text entry screens can be changed. The following selections are available. English (US) English (UK) French German LIST PRINT (USER) Lists showing the settings and information stored in the machine can be printed. Touch the [List Print (User)] key and select the settings. List name Description All Custom Setting List This list shows the hardware status, software status, printer condition settings, system settings, and total counts.
PAPER TRAY SETTINGS Paper tray and paper type settings are explained in this section. Touch the [Paper Tray Settings] key to configure the settings. TRAY SETTINGS These settings specify the paper type, paper size, and functions allowed for each paper tray. When the [Tray Settings] key is touched, a list appears showing the trays and the current settings.
Tray Settings Paper Tray Tray 1 Tray 2 Tray 3 Paper Type Size Plain, Pre-Printed, Recycled, Letter Head, Pre-Punched, Color, User Type 8-1/2" x 11", A4 In addition to the paper types of trays 1 and 2, Heavy Paper 1 to 3*1 Auto-Inch (12" x 18", 11" x 17", 8-1/2" x 14"*2, 8-1/2" x 13-2/5"*2, 8-1/2" x 11", 8-1/2" x 11"R, 7-1/4" x 10-1/2"R), Auto-AB (A3W, A3, B4, A4, A4R, B5, B5R, 8-1/2" x 13"), 9" x 12" (A4W), 8K, 16K, 16KR In addition to the paper types of trays 1 and 2, Heavy Paper 1 to 3*1 Auto-In
Paper Tray Tray 6 (When large capacity trays are installed) Tray 7 (When large capacity trays are installed) Bypass (When a bypass tray is installed) Paper Type Size MX-LCX4 In addition to the paper types of trays 1 and 2, Heavy Paper 1 to 3*1, Thin paper, Labels*4, Transparency*4, Tab paper*4 8-1/2" x 11", 5-1/2" x 8-1/2"R, A4, B5, A5R, 9" x 12" (A4W) (Use the paper selector knob on the tray to change the paper size.
Paper Tray Inserter (Upper Tray) (When an inserter is installed) Inserter (Lower Tray) (When an inserter is installed) Paper Type In addition to the paper types of trays 1 and 2, Heavy Paper 1 to 3*1 Size Auto-Inch (12" x 18", 11" x 17", 8-1/2" x 14"*3, 8-1/2" x 13-2/5"*3, 9" x 12", 8-1/2" x 11", 8-1/2" x 11"R*3, 7-1/4" x 10-1/2"R, 5-1/2" x 8-1/2"R, A3, A4, B4, B5), Auto-AB (A3W, A4W, A3, B4, A4, A4R*3, A5R, B5, B5R, 11" x 17", 8-1/2" x 13"*3, 8-1/2" x 13-2/5"*3, 8-1/2" x 11"), Custom Size-Inch, Custom
PAPER TYPE REGISTRATION Store a paper type when the desired paper type does not appear as a selection or when you wish to create a new set of paper properties. Up to 10 paper types can be stored. Item Description Type Name Store any name. The factory default names are "User Type 1" - "User Type 10". Fixed Paper Side Enable this setting when paper with a front and reverse side is used. Disable Duplex Enable this setting when paper is loaded that cannot used for two-sided printing.
USER CONTROL This section explains settings for user control. Touch the [User Control] key to configure the settings. • User Control settings can only be configured when "User Authentication Setting" in the system settings (administrator) is enabled. • Depending on the user that logged in, it may not be possible to use the settings below. MODIFY USER INFORMATION The information of the currently logged in user can be edited. Settings Item Description User Name Edit the name of the user (max.
6 TROUBLESHOOTING This chapter provides solutions to possible printing problems. See the following table of contents to locate the appropriate page for your question or problem. PROBLEMS RELATED TO MACHINE OPERATION • Specified machine functions cannot be used.. . . . . . . . . . . . . . . . . . . . . . . . . . . . . . . . . . . . . . . . . . . . 84 • The operation panel cannot be used. . . . . . . . . . . . . . . . . . . . . . . . . . . . . . . . . . . . . . . . . . . . . . . . . . .
• System settings Descriptions of system settings similar to the following example appear in this chapter. Example: ➞ System Settings (Administrator) > "Copy Settings" > "Other Settings" > "Rotation Copy Setting" > This is an abbreviated description of the procedure for selecting the setting. ">" indicates the setting sequence and indicates the state of the setting after it has been enabled. Use these descriptions as a quick manual to help you configure the settings.
Problem The operation panel cannot be used. Printing is not possible or stops during a job. Point to check Solution Does a message appear indicating that Auto Login failed? Auto Login failed due to a problem on the network. Contact your administrator. If you are the administrator, touch the [Admin Password] key, log in as an administrator, and temporarily change the auto login settings in the system settings (administrator).
Problem Point to check Solution The original size is not automatically selected or the wrong size is selected. Is the original curled or folded? The correct original size cannot be detected if the original is curled or folded. Straighten the original. Did you place an original smaller than 5-1/2" x 8-1/2" (A5) size? Original sizes smaller than 5-1/2" x 8-1/2" (A5) cannot be detected. Enter the original size manually.
PROBLEMS RELATED TO PAPER FEEDING AND OUTPUT Problem The original misfeeds (automatic document feeder). The paper misfeeds. Point to check Solution Is too much paper loaded in document feeder tray? Make sure that the stack of paper in the tray is not higher than the indicator line. ☞ PLACING ORIGINALS IN THE AUTOMATIC DOCUMENT FEEDER (page 53) Is the original a long original? When using the automatic document feeder to scan a long original, set the scan size to [Long Size].
Problem The paper misfeeds. Paper does not feed from the paper tray. The image on paper is skewed. The automatic document feeder does not operate. Point to check Solution Is 5-1/2" x 8-1/2" (A5) size paper loaded? Load 5-1/2" x 8-1/2" (A5) size paper in tray 4 (the second tray) or in the bypass tray. For the paper trays in which A5 size paper can be loaded, see "PAPER TRAY SETTINGS" (page 77).
PROBLEMS RELATED TO QUALITY / PRINT RESULTS Problem Point to check Solution Are the scanning areas of the document glass or automatic document feeder dirty? Clean the scanning areas of the document glass or automatic document feeder. ☞ "CLEANING THE DOCUMENT GLASS AND AUTOMATIC DOCUMENT FEEDER" in the Maintenance Guide Is the bypass feed roller dirty? Clean the surface of the bypass feed roller. ☞ "CLEANING THE BYPASS FEED ROLLER" in the Maintenance Guide Smudges appear on printed output.
Problem Part of the image is cut off. Printing takes place on the wrong side of the paper. Point to check Solution Has the correct paper size been set? If you are using a special size, be sure to specify the paper size. If the size of paper loaded in a tray was changed, be sure to check the paper size setting. ☞ PAPER TRAY SETTINGS (page 77) Was the original placed in the correct position? If you are using the document glass, be sure to place the original in the far left corner of the document glass.
Problem Point to check Solution Stapling does not take place (including saddle stitch). Does a message appear instructing you to check the staple unit? Remove jammed staples. ☞ "3. REMOVING MISFEEDS" in the Maintenance Guide Does a message appear instructing you to add staples? Replace the staple cartridge. Do not forget to replace the staple case. ☞ "2.
Problem Punching does not take place. Point to check Solution Does a message appear instructing you to check the punch module? Dispose of punch scraps. ☞ "DISCARDING PUNCH WASTE" in the Maintenance Guide Is a different size of paper mixed in? Punching is not possible when different widths of paper are mixed together. To perform mixed size punching, use paper of the same width and select the [Same Width] setting. When copying, select [Same Width] for [Mixed Size Original] in the special modes.
OTHER PROBLEMS Problem Point to check Solution The touch panel screen is difficult to view. Is the display contrast properly adjusted? Touch the brightness adjustment key ( ) on the system bar in the touch panel to adjust the brightness. ☞ SYSTEM BAR (page 15) You were logged out without having performed logout yourself. Did Auto Clear activate? When user authentication is used, the currently logged in user will be automatically logged out if Auto Clear activates. (Except when in PC scan mode.
7 ENTERING TEXT This chapter explains the text entry screen. FUNCTIONS OF THE MAIN KEYS Key Description Caps This changes the text entry screen from the lower case screen to the upper case screen. The upper case screen will continue to appear until the [Caps] key is touched again so that it is no longer highlighted. The [Caps] key is convenient when you wish to enter all capital letters.
• " " in the text entry screen indicates how many characters can be entered. A number of characters greater than " cannot be entered. " • The key layouts that can be selected vary depending on the language selected in "MFP Display Language Setting" in the system settings (administrator). • The following symbols cannot be used when entering a file name or folder name. \ ? / " ; : , < > ! * | & # Some computer environments may not allow the use of spaces and the symbols indicated below.
User's Guide MODEL: MX-M850 MX-M950 MX-M1100 SHARP ELECTRONICS CORPORATION Sharp Plaza, Mahwah, New Jersey 07430-1163. www.sharpusa.com SHARP ELECTRONICS OF CANADA LTD.
MODEL: MX-M850 MX-M950 MX-M1100 Copier Guide
TABLE OF CONTENTS ORIGINALS . . . . . . . . . . . . . . . . . . . . . . . . . . . . . . . . 12 • CHECKING THE ORIGINAL SIZE . . . . . . . . . . . . 12 OUTPUT . . . . . . . . . . . . . . . . . . . . . . . . . . . . . . . . . . . 34 • SORT MODE . . . . . . . . . . . . . . . . . . . . . . . . . . . . 35 • GROUP MODE. . . . . . . . . . . . . . . . . . . . . . . . . . . 35 • OFFSET FUNCTION . . . . . . . . . . . . . . . . . . . . . . 35 • STAPLE SORT FUNCTION / SADDLE STITCH FUNCTION . . . . . . . . . . . . .
PRINTING THE DATE AND A STAMP ON COPIES (Stamp) . . . . . . . . . . . . . . . . . . . . . . . . . . . . 83 • GENERAL PROCEDURE FOR USING STAMP . . . . . . . . . . . . . . . . . . . . . . . . . . . . . . . . . 84 • ADDING THE DATE TO COPIES (Date) . . . . . . . 87 • STAMPING COPIES (Stamp) . . . . . . . . . . . . . . . 89 • PRINTING PAGE NUMBERS ON COPIES (Page Numbering) . . . . . . . . . . . . . . . . . . . . . . . . 91 • PRINTING TEXT ON COPIES (Text) . . . . . . . . . .
ABOUT THIS MANUAL Please note • Considerable care has been taken in preparing this manual. If you have any comments or concerns about the manual, please contact your dealer or nearest SHARP Service Department. • This product has undergone strict quality control and inspection procedures. In the unlikely event that a defect or other problem is discovered, please contact your dealer or nearest SHARP Service Department.
MANUALS PROVIDED WITH THE MACHINE Printed manuals and manuals stored in PDF format on the machine's hard drive are provided with the machine. When using the machine, read the appropriate manual for the feature you are using. Printed manuals Manual name Contents Safety Guide This manual contains instructions for using the machine safely and lists the specifications of the machine and its peripheral devices.
1 BEFORE USING THE MACHINE AS A COPIER This section provides information that you should know before using the machine as a copier. BASE SCREEN OF COPY MODE Touch the [COPY] key in the touch panel to open the base screen of copy mode. The base screen shows messages and keys necessary for copying, and settings that have been selected. (7) (1) COPY (8) MANUAL FINISHING DOCUMENT FILING IMAGE SEND Ready to scan for copy. 0 Plain Plain Plain 8½x11 (2) (3) (10) 2-Sided Copy (11) Output (12) 5.
(8) (13) Customized keys Paper select display The keys that appear here can be changed to show settings or functions that you prefer. The following keys appear by factory default: ☞ Customizing displayed keys (page 8) [File] key, [Quick File] key Touch one of these keys to use the File function or Quick File function of document filing mode. These are the same [File] and [Quick File] keys that appear when the [Special Modes] key is touched.
Customizing displayed keys Special mode keys and other keys can be displayed in the base screen. By assigning frequently used functions to these keys, you can access the functions with a single touch. To change the function that is assigned to a key, use "Customize Key Setting" in the Web pages. When "Erase", "Margin Shift", and "Pamphlet Copy" are assigned to the customized keys Plain Special Modes Plain Plain 8½x11 2-Sided Copy 5. 11x17 Output 8½x11 8½x11 11x17 7.
COPYING SEQUENCE This section explains the basic procedure for copying. Select settings in the order shown below to ensure that the copy operation takes place smoothly. For detailed procedures for selecting the settings, see the explanation of each setting in this manual. Place the original. Place the original in the document feeder tray of the automatic document feeder, or on the document glass.
Output settings OK Output Top Tray Offset Tray Fold Offset 2 Hole Punch Sort Staple Sort 3 Hole Punch Saddle Stitch Group Select copy output settings.
Start copying. Start scanning the original(s) and making copies. Start copying. • When one or more special modes are selected, the key appears in the base screen. Touch the key to display a list of the selected special modes. This lets you check what special modes are selected and the settings of each mode. ☞ Checking what special modes are selected (page 8) • To store a copy job using the document filing function, select copy settings and then touch the [File] key or the [Quick File] key.
ORIGINALS CHECKING THE ORIGINAL SIZE When [Auto] appears in the [Original] key, the size of the placed original is automatically detected. The machine automatically detects the original size when an original is placed and displays the size in the [Original] key in the base screen. Example of base screen The original size is displayed. Plain Special Modes Plain Plain 8½x11 2-Sided Copy 5. 11x17 Exposure 1. 2. Output 6. 8½x11 8½x11 11x17 3. 11x17 7. 11x17 4.
Standard original placement orientations Place originals in the document feeder tray or on the document glass so that the top and bottom of the original are oriented as shown in the illustration. If the original is not oriented correctly and a function such as stapling is selected, the staple positions may not be correct. For more information on placing the original, see "3. ORIGINALS" in the User's Guide. [Example 1] Document feeder tray Document glass Place the originals with the corners aligned here.
PAPER TRAYS The machine is set to automatically select a tray containing plain or recycled paper of the same size as the original (automatic paper selection). If the selected tray runs out of paper during a copy job and there is another tray that has the same size and type of paper, that tray will be automatically selected and the copy job will continue. Selecting the paper tray manually If the correct paper size is not selected or you wish to change the paper size, you can select the paper tray manually.
2 BASIC PROCEDURE FOR MAKING COPIES This chapter explains the basic procedures for making copies, including selection of the copy ratio and other copy settings. MAKING COPIES USING THE AUTOMATIC DOCUMENT FEEDER TO MAKE COPIES This section explains how to make copies (1-sided copies of 1-sided originals) using the automatic document feeder. 1 Place the originals face up in the document feeder tray with the edges aligned evenly.
Set the number of copies (number of sets) with the numeric keys. 7 Special Modes Plain 8½x11 3 2-Sided Copy 5. • Up to 9999 copies (sets) can be set. • A single copy can be made even if "0" appears for the number of copies. If an incorrect number of copies is set... Press the [CLEAR] key ( ) and then enter the correct number. Press the [START] key ( 4 ). To cancel scanning of the original and copying... Press the [STOP] key ( ).
MAKING A COPY USING THE DOCUMENT GLASS To make a copy of a book or other thick original that cannot be scanned with the automatic document feeder, open the automatic document feeder and place the original on the document glass. This section explains how to make a copy (1-sided copy of a 1-sided original) using the document glass. Open the automatic document feeder, place the original face down on the document glass, and then gently close the automatic document feeder.
Set the number of copies (number of sets) with the numeric keys. 7 Special Modes Plain 8½x11 3 2-Sided Copy 5. • Up to 9999 copies (sets) can be set. • A single copy can be made even if "0" appears for the number of copies. If an incorrect number of copies is set... Press the [CLEAR] key ( ) and then enter the correct number. Press the [START] key ( 4 5 ). Normally copying will start. Depending on the copy settings (2-sided copying, etc.
AUTOMATIC 2-SIDED COPYING USING THE AUTOMATIC DOCUMENT FEEDER TO MAKE 2-SIDED COPIES Originals Originals Copies Automatic 2-sided copying of 1-sided originals 1 Originals Copies Automatic 2-sided copying of 2-sided originals Copies 1-sided copying of 2-sided originals Place the originals face up in the document feeder tray with the edges aligned evenly. Indicator line Insert the originals all the way into the document feeder tray. Multiple originals can be placed in the document feeder tray.
Check the paper to be used. Plain Special Modes Plain Plain Make sure that the desired paper (tray) is selected. To change the paper (tray), touch the [Paper Select] key. ☞ PAPER TRAYS (page 14) 2-Sided Copy 8½x11 5. 11x17 Exposure 1. Auto 4 2. Output 6. 8½x11 8½x11 11x17 3. 11x17 7. 11x17 4.
AUTOMATIC 2-SIDED COPYING USING THE DOCUMENT GLASS Originals Copies Automatic 2-sided copying of 1-sided originals Open the automatic document feeder, place the original face down on the document glass, and then gently close the automatic document feeder.
(1) Select the 2-sided copy mode. (2) (1) Touch the [1-Sided to 2-Sided] key. OK 2-Sided Copy (2) Touch the [OK] key. 3 Binding Change The [2-Sided to 2-Sided] key and [2-Sided to 1-Sided] key cannot be used when copying from the document glass. Plain Special Modes Plain Plain 8½x11 2-Sided Copy 5. 11x17 Exposure 1. Output 6. 8½x11 8½x11 11x17 3. 11x17 7. 11x17 4. 8½x14 Auto 4 2. Check the paper to be used. Make sure that the desired paper (tray) is selected.
7 Remove the original and place the next original, and then press the [START] key ( ). Repeat this step until all originals have been scanned. For the second original and following originals, use the same [START] key ( ) as you did for the first original. Touch the [Read-End] key. Place next original. Press [Start]. When finished, press [Read-End]. Read-End 8 To cancel scanning of the original and copying... Press the [STOP] key ( ).
CHANGING THE EXPOSURE AND ORIGINAL IMAGE TYPE The exposure and original image type can be selected to obtain a clear copy. AUTOMATIC ADJUSTMENT OF THE EXPOSURE AND ORIGINAL TYPE Automatic exposure adjustment operates by default to automatically adjust the exposure level and original type as appropriate for the original being copied. ("Auto" is displayed.) Automatic adjustment takes place to enable optimum copying. Plain Special Modes Plain Plain 8½x11 2-Sided Copy 5. 11x17 Exposure 2. 1.
Adjust the exposure level. OK Exposure Touch the Touch the Auto Manual Original Image Type 2 1 3 key to make the copy darker. key to make the copy lighter. 5 Text Text/ Prtd.Photo Text/Photo Printed Photo Photo Map Light Original Scan Resolution Touch the [OK] key. OK Exposure Auto Manual Original Image Type 3 1 3 5 Text Text/ Prtd.
REDUCTION/ENLARGEMENT/ZOOM AUTOMATIC RATIO SELECTION (Auto Image) This section explains the automatic ratio selection function (Auto Image), which automatically selects the ratio to match the paper size. When the paper tray is manually changed, the [Auto Image] key appears in the base screen of copy mode. Touch the [Auto Image] key to have the reduction or enlargement ratio automatically selected based on the original size and the selected paper size.
MANUALLY SELECTING THE RATIO (Preset ratios/Zoom) Touch the [Copy Ratio] key in the base screen of copy mode to select one of four preset enlargement ratios or four preset reduction ratios (maximum 400%, minimum 25%). In addition, the zoom keys can be used to select any ratio from 25% to 400% in increments of 1%. Set the ratio. Touch a preset ratio key and/or the zoom keys to set the ratio. There are two setting screens. Use the keys to switch between the screens.
2 11x17 8½x11 8½x11 5½x8½ 11x17 8½x14 8½x14 8½x11 Touch the [OK] key. OK Copy Ratio 75 64% Zoom 77% After touching the [OK] key, make sure that a paper size suitable for the ratio is selected. % 121% 8½x14 11x17 129% 8½x11 5½x8½ 11x17 8½x11 1 2 100% Auto Image XY Zoom When the automatic document feeder is used, the vertical and horizontal ratio selection ranges are both 25% to 200%. To return the ratio to 100%...
ENLARGING/REDUCING THE LENGTH AND WIDTH SEPARATELY (XY Zoom) The XY Zoom feature allows the horizontal and vertical copy ratios to be changed separately. Both the horizontal and vertical ratios can be set from 25% to 400% in increments of 1%. Touch the [Copy Ratio] key in the base screen of copy mode and then follow the steps below. When 50% is selected for the horizontal ratio and 70% is selected for the vertical ratio Copy Original 1 Touch the [XY Zoom] key.
ORIGINAL SIZES SPECIFYING THE ORIGINAL SIZE When the original size is a non-standard size or is not detected correctly, manually specify the original size. Touch the [Original] key in the base screen of copy mode and then follow the steps below. Specifying an inch original size Touch the appropriate original size key and then the [OK] key.
(1), (2) (3) OK Original Cancel Size Input X 17 (2 1/2~17) inch Y 11 (2 1/2~11 5/8) inch OK Enter the original size. (1) Enter the X (horizontal) dimension of the original. With the [X] key highlighted, enter the X (horizontal) dimension of the original with the keys. When the document glass is used, a number from 2-1/2" to 17" (64 mm to 432 mm) can be entered. When the automatic document feeder is used, a number from 5-1/2" to 17" (140 mm to 432 mm) can be entered.
Original OK Custom Size OK Store the original size. (1) Touch the [Store/Delete] tab. (2) Touch a key for storing a custom original size. X15½ Y 8½ Touch a key that does not show a size ( Store/Delete Recall (2) 2 ). (1) If you wish to edit or clear a previously stored key... Touch the key that you want to edit or clear. The following screen will appear. A custom size has already been stored in this location.
Retrieving a stored original size To retrieve a stored original size, touch the [Original] key in the base screen of copy mode and perform the steps below. OK Original Auto Touch the [Custom Size] key. 8½x14 Manual 1 5½x8½ 8½x11R 11x17 AB 5½x8½R 8½x13(216x330) 8½x1325(216x340) Inch 8½x11 8½x14 Custom Size Size Input (2) 2 (1) (3) Original OK Custom Size OK Retrieve the desired stored original size. (1) Touch the [Recall] tab.
OUTPUT The [Output] key can be touched in the base screen of copy mode to select sort, group, offset and other finishing functions, as well as the output tray. All settings are explained below, and it is assumed that a finisher, punch module, saddle unit, and paper folding unit are installed.
SORT MODE GROUP MODE This is used to sort (collate) output into sets. Example: Sorting the output into 5 sets This function groups copies by page. Example: Groups of 5 copies of each page Originals Output Originals Output Set the number of copies (5). Set the number of copies (5). Touch the [Output] key. Output Touch the [Output] key. Output Group Sort Touch the [Sort] key. Press the [START] key ( Touch the [Group] key. Press the [START] key ( ). ).
STAPLE SORT FUNCTION / SADDLE STITCH FUNCTION The staple sort function sorts output into sets, staples each set, and delivers the sets to the tray. The saddle stitch function staples each set in 2 places at the centerline and folds the stapled set. Paper that can be used for the saddle stitch function is 8-1/2" x 11"R to 12" x 18" (16 lbs. to 24 lbs.) (B5R to A3W (60 g/m2 to 90 g/m2)).
Stapling positions and stapling results Stapling result Stapling positions Vertically-oriented paper Horizontally-oriented paper Slant staple 1 staple at top left corner Slant staple 1 staple at bottom left corner 2 staples at left edge Slanted stapling can be used when one staple at the top of the paper is selected Saddle stitch function To select saddle stitch, touch the [Saddle Stitch] key in the output screen.
PUNCH FUNCTION If an optional punch module is installed, holes can be punched in output. The [2 Hole Punch] key can be touched in the output screen to selecting two-hole punching. The [3 Hole Punch] key can be touched to select three-hole punching. When the finisher is installed, 5-1/2" x 8-1/2" to 11" x 17" (16 lbs. to 65 lbs. cover) (A5 to A3 (52 g/m2 to 176 g/m2)) paper can be used. However, 12" x 18" (A3W) sized paper and special media such as transparency film and tab paper cannot be used.
PAPER FOLDING FUNCTION When the paper folding unit is installed, output can be folded to reduce the paper size by a half. Paper sizes that can be folded using the paper folding function are 8-1/2" x 11"R, 8-1/2" x 14", 11" x 17", A4R, B4, and A3. For detailed information on the sizes and types of paper that can be folded, see the specifications in the Safety Guide. Fold out Fold in The following screen appears when the paper folding key is touched.
MAKING COPIES USING THE BYPASS TRAY In addition to plain paper, transparency film, and tab paper can be loaded in the bypass tray. For detailed information on paper that can be loaded in the bypass tray, see the Safety Guide. For precautions when loading paper in the bypass tray, see "LOADING PAPER IN THE BYPASS TRAY" in the User's Guide. Place the original. Place the original face up in the document feeder tray, or face down on the document glass. 1 Place paper in the bypass tray.
OK Paper Select Large Capacity Tray 5. 11x17 Paper Tray 1. 8½x11 2. 8½x11 Plain Plain 4 Bypass Tray 8½x11 Plain If you do not need to change the paper size and type that appear under "Bypass Tray", go to step 7. Plain 6. 11x17 Plain 3. 11x17 Check the paper type setting for the bypass tray. If you need to change the setting, touch the paper type key. Plain 7. 11x17 Plain 4. 8½x14 Plain Paper Select Cancel Bypass Tray Type/Size Setting Select the paper type.
(1) (1) Touch the paper size key of the bypass tray. OK Paper Select Paper Tray 1. 8½x11 7 Select the bypass tray. (2) Plain 2. 8½x11 Plain Large Capacity Tray 5. 11x17 Plain (2) Touch the [OK] key. Bypass Tray 8½x11 Recycled 6. 11x17 3. 11x17 Plain Plain 7. 11x17 4. 8½x14 Plain Plain Press the [START] key ( 8 ). Scanning begins. • If the originals were placed in the document feeder tray, the originals are copied.
3 SPECIAL MODES This chapter explains Margin Shift, Erase, Dual Page Copy, and other special modes. SPECIAL MODES When the [Special Modes] key is pressed in the base screen, the special modes menu screen appears. The special modes menu consists of two screens. Touch the keys to move between the screens. After selecting special mode settings, touch the [OK] key in the special modes menu screen to complete the settings and return to the base screen of copy mode.
[OK] key and [Cancel] key In some cases two [OK] keys and one [Cancel] key will appear in the special mode screens. The keys are used as follows: Cancel Margin Shift Right (A) (B) (C) OK Special Modes Left Down Side 1 1/2 OK Side 2 (0~1) inch 1/2 (0~1) inch (A) Enter the selected special mode settings and return to the base screen of copy mode. (B) Enter the selected special mode settings and return to the special modes menu screen.
ADDING MARGINS (Margin Shift) This function is used to shift the copy image right, left or down to adjust the margin. This is convenient when you wish to bind the copies with a string or in a binder. Shifting the image to the right so the copies can be bound at the left edge with a string Not using margin shift Using margin shift 1 1 1 1 The punch holes cut off part of the image The image is moved to allow space for the string holes so the image is not cut off.
Press the [START] key ( 4 ). Copying will begin. If you are using the document glass to copy multiple original pages, copying will take place as you scan each original. If you have selected sort mode, change originals and press the [START] key ( ). Repeat until all pages have been scanned and then touch the [Read-End] key. To cancel scanning of the original and copying... Press the [STOP] key ( ). Rotation copy cannot be used in combination with margin shift. To cancel the margin shift setting...
ERASING PERIPHERAL SHADOWS (Erase) The erase function is used to erase shadows around the edges of copies that occur when copying thick originals or books. When a thick book is copied Not using the erase function Using the erase function Shadows appear here Shadows appear on the copy. Shadows do not appear on the copy. Erase modes Edge Erase 1 Center Erase Edge + Center Erase Place the original. Place the original face up in the document feeder tray, or face down on the document glass.
(1) (2) (1) Touch the desired erase mode. OK Special Modes Cancel Erase Edge Erase Select the erase settings. (3) Center Erase Edge+Center Erase Edge 1/2 Select one of the four positions. Touch the [Side Erase] key to open the following screen.
COPYING EACH FACING PAGE OF A BOUND DOCUMENT (Dual Page Copy) The dual page copy function produces separate copies of two document pages that are placed side by side on the document glass. This function is useful when making copies of the facing pages of a book or other bound document. Copying the facing pages of a book or bound document 5 6 5 Book or bound document 6 The facing pages are copied onto 2 separate pages. Place the original on the document glass.
(2) 3 Pamphlet Copy (1) Touch the [Special Modes] key. OK Special Modes Margin Shift Select Dual Page Copy. (3) ☞ SPECIAL MODES (page 43) Dual Page Copy Erase Tandem Copy Job Build Covers/Inserts Transparency Inserts Multi Shot Book Copy Tab Copy Card Shot (2) Touch the [Dual Page Copy] key so that it is highlighted. 1 2 (3) Touch the [OK] key. You will return to the base screen of copy mode. Press the [START] key ( 4 ). Copying will begin.
MAKING COPIES IN PAMPHLET FORMAT (Pamphlet Copy) This function copies 2 original pages onto the front side and 2 original pages onto the reverse side of each sheet of paper so that the copies can be folded at the centerline to form a pamphlet. This function is convenient for arranging copies into an attractive booklet or pamphlet.
OK Special Modes Cancel Pamphlet Copy 3 Original 1-Sided 2-Sided Left Binding OK Right Binding Cover Setting Select pamphlet copy settings. (1) If the original is 1-sided, touch the [1-Sided] key. If the original is 2-sided, touch the [2-Sided] key. (2) Select the binding edge ([Left Binding] or [Right Binding]). (3) To insert a cover, touch the [Cover Setting] key. (1) (2) (2) (3) (1) (3) Pamphlet Copy Cancel Cover Setting Select cover settings.
Special Modes Cancel Pamphlet Copy OK Touch the [OK] key. OK You will return to the base screen of copy mode. 5 Original 1-Sided 2-Sided Left Binding Right Binding Cover Setting Press the [START] key ( 6 ). Copying will begin. If you are using the document glass, change originals and press the [START] key ( scanned and then touch the [Read-End] key. ). Repeat until all pages have been To cancel scanning of the original and copying... Press the [STOP] key ( ).
COPYING A LARGE NUMBER OF ORIGINALS AT ONCE (Job Build) When copying a very large number of originals, this function allows you to divide the originals into sets and feed each set through the automatic document feeder one set at a time. Use this function when you wish to copy all of the originals as a single job but the number of originals exceeds the maximum number that can be inserted. This function is convenient when you wish to sort copies of a large number of originals into multiple sets.
Press the [START] key ( ) to scan the first set of originals. Scanning begins. 3 To cancel scanning... Press the [STOP] key ( ). Insert the next set of originals and press the [START] key ( ). Repeat this step until all originals have been scanned. 4 To cancel scanning... Press the [STOP] key ( ). All scanned data will be cleared. Touch the [Read-End] key. Place next original. Press [Start]. When finished, press [Read-End]. 5 Read-End To cancel copying... Press the [STOP] key ( ).
USING TWO MACHINES TO MAKE A LARGE NUMBER OF COPIES (Tandem Copy) Two machines connected to the same network can be used to run a large copy job in parallel. Each machine prints half of the copies, reducing the time required to complete the job. Master machine and slave machine In the following explanation, the master machine is the machine that is used to scan the originals.
Set the number of copies (number of sets) with the numeric keys. Up to 9999 copies (sets) can be set. When the [START] key ( ) is pressed, the copies will automatically be divided between the master and slave machines. If an odd number of copies is set, the master machine will print the extra set. 3 If an incorrect number of copies is set... Press the [CLEAR] key ( ) and then enter the correct number. Press the [START] key ( ). Copying will begin.
In this situation... A punch module is installed on the master machine but not on the slave machine. • Copying without punching: tandem copy is possible. • Copying with punching: tandem copy is not possible. In this way, if tandem copying is executed using a function that the slave machine does not have, a message will appear. To have the master machine make all copies, touch the [OK] key. To cancel the job, touch the [Cancel] key.
USING A DIFFERENT PAPER TYPE FOR COVERS (Covers/Inserts) A different type of paper can be inserted in positions corresponding to front and back covers of a copy job when the automatic document feeder is used. A different type of paper can also be automatically added as an insert at specified pages.
INSERTING COVERS IN COPIES (Cover Settings) A different type of paper can be inserted at the positions corresponding to the front and back covers of a copy job. This is useful for arranging documents in an attractive format and for using a different type of paper as a cover on an estimate sheet or similar document. Covers can be used in combination with inserts.
(3) (2) (1) (4) Covers/Inserts Cancel Front Cover Setting Paper Tray Bypass Tray OK Print on Front Cover Yes No 1-Sided 2-Sided Select cover settings. (1) If the cover sheet will be copied on, touch the [Yes] key. Otherwise, touch the [No] key. If the [No] key is touched, only cover insertion will be performed. In this case, go to step (3). (A) 8½x11 Plain (B) (2) To copy on one side of the cover, touch the [1-Sided] key. To copy on both sides of the cover, touch the [2-Sided] key.
6 You will return to the base screen of copy mode. You can touch the [Insertion Type A] key or the [Insertion Type B] key to select insert settings. ☞ INSERTING INSERT SHEETS IN COPIES (Insert Settings) (page 63) To check your settings, touch the [Page Layout] key. ☞ CHANGING COVER/INSERT SETTINGS (Page Layout) (page 67) OK Cancel Covers/Inserts Cover Setting Touch the [OK] key.
INSERTING INSERT SHEETS IN COPIES (Insert Settings) You can have different paper automatically inserted as inserts at specified pages of copies. Two types of paper can be used as inserts, and the insertion positions can be specified separately for each. Covers can be used in combination with inserts. Example: Insert A after page 3 and insert B after page 5. Originals 1 2 Insert A 3 1 2 3 4 5 4 6 5 Insert B 6 Copies Insert the originals face up in the document feeder tray.
(3) (2) (5) (1) Select insert paper settings. Covers/Inserts Cancel Insertion Type A Settings Paper Tray (A) Select insert settings. (A) The currently selected paper tray for the insert is displayed. (B) The size and type of paper in the currently selected tray is displayed. To change the paper tray for the inserts, touch the "Paper Tray" key. When the "Paper Tray" key is touched, a tray selection screen appears. Select the desired paper tray in the tray selection screen and touch the [OK] key.
OK Special Modes Cancel Covers/Inserts OK Inserts Setting Cover Setting 6 Front Cover Insertion Type A Back Cover Insertion Type B Insertion Settings Tray Settings (1) Page Layout (2) (5) Covers/Inserts OK Insertion Settings Insertion Page Insertion Type A Tray 2 8½x11 Plain (A) 7 Touch the [Insertion Settings] key. Insertion Type B Bypass Tray 8½x11 Plain (B) Specify the pages where inserts A and B will be inserted.
Cancel Covers/Inserts Cover Setting 8 Touch the [OK] key. OK Special Modes You will return to the base screen of copy mode. To select cover settings, touch the [Front Cover] key or the [Back Cover] key. ☞ INSERTING COVERS IN COPIES (Cover Settings) (page 60) To check your settings, touch the [Page Layout] key.
CHANGING COVER/INSERT SETTINGS (Page Layout) Cover settings and insert settings can be combined. This section explains how to check completed cover and insert insertion page settings, and change or delete insertion pages.
Touch the key of the page that you wish to delete or change. Example: Touch insert A at page 4 Covers/Inserts OK Page Layout 1 Insertion Type A 4/- Insertion Type B 7/- Insertion Type B 9/- Insertion Type A 12/- 1 If you do not need to change the setting, touch the [OK] key and go to step 6. • Each key shows a print image icon and the insertion page. • If there are multiple screens, touch the keys to move through the screens.
Change the settings for insert type A/B. Covers/Inserts OK Insertion Modify Insertion Page 5 Insertion Type A Insertion Type B 5 Insertion Total:4 Bypass Tray 8½x11 Plain Tray 2 8½x11 Plain Enter Special Modes Cancel Covers/Inserts Cover Setting 6 The settings are changed in the same way as they are initially configured. See step 7 of "INSERTING INSERT SHEETS IN COPIES (Insert Settings)" (page 63) to change the insert settings.
ADDING INSERTS WHEN COPYING ON TRANSPARENCY FILM (Transparency Inserts) When copying on transparency film, the sheets may stick together due to static electricity. The transparency inserts function can be used to automatically insert a sheet of paper between each sheet of transparency film, making the sheets easy to handle. It is also possible to copy on the inserts. B C A Inserts Load the transparency film. • If you are using the bypass tray, load the transparency film face up in the tray.
(1) Cancel Transparency Inserts 4 (1) Select whether or not the insert paper will be copied on ([Yes] or [No]). OK Special Modes Paper Tray Select insert settings. (2) OK (2) Touch the [OK] key. Print on Insert Sheets Yes You will return to the base screen of copy mode. Explanation of (A) When transparency inserts is selected, paper suitable for the inserts is automatically selected. The automatically selected paper tray, paper size, and paper type are indicated here.
COPYING MULTIPLE ORIGINALS ONTO ONE SHEET (Multi Shot) Multiple original pages can be copied onto a single sheet of paper in a uniform layout. Select 2in1 to copy two original pages onto one sheet, or 4in1 to copy four original pages onto one sheet. This function is convenient when you wish to present multiple pages in a compact format, or show a view of all pages in a document. 2in1 copying A 1 4in1 copying B AB A B Place the original.
(1) (3) (2) (4) OK Special Modes OK Cancel Multi Shot Layout 2in1 Select the number of originals to be copied onto one sheet of paper, the layout, and the border. (1) Touch the [2in1] key or the [4in1] key. If needed, the images will be rotated. 4in1 Border (2) Select the layout. Select the order in which the originals will be arranged on the copy. Number of pages Layout 2in1 3 4in1 The arrows in the above diagram indicate how the images are arranged. (3) Select the border.
COPYING A PAMPHLET (Book Copy) This function is used to make a copy of the two facing pages of an open book or other bound document. Copies made with this function can be folded at the center to create a booklet. This function is convenient for arranging copies into an attractive booklet or pamphlet.
(1) Select book copy settings. (2) Special Modes OK Book Copy Cancel OK (1) Select the binding position ([Left Binding] or [Right Binding]). (2) To insert a cover, touch the [Cover Setting] key. 2 If a cover will not be added, go to step 4. Left Binding Right Binding Cover Setting Cover settings cannot be selected if insertion of covers and inserts is disabled in the system settings (administrator).
Special Modes Book Copy Cancel OK Touch the [OK] key. OK You will return to the base screen of copy mode. 4 Left Binding Right Binding Cover Setting Place the original face down on the document glass. Place the opened front cover and back cover face down. 5 Press the [START] key ( 6 ) to scan the first original. Scanning begins.
Touch the [Read-End] key. Place next original. Press [Start]. When finished, press [Read-End]. 8 Copying will begin. Read-End To cancel scanning and copying... Press the [STOP] key ( ). • Four original pages will be copied onto each sheet of paper. Blank pages will be automatically added at the end if the total number of original pages is not a multiple of four. • If a saddle unit/saddle stitch finisher is installed, the book copy function can be used in combination with the saddle stitch function.
COPYING CAPTIONS ONTO TAB PAPER (Tab Copy) Captions can be copied onto the tabs of tab paper. Prepare appropriate originals for the tab captions. Tab copy is possible from both tray 4 and the bypass tray. The following explanation uses the bypass tray (MX-MFX1) as an example. ABC ABC ABC DEF DEF GHI GHI Prepare originals that match the tab positions.
Tab copying with a right binding Originals Placing the originals Loading tab paper • Document feeder tray Originals 1 1 Insert the originals so that the side with no tab text enters first. • Document glass Front side 1 Final image Load the tab paper so that the tab on the first sheet is toward you. Place so that the side with the tab text is on the left. 1 Place the original. Place the original face up in the document feeder tray, or face down on the document glass. Select the special modes.
Load the tab paper. • When using the bypass tray, place the paper with the print side up. Place the paper so that the sides with the tabs enter the machine last. After loading the tab paper, configure the bypass tray settings as explained in "MAKING COPIES USING THE BYPASS TRAY" (page 40). • If tab paper is loaded in a tray other than the bypass tray, see "2. Loading Paper" in the User's Guide. After loading tab paper in a tray, see "PAPER TRAYS" (page 14) to select the tray.
COPYING BOTH SIDES OF A CARD ON ONE SHEET OF PAPER (Card Shot) When copying a card, this function allows you to copy the front and reverse sides together onto a single sheet of paper. This function is convenient for making copies for identification purposes and helps save paper. Copies Originals Front Back Example of an 8-1/2" x 11" (A4) size portrait copy Plain Special Modes Plain Plain 8½x11 2-Sided Copy 5. 11x17 Exposure 1. 2. Output 1 Select the paper to be used for card shot.
(1) Select card shot settings. (2) (1) Enter the original size. OK Special Modes Cancel Card Shot X 3 3 8 (1~8 1/2) inch Y 2 1 8 (1~8 1/2) inch 4 With the [X] key highlighted, enter the X (horizontal) dimension of the original with the keys. Touch the [Y] key and enter the Y (vertical) dimension of the original with the keys. (A) To enlarge or reduce the images to fit the paper based on the entered original size, touch the [Fit to Page] key.
PRINTING THE DATE AND A STAMP ON COPIES (Stamp) Use this function to print the date, a stamp, the page number, and text on copies. Six printing positions are available: top left, top center, top right, bottom left, bottom center, and bottom right. The printing positions are separated into areas that are used for the date, page number and text (A below), and areas that are used for a stamp (B below).
GENERAL PROCEDURE FOR USING STAMP To select stamp settings, follow the steps below. 1 Place the original. Place the original face up in the document feeder tray, or face down on the document glass. Select the special modes. (1) Touch the [Special Modes] key. 2 (2) Touch the keys to switch through the screens. (3) Touch the [Stamp] key. ☞ SPECIAL MODES (page 43) Select the print position.
Select Stamp. OK Special Modes Cancel Stamp OK 1 2 4 Date Stamp Page Numbering Text Layout When you have finished selecting stamp settings, touch the key.
Press the [START] key ( 7 ). Copying will begin. If you are using the document glass to copy multiple original pages, copying will take place as you scan each original. If you have selected sort mode, change originals and press the [START] key ( ). Repeat until all pages have been scanned and then touch the [Read-End] key. To cancel scanning and copying... Press the [STOP] key ( ). To cancel Stamp... Touch the [Cancel] key in the screen of step 3.
ADDING THE DATE TO COPIES (Date) The date can be printed on copies. The position of the date, format, and page (first page only or all pages) can be selected. Example: Printing APRIL 4, 2010 in the top right corner of the paper. APR/04/2010 1 Touch the [Date] key in the stamp selection screen. See steps 1 to 4 of "GENERAL PROCEDURE FOR USING STAMP" (page 84). Set the date format. Stamp Cancel Date 2 YYYY/MM/DD / MM/DD/YYYY .
Stamp Cancel Date 4 YYYY/MM/DD / MM/DD/YYYY . First Page APR/04/2010 Date Change DD/MM/YYYY OK All Pages Select the pages that the date will be printed on and touch the [OK] key. Select printing on the first page only, or printing on all pages. After touching the [OK] key, continue from step 5 of "GENERAL PROCEDURE FOR USING STAMP" (page 84) to complete the copy procedure. MM DD, YYYY To cancel the date print setting... Touch the [Cancel] key in the screen of step 2.
STAMPING COPIES (Stamp) Text such as "CONFIDENTIAL" can be printed in white on a dark background as a "stamp" on copies. The position, size, density, and pages (first page only or all pages) can be selected for a stamp. Printing "CONFIDENTIAL" in the top left corner of a copy CONFIDENTIAL The following 12 selections are available for the stamp text. CONFIDENTIAL PRIORITY PRELIMINARY FINAL FOR YOUR INFO.
Stamp OK Cancel Stamp CONFIDENTIAL PRIORITY First Page Exposure FOR YOUR INFO. DO NOT COPY URGENT DRAFT PRELIMINARY FINAL IMPORTANT COPY Larger TOP SECRET PLEASE REPLY Smaller Size All Pages Touch the [Exposure] key and set the density. If you wish to darken the image, touch the key. If you wish to lighten the image, touch the key. When you have finished selecting the settings, touch the [OK] key. Stamp 3 Exposure OK Exposure Stamp CONFIDENTIAL PRIORITY FOR YOUR INFO.
PRINTING PAGE NUMBERS ON COPIES (Page Numbering) Page numbers can be printed on copies. The position, format, and page number can be selected for page numbering. Printing the page number at the bottom center of the paper. 1 2 3 1 Touch the [Page Numbering] key in the stamp selection screen. See steps 1 to 4 of "GENERAL PROCEDURE FOR USING STAMP" (page 84). Select a format for the page number. Stamp Cancel Page Numbering Page Numbering Format Total Page (1),(2),(3).. Auto -1-,-2-,-3-.. P.1,P.2,P.
Stamp Cancel Page Numbering 1,2,3.. If you do not need to configure page number settings, go to step 8. Total Page Page Numbering Format 3 OK Auto (1),(2),(3).. -1-,-2-,-3-.. P.1,P.2,P.3.. <1>,<2>,<3>.. 1/5,2/5,3/5.. To configure page number settings, touch the [Page Number] key. Manual 1 Page Page Number Select page number settings. Stamp OK Page Number Auto Manual First Number (2) Set the first number, the last number, and the "Printing Starts from Page" number.
(1) (2) Stamp OK Covers/Inserts Counting Touch each item that you want counted in the page numbers so that a checkmark appears , and then touch the [OK] key. Items with a checkmark will be reflected in the print image on the right side of the screen.
• When Page Numbering is selected, copying in group mode is not possible. The mode automatically changes to sort mode. • When the page number printing position is set to the right side or left side and pamphlet copy or book copy is used, the print position is changed so that the page numbers always appear on the outer side of each opened page (the left and right sides of the opened pages).
PRINTING TEXT ON COPIES (Text) Entered text can be printed on copies. Up to 30 frequently used text strings can be stored. Example: Printing "April 2010 Planning Meeting" in the top left corner of the paper April 2010 Planning Meeting 1 Touch the [Text] key in the stamp selection screen. See steps 1 to 4 of "GENERAL PROCEDURE FOR USING STAMP" (page 84). Touch the [Recall] key.
Stamp OK Cancel Text First Page AAA AAA 4 Pre-Set Recall Store/Delete All Pages Select the pages to be printed on and touch the [OK] key. Select printing on the first page only, or printing on all pages. After touching the [OK] key, continue from step 5 of "GENERAL PROCEDURE FOR USING STAMP" (page 84) to complete the copy procedure. Direct Entry Text settings can also be configured in the Web pages.
Storing, editing, and deleting text strings 1 Touch the [Text] key in the stamp selection screen. See steps 1 to 4 of "GENERAL PROCEDURE FOR USING STAMP" (page 84). Touch the [Store/Delete] key. Stamp Cancel Text OK First Page 2 Pre-Set Recall All Pages Store/Delete Direct Entry Store a text string, or edit/delete a stored text string. Stamp Back Text 10 5 Store/Delete • To store a text string, touch a key with no text stored. A text entry screen will appear.
Touch the [Back] key. Stamp Back Text 5 10 Store/Delete 4 1 No.01 AAA AAA No.02 BBB BBB No.03 CCC CCC No.04 No.05 No.06 No.07 No.08 No.09 No.10 You will return to the screen of step 2. To copy using a stored text string, continue from step 2 of "PRINTING TEXT ON COPIES (Text)" (page 95).
CHECKING THE STAMP LAYOUT (Layout) After stamp items have been selected, you can check the print layout, change the print position, and delete stamp items. Touch the [Layout] key. OK Special Modes OK Cancel Special Modes 1 2 Date Stamp Page Numbering Text 1 Layout The [Layout] key can only be touched when stamp items have been selected. Stamp OK Layout If the layout is correct, touch the [OK] key. Touch the key of the stamp item that you want to delete or whose position you want to change.
Stamp OK Move Select the location to move the selected item. Touch the key of the desired destination position. The touched position key is highlighted and the print position changes. The keys that show the print positions will appear as follows depending on the state of the settings. Not selected, stamp setting has not been selected. 4 Selected during selection of the stamp setting. Not available, stamp setting has already been selected. The above key is the top left key.
[Image Edit] KEY When the [Image Edit] key is touched in the 2nd special modes menu screen, the image edit menu screen opens. Image edit menu screen OK Special Modes Stamp Image Edit Original Count File Quick File Reverse Order OK Image Edit OK (1) 2 Mixed Size Original Special Modes (2) Photo Repeat 2 (4) Slow Scan Mode Full Bleed Copy (5) Multi-Page Enlargement Centering (3) (6) Mirror Image B/W Reverse Click a key in the screen to jump to an explanation of the key.
REPEATING PHOTOS ON A COPY (Photo Repeat) Photo Repeat is used to create repeated images of a photo-size original (3" x 5" size, 5" x 7" size, 2-1/2" x 4" size, 2-1/2" x 2-1/2" size or 2-1/8" x 3-5/8" size (130 mm x 90 mm size, 100 mm x 150 mm size, 70 mm x 100 mm size, 65 mm x 70 mm size or 57 mm x 100 mm size)) on a single sheet of copy paper as shown below. Up to 24 images (when the image is 2-1/2" x 2-1/2" size (65 mm x 70 mm size)) can be repeated on a single sheet of paper.
Select the special modes. (1) Touch the [Special Modes] key. 2 (2) Touch the keys to switch through the screens. (3) Touch the [Image Edit] key. (4) Touch the [Photo Repeat] key. ☞ [Image Edit] KEY (page 101) (1) (1) Touch the key showing the original type and paper size combination that you want to use. OK Image Edit OK Cancel Photo Repeat Original Size Select Photo Repeat settings.
CREATING A LARGE POSTER (Multi-Page Enlargement) This function is used to enlarge an image of an original and print it as a composite image using multiple sheets of paper. Original (8-1/2" x 11" (A4) size) Copy (enlarged image on 8 sheets of 11" x 17" (A3) paper) Select the special modes. (1) Touch the [Special Modes] key. 1 (2) Touch the keys to switch through the screens. (3) Touch the [Image Edit] key. (4) Touch the [Multi-Page Enlargement] key.
Set the enlargement size and the original size. (B) Ready to scan for copy. Copies will be delivered in 2 parts. Cancel M.Page Enlarge Enlargement Size (Inch) (1) Select the size system that you wish to use for multi-page enlargement. OK Image Edit Original Size OK 1 22x17 11x17 22x34 8½x14 34x44 8½x11 3 44x68 (2) Touch the keys to display the screen that shows the desired group of sizes.
Enlargement Size (Inch) Original Size 22x17 11x17 22x34 8½x14 34x44 8½x11 You will return to the special modes screen. Touch the [OK] key to return to the base screen of copy mode. OK Cancel M.Page Enlarge 4 Touch the [OK] key. OK Image Edit Original Orientation 1 3 44x68 Press the [START] key ( 5 ). Copying will begin. If you have selected sort mode, change originals and press the [START] key ( and then touch the [Read-End] key. ).
REVERSING THE IMAGE (Mirror Image) This feature is used to make a copy that is a mirror image of the original. Original 1 Mirror image copy Place the original. Place the original face up in the document feeder tray, or face down on the document glass. Select the special modes. (1) Touch the [Special Modes] key. 2 (2) Touch the keys to switch through the screens. (3) Touch the [Image Edit] key.
COPYING WITHOUT CUTTING OFF THE ORIGINAL (Full Bleed Copy) An entire original can be copied at full size, without cutting off the edges, using paper larger than the original. Full bleed copy Original A 1 A Place the original. Place the original face up in the document feeder tray, or face down on the document glass. Select the special modes. (1) Touch the [Special Modes] key. 2 (2) Touch the keys to switch through the screens. (3) Touch the [Image Edit] key.
Press the [START] key ( 5 ). Copying will begin. If you have selected sort mode, change originals and press the [START] key ( and then touch the [Read-End] key. ). Repeat until all pages have been scanned To cancel scanning and copying... Press the [STOP] key ( ). • The copy ratio is 100% when this function is used. The ratio cannot be changed. • The punch function cannot be used. To cancel Full Bleed Copy... Touch the [Full Bleed Copy] key in the screen of step 3 so that it is not highlighted.
COPYING IN THE CENTER OF THE PAPER (Centering) This is used to center the copied image on the paper. This lets you place the image in the center of the paper when the original size is smaller than the paper size or when the image is reduced. Not using the centering function 1 Using the centering function Place the original. Place the original face up in the document feeder tray, or face down on the document glass. Select the special modes. (1) Touch the [Special Modes] key.
• The image can be reduced when using the centering function, but not enlarged. • When the original size or the paper size is displayed as a special size, this function cannot be used. To cancel centering... Touch the [Centering] key in the screen of step 3 so that it is not highlighted.
REVERSING WHITE AND BLACK IN A COPY (B/W Reverse) This is used to reverse black and white in a copy to create a negative image. Originals with large black areas (which use a large amount of toner) can be copied using Black/White Reverse to reduce toner consumption. Originals 1 B/W Reverse copy Place the original. Place the original face up in the document feeder tray, or face down on the document glass. Select the special modes. (1) Touch the [Special Modes] key.
CHECKING THE NUMBER OF SCANNED ORIGINAL SHEETS BEFORE COPYING (Original Count) The number of scanned original sheets can be counted and displayed before copying is executed. By allowing you to check the number of original sheets that were scanned, this helps reduce the occurrence of copy mistakes. 1 Insert the originals face up in the document feeder tray. Indicator line Insert the originals all the way into the document feeder tray. Multiple originals can be placed in the document feeder tray.
After scanning is finished, check the number of sheets that were scanned and touch the [OK] key. 130 pages of original have been scanned. Copy the scanned data? Cancel 4 OK Copying will begin. • When job build mode is used, the number of scanned sheets appears when the [Read-End] key is touched. • The number that is displayed is the number of scanned original sheets, not the number of scanned original pages.
COPYING IN REVERSE ORDER (Reverse Order) With normal copying, the copies are delivered face down in order beginning from the first page, which means that the copies are in the same order as the pages of the original. When reverse order copying is used, the copies are delivered face up in order beginning from the first page, which means that the copies are in the reverse order of the original pages. Result Originals Normal copying 1 4 2 4 3 3 2 3 4 1 2 1 1 Place the original.
COPYING ORIGINALS OF DIFFERENT SIZES (Mixed Size Original) Even when 8-1/2" x 14" (B4) originals are mixed in with 11" x 17" (A3) originals, all originals can be copied at once. When scanning the originals, the machine automatically detects the size of each original and uses paper appropriate for that size. When mixed size original is combined with auto ratio selection, the ratio is adjusted individually for each original according to the selected paper size, enabling output on a uniform paper size.
Insert the originals face up in the document feeder tray. ● When "Same Width" is used Place the originals with the sides that are the same length aligned on the left. 11" x 17" (A3) 8-1/2" x 11" (A4) Place with the sides that are the same length aligned on the left. 1 ● When "Different Width" is used Place the originals aligned to the far left corner. 8-1/2" x 14" (B4) Place the originals with the corners aligned in the far left corner of the document feeder tray.
Press the [START] key ( ). Copying will begin. 4 To cancel scanning and copying... Press the [STOP] key ( ). • When "1-sided to 2-sided" mode of automatic 2-sided copying is performed with [Different Width] selected, 2-sided copying will only be performed when two originals of the same size are grouped together. • When [Different Width] is selected, the staple function cannot be used.
COPYING THIN ORIGINALS (Slow Scan Mode) Use this function when you wish to scan thin originals using the automatic document feeder. This function helps prevent thin originals from misfeeding. A A B C D B C D Insert the originals face up in the document feeder tray. Indicator line Insert the originals all the way into the document feeder tray. Multiple originals can be placed in the document feeder tray. The stack of originals must not be higher than the indicator line on the tray.
The "2-Sided to 2-Sided" and "2-Sided to 1-Sided" modes of automatic 2-sided copying cannot be used. To cancel the slow scan mode setting... Touch the [Slow Scan Mode] key in the screen of step 2 so that it is not highlighted. System Settings (Administrator): Original Feeding Mode This is used to have scanning always take place in slow scan mode.
4 CONVENIENT COPY FUNCTIONS This chapter explains convenient copy functions such as checking copies before printing, interrupting a copy run, changing the order of reserved copy jobs, and storing copy settings in a program. CHECKING COPIES BEFORE PRINTING (Proof Copy) This feature prints only one set of copies, regardless of how many sets have been specified. After the first set is checked for errors, the remaining sets can be printed.
7 If you will copy multiple originals using the document glass, switch to sort mode after this step. ☞ SORT MODE (page 35) Special Modes Plain 8½x11 3 Set the number of copies (number of sets) with the numeric keys. 2-Sided Copy 5. Up to 9999 copies (sets) can be set. If an incorrect number of copies is set... Press the [CLEAR] key ( ) and then enter the correct number. PROOF COPY Press the [PROOF COPY] key ( ). One set of copies is printed. 4 To cancel copying... Press the [STOP] key ( ).
PROOF COPY Press the [PROOF COPY] key ( 7 ). One set of copies is printed again using the adjusted settings. Check the results. If further adjustments are needed, repeat steps 5 through 7. (Repeating Proof Copy does not decrease the remaining number of sets to be printed.) Press the [START] key ( ). You will return to the base screen of copy mode and the remaining sets will be printed. 8 To cancel scanning and copying... Press the [STOP] key ( ).
INTERRUPTING A COPY RUN (Interrupt copy) When you need to make an urgent copy and the machine is busy with a long copy run or other job, use interrupt copy. Interrupt copy temporarily stops the job in progress and lets you perform the interrupt copy job first. Copies in progress from tray 2. Ready to scan for next copy job. 7 Interrupt Plain Special Modes Plain Plain 8½x11 Touch the [Interrupt] key. The [Interrupt] key does not appear while an original is being scanned. 2-Sided Copy 5.
JOB STATUS SCREEN The job status screen is displayed when the [JOB STATUS] key on the operation panel is pressed. The job status screen shows the status of jobs by mode. When the [JOB STATUS] key is pressed, the job status screen of the mode that was being used before the key was pressed appears.
JOB QUEUE SCREEN AND COMPLETED JOB SCREEN The job status screen consists of the job queue screen that shows copy and print jobs waiting to be printed and the job currently in progress, the completed job screen that shows jobs that have been completed, and the spool screen that shows print jobs that have been spooled and encrypted PDF jobs that are waiting for a password to be entered. This section explains the job queue screen and the completed jobs screen, which are related to copy mode.
Job key display Each job key shows the position of the job in the job queue and the current status of the job. 2 (1) (1) Copy (2) 0002/0000 (3) (4) (6) Indicates the number (position) of the job in the job queue. Mode icon The (3) icon appears when the job is a copy job. Status Message Status "Copying" Copying is in progress. "Waiting" The job is waiting to be executed. "Toner Empty" The toner cartridge is out of toner. Replace the toner cartridge with a new cartridge.
GIVING PRIORITY TO A JOB IN THE QUEUE If a copy job is begun when there are already multiple jobs in the queue, the copy job will appear at the end of the queue. However, if you have an urgent copy job, you can give priority to the job and have it executed first. Touch the key of the urgent job and then touch the [Priority] key. The job will move to the top of the queue and copying will begin.
STORING COPY OPERATIONS (Job Programs) A job program is a group of copy settings stored together. When copy settings are stored in a job program, the settings can be retrieved and used for a copy job by means of a simple operation. For example, suppose 11" x 17" (A3) size CAD drawings are copied once a month for archive purposes using the following settings: (1) The 11" x 17" (A3) size CAD drawings are reduced to 8-1/2" x 11"(A4) size.
STORING (EDITING/DELETING) A JOB PROGRAM The procedures for storing copy settings in a job program and deleting a job program are explained below. Press the [#/P] key ( ). 1 LOGOUT Touch the [Store/Delete] tab. Exit Job Programs Press program number. 1 2 3 4 5 6 7 8 9 10 11 12 1 4 2 Recall Store/Delete Touch a numeric key. Exit Job Programs Numeric keys in which job programs are already stored are highlighted. • To store a job program, touch a numeric key that is not highlighted.
To store, make selections and press [OK], to delete, press [Cancel]. Cancel OK Plain Special Modes Plain Plain 8½x11 2-Sided Copy 5. 11x17 Exposure 1. 2. Auto Output 6. 8½x11 8½x11 11x17 3. 11x17 7. 11x17 4. 8½x14 Program Name 4 Copy Ratio Original Paper Select 100% Auto Auto 8½x11 Plain Select the copy settings that you wish to store in the job program and touch the [OK] key. To assign a name to the program, touch the [Program Name] key. A text entry screen will appear.
5 TROUBLESHOOTING This chapter provides solutions to possible copying problems. See the following table of contents to locate the appropriate page for your question or problem. PROBLEMS RELATED TO COPYING OPERATION • Copying does not take place. . . . . . . . . . . . . . . . . . . . . . . . . . . . . . . . . . . . . . . . . . . . . . . . . . . . . . . . 133 • Image rotation does not take place. . . . . . . . . . . . . . . . . . . . . . . . . . . . . . . . . . . . . . . . . . . . . . . . . . .
PROBLEMS RELATED TO COPYING OPERATION Problem Point to check Solution Copying does not take place. Have functions been disabled by the administrator? When user authentication is enabled, the functions that you can use may be restricted in your user settings. Check with your administrator. Image rotation does not take place. Did you select the paper size or copy ratio manually? Copy using automatic paper selection and automatic ratio selection.
PROBLEMS RELATED TO COPY RESULTS Problem The image is too light or too dark. Point to check Solution Is the image too light or too dark? Select an appropriate exposure mode for the original being copied and adjust the exposure level manually. ☞ CHANGING THE EXPOSURE AND ORIGINAL IMAGE TYPE (page 24) Has an appropriate exposure mode for the original type been selected? Select one of the following modes depending on the original type.
APPENDIX Examples of covers and inserts The relations between the originals and finished copies when covers or inserts are inserted are shown on the following pages.
Covers (1-sided copying of 1-sided originals) 1-sided copies are made of the following 1-sided originals.
Covers (2-sided copying of 1-sided originals) 2-sided copies are made of the following 1-sided originals.
Covers (1-sided copying of 2-sided originals) 1-sided copies are made of the following 2-sided originals.
Covers (2-sided copying of 2-sided originals) 2-sided copies are made of the following 2-sided originals.
Inserts (copying of 1-sided originals) 1-sided and 2-sided copying of the following 1-sided originals. The example of adding an insert at the 3rd sheet is shown.
Copier Guide MODEL: MX-M850 MX-M950 MX-M1100 SHARP ELECTRONICS CORPORATION Sharp Plaza, Mahwah, New Jersey 07430-1163. www.sharpusa.com SHARP ELECTRONICS OF CANADA LTD.
MODEL: MX-M850 MX-M950 MX-M1100 Printer Guide
CONTENTS ABOUT THIS MANUAL . . . . . . . . . . . . . . . . . . . . . . . . 4 • MANUALS PROVIDED WITH THE MACHINE . . . 5 4 PRINTER FUNCTION OF THE MACHINE . . . . . . . . . . 6 1 CONVENIENT FUNCTIONS FOR CREATING PAMPHLETS AND POSTERS . . . . . . . . . . . . . . . . . . 34 • CREATING A PAMPHLET (Pamphlet/Pamphlet Staple). . . . . . . . . . . . . . . . . 34 • INCREASING THE MARGIN (Margin Shift) . . . . . 36 • CREATING A LARGE POSTER (Poster Printing) . .
5 PERFORMING PRINTING AT THE MACHINE DIRECTLY PRINTING FROM THE MACHINE. . . . . . 61 • DIRECTLY PRINTING A FILE ON AN FTP SERVER. . . . . . . . . . . . . . . . . . . . . . . . . . . . . . . . 62 • DIRECTLY PRINTING A FILE IN USB MEMORY . . 63 • PRINT SETTINGS SCREEN. . . . . . . . . . . . . . . . . . 65 DIRECTLY PRINTING FROM A COMPUTER . . . . . . 66 • SUBMIT PRINT JOB . . . . . . . . . . . . . . . . . . . . . . 66 • FTP PRINT . . . . . . . . . . . . . . . . . . . . . . . . . . . . . .
ABOUT THIS MANUAL Please note • For information on installing the drivers and software cited in this manual, please refer to the Software Setup Guide. • For information on your operating system, please refer to your operating system manual or the online Help function. • The explanations of screens and procedures in a Windows environment are primarily for Windows® XP. The screens may vary depending on the version of the operating system or the software application.
MANUALS PROVIDED WITH THE MACHINE Printed manuals and manuals stored in PDF format on the machine's hard drive are provided with the machine. When using the machine, read the appropriate manual for the feature you are using. Printed manuals Manual name Contents Safety Guide This manual contains instructions for using the machine safely and lists the specifications of the machine and its peripheral devices.
PRINTER FUNCTION OF THE MACHINE To use the machine's print function, the expansion kit must be installed in the machine in accordance with your environment. Printing will be possible from your computer after you have installed the printer driver from the CD-ROM that accompanies the expansion kit. See the table below to determine which printer driver to use in your environment. Environment Printer driver type Remarks The printer expansion kit is required.
1 PRINTING FROM WINDOWS BASIC PRINTING PROCEDURE The following example explains how to print a document from "WordPad", which is a standard accessory program in Windows. Select [Print] from the [File] menu of WordPad. 1 The menu used to execute printing may vary depending on the software application. Open the printer driver properties window. (1) Select the printer driver of the machine. • If the printer drivers appear as icons, click the icon of the printer driver to be used.
Select print settings. (1) (1) Click the [Paper] tab. (2) Select the paper size. To select settings on other tabs, click the desired tab and then select the settings. (3) Click the [OK] button. 3 (2) (3) Click the [Print] button. Printing begins. In Windows 98/Me/NT 4.0, click the [OK] button.
SELECTING THE PAPER This section explains how to configure the "Paper Selection" setting on the [Paper] tab of the printer driver properties window. Before printing, check the paper sizes, paper types, and paper remaining in the machine's trays. To view the most recent tray information, click the [Tray Status] button. • When [Auto Select] is selected in "Paper Source" The tray that has the size and type of paper selected in "Paper Size" and "Paper Type" on the [Paper] tab is automatically selected.
PRINTING WHEN THE USER AUTHENTICATION FUNCTION IS ENABLED When the user authentication function is enabled in the machine's system settings (administrator), your user information (login name, password, etc.) must be entered in the printer driver properties window before you can print. The information that must be entered varies depending on the authentication method being used, so check with the administrator of the machine before printing.
Enter your login name and password. (1) (1) Click the [Job Handling] tab. (2) Enter your user information. • When authentication is by login name/password Select the [Login Name] and [Password] checkboxes so that checkmarks appear, and enter your login name and password. Enter 1 to 32 characters for the password. • When authentication is by user number Click the [User Number] checkbox and enter a user number (5 to 8 digits). 2 (3) Click the [OK] button.
VIEWING PRINTER DRIVER HELP When selecting settings in the printer driver, you can display Help to view explanations of the settings. Open the printer driver properties window from the print window of the software application. (1) Select the printer driver of the machine. (2) Click the [Preferences] button. 1 (1) (2) The button that is used to open the printer driver properties window (usually [Properties] or [Printing Preferences]) may vary depending on the software application.
SAVING FREQUENTLY USED PRINT SETTINGS Settings configured on each of the tabs at the time of printing can be saved as user settings. Saving frequently used settings or complex settings under an assigned name makes it easy to select those settings the next time you need to use them. SAVING SETTINGS AT THE TIME OF PRINTING Settings can be saved from any tab of the printer driver properties window.
(1) Check and save the settings. (2) (1) Check the displayed settings. (2) Enter a name for the settings (maximum of 20 characters). (3) Click the [OK] button. 3 (3) Click the [OK] button. 4 Start printing. 5 • Up to 30 sets of user settings can be saved. • The following items cannot be saved in user settings.
USING SAVED SETTINGS Open the printer driver properties window from the print window of the software application. (1) Select the printer driver of the machine. (2) Click the [Preferences] button. 1 (1) (2) The button that is used to open the printer driver properties window (usually [Properties] or [Printing Preferences]) may vary depending on the software application. Select the print settings. (1) Select the user settings that you wish to use. (2) Click the [OK] button. 2 (1) (2) Start printing.
CHANGING THE PRINTER DRIVER DEFAULT SETTINGS The default settings of the printer driver can be changed using the procedure below. The settings selected using this procedure are saved and become the default settings when printing from a software application. (Settings selected in the printer driver properties window when printing from an application remain in effect only while the application is in use.) Click the [start] button and then click [Printers and Faxes].
Click the [Printing Preferences] button on the [General] tab. In Windows 98/Me, click the [Setup] tab. 3 Configure the settings and click the [OK] button. For explanations of the settings, see printer driver Help.
2 PRINTING FROM A MACINTOSH BASIC PRINTING PROCEDURE The following example explains how to print a document from the standard accessory program "TextEdit" in Mac OS X ("SimpleText" in Mac OS 9). To use the machine as a printer for the Macintosh, the PS3 expansion kit must be installed in the machine and the machine must be connected to a network. To install the PPD file and configure printer driver settings, see "3. SETUP IN A MACINTOSH ENVIRONMENT" in the Software Setup Guide.
Mac OS 9 Select [Page Setup] from the [File] menu of SimpleText. 1 Select paper settings. (1) (1) Make sure that the correct printer is selected. (2) Select paper settings. The paper size, paper orientation, and enlarge/reduce can be selected. (3) Click the [OK] button. 2 (2) (3) The machine name that appears in the "Format for" menu is normally [SCxxxxxx]. ("xxxxxx" is a sequence of characters that varies depending on your machine model.
PRINTING Mac OS X Select [Print] from the [File] menu of TextEdit. 1 The menu used to execute printing may vary depending on the software application. Make sure that the correct printer is selected. 2 The machine name that appears in the "Printer" menu is normally [SCxxxxxx]. ("xxxxxx" is a sequence of characters that varies depending on the machine model.) Select print settings. Click next to [Copies & Pages] and select the settings that you wish to configure from the pull-down menu.
Click the [Print] button. Printing begins. 4 Mac OS 9 Select [Print] from the [File] menu of SimpleText. 1 The menu used to execute printing may vary depending on the software application. Make sure that the correct printer is selected. 2 The machine name that appears in the "Printer" menu is normally [SCxxxxxx]. ("xxxxxx" is a sequence of characters that varies depending on your machine model.
Select print settings. Click next to [General] and select the settings that you wish to configure from the pull-down menu. The corresponding setting screen will appear. 3 Click the [Print] button. Printing begins.
SELECTING THE PAPER This section explains the [Paper Feed] settings ("Paper Source" setting in [General] in Mac OS 9) in the print settings window. • When [Auto Select] is selected A tray with plain paper or recycled paper (the factory default setting is plain paper only) of the size specified in "Paper Size" in the page settings window is automatically selected. • When a paper tray is selected The specified tray is used for printing regardless of the "Paper Size" setting in the page settings window.
PRINTING WHEN THE USER AUTHENTICATION FUNCTION IS ENABLED When the user authentication function is enabled in the machine's system settings (administrator), you must enter your user information (login name, password, etc.) in order to print. The information that must be entered varies depending on the authentication method being used, so check with the administrator of the machine before printing. Mac OS X (This function cannot be used in Mac OS X v10.1.5.
Start printing. (1) Enter your user information. • When authentication is by login name/password Enter your login name in "Login Name" and your password in "Password" (1 to 32 characters). • When authentication is by user number Enter your user number (5 to 8 digits) in "User Number". (2) Click the [Print] button.
Display the user authentication screen. (1) (1) Make sure that the machine's printer name is selected. (2) Select [User Authentication]. 2 (2) The machine name that appears in the "Printer" menu is normally [SCxxxxxx]. ("xxxxxx" is a sequence of characters that varies depending on the machine model.) Start printing. (1) Enter your user information. • When authentication is by login name/password Enter your login name in "Login Name" and your password in "Password" (1 to 32 characters).
3 FREQUENTLY USED FUNCTIONS This chapter explains frequently used functions. • TWO-SIDED PRINTING • FITTING THE PRINT IMAGE TO THE PAPER (page 29) • PRINTING MULTIPLE PAGES ON ONE PAGE (page 30) • STAPLING OUTPUT/PUNCHING HOLES IN OUTPUT (page 32) The explanations assume that the paper size and other basic settings have already been selected.
Windows (1) (1) Configure the settings on the [Main] tab. (2) (2) Select [2-Sided(Book)] or [2-Sided(Tablet)]. Macintosh Mac OS X (1) (1) Select [Layout]. (2) (2) Select [Long-edged binding] or [Short-edged binding]. • In Mac OS X v10.1.5, select the settings in [Duplex]. • In Mac OS X v10.2.8, select the settings in [Advanced]. Mac OS 9 (1) (1) Select [Output/Document Style]. (2) (2) Select [Flip on long edge] or [Flip on short edge].
FITTING THE PRINT IMAGE TO THE PAPER This function is used to automatically enlarge or reduce the printed image to match the size of the paper loaded in the machine. This is convenient for such purposes as enlarging a letter or A4 size document to ledger or A3 size to make it easier to view, and to print when the same size of paper as the document image is not loaded in the machine. Ledger or A3 Letter or A4 The following example explains how to print a letter size document on ledger size paper.
PRINTING MULTIPLE PAGES ON ONE PAGE This function can be used to reduce the print image and print multiple pages on a single sheet of paper. This is convenient when you want to print multiple images such as photos on a single sheet of paper, and when you want to conserve paper. This function can also be used in combination with two-sided printing for maximum conservation of paper.
Macintosh Mac OS X (1) (1) Select [Layout]. (2) (2) Select the number of pages per sheet. (3) Select the order of the pages. (4) If you wish to print borderlines, select the desired type of borderline. (4) (3) Mac OS 9 (1) (2) (1) Select [Layout]. (3) (2) Select the number of pages per sheet. (3) Select the order of the pages. (4) If you wish to print borderlines, select the desired type of borderline.
STAPLING OUTPUT/PUNCHING HOLES IN OUTPUT Staple function The staple function can be used to staple output. This function saves considerable time when preparing handouts for a meeting or other stapled materials. The staple function can also be used in combination with two-sided printing to create materials with a more sophisticated appearance. Stapling positions and the number of staples can be selected to obtain the following stapling results.
Windows (3) (1) (1) Configure the settings on the [Main] tab. (2) (2) Select the "Binding Edge". (3) Select the staple function or the punch function. • For the staple function, select the number of staples in the "Staple" menu. • To punch holes in output, select the number of holes in the "Punch" menu. Macintosh Mac OS X (1) (2) (1) Select [Printer Features]. (3) (2) Select the "Binding Edge". (3) Select the staple function or the punch function.
4 CONVENIENT PRINTING FUNCTIONS This chapter explains convenient functions for specific printing objectives.
Macintosh Mac OS X (This function cannot be used in Mac OS X v10.1.5.) (1) (1) Select [Printer Features]. (2) (2) Select the "Binding Edge". [2 Staples] in "Staple" can be selected when a finisher and saddle unit are installed, or when a saddle stitch finisher is installed. (3) Select [Tiled Pamphlet] or [2-Up Pamphlet]. In Mac OS X v10.2.8, select from the "2-Side Printing" and "Binding Edge" menus in [Advanced]. (3) Mac OS 9 (1) (1) Select [Output/Document Style].
INCREASING THE MARGIN (Margin Shift) This function is used to shift the print image to increase the margin at the left, right, or top of the paper. This is convenient when you wish to staple or punch the output but the binding area overlaps the text. When a finisher or saddle stitch finisher is installed, the staple function or the punch function can be used with this function. Windows (1) (1) Configure the settings on the [Main] tab. (2) (2) Select the "Binding Edge". (3) Select the "Margin Shift".
Mac OS 9 (1) (2) (1) Select [Output/Document Style]. (3) (2) Select the "Margin Shift". (3) Select the "Binding Edge". CREATING A LARGE POSTER (Poster Printing) (This function is only available in Windows.) One page of print data can be enlarged and printed using multiple sheets of paper (4 sheets (2 x 2), 9 sheets (3 x 3) or 16 sheets (4 x 4)). The sheets can then be attached together to create a large poster.
FUNCTIONS TO ADJUST THE SIZE AND ORIENTATION OF THE IMAGE ROTATING THE PRINT IMAGE 180 DEGREES (Rotate 180 degrees) This feature rotates the image 180 degrees so that it can be printed correctly on paper that can only be loaded in one orientation (such as paper with punch holes). (In Mac OS X, a portrait image cannot be rotated 180 degrees.) ABCD ABCD Windows (1) Select the setting on the [Main] tab. (1) (2) Select the [Rotate 180 degrees] checkbox .
Mac OS 9 (1) (2) (1) Select [Page Setup] from the [File] menu and select [PostScript Options]. (3) (2) Select the [Flip Horizontal] and [Flip Vertical] checkboxes . The print image will show an image of the print result. (3) Click the [OK] button. ENLARGING/REDUCING THE PRINT IMAGE (Zoom/XY-Zoom) This function is used to enlarge or reduce the image to a selected percentage. This allows you to enlarge a small image or add margins to the paper by slightly reducing an image.
Macintosh Mac OS X (1) Select [Page Setup] from the [File] menu and enter the ratio (%). (2) Click the [OK] button. (2) (1) Mac OS 9 (1) Select [Page Setup] from the [File] menu and enter the ratio (%). (2) Click the [OK] button.
REVERSING THE IMAGE (Mirror Image) The image can be reversed to create a mirror image. This function can be used to conveniently print a design for a woodblock print or other printing medium. B B Windows (This function can be used when the PS printer driver is used.) (1) Click the [Advanced] tab. (1) (2) Select a mirror image setting. If you wish to reverse the image horizontally, select [Horizontal]. If you wish to reverse the image vertically, select [Vertical].
IMAGE ADJUSTMENT FUNCTION ADJUSTING THE BRIGHTNESS AND CONTRAST OF THE IMAGE (Image Adjustment) (This function is only available in Windows.) The brightness and contrast can be adjusted in the print settings when printing a photo or other image. These settings can be used for simple corrections when you do not have image editing software installed on your computer. Windows (This function can be used when the PCL6 or PS printer driver is used.) (1) Click the [Advanced] tab.
PRINTING FAINT TEXT AND LINES IN BLACK (Text To Black/Vector To Black) (This function is only available in Windows.) When printing a color image, color text and lines that are faint can be printed in black. (Raster data such as bitmap images cannot be adjusted.) This allows you to bring out color text and lines that are faint and difficult to see. ABCD ABCD • [Text To Black] can be selected to print all text other than white text in black.
FUNCTIONS THAT COMBINE TEXT AND IMAGES ADDING A WATERMARK TO PRINTED PAGES (Watermark) CO NF ID EN TI A L Faint shadow-like text can be added to the background of the printed image as a watermark. The size and angle of the watermark text can be adjusted. The text can be selected from a pre-stored list, or entered to create an original watermark. Windows (1) (1) Click the [Watermarks] tab. (2) (2) Select the watermark settings. Select a stored water mark from the pull-down menu.
Mac OS 9 (1) (1) Select [Watermark]. (2) (2) Configure watermark settings. Detailed watermark settings can be configured such as selection of the text. Select the text from the "Watermark" menu. Select the size and angle of the text from the corresponding menus. PRINTING AN IMAGE OVER THE PRINT DATA (Image Stamp) (This function is only available in Windows.) A bitmap or JPEG image stored on your computer can be printed over the print data. The size, position, and angle of the image can be adjusted.
CREATING OVERLAYS FOR PRINT DATA (Overlays) (This function is only available in Windows.) The print data can be printed in a previously created overlay. By creating table rulings or a decorative frame in an application different from that of the text file and registering the data as an overlay file, an attractive print result can be easily obtained without the need for complex manipulations.
PRINT FUNCTIONS FOR SPECIAL PURPOSES PRINTING SPECIFIED PAGES ON DIFFERENT PAPER (Different Paper) • Using this function in a Windows environment The front and back cover and specified pages of a document can be printed on paper that is different from the other pages. Use this function when you wish to print the front and back cover on heavy paper, or insert colored paper or a different paper type at specified pages. You can also insert paper as an insert without printing on it.
Macintosh Mac OS X (1) Select [Paper Feed]. (2) (1) (2) Select cover insertion settings. Select the paper tray or paper type for the first page in "First page from", and then select the paper tray or paper type used for the remaining pages in "Remaining from". Mac OS 9 (1) (1) Select [General]. (2) (2) Select cover insertion settings.
ADDING INSERTS WHEN PRINTING ON TRANSPARENCY FILM (Transparency Inserts) When printing on transparency film, this function helps prevent the sheets of transparency film from sticking together by inserting a sheet of paper between each sheet of film. It is also possible to print the same content on each inserted sheet of paper as is printed on the corresponding sheet of transparency film. A B C Windows (1) Click the [Special Modes] tab.
Mac OS 9 (1) (1) Select [Transparency Inserts]. (2) (2) Select the transparency insert settings. To print the same content on the insert as is printed on the sheet of transparency film, select [On (Printed)] from the "Transparency Inserts" menu. Select the paper source and type if needed. When [Bypass Tray] is selected in "Paper Source", be sure to select the "Paper Type". PRINTING A CARBON COPY (Carbon Copy) (This function is only available in Windows.
PRINTING TEXT ON TABS OF TAB PAPER (Tab Printing) (This function is only available in Windows.) This function is used to print text on the tabs of tab paper.
Printing tab text created in a software application (1) Click the [Advanced] tab. (1) (2) Click the [Tab Paper Settings] button. (3) Select the tab paper settings. To shift the image, directly enter a number or click the button.
TWO-SIDED PRINTING WITH SPECIFIC PAGES PRINTED ON THE FRONT SIDE (Chapter Inserts Printing) (This function is only available in Windows.) When performing two-sided printing, you can keep specific pages from being printed on the reverse side of the paper and have them printed on the front side of the next page. By printing printed matter consisting of chapters with the first page of each chapter on the front side, a fixed design can be added to each chapter.
FOLDING SPECIFIED PAPER IN HALF BEFORE PRINTING (Paper Fold Print) Fold in Fold out When a folding unit is installed, the paper can be folded in half so that the printed output is half the paper size. As an example, when the print data consists of mixed letter (A4) and ledger (A3) sizes, ledger (A3) size can be folded into letter (A4) size so that the actual width of all pages of the printed output is letter (A4) width. The folded paper can also be stapled (excluding sizes A4R, Legal, and LetterR).
Mac OS 9 (1) (1) Select [Paper Folding Settings]. (2) (2) Select the paper folding settings. Select [On] from the menu of the paper size to be folded. PRINTING THE PAGES IN REVERSE ORDER (Reverse Order Print) When normal printing is used, the pages are output face down in order from the first page so that the output is in the same order as the original document. When reverse print is used, the pages are output face up in order from the first page so that the output is in reverse order.
Macintosh Mac OS X (1) (3) (1) Select [Printer Features]. (2) (2) Select [Advanced]. (3) Click the [Reverse Order Print] checkbox to select it . Mac OS 9 (1) (1) Select [Advanced]. (2) (2) Select [On] from the "Reverse Order Print" menu.
CONVENIENT PRINTER FUNCTIONS USING TWO MACHINES TO PRINT A LARGE PRINT JOB (Tandem Print) Two machines are required to use this function. Tandem Print allows you to divide a large print job between two machines connected to your network. The machines simultaneously print each half of the job, making it possible to shorten the printing time when printing a large number of sets.
Mac OS 9 (1) (1) Select [Advanced]. (2) (2) Select [On] from the "Tandem Print" menu. The tandem print function does not support SSL (encrypted communication) between the master machine and slave machine. SAVING AND USING PRINT FILES (Retention/Document Filing) This function is used to store a print job as a file on the machine's hard drive, allowing the job to be printed from the operation panel when needed.
User Name and Job Name When a "User Name" and "Job Name" are entered in the printer driver, the entered names appear in the machine's touch panel as the user name and job name. When document filing settings are configured, the entered "User Name" and "Job Name" are used as the "User Name" and "File Name" for document filing. For this reason, when you wish to print a file stored in the machine, use the "User Name" or "Job Name (File Name)" that was entered in the printer driver to specify the file.
Macintosh Mac OS X (This function cannot be used in Mac OS X v10.1.5.) (2) (1) Select [Job Handling]. (1) (2) Select the retention setting. Click the [Retention] checkbox . Select the retention method in "Retention Settings". To simplify operation the next time the same password is set, click the (lock) button after entering the password (5 to 8 digit number). (3) Select document filing settings. Select the folder for storing the file in "Document Filing Settings".
5 PERFORMING PRINTING AT THE MACHINE When you do not have the printer driver installed on your computer, or when the software application used to open a file that you wish to print is not available, you can print directly to the machine without using the printer driver. The file types (and corresponding extensions) that can be printed directly are shown below.
DIRECTLY PRINTING A FILE ON AN FTP SERVER When an FTP server is configured in the machine's Web pages, you can specify and print a file on the FTP server from the operation panel of the machine. This saves you the trouble of downloading the file and printing it from a computer. To configure FTP server settings, click [Application Settings] and then [FTP Print Settings] in the Web page menu, and configure the settings in "FTP Print Settings from Operation Panel". (Administrator rights are required.
Cancel Print File-01.tiff Print the selected file. (1) Select print conditions. • For details on the settings, see "PRINT SETTINGS SCREEN" (page 65). • If you selected a file (PCL or PS) in step 3 that includes print settings, the settings will be applied. Paper Select Number of Prints Auto 4 1 Tandem Print (1 9999) Output Fit To Page 2-Sided (2) Touch the [Print] key. Quick File Print (1) Printing begins. When the message "Job stored. ..." appears in the touch panel, touch the [OK] key.
Touch the key of the file that you wish to print. USB Memory File or Folder Name File-01.tiff • The icon appears to the left of keys of files that can be printed. • The icon is displayed to the left of keys of folders in the USB memory. To display the files and folders in a folder, touch the key of the folder. 1 Folder01 1 File-02.tiff File-03.tiff Folder02 File-04.tiff 3 File-05.tiff • A total of 100 keys of files and folders can be displayed. • Touch the key to move up one folder level.
PRINT SETTINGS SCREEN The print settings screen for printing a file on an FTP server or a file in USB memory connected to the machine is explained below. Cancel Print File-01.tiff (5) Paper Select (1) Auto 1 (2) (3) (4) (1) (6) Number of Prints Tandem Print (1 9999) Output Fit To Page 2-Sided Quick File (5) [Paper Select] key (6) [Output] key (7) [Fit To Page] checkbox If you do not wish to use the Fit To Page function, make sure this checkbox is not selected .
DIRECTLY PRINTING FROM A COMPUTER Settings can be configured in the Web pages of the machine to enable direct printing from a computer without using the printer driver. SUBMIT PRINT JOB You can specify a file to be printed directly without using the printer driver. In addition to a file on your computer, this procedure can be used to print any file that can be accessed from your computer, such as a file on another computer connected to the same network.
E-MAIL PRINT An e-mail account can be configured in the machine to have the machine periodically check your mail server and automatically print received e-mail attachments without using the printer driver. • Configuring settings To use E-mail Print, you must first configure an e-mail account in the machine. To configure an account, click [Application Settings] and then [E-mail Print Settings] in the Web page menu. (Administrator rights are required.
PRINTING AN ENCRYPTED PDF FILE Encrypted PDF is used to protect a PDF file by requiring the entry of a password to print or edit the file. To directly print an encrypted PDF file on an FTP server or in a USB memory device connected to the machine, follow the steps below to enter the password and begin printing. The PS3 expansion kit is required to use this function. Press the [JOB STATUS] key. JOB STATUS 1 (1) (3) Scan to Print Job Job Queue 2 (2) (1) Touch the [Print Job] tab.
GIVING A PRINT JOB PRIORITY/CANCELING A PRINT JOB GIVING A PRINT JOB PRIORITY When the machine is busy copying or printing a received fax or other job, you can give priority to a print job that is waiting to be printed and print it ahead of the other jobs. Press the [JOB STATUS] key. JOB STATUS 1 (2) (1) Print Job Job Queue 2 Scan to (1) Touch the [Print Job] tab.
CANCELING A PRINT JOB A job being printed, a job waiting to be printed, or a spooled job can be canceled. Press the [JOB STATUS] key. JOB STATUS 1 (2) (1) Print Job Job Queue Scan to (1) Touch the [Print Job] tab.
CHANGING TO ANOTHER PAPER SIZE AND PRINTING WHEN PAPER RUNS OUT If printing stops because the machine ran out of paper, or if the size of paper specified in the printer driver is not loaded in the machine, a message will appear in the touch panel. Printing will begin automatically when the [OK] key is touched and paper is loaded in the machine. If you wish to print on paper in another tray because the desired size of paper is not immediately available, follow the steps below. Press the [JOB STATUS] key.
6 SYSTEM SETTINGS This chapter explains the system settings for the printer function that can be configured by general users. For information on configuring the system settings, see the User's Guide. For system settings that require administrator rights, see the Administrator's Guide. ACCESSING THE SYSTEM SETTINGS Make sure that the machine is in the standby state and then press the [SYSTEM SETTINGS] key on the operation panel.
SYSTEM SETTINGS LIST When the system settings are accessed with general rights, the following items appear. Depending on the machine specifications and peripheral devices installed, it may not be possible to use some settings.
PRINTER CONDITION SETTINGS The Printer Condition Settings are used to configure basic printer settings and settings for printing from a DOS application. To configure the settings, touch the [Printer Condition Settings] key. PRINTER DEFAULT SETTINGS The default settings are used to set advanced print conditions for printing in an environment where the print driver is not used (such as printing from MS-DOS or from a computer that does not have the provided print driver installed).
*1 Only effective when a finisher or saddle stitch finisher is installed. *2 This setting is used to adjust the line width of vector graphics. Except for CAD and other specialized uses, there is normally no need to change this setting. Information on the selections is shown in "Selections for the line thickness setting" (Table below). *3 Paper sizes that can be used with this function are 11" x 17", 8-1/2" x 14", 8-1/2" x 11", A3, B4, and A4. (This function may not take effect with some print methods.
7 TROUBLESHOOTING This chapter provides solutions to possible printing problems. See the following table of contents to locate the appropriate page for your question or problem. PROBLEMS RELATED TO PRINTING OPERATION • Printing does not take place.. . . . . . . . . . . . . . . . . . . . . . . . . . . . . . . . . . . . . . . . . . . . . . . . . . . . . . . . . 77 • Two-sided printing does not take place. . . . . . . . . . . . . . . . . . . . . . . . . . . . . . . . . . . . . . . . . . . . . . . . .
PROBLEMS RELATED TO PRINTING OPERATION Problem Point to check Solution Printing does not take place. Is your computer connected correctly to the machine? Make sure that the cable is connected securely to the LAN connector or the USB connector on your computer and the machine. If you are on a network, check the connections at the hub as well. Is the machine connected to the same network (LAN, etc.) as your computer? The machine must be connected to the same network as your computer.
Problem Point to check Solution Printing does not take place. Is the machine specified correctly in the software application that you are using for printing? Make sure that the printer driver of the machine is selected in the Print window of the application. If the printer driver does not appear in the list of available printer drivers, it may not be installed correctly. Remove the printer driver and then install it once again.
PROBLEMS RELATED TO PRINT RESULTS Problem Point to check Solution The image is grainy. Are the printer driver settings appropriate for the print job? (Windows) The resolution can be set to [1200 x 1200 dpi] or [600 x 600 dpi] at the time of printing. If you need a finely detailed image, select [1200 x 1200 dpi]. The resolution setting is selected in the [Advanced] tab of the printer driver properties window. The image is too light or too dark.
Problem The image is upside down. Many nonsense characters are printed. Point to check Solution Are you using a type of paper (tab paper, punch paper, etc.) that can only be loaded in a fixed orientation? When the image size and paper size are the same but the orientations are different, the orientation of the image is automatically rotated to match the paper. However, when the paper can only be loaded in a fixed orientation, this may result in the image being printed upside down.
PRINTER DRIVER SPECIFICATIONS 8 PRINTER DRIVER SPECIFICATION LIST PCL6 PCL5e PS Windows PPD*1 Macintosh PPD*1 1-9999 1-9999 1-9999 1-9999 1-9999 Yes Yes Yes Yes Yes 2,4,6,8,9,16 2,4,6,8,9,16 2,4,6,8,9,16 2,4,6,9,16*2,3 2,4,6,9,16 Order Selectable Selectable Selectable Selectable Selectable Border On/Off On/Off On/Off No Selectable 2-Sided Print Yes Yes Yes Yes Yes Fit To Page Yes Yes Yes No Yes*4 Selectable Selectable Selectable No Yes*5 Staple*6 Yes Yes
PCL6 PCL5e PS Windows PPD*1 Macintosh PPD*1 Different Paper Yes Yes Yes No Yes*10 Transparency Inserts Yes Yes Yes No Yes Carbon Copy Yes Yes Yes No No Tab Printing Yes Yes*11 Yes*11 No No Chapter Inserts Printing Yes No No No No Paper Fold Print Yes Yes Yes Yes Yes Reverse Order Print Yes Yes Yes Yes Yes Tandem Print Yes Yes Yes Yes Yes*5 Retention Yes Yes Yes No Yes*5 Document Filing Yes Yes Yes No Yes*5,12 Image Adjustment Yes No Yes No
Printer Guide MODEL: MX-M850 MX-M950 MX-M1100 SHARP ELECTRONICS CORPORATION Sharp Plaza, Mahwah, New Jersey 07430-1163. www.sharpusa.com SHARP ELECTRONICS OF CANADA LTD.
MODEL: MX-M850 MX-M950 MX-M1100 Image Send Guide
TABLE OF CONTENTS ABOUT THIS MANUAL . . . . . . . . . . . . . . . . . . . . . . . . 5 • MANUALS PROVIDED WITH THE MACHINE . . . 6 1 3 SENDING AN IMAGE IN SCAN MODE . . . . . . . . . . . 36 • CHANGING THE SUBJECT, FILE NAME, REPLY-TO, AND BODY TEXT. . . . . . . . . . . . . . . 40 BEFORE USING THE IMAGE SEND FUNCTION SENDING AN IMAGE IN USB MEMORY MODE. . . . 43 • ENTERING A FILE NAME . . . . . . . . . . . . . . . . . . 47 IMAGE SEND FUNCTION OF THE MACHINE . . . . . .
4 5 SPECIAL MODES SPECIAL MODES . . . . . . . . . . . . . . . . . . . . . . . . . . . 87 SPECIAL FAX FUNCTIONS CALLING A FAX MACHINE AND INITIATING RECEPTION (Polling) . . . . . . . . . . . . . . . . . . . . . . . 122 • INITIATING POLLING RECEPTION MANUALLY . . . . . . . . . . . . . . . . . . . . . . . . . . . . 124 STORING FAX OPERATIONS (Program). . . . . . . . . 90 ERASING PERIPHERAL SHADOWS ON THE IMAGE (Erase) . . . . . . . . . . . . . . . . . . . . . . . . . . . . . .
6 9 RECEPTION FUNCTIONS SYSTEM SETTINGS RECEIVING AN INTERNET FAX . . . . . . . . . . . . . . . 148 • RECEIVING INTERNET FAXES MANUALLY . . 149 ACCESSING THE SYSTEM SETTINGS . . . . . . . . . 172 RECEIVING FAXES . . . . . . . . . . . . . . . . . . . . . . . . . 150 • FAX RECEPTION MODES . . . . . . . . . . . . . . . . 151 • RECEIVING A FAX MANUALLY . . . . . . . . . . . . 151 ADDRESS CONTROL . . . . . . . . . . . . . . . . . . . . . . . 174 • ADDRESS BOOK . . . . . . . . . . . . . . . . . . . . . . .
ABOUT THIS MANUAL This manual explains the procedures for using image send function (scan mode, USB memory mode, Internet fax mode, fax mode and data entry mode) on the machine. Required expansion kits To use each mode of the image send function, the expansion kits below are required. The explanations in this manual assume that all expansion kits are installed.
MANUALS PROVIDED WITH THE MACHINE Printed manuals and manuals stored in PDF format on the machine's hard drive are provided with the machine. When using the machine, read the appropriate manual for the feature you are using. Printed manuals Manual name Contents Safety Guide This manual contains instructions for using the machine safely and lists the specifications of the machine and its peripheral devices.
1 BEFORE USING THE IMAGE SEND FUNCTION This chapter provides information that you should know before using the image send function of the machine. To use the image send function of the machine, an expansion kit is required for each mode. See "Required expansion kits" (page 5). IMAGE SEND FUNCTION OF THE MACHINE The image send function of the machine can be used to send a scanned document by a variety of different methods. The modes and transmission methods that can be used are explained below.
USB memory mode ☞SENDING AN IMAGE IN USB MEMORY MODE (page 43) USB Memory Scan The scanned file is sent to and stored in a USB memory device connected to the machine. Internet fax mode ☞SENDING A FAX IN INTERNET FAX MODE (page 48) Internet fax transmission The scanned file is sent as an Internet fax. Reception of Internet faxes is also possible. Fax mode ☞SENDING AN IMAGE IN FAX MODE (page 54) Fax transmission This mode is used to send and received faxes.
PREPARATIONS FOR USING THE IMAGE SEND FUNCTION MAKE SURE THE MAIN POWER SWITCH IS IN THE "ON" POSITION The main power is "on" when the main power indicator on the right side of the operation panel is lit. If the main power indicator is not lit, the main power is "off". Switch the main power switch to the "on" position and press the [POWER] key ( ) on the operation panel.
STORING SENDER INFORMATION Before using Scan to E-mail Store a default sender name in "Sender Name" and a reply e-mail address in "Reply E-mail Address". These will be used when a sender is not selected. System Settings (Administrator): Default Sender Set This is used to store the sender name and e-mail address that is used when a sender is not selected. Before using the Internet fax function Store a sender name in "Sender Name" and a sender Internet fax address in "Own Address".
STORING DESTINATION ADDRESSES FOR EACH SCAN MODE IN THE ADDRESS BOOK To use Scan to FTP, Scan to Desktop, and Scan to Network Folder, destinations must be stored in the address book. Although destinations for Scan to E-mail, Internet fax, and fax do not need to be stored in the address book (they can be entered directly or looked up in a global address book at the time of transmission), storing these types of destinations in the address book makes it easy to select them.
STORING A DESTINATION FOR SCAN TO DESKTOP To store your computer in the machine as a destination for Scan to Desktop, Network Scanner Tool must be installed from the "Sharpdesk/Network Scanner Utilities" CD-ROM that accompanies the network scanner expansion kit. To scan an image to your computer, Network Scanner Tool must be running on your computer. INSTALLING NETWORK SCANNER TOOL To install Network Scanner Tool, see the "Sharpdesk Installation Guide" that accompanies the network scanner expansion kit.
PREPARATIONS FOR FAX To use the machine as a fax, the telephone line must be connected and the type of line set. Connection to the telephone line Be sure to use the provided telephone line cord to connect the machine to the wall telephone jack. Connect the end of the line cord that has the core to the "LINE" jack on the machine. Insert the other end (the end without the core) into a telephone line jack. Click! Core "LINE" jack Insert the end of the cord with the core into the "LINE" jack.
Setting the telephone line type The machine's dial mode setting must be set to the type of telephone line you are using. If the setting is not correct, dialing will not be possible. Touch the [Auto Select] key in "Dial Mode Setting" in the system settings (administrator). The machine will automatically set the dial mode to the type of line you are using. You can also set the "Dial Mode Setting" manually.
BASE SCREEN Scan mode, USB memory mode, Internet fax mode, and fax mode are used by selecting operations and settings in the base screens of those modes. To display the base screen of a mode, touch the [IMAGE SEND] key in the touch panel and then touch the tab of the mode that you wish to use. The screen that initially appears when the [IMAGE SEND] key is touched varies depending on what peripheral devices have been installed. The screen that initially appears can be changed in the system settings.
BASE SCREEN This screen is used to select settings and operations in each mode. Base screen of scan mode (1) (2) (3) (4) IMAGE SEND COPY DOCUMENT FILING (1) Resend Internet Fax Fax Address Book Original (5) Address Entry Exposure (6) Send Settings Resolution 200X200dpi Address Review File Format PDF File Color Mode Mono2 Quick File Special Modes (7) MANUAL FINISHING Ready to send. Scan Base screen of USB memory mode Scan: Auto Data Entry Auto (2) (9) (3) USB Mem.
(8) (14) [I-Fax Manual Reception] key key Touch this key to receive an Internet fax manually. ☞ RECEIVING INTERNET FAXES MANUALLY (page 149) Touch this key to specify a destination using a search number*. * 3-digit number assigned to a destination when it is stored. ☞ USING A SEARCH NUMBER TO RETRIEVE A DESTINATION (page 28) (9) (15) [Direct TX] key Touch this key to send a fax by direct transmission. When the [Direct TX] key is not highlighted, normal transmission (memory TX mode) is selected.
Customizing displayed keys Special mode keys and other keys can be displayed in the base screen. Set these keys to functions that you frequently use to access the functions with a single touch. The customized keys are configured using "Customize Key Setting" in the Web pages. The following keys appear by factory default: • [Address Review] key Touch this key to display a list of the destinations that have been selected in the address book.
ADDRESS BOOK SCREEN This screen is used to select transmission destinations.
• For information on storing addresses in the address book, see "STORING DESTINATION ADDRESSES FOR EACH SCAN MODE IN THE ADDRESS BOOK" (page 11). • To store destinations for Scan to Desktop, Network Scanner Tool must be installed from the CD-ROM that accompanies the network scanner expansion kit. For more information on storing destinations for Scan to Desktop, see "STORING A DESTINATION FOR SCAN TO DESKTOP" (page 12).
Index display Indexes make it easy to search for a destination (one-touch key). Destinations are grouped on alphabetical index tabs. To display a stored destination, touch the appropriate index tab. It is convenient to store frequently used destinations in the [Frequent Use] index. Specify that a destination be displayed in the [Frequent Use] index when you store the destination.
IMAGE SEND SEQUENCE This section explains the basic procedure for sending an image. Select settings in the order shown below to ensure smooth transmission. For the detailed procedures for selecting the settings, see the explanation of each setting in this manual. Place the original. Place the original in the document feeder tray of the automatic document feeder, or on the document glass.
Select settings Scan Internet Fax Address Book Original Address Entry Exposure Fax Data Entry Auto Scan: Auto 8½x11 USB Mem. Scan Send: Auto Text Send Settings Resolution 200X200dpi Address Review File Format PDF File Color Mode Mono2 Quick File Special Modes PDF Settings can be selected for scanning the original.
ORIGINAL SIZES TRANSMITTABLE ORIGINAL SIZES The following original sizes can be transmitted Minimum original size Using the automatic document feeder 5-1/8" (height) x 5-1/2" (width) (131 mm (height) x 140 mm (width)) Using the document glass – Maximum original size 11" (height) x 31-1/2"* (width) (297 mm (height) x 800 mm* (width)) 11" (height) x 17" (width) (297 mm (height) x 432 mm (width)) * A long original can be transmitted. (The original will be scanned in Mono2.
2 ENTERING DESTINATIONS This chapter explains how to specify destination addresses, including selecting an address from the address book and retrieving an address by entering a search number. RETRIEVING A DESTINATION FROM THE ADDRESS BOOK The address book screen shows stored destinations as one-touch keys. The destinations are displayed in order by search number. To make it easy to find a destination, the destinations are grouped by name on alphabetical index tabs.
RETRIEVING A DESTINATION A destination is retrieved by selecting its one-touch key. Scan 1 Internet Fax Address Book Original Address Entry Exposure Fax Data Entry Auto Scan: Auto Send Settings Resolution 200X200dpi File Format PDF File Color Mode Mono2 Quick File Special Modes 5 10 15 Condition Settings Specify the destination.
CHECKING AND DELETING THE SELECTED DESTINATIONS When multiple destinations have been selected, you can display and check the destinations. You can also delete a destination from the list (cancel selection of the destination). 5 10 15 Condition Settings Address Review 1 To Touch the [Address Review] key.
USING A SEARCH NUMBER TO RETRIEVE A DESTINATION A destination stored in the address book can be retrieved using the of the modes or in the address book screen. Scan Address Book 1 Internet Fax Original Fax Scan: Address Entry Exposure Send Settings Resolution 200X200dpi Address Review File Format PDF File Color Mode Mono2 Quick File Special Modes Auto Data Entry Auto 8½x11 Send: USB Mem. Scan key. This can be done in the base screen of any Touch the key.
ENTERING AN ADDRESS MANUALLY Destination addresses for Scan to E-mail and Internet fax can be entered manually. For manual entry (using the numeric keys) of fax destinations, see "ENTERING FAX NUMBERS" (page 34). Display the address input screen.
RETRIEVING A DESTINATION FROM A GLOBAL ADDRESS BOOK To use a global address book on the network to which the machine is connected, configure LDAP server settings in the Web pages. This will allow you to retrieve and use destinations that have been stored in the global address book. Open the global address search screen. (2) 5 10 15 Condition Settings (1) Touch the [Address Book] key in the base screen.
(2) To Condition Settings Address Review Search Again XXX Select the destination. (1) (1) Touch the key of the desired destination. Cc If no names are found that match the search characters, a message will appear. Touch the [OK] key to close the message and touch the [Search Again] key to search again. Detail XXX AAA AAA@xx.xxx.com XXX BBB BBB@xx.xxx.com XXX CCC CCC@xx.xxx.com XXX DDD DDD@xx.xxx.com XXX EEE EEE@xx.xxx.com XXX FFF FFF@xx.xxx.com 1 2 Address Book (2) Touch the [To]* key.
Storing a destination from a global address book in the machine's address book A destination from a global address book can be stored in the machine's address book as a one-touch key. Touch the [Detail] key in the search results screen of the global address book (the screen of step 3 on page 31) to display information on the selected destination. Touch the [Register] key in the detailed information screen and then touch the item to be used ([E-mail], [Internet Fax], or [Fax]).
USING THE RESEND FUNCTION The destinations of the most recent 8 transmissions by Scan to E-mail, Internet fax and/or fax are stored. One of these can be selected to resend to that destination. Ready to send. Internet Fax Scan Address Book 1 Resend Original Fax Scan: Address Entry Exposure Send Settings Resolution 200X200dpi Address Review File Format PDF File Color Mode Mono2 Quick File Special Modes Auto Data Entry Auto 8½x11 USB Mem.
ENTERING FAX NUMBERS ENTERING A FAX NUMBER WITH THE NUMERIC KEYS Enter the destination fax number with the numeric keys. Take care to enter the correct number. If an incorrect number is entered... Press the [CLEAR] key ( ) to clear the number and then enter the correct number. Entering a pause between digits of the number Enter a pause after the number used to dial out from a PBX (for example, after "0"), or after the country code when dialing an international number.
CHAIN DIALING Number sequences entered with the numeric keys and/or one-touch keys can be linked together with pauses and dialed as a single number. Use chain dialing to dial a long number (such as an international number) when the country code and/or area code are stored separately in one-touch keys.
3 TRANSMITTING AN IMAGE SENDING AN IMAGE IN SCAN MODE This section explains the basic procedure for transmission in scan mode (Scan to E-mail, Scan to FTP, Scan to Desktop, and Scan to Network Folder). When a default address is configured in "Default Address Setting" in the system settings (administrator), the mode cannot be changed, the destination cannot be changed, and destinations cannot be added.
(4) 5 10 15 Condition Settings Address Review (3) Specify the destination. (2) To (1) Touch the [Address Book] key in the base screen. Cc AAA AAA BBB BBB CCC CCC DDD DDD 1 2 Address Entry EEE EEE FFF FFF Global Address Search GGG GGG HHH HHH III III JJJ JJJ Frequent Use ABCD EFGHI JKLMN OPQRST (2) Touch the one-touch key of the desired destination. The icon on the key indicates the type of destination stored in the key.
(1) Scan Size Auto 8½x11 To enable the original to be scanned in the correct orientation (the orientation of the top edge of the original that is shown at the top of the display), specify the orientation in which the original was placed in step 1. 100% Send Size Auto Image Orientation 4 Specify the orientation in which the original is placed. OK Scan/Original 2-Sided Booklet (2) (1) Touch the appropriate orientation key. If the top edge of the original is up, touch the key.
6 If the original was placed on the document glass, replace it with the next original and press the [START] key ( ). Repeat until all originals have been scanned. Touch the [Read-End] key. Place next original. (Pg.No.x) Press [Start]. When finished, press [Read-End]. Configure A beep will sound to indicate that the operation is completed. Open the automatic document feeder and remove the original.
CHANGING THE SUBJECT, FILE NAME, REPLY-TO, AND BODY TEXT The subject, file name, reply-to, and body text can be changed when performing a scan transmission. Preset items can be selected or text can be directly entered. • When performing Scan to FTP, Scan to Desktop, or Scan to Network Folder, only the file name is used. • If the subject and file name are not changed, the settings in the Web page are used.
Subject To change the file name, touch the [File Name] key. OK Send Settings • The file name is entered in the same way as the subject. • If you are sending to a Scan to FTP, Scan to Desktop, or Scan to Network Folder destination, go to step 9. Sub: Schedule coordination meeting File Name 4 Reply-To Body Text Add 'Reply to' to Cc Subject File Name To change "Reply-To", touch the [Reply-To] key.
Subject 7 To change the body text, touch the [Body Text] key. OK Send Settings Sub: Schedule coordination meeting File Name Material for planning meeting Reply-To AAA AAA Body Text Add 'Reply to' to Cc Clear All Body Entry Enter the body text and touch the [OK] key. OK Thank you for your continuous support. We have attached scanned data, which you have requested. • To select a pre-set message previously stored in the Web page, touch the [Pre-Set Select] key.
SENDING AN IMAGE IN USB MEMORY MODE Follow the steps below to send a scanned image to a commercially available USB memory device that has been connected to the machine. This stores the file in the USB device. • Consult your dealer or retailer for USB memory devices that can be used. • When a default address is configured in "Default Address Setting" in the system settings (administrator), the mode cannot be changed.
(2) Scan Internet Fax Original File Name Exposure (1) Fax Scan: Auto Resolution 200X200dpi File Format PDF Color Mode Mono2 Data Entry Auto 8½x11 USB Mem. Scan Send: Auto Text Switch to USB memory mode and display the image settings screen. (1) Touch the [USB Mem. Scan] tab (2) Touch the [Original] key. PDF Special Modes 3 • When scanning to USB memory, there is no need to specify the destination.
Press the [START] key ( ). Scanning begins. • If the original is placed on the document glass, the [Read-End] key appears in the touch panel. If the original is only one page, go to step 7. To scan more pages, go to the next step. • If the original was inserted in the document feeder tray, a beep will sound when scanning is completed and transmission will take place. Go to step 8. Do not disconnect the USB memory until "Sending data has been completed." appears in the touch panel.
When "Sending data has been completed." appears in the touch panel, disconnect the USB memory. 8 Do not disconnect the USB memory while "Processing data." or "Sending data." appears in the touch panel. • When transmission to USB memory is completed, "Sending data has been completed." is displayed. After a brief interval the message is cleared and the base screen of image send mode reappears. (The base screen of image send mode is the screen that appears when the [IMAGE SEND] key is touched.
ENTERING A FILE NAME The file name can be directly entered when performing a scan transmission. • If the file name is not entered, the settings in the Web page are used. • For the procedure for entering text, see "7. ENTERING TEXT" in the User's Guide. Scan Internet Fax Original File Name Exposure Fax Scan: Auto Resolution 200X200dpi File Format PDF Color Mode Mono2 Data Entry Auto Send: USB Mem. Scan Auto Text PDF Special Modes File Name: Planning meeting Touch the [File Name] key.
SENDING A FAX IN INTERNET FAX MODE When a default address is configured in "Default Address Setting" in the system settings (administrator), the mode cannot be changed, the destination cannot be changed, and destinations cannot be added. To switch to Internet fax mode, touch the [Cancel] key in the touch panel and follow the steps below. Place the original. Place the original face up in the document feeder tray, or face down on the document glass.
(1) Scan 3 Display the original settings screen. (2) Internet Fax Address Book Original Address Entry Exposure Fax Scan: Data Entry 8½x11 Auto USB Mem. Scan Auto Send: (1) Make sure that Internet fax mode is selected. If Internet fax mode is not selected, touch the [Internet fax] tab. Auto Send Settings Resolution 200X100dpi Address Review File Format TIFF-F File Special Modes (2) Touch the [Original] key.
Touch the [Read-End] key. Place next original. (Pg.No.x) Press [Start]. When finished, press [Read-End]. Configure A beep will sound to indicate that the operation is completed. Open the automatic document feeder and remove the original. Read-End 7 • If no action is taken for one minute after the confirmation screen appears, scanning automatically ends and the transmission is reserved.
CHANGING THE SUBJECT, FILE NAME, AND BODY TEXT The subject, file name, and body text can be changed when performing an Internet fax transmission. Preset items can be selected or text can be directly entered. • If the subject and file name are not changed, the settings in the Web page are used. • Selections for the subject, file name, and body text are configured by clicking [Application Settings] and then [Network Scanner Settings] in the Web page menu. • For the procedure for entering text, see "7.
OK Send Settings Subject To change the file name, touch the [File Name] key. The file name is entered in the same way as the subject. Sub: Schedule coordination meeting File Name 4 Body Text OK Send Settings Subject File Name To change the body text, touch the [Body Text] key. Sub: Schedule coordination meeting Material for planning meeting 5 Body Text Clear All Body Entry OK Thank you for your continuous support. We have attached scanned data, which you have requested.
OK Send Settings Subject Touch the [OK] key. Sub: Schedule coordination meeting File Name Material for planning meeting Body Text Thank you for your continuous support. We have attached sca 7 When storing pre-set text for the subject and file name in the Web pages, up to 80 characters can be entered.
SENDING AN IMAGE IN FAX MODE When a default address is configured in "Default Address Setting" in the system settings (administrator), the mode cannot be changed, the destination cannot be changed, and destinations cannot be added. To switch to Internet fax mode, touch the [Cancel] key in the touch panel and follow the steps below. MEMORY TRANSMISSION MODE Normally this mode is used. The originals will be scanned into memory and then transmitted (memory transmission).
(2) Scan Address Book Internet Fax Original Display the original settings screen. (1) Fax Scan: Direct TX Exposure Auto Sub Address Resolution Standard Address Review Special Modes Data Entry Auto 8½x11 USB Mem. Scan Send: (1) Make sure that fax mode is selected. If fax mode is not selected, touch the [Fax] tab. Auto (2) Touch the [Original] key.
Touch the [Read-End] key. Place next original. (Pg.No.x) Press [Start]. When finished, press [Read-End]. Configure A beep sounds. Open the automatic document feeder and remove the original. Read-End 7 • If no action is taken for one minute after the confirmation screen appears, scanning automatically ends and the transmission is reserved. • The [Configure] key can be touched to change the exposure, resolution, scan size, and send size for each original page scanned.
DIRECT TRANSMISSION MODE If you wish to send a fax ahead of other previously reserved fax transmissions, use direct transmission mode. The original is transmitted directly to the receiving fax machine without being scanned into memory. When direct transmission mode is used, transmission will begin as soon as the transmission in progress is completed (ahead of any previously reserved transmissions). When sending a fax from the document glass in direct transmission mode, only one page can be transmitted.
(2) Scan Address Book Direct TX 3 (3) Internet Fax Original Change to direct transmission mode and display the original settings screen. (1) Fax Scan: Exposure Auto Sub Address Resolution Standard Address Review Special Modes Data Entry Auto 8½x11 USB Mem. Scan Send: Auto (1) Make sure that fax mode is selected. If fax mode is not selected, touch the [Fax] tab. (2) Touch the [Direct TX] key. (3) Touch the [Original] key.
TRANSMISSION USING THE SPEAKER When the speaker is used to dial, the fax is sent after the number is dialed and the connection is established. If a person answers, you will be able to hear his or her voice, but you will not be able to speak. When the speaker is used and the original is sent from the document glass, only one original page can be sent per transmission. Place the original. Place the original face up in the document feeder tray, or face down on the document glass.
(1) Specify the orientation in which the original is placed. (2) OK Fax/Original Scan Size Auto When specifying the orientation of the image to be transmitted, specify the orientation of the original placed in step 1. 100% Send Size Auto 8½x11 3 (1) Touch the appropriate orientation key. If the top edge of the original is up, touch the the top edge of the original is to the left, touch the Image Orientation 2-Sided Booklet 2-Sided Tablet key. If key. (2) Touch the [OK] key.
FAX DESTINATION CONFIRMATION MODE The fax destination confirmation mode displays a destination confirmation message when a fax transmission is performed to prevent accidental transmission to the wrong destination. This function is enabled in the system settings (administrator). When the function is enabled, a message will appear to confirm the destination when the [START] key ( ) is pressed to begin fax transmission. The message that appears will vary depending on the method used to specify the destination.
WHEN THE LINE IS BUSY If the line is busy when you send a fax, transmission will be re-attempted automatically after a preset interval. This function only operates in memory transmission mode. In direct transmission mode or manual transmission mode, the transmission will be canceled. Wait briefly and then try sending the fax again. To cancel transmission... Cancel the transmission from the job status screen.
SENDING THE SAME IMAGE TO MULTIPLE DESTINATIONS (Broadcast Transmission) The same scanned image can be sent to multiple scan modes (Scan to E-mail, Scan to FTP, and Scan to Desktop), Internet fax mode, and fax mode destinations in a single operation. Up to 500 destinations (including a combined maximum of 200 Scan to FTP and Scan to Desktop destinations) can be selected in one broadcast operation.
(3) 5 10 15 Condition Settings Specify the destination. (2) To Cc AAA AAA BBB BBB CCC CCC DDD DDD Address Entry EEE EEE FFF FFF Global Address Search GGG GGG HHH HHH III III JJJ JJJ Address Review 1 2 (2) Touch the one-touch key of the desired destination. (3) Touch the [To] key. The destination is specified. Frequent Use EFGHI ABCD JKLMN OPQRST UVWXYZ (4) Repeat steps (2) and (3) until all destinations are selected.
4 001 AAA AAA 002 BBB BBB 003 KKK KKK 004 LLL LLL 005 MMM MMM 006 NNN NNN 007 OOO OOO 008 PPP PPP 009 QQQ QQQ 010 RRR RRR 011 SSS SSS 012 TTT TTT To Check the destinations and then touch the [OK] key. OK Address Review 1 2 Cc If the transmission includes Cc or Bcc destinations, touch the [Cc] tab or the [Bcc] tab to check those destinations. To cancel a specified destination... Touch the one touch-key of the destination that you wish to cancel.
BROADCAST TRANSMISSIONS THAT INCLUDE INTERNET FAX OR FAX DESTINATIONS When performing a broadcast transmission that includes mixed scan mode, Internet fax mode, and fax mode destinations, note the following: The orientation of Internet fax mode or fax mode is given priority. When "Rotation Sending Setting" is enabled in the system settings (administrator), the image is rotated 90 degrees. For this reason, in some cases the image may not be displayed in the correct orientation.
(1) (2) Print Job Scan to Address 3 Internet Fax Fax Job Start Time Pages Status Broadcast0001 10:00 04/04 010/003 NG000000 Broadcast0002 10:05 04/04 001/001 Send OK Broadcast0003 10:22 04/04 004/004 Send OK DDD DDD 10:30 04/04 010/010 Send OK Job Queue 1 Complete 1 Display details on the broadcast transmission. (1) Touch the key of the completed broadcast transmission. (2) Touch the [Detail] key. Detail Call "Broadcastxxxx" will appear as the address of the broadcast job key.
IMAGE SETTINGS Settings for scanning the original are selected in the base screen of each mode. The current state of each setting appears to the right of the key used to select the setting.
AUTOMATICALLY SCANNING BOTH SIDES OF AN ORIGINAL (2-Sided Original) The automatic document feeder can be used to automatically scan both sides of an original. Scan transmission 2-sided original Front and reverse sides are scanned Select the mode and display the image settings screen. 1 (1) Touch the tab of the mode that you wish to use. (2) Touch the [Original] key.
SPECIFYING THE ORIGINAL SCAN SIZE AND SEND SIZE (Enlarge/Reduce) When the original is placed, its size is automatically detected and displayed in the base screen. The size of the placed original is indicated as the scan size, and the size to be transmitted is indicated as the send size.
Specifying the original scan size (by paper size) If you place a non-standard size original or wish to change the scan size, you must touch the [Original] key and specify the original size manually. Follow the steps below after placing the original in the document feeder tray or on the document glass. Select the mode and display the image settings screen. (1) Touch the tab of the mode that you wish to use. 1 (2) Touch the [Original] key.
Specifying the original scan size (by numerical values) When scanning a non-standard size original such as a card, follow these steps to specify the original size. The width can be from 2-1/2" to 17" (64mm to 432mm), and the height can be from 2-1/2" to 11-5/8" (64mm to 297mm). Select the mode and display the image settings screen. (1) Touch the tab of the mode that you wish to use. 1 (2) Touch the [Original] key. The automatically detected original size appears to the right of the [Original] key.
OK Scan/Original Touch the [OK] key. The specified size appears in the [Scan Size] key. Scan Size X17 Y11 Send Size Auto 5 Image Orientation 2-Sided Booklet 2-Sided Tablet • When the scan size is specified by numerical values, the send size cannot be specified. • When the automatic document feeder is used, an original longer than 17" (432mm) can be scanned (maximum width 31-1/2" (800mm)). In this case, touch the [Long Size] key in the screen of step 3.
Specifying the send size of the image Specify the send size as a paper size. If a send size bigger than the scan size is selected, the image will be enlarged. If a send size smaller than the scan size is selected, the image will be reduced. • The send size cannot be specified when [Long Size] is selected for the scan size, or when the scan size is specified by numerical values. • The send size cannot be specified when [TIFF-S] is selected for the format in Internet fax mode.
(2) OK Scan/Original Scan Size Auto (1) Touch the "Image Orientation" key with the same orientation as the original image. 129% Send Size 8½x11 Specify the orientation in which the original is placed. 11x17 If this setting is not correct when sending an image with a changed ratio, a suitable image may not be transmitted. 4 Image Orientation 2-Sided Booklet (2) Touch the [OK] key.
CHANGING THE EXPOSURE AND EXPOSURE MODE (ORIGINAL IMAGE TYPE) The exposure can be changed to match the darkness of the original. In scan mode and USB memory mode, the exposure mode can be set to match the original type. Refer the following tables to select appropriate settings. How to select the exposure Exposure When to select Auto This setting automatically adjusts the exposure for light and dark parts of the original. Manual 1-2 Select this setting when the original consists of dark text.
Select the exposure and original image type. Scan mode, USB memory mode (1) (2) (3) (4) OK Scan/Exposure (1) Touch the [Manual] key. (2) Adjust the exposure with the When the exposure is set to [Auto], the keys cannot be used. The exposure darkens when the key is touched, and lightens when the key is touched. To return to auto exposure adjustment, touch the [Auto] key. Auto Original Image Type Manual 1 3 5 Text Text/ Prtd.
CHANGING THE RESOLUTION The resolution can be selected to match the characteristics of the original, such as text or photo, the size of the text, and the darkness of the image. ☞ Scan mode, USB memory mode, Internet fax mode (see below) Fax mode (page 80) Scan mode, USB memory mode, Internet fax mode Select the mode and display the image settings screen. 1 (1) Touch the tab of the mode that you wish to use. (2) Touch the [Resolution] key. ☞ IMAGE SETTINGS (page 68) Select the resolution.
How to select the resolution For normal text originals, 200X200dpi (200X100dpi in Internet fax mode) produces an image that is sufficiently legible. For photos and illustrations, a high resolution setting (600X600dpi, etc.) will produce a sharp image. However, a high resolution setting will result in a large file, and if the file is too large, transmission may not be possible. In this event, reduce the number of pages scanned or take other measures to decrease the file size.
Fax mode Switch to fax mode and display the resolution settings screen. 1 (1) Touch the [Fax] tab. (2) Touch the [Resolution] key. ☞ IMAGE SETTINGS (page 68) (1) (2) Fax/Resolution OK Select the resolution. (1) Touch the key of the desired resolution. (2) Touch the [OK] key. Standard Fine 2 Super Fine Half Tone Ultra Fine When [Fine], [Super Fine], or [Ultra Fine] is selected, the [Half Tone] key can be touched to select halftone.
CHANGING THE FILE FORMAT You can change the file format when sending an image. ☞ Scan mode, USB memory mode (see below) Internet fax mode (page 84) This function cannot be used in fax mode. Scan mode, USB memory mode The file format (file type and compression mode/compression ratio) for sending a scanned image can be changed at the time of transmission. In addition, if the scanned originals are divided into separate files, the number of pages per file can be changed.
Set the format. ● Scanning in Mono2 (1) (1) Select the file type. (2) OK Scan/File Format File Type PDF (2) Select the compression mode. Compression Mode TIFF None Encrypt PDF MH (G3) Programmed MMR (G4) B/W Specified Pages per File Color/Gray (1-99) ● Scanning in color/grayscale (2) 3 (3) (1) Touch the indicated key to select [Color/Gray] mode. (1) OK Scan/File Format File Type When [Color/Gray] is highlighted, [Color/Gray] mode is selected.
(3) OK Scan/File Format File Type To change the number of pages per file, enter the number of pages and exit the format settings. Compression Ratio PDF TIFF Low Encrypt PDF JPEG Medium B/W High Programmed Specified Pages per File 1 4 (1-99) Color/Gray (1) Touch the [Specified Pages per File] checkbox so that a checkmark appears. (2) Set the number of pages per file with the keys. (3) Touch the [OK] key.
Internet fax mode The file format for sending an Internet fax is normally set to [TIFF-F]. If the destination Internet fax machine does not support full mode (it only supports simple mode), follow the steps below to select [TIFF-S]. Switch to Internet fax mode and display the file format settings screen. 1 (1) Touch the [Internet Fax] tab. (2) Touch the [File Format] key. ☞ IMAGE SETTINGS (page 68) (1) (2) OK Internet Fax/File Format Select the file format. (1) Touch the key of the desired format.
CHANGING THE COLOR MODE This procedure is used to change the color mode used to scan the original when the [START] key ( ) is pressed. • This function cannot be used in Internet fax mode and in fax mode. • The [Color Mode] key will only appear if the color expansion kit has been installed. Mode Auto Scanning method Grayscale The machine detects whether the original is color or black and white and automatically selects full color or black and white (Mono2 or Grayscale) scanning.
SENDING A COMPUTER FILE PC-I-Fax (When the Internet fax expansion kit is installed) PC-Fax (When the facsimile expansion kit is installed) A file on a computer can be sent via the machine as an Internet fax (PC-I-Fax function). Internet faxes are sent using the PC-I-Fax function in the same way as documents are printed. Select the PC-Fax driver as the printer driver for your computer and then select the Print command in the software application.
4 SPECIAL MODES This chapter explains special modes that can be used in scan send mode. SPECIAL MODES When the [Special Modes] key is touched in the base screen, the special modes menu screen appears. The special modes menu consists of two screens. Touch the key to switch between the two screens. When the [OK] key is touched in the special modes screen, the selected settings are entered and the base screen reappears.
Internet fax mode 1st screen 2nd screen OK Internet Fax/Special Modes (1) (2) Program (4) Timer (7) Job Build (10) Original Count (3) (5) (8) 2in1 Mixed Size Original (11) (13) Dual Page Scan Erase (6) Card Shot (9) OK Internet Fax/Special Modes Verif.
[OK] key and [Cancel] key In some cases two [OK] keys and one [Cancel] key will appear in the special mode screens. The keys are used as follows: Scan/Special Modes Cancel Erase OK (A) OK (B) (C) Edge Erase Center Erase Edge+Center Erase Edge 1/2 (0 1) inch Side Erase (A) Enter the selected special mode setting and return to the base screen. (B) Enter the selected special mode setting and return to the special modes menu screen.
STORING FAX OPERATIONS (Program) A destination, original settings, and functions can be stored in a program. When you wish to use those settings to send an image, they can be retrieved with ease. For example, suppose 8-1/2" x 11" (A4) size documents are scanned into a file and sent to each branch office once a month.
1 Place the original. Place the original in the document feeder tray or on the document glass as appropriate for the functions stored in the program. Select the special modes. 2 (1) Touch the [Special Modes] key. (2) Touch the [Program] key. ☞ SPECIAL MODES (page 87) (1) Retrieve the stored program. (2) (1) Touch the desired program key. OK Program (2) Touch the [OK] key.
ERASING PERIPHERAL SHADOWS ON THE IMAGE (Erase) The erase function is used to erase shadows on images produced when scanning thick originals or books. (This function erases the parts of the image where shadows tend to form. The function does not detect shadows and erase only the shadows.) Scanning a thick book Not using the erase function Using the erase function Shadows appear here Shadows appear in the image. No shadows appear.
Select the special modes. If the base screen is not displayed, touch the [Condition Settings] key. (1) Make sure that the desired mode is selected. If the desired mode is not selected, touch the tab of that mode. 3 (2) Touch the [Special Modes] key. (3) Touch the [Erase] key. ☞ SPECIAL MODES (page 87) When you return to the base screen after specifying the destination, the base screen of the mode of the specified destination appears. (1) (2) (3) Select the erase settings.
Press the [START] key ( 5 ). Scanning begins. • If you inserted the original pages in the document feeder tray, all pages are scanned. A beep will sound to indicate that scanning is finished. • If you are scanning the original on the document glass, scan each page one page at a time. When scanning finishes, place the next original and press the [START] key ( ). Repeat until all pages have been scanned and then touch the [Read-End] key. A beep will sound to indicate that scanning is finished.
SENDING AN ORIGINAL AS TWO SEPARATE PAGES (Dual Page Scan) The left and right sides of an original can be scanned as two separate pages. This function is useful when you wish to successively scan each page of a book or other bound document. Example: Faxing the left and right pages of a book Book or bound document The pages are scanned and transmitted as two separate pages.
Specify the destination. ☞ 2. ENTERING DESTINATIONS (page 25) 2 When scanning to USB memory in USB memory mode, there is no need to specify the destination. Go to step 3. Select the special modes. If the base screen is not displayed, touch the [Condition Settings] key. (1) Make sure that the desired mode is selected. If the desired mode is not selected, touch the tab of that mode. 3 (2) Touch the [Special Modes] key.
Touch the [Read-End] key. Place next original. (Pg.No.x) Press [Start]. When finished, press [Read-End]. Configure Read-End 7 The [Configure] key can be touched to change the exposure, resolution and scan size for each original page scanned. The send size cannot be changed. To cancel scanning... Press the [STOP] key ( ) to cancel the operation. • To erase shadows caused by the binding of a book or other bound document, use the erase function.
SENDING A FAX AT A SPECIFIED TIME (Timer) This function lets you specify a time at which a transmission or broadcast transmission will automatically take place. Transmission begins automatically at the specified time. For fax, this function is convenient for performing a transmission reservation or broadcast transmission when you are not present or at night when telephone charges are less expensive. A timer setting can also be specified for polling reception to receive a fax when you are not present.
(1) (2) Set the time with the (3) (1) Specify the day. OK Scan/Special Modes Cancel Timer If you do not wish to specify the day, select [---]. In this case, transmission will begin when the time specified in (2) arrives. OK Time Day of the Week 10 hh. 00 keys. (2) Specify the time (hour, minute) mm. Select the time in 24-hour format. 4 (3) Touch the [OK] key. When this screen is opened, the setting will show the current time.
WHITENING FAINT COLORS IN THE IMAGE (Suppress Background) This feature is used to suppress light background areas. Level [+] The lightness level at which suppression takes place can be adjusted. Level [-] • This function cannot be used in Internet fax mode and in fax mode. • To use this function, the color expansion kit must be installed. • When using USB memory mode, connect the USB memory device to the machine before performing the procedure below. 1 Place the original.
Select the special modes. If the base screen is not displayed, touch the [Condition Settings] key. (1) Make sure that the desired mode is selected. If the desired mode is not selected, touch the tab of that mode. 3 (2) Touch the [Special Modes] key. (3) Touch the [Suppress Background] key. Read the message that appears and then touch the [OK] key.
SENDING BOTH SIDES OF A CARD AS A SINGLE PAGE (Card Shot) This function lets you send the front and reverse sides of a card as a single page, without the need to send each side separately. Transmitted image Originals Front Transmission Back Example of an 8-1/2" x 11" (A4) size portrait scan transmission Example of an 8-1/2" x 11" (A4) size landscape scan transmission • When using card shot, the original must be placed on the document glass.
Select the special modes. If the base screen is not displayed, touch the [Condition Settings] key. (1) Make sure that the desired mode is selected. If the desired mode is not selected, touch the tab of that mode. 3 (2) Touch the [Special Modes] key. (3) Touch the [Card Shot] key. ☞ SPECIAL MODES (page 87) When you return to the base screen after specifying the destination, the base screen of the mode of the specified destination appears. (A) (1) Specify the original size.
Turn the card over so that the back is face down, and press the [START] key ( ) to scan the back of the card. The back of the card will be scanned using the same color mode as the front. 6 Before scanning the back of the card, you can touch the [Configure] key in the touch panel to change the exposure. To cancel scanning... Press the [STOP] key ( ) to cancel the operation. Touch the [Read-End] key. Place next original. (Pg.No.x) Press [Start]. When finished, press [Read-End].
SENDING A LARGE NUMBER OF PAGES (Job Build) This function lets you separate an original consisting of numerous pages into sets, scan each set using the automatic document feeder, and transmit the pages in a single transmission. Use this function when the number of originals that you wish to scan exceeds the maximum number of sheets that can be inserted in the automatic document feeder at once. When scanning originals that are separated into sets, scan the set that has the first page first.
(1) Dual Page Scan Program Erase Timer Suppress Background (2) Touch the [OK] key. 1 Job Build Original Count Card Shot 2 Slow Scan Mode Mixed Size Original File Quick File Press the [START] key ( 5 (1) Touch the [Job Build] key so that it is highlighted. OK Scan/Special Modes 4 Select job build mode. (2) To cancel scanning... Press the [STOP] key ( ) to scan the first original. ) to cancel the operation. Insert the next set of originals and press the [START] key ( ).
TRANSMITTING ORIGINALS OF DIFFERENT SIZES (Mixed Size Original) This feature lets you send originals of different sizes at the same time; for example, 8-1/2" x 14" (B4) size originals mixed together with 11" x 17" (A3) size originals. When scanning the originals, the machine automatically detects the size of each original.
Select the special modes. If the base screen is not displayed, touch the [Condition Settings] key. (1) Make sure that the desired mode is selected. If the desired mode is not selected, touch the tab of that mode. 3 (2) Touch the [Special Modes] key. ☞ SPECIAL MODES (page 87) When you return to the base screen after specifying the destination, the base screen of the mode of the specified destination appears. Select the mixed size original setting.
SCANNING THIN ORIGINALS (Slow Scan Mode) Use this function when you wish to scan thin originals using the automatic document feeder. This function helps prevent thin originals from misfeeding. A A B C D B C D When using USB memory mode, connect the USB memory device to the machine before performing the procedure below. Insert the originals face up in the document feeder tray. Adjust the original guides slowly. 1 If the originals are inserted with too much force, they may crumple and misfeed.
(1) (1) Touch the [Slow Scan Mode] key so that it is highlighted. OK Scan/Special Modes 4 Select slow scan mode. (2) Program Erase Timer Suppress Background Dual Page Scan (2) Touch the [OK] key. 1 Job Build Original Count Card Shot Slow Scan Mode Mixed Size Original File 2 Quick File Press the [START] key ( ). Scanning begins. A beep will sound to indicate that scanning is finished. 5 To cancel scanning... Press the [STOP] key ( ) to cancel the operation.
CHECKING THE NUMBER OF SCANNED ORIGINAL SHEETS BEFORE TRANSMISSION (Original Count) The number of scanned original sheets can be counted and displayed before transmission. Checking the number of scanned original sheets before transmission helps prevent transmission mistakes. • This function cannot be used in USB memory mode. • The setting can be enabled separately for each mode. Insert the originals face up in the document feeder tray. Insert the originals all the way into the document feeder tray.
Press the [START] key ( ). Scanning begins. 5 To cancel scanning... Press the [STOP] key ( ) to cancel the operation. All scanned data will be cleared. (A) (B) XX pages of original have been scanned. Send the scanned data? Cancel 6 (P.x) OK When scanning ends, check the number of original sheets scanned and touch the [OK] key. Transmission will begin. • When Job Build mode is used, the confirmation message will appear after the [Read-End] key is touched.
STAMPING SCANNED ORIGINALS (Verif. Stamp) This function stamps each original that is scanned using the automatic document feeder, allowing you to verify that all originals were correctly scanned. Position of stamp Originals are scanned Originals An "O" mark is stamped in fluorescent pink. • To use this function, the optional stamp unit must be installed. • When using USB memory mode, connect the USB memory device to the machine before performing the procedure below.
(2) (1) Scan/Special Modes Select "Verif. Stamp". (3) (1) Touch the screens. OK Verif. Stamp keys to switch through the (2) Touch the [Verif. Stamp] key so that it is highlighted. 4 (3) Touch the [OK] key. Press the [START] key ( ). Scanning begins. A beep will sound to indicate that scanning is finished. 5 To cancel scanning... Press the [STOP] key ( ) to cancel the operation. • When two-sided scanning is selected, the front side of the original is stamped twice.
SENDING TWO PAGES AS A SINGLE PAGE (2in1) Two original pages can be reduced to half their original size and sent together as a single page. Portrait-oriented originals A B C D Landscape-oriented originals Transmission A C B D Transmission AB CD AB CD This function can be used in Internet Fax mode and fax mode. Place the original. When placing the originals, orient them as shown below. Originals Document feeder tray Document glass Place the originals face up. Place the originals face down.
2 Specify the destination. ☞ 2. ENTERING DESTINATIONS (page 25) Select the special modes. If the base screen is not displayed, touch the [Condition Settings] key. (1) Make sure that the desired mode is selected. If the desired mode is not selected, touch the tab of that mode. 3 (2) Touch the [Special Modes] key. ☞ SPECIAL MODES (page 87) When you return to the base screen after specifying the destination, the base screen of the mode of the specified destination appears.
Specify the orientation in which the original is placed. (2) OK Internet Fax/Original Scan Size Auto (1) Touch the "Image Orientation" key with the same orientation as the original image. 100% Send Size 8½x11 Auto If this setting is not correct, a suitable image may not be transmitted. 6 Image Orientation 2-Sided Booklet (2) Touch the [OK] key. 2-Sided Tablet (1) Press the [START] key ( 7 ). Scanning begins.
CHANGING THE PRINT SETTINGS FOR THE TRANSACTION REPORT (Transaction Report) A transaction report is automatically printed out to alert you when a transmission fails or when a broadcast transmission is performed. The transaction report contains a description of the transmission (date, start time, name of other party, time required, number of pages, result, etc.). ☞ INFORMATION APPEARING IN THE RESULT COLUMN (page 170) This function can be used in Internet Fax mode and fax mode.
(1) (1) Select the print conditions. OK Internet Fax/Special Modes Cancel Transaction Report Always Print Select print conditions. (2) Print at Error OK (2) Touch the [OK] key. Do not Print Print Original Image 4 • The print conditions for a transaction report are as follows: "Always Print": A transaction report is printed no matter whether the transmission succeeds or fails. "Print at Error": A transaction report is printed when transmission fails.
ADDING YOUR SENDER INFORMATION TO FAXES (Own number sending) Your sender information (date, time, sender name, sender fax number, number of pages) is automatically added to the top of each fax page you transmit. Example of the sender information printed APR/04/2010/Sun 3:00 PM AAAAA FAX No. 0123456789 P.001/001 (1) (1) (2) (3) (4) (2) (3) (4) Date, time: The date and time of transmission. Sender name: The sender name programmed in the machine.
TEMPORARILY CHANGING THE FAX SENDER INFORMATION (Own Name Select) You can select the sender information printed on a transmitted fax from a list of stored senders. Select the special modes. (1) Touch the [Fax] tab. 1 (2) Touch the [Special Modes] key. (3) Touch the keys to switch through the screens. (4) Touch the [Own Name Select] key. ☞ SPECIAL MODES (page 87) (1) Cancel Own Name Select Select the sender information. (2) (1) Touch the desired sender information key. OK (2) Touch the [OK] key.
5 SPECIAL FAX FUNCTIONS This chapter explains special functions for fax, including polling, F-code communication, and using an extension phone. The explanations in this chapter assume that fax mode has been selected (the [Fax] tab has been selected in the send mode selection tabs). CALLING A FAX MACHINE AND INITIATING RECEPTION (Polling) The Polling function allows the receiving machine to call the transmitting machine and initiate reception of a document in that machine.
Enter the destination fax number. ☞ 2. ENTERING DESTINATIONS (page 25) 2 • Multiple fax numbers can be entered. Polling will take place in the order that the numbers were entered. Polling multiple machines is called "Serial Polling". Up to 500 fax numbers can be entered. In this procedure, one-touch keys that have a sub-address and passcode cannot be used. • To enter multiple fax numbers, touch the [Next Address] key after entering a fax number and enter the next fax number.
INITIATING POLLING RECEPTION MANUALLY • Make sure that an original is not placed in the machine when using the polling reception function. • This function cannot be used to poll multiple machines (serial polling). (3) Telephone mode. 5 10 15 (1) Touch the [Speaker] key. Resend Speaker To Condition Settings Enter the destination fax number. (1) You will hear the dial tone through the machine's speaker.
SENDING A FAX WHEN ANOTHER MACHINE POLLS YOUR MACHINE (Polling Memory) Sending a document that has been scanned into memory when another machine polls your machine is called "Polling Memory". Prior to polling, the document that will be faxed to the other machine must be scanned into a polling memory box. This function can only be used when the other machine is Super G3 or G3 compatible and has a polling function. (1) Requests fax transmission.
SCANNING A DOCUMENT INTO POLLING MEMORY Follow these steps to scan a document into the memory box for polling transmission (Public Box). A document cannot be scanned into the Public Box while it is in use for communication. 1 Place the original. Place the original face up in the document feeder tray, or face down on the document glass. Select the special modes. (1) Touch the [Special Modes] key. 2 ☞ SPECIAL MODES (page 87) (2) Touch the keys to switch through the screens.
Memory Box - Data Store Memory Box List Original Scan: Exposure Auto Resolution Standard Auto 8½x11 Send: Auto Select image settings and special modes. Special Modes 6 Auto Reception Fax Memory:100% • A program, timer setting, transaction report, polling, and document filing cannot be selected. • To return to the screen of step 4, touch the [Memory Box List] key. Press the [START] key ( 7 ). Scanning begins.
PRINTING A DOCUMENT STORED IN THE PUBLIC BOX To check a document stored in the Public Box for polling transmission, follow the steps below to print the document. Document data in the Public Box cannot be printed while the Public Box is in use for communication. Select the special modes. (1) Touch the [Special Modes] key. 1 ☞ SPECIAL MODES (page 87) (2) Touch the keys to switch through the screens. (3) Touch the [Memory Box] key.
DELETING A DOCUMENT FROM THE PUBLIC BOX Delete a document from the Public Box when it is no longer needed. Document data in the Public Box cannot be deleted while the Public Box is in use for communication. Select the special modes. (1) Touch the [Special Modes] key. 1 ☞ SPECIAL MODES (page 87) (2) Touch the keys to switch through the screens. (3) Touch the [Memory Box] key. Confidential Reception Polling Memory 2 Data Store Touch the [Delete Data] key.
F-CODE COMMUNICATION Exchange of confidential documents (confidential communication), retrieval (polling) and distribution (polling memory) of information, distribution of information to multiple destinations (relay broadcast transmission) are possible with other machines that support F-code communication. An F-code* is specified in each communication, enabling a higher level of security. *F-code is a communication function based on the G3 standard of the ITU-T.
CREATING MEMORY BOXES IN THE MACHINE FOR F-CODE COMMUNICATION Before the F-code communication function can be used, special memory boxes must be created using "F-Code Memory Box" in the system settings. A box name and F-code (sub-address and passcode) are programmed in each box, and an F-code communication function is assigned to each box. After you have created a memory box, inform the other party of the sub-address and passcode of the box.
CONFIDENTIAL COMMUNICATION USING F-CODES By sending a fax to an F-code memory box (confidential) in the receiving machine (your machine or the other machine), the sender can direct the transmission specifically to the user of the box. This is convenient for sending sensitive documents that you do not wish people other than the recipient to see, or when the receiving machine is shared by multiple departments. To print an F-code confidential fax, the print passcode must be entered.
F-CODE CONFIDENTIAL TRANSMISSION Follow the steps below to send a confidential fax by adding an F-code to the fax number. 1 Place the original. Place the original face up in the document feeder tray, or face down on the document glass. Enter the destination fax number.
PRINTING A FAX RECEIVED BY F-CODE CONFIDENTIAL RECEPTION When an F-code confidential fax is sent to your machine, the fax is received to the memory box specified by the F-code. To print the received fax, enter the print passcode. The machine rings and the fax is received. Beep A beep sounds when reception ends. 1 Select the special modes. (1) Touch the [Special Modes] key. 2 ☞ SPECIAL MODES (page 87) (2) Touch the keys to switch through the screens. (3) Touch the [Memory Box] key.
Enter the print passcode with the numeric keys. Enter PIN via the 10-key. As each digit is entered, "-" changes to " ". 5 Cancel Take care to enter the correct print passcode. If you make a mistake, a message will appear and you will return to the entry screen. You can touch the [Cancel] key to return to step 4. 6 Press the [START] key ( ). • The confidential fax is automatically given priority in the print job queue. • The fax is automatically cleared from the memory box after printing.
POLLING RECEPTION USING F-CODES This function enables your machine to call another machine and initiate reception of a fax stored in an F-code memory box (polling memory) in the other machine. During the polling operation, your machine must correctly specify the F-code (sub-address and passcode) configured in the other machine or polling reception will not take place.
Enter the destination fax number. (2) 5 10 15 Condition Settings AAA AAA BBB BBB CCC CCC DDD DDD Address Entry EEE EEE FFF FFF Global Address Search GGG GGG HHH HHH Sub Address III III JJJ JJJ Address Review 1 2 Frequent Use Sort Address 2 (1) Touch the [Address Book] key in the base screen. Cc To ABCD EFGHI (2) Touch the one-touch key of the desired destination. If the destination is not stored in the address book, enter the fax number with the numeric keys.
POLLING MEMORY TRANSMISSION USING F-CODES When your machine receives a transmission request from another machine, this function sends a fax stored in an F-code memory box (polling memory) in your machine to that machine. The other machine must correctly specify the F-code configured in your machine or transmission will not take place. The document to be transmitted must be scanned into an F-code polling memory box.
Confidential Reception Polling Memory 3 Data Store Touch the [Data Store] key. Exit Memory Box Print Data Print Data Delete Data Back Memory Box - Data Store Public Box 4 Box 1 Box 2 Box 3 Box 4 Box 5 Box 6 Box 7 Box 8 Box 9 Box 10 Box 11 Box 12 Touch the key of the F-code memory polling box. 1 2 (1) (2) OK Memory Box - Data Store 5 Specify the number of polling times. (1) Touch the key for the desired number of times.
Press the [START] key ( 7 ). Scanning begins. • If you inserted the original pages in the document feeder tray, all pages are scanned. • If you are scanning the original on the document glass, scan each page one page at a time. When scanning finishes, place the next original and press the [START] key ( ). Repeat until all pages have been scanned and then touch the [Read-End] key. To cancel scanning... Press the [STOP] key ( ) while the original is being scanned.
PRINTING A DOCUMENT STORED FOR F-CODE POLLING TRANSMISSION You can check a document in an F-code memory polling box by printing it out. A document in a memory box cannot be printed while the document is being transmitted. Select the special modes. (1) Touch the [Special Modes] key. 1 ☞ SPECIAL MODES (page 87) (2) Touch the keys to switch through the screens. (3) Touch the [Memory Box] key. Confidential Reception Polling Memory 2 Data Store Touch the [Print Data] key.
DELETING A DOCUMENT STORED FOR F-CODE POLLING TRANSMISSION When a document in an F-code memory polling box is no longer needed, follow the steps below to delete it. A document in a memory box cannot be deleted while the document is being transmitted. Select the special modes. (1) Touch the [Special Modes] key. 1 ☞ SPECIAL MODES (page 87) (2) Touch the keys to switch through the screens. (3) Touch the [Memory Box] key. Confidential Reception Polling Memory 2 Touch the [Delete Data] key.
RELAY REQUEST TRANSMISSION USING F-CODES This function is used to send a fax to an F-code relay broadcast memory box in another machine and have that machine relay the fax to multiple end receiving machines. When the end receiving machines are far from your machine, sending the fax to a relay machine that is close to the end receiving machines can help reduce phone charges. A relay request transmission can be used in combination with the timer transmission function to further reduce phone costs.
Enter the destination fax number. (2) 5 10 15 Condition Settings AAA AAA BBB BBB CCC CCC DDD DDD Address Entry EEE EEE FFF FFF Global Address Search GGG GGG HHH HHH Sub Address III III JJJ JJJ Address Review 1 2 Frequent Use Sort Address 2 (1) Touch the [Address Book] key in the base screen. Cc To ABCD EFGHI (2) Touch the one-touch key of the desired destination. If the destination is not stored in the address book, enter the fax number with the numeric keys.
RELAY BROADCAST TRANSMISSION USING F-CODES When your machine receives an F-code relay request transmission, the fax is received to an F-code relay broadcast memory box in your machine. Your machine then relays the fax to each of the end receiving machines programmed in the memory box. Transmission to the end receiving machines takes place automatically. The fax is transmitted to each of the end receiving machines programmed in the F-code relay broadcast memory box.
USING AN EXTENSION PHONE This section explains how to use an extension phone to make voice calls and receive a fax after talking with the other party. CONNECTING AND USING AN EXISTING PHONE (Extension Phone Connection) You can connect an existing extension phone to the machine. The phone can be used for voice calls and to start fax reception on the machine.
RECEIVING A FAX AFTER ANSWERING A CALL ON THE EXTENSION PHONE (Remote Reception) Follow the steps below if you need to start fax reception after answering a call and speaking on the extension phone. If you are on a pulse-dial (rotary) line, set the extension phone to issue tone signals. For details on receiving faxes, see "RECEIVING FAXES" (page 150). When you hear ringing, answer the call on the extension phone. 1 Signal the machine to start fax reception.
6 RECEPTION FUNCTIONS This chapter explains how to receive faxes and Internet faxes, and how to use the forwarding functions. RECEIVING AN INTERNET FAX The Internet fax function periodically* connects to the mail server (POP3 server) and checks whether or not Internet faxes have been received. When faxes have been received, the faxes are automatically retrieved and printed. * The factory default setting is once every 5 minutes.
RECEIVING INTERNET FAXES MANUALLY If the interval for checking for received faxes is somewhat long and you wish to check immediately, you can manually initiate reception. Touch the [I-Fax Manual Reception] key to connect to the mail server and retrieve received faxes. Scan Address Book Internet Fax Original Fax Scan: Address Entry Exposure Send Settings Resolution 200X100dpi Address Review File Format TIFF-F File Special Modes Data Entry Auto Send: USB Mem.
RECEIVING FAXES To have the machine automatically receive and print faxes, set the reception mode to "Auto Reception". If faxes will be received at night, keep the main power switch in the "on" position. Beep The machine rings and fax reception begins automatically. A beep sounds when reception ends. 1 System Settings (Administrator): Number of Calls in Auto Reception This is used to change the number of rings on which fax reception begins automatically.
FAX RECEPTION MODES The fax reception mode is shown in the base screen. Normally the reception mode should be set to "Auto Reception". Select "Manual Reception" when an extension phone is connected to the machine. Scan Internet Fax Address Book Original Fax Auto Scan: Exposure Auto Sub Address Resolution Standard Address Review Special Modes Direct TX USB Mem. Scan Data Entry Send: Auto File This shows the current fax reception mode and the amount of free memory remaining.
PRINTING A PASSWORD-PROTECTED FAX (Hold Setting For Received Data Print) "Hold Setting for Received Data Print" in the system settings (administrator) can be enabled to have faxes received to memory without being printed. To print the faxes, a password must be entered. When this function is enabled, a password entry screen appears in the touch panel when received Internet faxes or faxes are retrieved. Received data is stored. Enter password via the 10-key.
FORWARDING RECEIVED FAXES TO AN E-MAIL ADDRESS (Inbound Routing Settings) You can have received faxes and Internet faxes automatically forwarded to an e-mail address. For example, this function can be used to forward received faxes directly to a specified e-mail address without printing the faxes. The machine Forwarding Received fax • To use this function, the network scanner expansion kit must be installed. • This function cannot be used for faxes received by confidential reception.
Storing sender addresses. If you wish to have only faxes from specified addresses forwarded, store the desired sender addresses. Send addresses stored here can be selected from a list when you store a forwarding table. (1) Click [Sender Number/Address Registration] in the [Inbound Routing Settings] menu in the Web page. (2) Enter the sender address in "Internet Fax Address" or "Fax Number" as appropriate, and click the [Add to List] button.
Specifying forwarding tables to be used. To use the inbound routing function, enable the forwarding tables that you wish to use from among the stored tables. (1) Click [Inbound Routing Settings] in the Web page menu. 4 (2) Select the "Forward Activated" checkbox of each forwarding table that you wish to use. (3) Click [Submit]. To delete a forwarding table, click the checkbox next to the table name so that it is selected 155 and click [Delete].
7 METADATA DELIVERY This chapter explains metadata delivery, which can be used when the application integration module is installed. METADATA DELIVERY (Data Entry) When the application integration module is installed and an image file is generated for a scan send transmission, metadata (data indicating the attributes of the image file and how it is to be processed) can be generated based on pre-stored information and transmitted as a separate file. The metadata file is created in XML format.
PREPARATIONS FOR METADATA TRANSMISSION SETTINGS REQUIRED IN THE WEB PAGES All settings related to metadata are configured in the Web pages. (Administrator rights are required.) To configure metadata settings, click [Application Settings] and then [Metadata Settings] in the Web page menu. When configuring settings, be sure to enable metadata transmission. Storing Metadata Sets Store the items (the metadata set) that are written to the XML file that is generated during scanning.
TRANSMITTING METADATA Follow the steps below to select a metadata set, enter each item, and perform metadata transmission. (1) Scan 1 Internet Fax Fax Address Book Original Address Entry Exposure Send Settings Resolution 200X200dpi Address Review File Format PDF File Color Mode Mono2 Quick File Special Modes Scan: USB Mem. Scan Data Entry Auto Auto 8½x11 Send: Switch to data entry mode and display the metadata set screen. (1) Touch the [Data Entry] tab.
(1) Enter the selected metadata item. (2) (1) Touch the key of the value that you wish to enter. Data Entry Cancel User ID 6 4 12 OK • When the entry values of the metadata item are in the form of selections, the selections are shown as keys. When a value is editable, you can touch the [Direct Entry] key to manually enter the value. • If the metadata item requires the entry of text, a text entry screen will appear. Enter the required information.
METADATA FIELDS The following three types of metadata are included in the XML file that is transmitted. • Data automatically generated by the machine: These data are always included in the XML file and are automatically stored on your computer. • Previously defined fields: These fields are automatically recognized by the machine and assigned to appropriate XML tags. These fields are selectable, and can only be included in the XML file if enabled in the Web pages.
8 CHECKING THE STATUS OF TRANSMISSION/RECEPTION JOBS This chapter explains how to check the status of transmission jobs and reception jobs. JOB STATUS SCREEN The job status screen is displayed when the [JOB STATUS] key on the operation panel is pressed. The job status screen shows the status of jobs by mode. When the [JOB STATUS] key is pressed, the job status screen of the mode that was being used before the key was pressed appears. Reserved transmissions and received faxes are referred to as jobs here.
JOB QUEUE SCREEN AND COMPLETED JOB SCREEN The job status screen consists of two screens: the job queue screen that shows reserved jobs and the job currently in progress, and the completed jobs screen. To switch between the two screens, touch the job status screen selector key ((2) below).
Job key display The following information is shown in the job queue keys and completed job keys that appear in the job status screen. 3 AAA AAA (1) (2) (1) 10:22 04/04 000/004 Waiting (3) Displays the number (position) of the job in the job queue. When the job currently being transmitted is finished, the job moves up one position in the job queue. This number does not appear in keys in the complete screen.
• Completed job Display Status "Send OK" Transmission was completed. "In Memory" Reception completed but the fax has not been printed. (The received fax is being held by the print hold function.) "Printed" Finished printing the received fax "Forward OK" The received fax has been forwarded. "Stopped" The job was stopped. "Number of successful transmission destinations/ Total destinations OK" Broadcast transmission or serial polling completed.
OPERATION WHEN A JOB IN THE JOB QUEUE IS COMPLETED When a normal transmission job is completed, it moves to the completed jobs screen and "Send OK" appears in the status column. Reception jobs, timer transmission jobs, forwarding jobs, and retry jobs are handled as explained below in the job status screen. Received jobs While an Internet fax or a fax is being received, "Receiving" appears. When reception is completed, the job moves to the completed jobs screen and "In Memory" appears.
CHECKING A RESERVED JOB OR THE JOB IN PROGRESS (FAX MODE) The detailed contents of a broadcast transmission or serial polling job can be displayed. Select (touch) the key of the job that you wish to check and touch the [Detail] key. The job details screen will appear (see below). OK Detail Broadcast0001 Progress: Fax No.
CHECKING COMPLETED JOBS You can check a list of the destinations, the destinations for which transmission failed, and other detailed information on completed jobs that used document filing function, broadcast transmission jobs, inbound routing jobs and serial polling jobs. Touch the key of the job for which you wish to display information in the completed jobs screen and touch the [Detail] key. The job detail screen (see below) will appear.
CANCELING A JOB IN PROGRESS OR A RESERVED JOB Follow the steps below to stop a job that is being transmitted or is waiting to be transmitted. Press the [JOB STATUS] key. JOB STATUS 1 Select the job that you wish to stop. (1) Print Job Scan to Address 2 Pages (1) Touch the mode tab of the job to be stopped.
GIVING PRIORITY TO A RESERVED JOB When multiple jobs are waiting to be transmitted, the jobs are normally transmitted in the order they were reserved. If you need to give priority to a job and send it ahead of the other jobs, follow the steps below. Press the [JOB STATUS] key. JOB STATUS 1 Select the job to which you wish to give priority.
CHECKING THE ACTIVITY LOG (Image Sending Activity Report) IMAGE SENDING ACTIVITY REPORT You can have the machine print a log of recent image sending activity (date, name of other party, time required, result, etc.). The Image Sending Activity Report contains useful information such as the types of errors that occurred. The most recent 199 transactions are included in the report.
Printed transmission result messages that may appear in fax mode Message Explanation G3 Communication took place in G3 mode. ECM Communication took place in G3 ECM mode. SG3 Communication took place in Super G3 mode. Forwarding The received data was forwarded. NO RESPONSE No response from the receiving party. BUSY Transmission was not possible because the other party was already using the line. MEMORY OVER The memory became full during quick on-line transmission.
9 SYSTEM SETTINGS This chapter explains the system settings for the image send function that can be configured by general users. For information on configuring the system settings, see the User's Guide. For system settings that require administrator rights, see the Administrator's Guide. ACCESSING THE SYSTEM SETTINGS Make sure that the machine is in the standby state and then press the [SYSTEM SETTINGS] key on the operation panel.
SYSTEM SETTINGS LIST A list of the system setting items explained in this manual and the factory default settings is shown below. Depending on the machine specifications and peripheral devices installed, it may not be possible to use some settings.
ADDRESS CONTROL Select this item to store, edit, and delete one-touch keys, group keys, program keys, user indexes, and F-code memory boxes. Touch the [Address Control] key to configure the settings. • The settings that can be selected vary depending on the peripheral devices installed. • When the application integration module is installed, fax destinations can be stored even if the facsimile expansion kit is not installed. ADDRESS BOOK Destinations can be stored in the address book for easy retrieval.
Settings Item Description General items stored Address Type Select the type of address to be stored in the address book. • E-mail: Store an e-mail address in a one-touch key. • Internet Fax: Store an Internet fax address in a one-touch key. • Fax: Store a fax number in a one-touch key. • Group: Store multiple addresses as a group for a broadcast transmission. Search Number Set a search number. The lowest available number is automatically entered. To change the number, enter a number from 001 to 999.
Item Description Items that appear when a fax destination is stored Fax Number Enter the fax number of the destination (maximum of 64 digits). Entering a pause between digits of the number Touch the [Pause] key at the place where you wish to enter a pause. To enter an F-code (sub-address and passcode)... (1) Enter the destination fax number. (2) Touch the [Sub Address] key. (3) Enter the sub address (maximum of 20 digits). (4) Touch the [Passcode] key. (5) Enter the passcode (maximum of 20 digits).
CUSTOM INDEX The name of a custom index can be changed for greater ease of use. Delete the previously entered name and enter a new name (maximum of 6 characters). The factory default names for the custom indexes are "User 1" to "User 6". PROGRAM If you frequently use the same settings and/or functions to transmit to the same destination or destinations, the settings and destinations can be stored in a program. This allows the settings and destinations to be selected by simply selecting the program.
Settings Item Description Program Number Set the number to be assigned to the program. The lowest available number is automatically entered. If you wish to change the number, enter a number from 01 to 48. A number that is already in use cannot be assigned. Program Name Enter a maximum of 18 characters for the program name. Address Book Select the address(es) to be used in the program from the address book. Up to 500 destinations can be stored in one program.
F-CODE MEMORY BOX This section explains how to store memory boxes for various types of F-code communication. When the [F-Code Memory Box] key is touched, the following screen appears. System Settings Back F-Code Memory Box Add New Sort Polling Memory Box 1 Box 2 Box 3 Box 4 Box 5 Box 6 Box 7 Box 8 Box 9 Box 10 • [Add New] key Use this to add a new memory box. 1 2 • List display This displays a list of the currently stored memory boxes.
Settings Item Description Items common to all types Box Type Select the type of box. • Polling Memory: Store a memory box for F-code polling memory. The sub-address and passcode that you program in the memory box are necessary for the other machine to poll your machine (request transmission) using F-code communication. • Confidential: Store a memory box for F-code confidential reception. In addition, store a "Print PIN" in the memory box to print faxes received by confidential reception.
FAX DATA RECEIVE/FORWARD This section explains settings for reception and forwarding. Touch the [Fax Data Receive/Forward] key and configure the settings. I-FAX SETTINGS These settings can be configured when the Internet fax expansion kit is installed. Reception Start The machine will connect to your mail server (POP3 server) and check for received Internet faxes. If you have received Internet faxes, the faxes will be retrieved and printed. To use this function, POP3 server settings must be configured.
FAX SETTINGS The following items appear when the "Fax Settings" are configured. Item Description Receive Setting Set the fax reception method. • Auto Reception: When a call comes in, the machine rings and then automatically begins fax reception. • Manual Reception:This can be used when an existing extension phone is connected to the machine. Fax reception is begun by manual operation after answering on the extension phone.
10 TROUBLESHOOTING This chapter provides solutions to possible image sending problems. See the following table of contents to locate the appropriate page for your question or problem. PROBLEMS RELATED TO TRANSMISSION General problems common to all modes • Transmission does not take place. . . . . . . . . . . . . . . . . . . . . . . . . . . . . . . . . . . . . . . . . . . . . . . . . . . . 185 • A destination cannot be specified. . . . . . . . . . . . . . . . . . . . . . . . . . . . . . . . . . . . . . . .
FAX PROBLEMS Problems related to transmission • Transmission does not take place. . . . . . . . . . . . . . . . . . . . . . . . . . . . . . . . . . . . . . . . . . . . . . . . . . . . 190 • Broadcast transmission is not possible. . . . . . . . . . . . . . . . . . . . . . . . . . . . . . . . . . . . . . . . . . . . . . . . 191 • Transmission is not possible using the speaker. . . . . . . . . . . . . . . . . . . . . . . . . . . . . . . . . . . . . . . . .
PROBLEMS RELATED TO TRANSMISSION General problems common to all modes Problem Point to check Solution Did you select the correct destination? Is the correct information (e-mail address or FTP server information) stored for that destination? Make sure that the correct destination information is stored for the destination and that the destination is correctly selected.
Scan mode, USB memory mode, Internet fax mode Problem Transmission does not take place. Auto selection of the color mode does not take place correctly. (When the color expansion kit is installed.) Point to check Solution Does the image file exceed the e-mail attachment limit set in the system settings (administrator)? If your administrator has set a limit on the size of transmitted files, a file that exceeds the limit cannot be transmitted. Check with your administrator.
Problem Cannot write to USB memory. (When using USB Memory Scan.) Point to check Solution Is the USB memory device connected securely to the machine? Make sure that the USB memory device is connected securely. PROBLEMS RELATED TO SCAN RESULTS Problem Point to check Solution The scanned image is clipped. Is the original scan size setting smaller than the actual original size? Set the scan size to the actual original size.
Problem Point to check Solution The scanned image is upside down or on its side. Are Internet fax or fax destinations included? When performing a broadcast transmission that includes Internet fax or fax destinations, the transmission orientation of the Internet faxes or faxes is given priority, and thus an image file may not appear in the correct orientation on a computer. If this problem occurs, transmit to the Internet fax and fax destinations separately. The scanned image is black and white.
Problem Point to check Solution You wish to delete or edit an individual key but do not know which group key it is stored in. Are multiple group keys stored? If multiple group keys have been stored, print the Group List in "Sending Address List" in the system settings. The list will show where the key is stored. ➞ System Settings > "List Print (User)" > "Sending Address List" > "Group List" You wish to delete or edit an individual or group key but do not know which program key it is stored in.
FAX PROBLEMS Problems related to transmission Problem Transmission does not take place. Point to check Solution Is the telephone line connected securely? Check the telephone line jack, the wall jack, and any extension adapters to make sure that all connections are secure. ☞ PREPARATIONS FOR FAX (page 13) Is the correct dial mode set for your line? Ask your administrator to verify that "Dial Mode Setting" is set correctly for the line you are using.
Problem Transmission does not take place. Broadcast transmission is not possible. Point to check Solution Does the job status screen (completed jobs) or a transaction report indicate that the transmission was not successful? Perform the transmission again.
Problem The machine does not begin fax reception. Manual reception / polling reception are not possible. Point to check Solution Has the reception mode been set to "Manual Reception" in the system settings? When the reception mode is set to "Manual Reception", the machine will not receive faxes automatically. To have the machine receive faxes automatically, set the reception mode to "Auto Reception".
Problems related to telephone Problem Point to check Solution Dialing is not possible. Is the extension phone connected? Check the telephone line jack, the extension phone jack, the wall jack, and any extension adapters to make sure that all connections are secure. You cannot talk to the other party. Did you dial using the speaker? When you dial using the speaker, you will be able to hear the voice of the other party, but he or she will not hear your voice. Use the extension phone.
Image Send Guide MODEL: MX-M850 MX-M950 MX-M1100 SHARP ELECTRONICS CORPORATION Sharp Plaza, Mahwah, New Jersey 07430-1163. www.sharpusa.com SHARP ELECTRONICS OF CANADA LTD.
MODEL: MX-M850 MX-M950 MX-M1100 Document Filing Guide
TABLE OF CONTENTS ABOUT THIS MANUAL . . . . . . . . . . . . . . . . . . . . . . . . 3 • MANUALS PROVIDED WITH THE MACHINE . . . 4 3 USING STORED FILES SEQUENCE FOR USING A STORED FILE. . . . . . . . 27 1 FOLDER AND FILE SELECTION SCREENS . . . . . . 29 • FOLDER SELECTION SCREEN . . . . . . . . . . . . . 29 • FILE SELECTION SCREEN. . . . . . . . . . . . . . . . . 30 DOCUMENT FILING OVERVIEW . . . . . . . . . . . . . . . . . . . . . . . . . . . . . . . . . . 5 • TYPES OF DOCUMENT FILING . . . . . . . .
ABOUT THIS MANUAL Please note • Considerable care has been taken in preparing this manual. If you have any comments or concerns about the manual, please contact your dealer or nearest SHARP Service Department. • This product has undergone strict quality control and inspection procedures. In the unlikely event that a defect or other problem is discovered, please contact your dealer or nearest SHARP Service Department.
MANUALS PROVIDED WITH THE MACHINE Printed manuals and manuals stored in PDF format on the machine's hard drive are provided with the machine. When using the machine, read the appropriate manual for the feature you are using. Printed manuals Manual name Contents Safety Guide This manual contains instructions for using the machine safely and lists the specifications of the machine and its peripheral devices.
1 DOCUMENT FILING This chapter provides information that you should know before using the document filing function, including an overview of document filing, the features and functions of document filing, and points to keep in mind when using document filing. OVERVIEW The document filing function allows you to save the document image of a copy or image send job, or the data of a print job, as a file on the machine's hard drive. The stored file can be retrieved and printed or transmitted as needed.
USES OF DOCUMENT FILING Quickly using a file Example: You prepared handouts consisting of numerous pages for a meeting, however, another handout is needed for a newly added participant. The handout was not saved using document filing The handout was saved using document filing Ratio and special mode settings must be reselected. The stored file is simply retrieved and printed. The numerous original pages must all be rescanned. Not likely to be completed in time for the meeting...
BEFORE USING DOCUMENT FILING This section provides information that you should know before using the document filing function. Folders Three types of folders are used to store files by document filing. Folders on the hard drive Quick File Folder Main Folder Custom Folder Quick File Folder Documents scanned using the [Quick File] key are stored in this folder. A user name and file name are automatically assigned to each job. Main Folder Documents scanned using the [File] key are stored in this folder.
Approximate number of pages and files that can be stored by document filing Combined total number of pages and total number of files that can be stored in main folders and in the custom folder Number of pages*1 Example of data Black & white data (Text) Number of files Max. 45,000 Size: 8-1/2" x 11" (A4) Gray data (Text) Max. 8,000 Size: 8-1/2" x 11" (A4) Max. 3,000 Gray data (Text and photo example) Max. 3,000 Size: 8-1/2" x 11" (A4) Full color data*2 (Text and photo example) Max.
Automatic deletion of files You can have document filing data in specified folders automatically deleted at regular intervals by specifying the folders and the time. Periodic deletion of files stored in the machine helps to prevent the leaking of sensitive information and frees space on the hard drive. Every day, every week, or every month can be selected for the deletion cycle, and a time can be set for each selection. For example, you can set file deletion to take place every week on Friday at 6:00 PM.
Files When a file is saved using "File", the following information can be appended. User Name: Name 1 File Name: Meeting handout Password: 12345678 "Meeting minutes" folder Saving a file with this information allows you to distinguish it from other files. User name: Use this to specify the owner of the file. The user name must first be stored in "User List" in the system settings. File Name: A file name can be entered. Folder: Select which folder the file will be saved in.
USING DOCUMENT FILING IN EACH MODE In copy or image send mode, the original can be saved as a file on the hard drive at the same time it is copied or transmitted. In addition, Scan to HDD can be used to save the scanned data of an original to the hard drive without copying or transmitting the data. Copy mode The original is saved as an image file at the same time it is copied. (1) (1) Touch the [COPY] key. (2) DOCUMENT FILING IMAGE SEND COPY (2) Touch the [File] key or the [Quick File] key.
Scan to HDD mode The scanned original is saved as an image file. Neither printing nor transmission are performed when Scan to HDD is used. (2) COPY (1) Touch the [DOCUMENT FILING] key. (1) DOCUMENT FILING IMAGE SEND (2) Touch the [Scan to HDD] tab. MANUAL FINISHING Ready to scan to HDD. Press [Start] to scan original. File Retrieve File Information Scan to HDD Original Exposure HDD Status Scan: Auto Resolution 200X200dpi Comp.
BASE SCREEN OF DOCUMENT FILING MODE Touch the [DOCUMENT FILING] key in the touch panel to open the base screen of document filing mode. Files stored on the hard drive in the machine can be retrieved from this screen. When user authentication is used and My Folder is configured, the file selection screen of My Folder will appear. If the user that logged in does not have My Folder configured, the folder selection screen will appear.
2 SAVING FILES WITH DOCUMENT FILING This chapter explains how to save an original as an image file using the Quick File, File, and Scan to HDD functions of document filing mode. SAVING A FILE WITH "Quick File" When copying, printing or transmitting a document in copy mode, print mode, or image send mode (excluding USB memory scan mode), "Quick File" can be selected to save an image of the document to the Quick File folder.
Select copy settings and then press the [START] key ( 4 ). • Copying begins and the scanned document image is saved to the hard drive. The selected copy settings are also saved. • To prevent accidental saving of the document, the message "The scanned data is stored in the quick file folder." appears for 6 seconds (default setting) after the [START] key ( ) is pressed. The message display time can be changed using "Message Time Setting" in the system settings (administrator).
SAVING A FILE WITH "File" When copying, printing or transmitting a document in copy mode, print mode, or image send mode (excluding USB memory scan mode), "File" can be selected to save an image of the document to the Main folder or a previously created custom folder. The image can retrieved at a later time, allowing you to print or transmit the document without having to locate the original. As an example, the procedure for using "File" while copying is explained below. Place the original.
Select copy settings and then press the [START] key ( 4 ). • Copying begins and the scanned document image is saved to the hard drive. The selected copy settings are also saved. • For the procedure for placing the original, see step 4 of "SAVING A FILE WITH "Quick File"" (page 14). To cancel scanning... Press the [STOP] key ( ). When a file is stored using File without appending file information, the following user name and file name are automatically assigned to the file.
FILE INFORMATION This section explains the settings that are configured in step 3 of "SAVING A FILE WITH "File"" (page 16). Specifying a user name, file name, folder, and confidential setting makes it easier to manage and search for a file. In addition, when confidential is selected and a password is established, other people will not be able to view the file without permission. Specifying a user name File Information Cancel Touch the [User Name] key.
Assigning a file name A file name can be assigned to the file. Cancel File Information Touch the [File Name] key. OK A text entry screen will appear. Enter the file name and touch the [OK] key. A maximum of 30 characters can be entered. For the procedure for entering text, see "7. ENTERING TEXT" in the User's Guide.
Storing a file as a confidential file A password can be set for the file to prevent others from viewing it. Set a password (5 to 8 digits) with the numeric keys. (1) Enable the confidential property. (2) Cancel File Information OK (1) Select the [Confidential] checkbox so that a checkmark appears. Confidential 1 Confidential mode is enabled and a password can be entered. Password User Name Name 1 File Name file-01 Stored to: User 1 Storage Format Password (2) Touch the [Password] key.
Set the file storage format Set the format that is appropriate for the use of the file. File Information Cancel OK Cancel OK Touch the [Storage Format] key. Confidential Password 1 User Name Name 1 File Name file-01 Stored to: User 1 Storage Format Hi-Speed Print Mode Storage Format 2 Hi-Speed Print Mode Send Allowed Mode Touch the key of the desired storage format. "Hi-Speed Print Mode" or "Send Allowed Mode" can be selected for the storage format.
SAVING A DOCUMENT FILE ONLY (Scan to HDD) Scan to HDD is used to store a scanned document in the Main folder or a custom folder. Neither printing nor transmission are performed. "Scan to HDD" SCREEN The following screen appears when the [Scan to HDD] tab is touched in document filing mode. Touch the keys below to select Scan to HDD settings. The current setting of each key appears to the right of the key. COPY DOCUMENT FILING IMAGE SEND MANUAL FINISHING Ready to scan to HDD.
[Original] key When the [Original] key is touched, the following screen appears. This screen is used to change the original size and select scanning settings for 2-sided originals. (1) (2) (4) Scan to HDD/Original OK Scan Size Auto 100% Store Size 8½x11 Auto Original Image Orientation 2-Sided Booklet 2-Sided Tablet (3) (1) Touch the [Scan Size] key.
[Color Mode] key Touch the [Color Mode] key to open the color mode setting screen for Scan to HDD. Scan to HDD/Color Mode Color Mode OK Auto Storage Format of Mono2 Full Color Hi-Speed Print Mode Grayscale Send Allowed Mode Mono2 The following settings can be selected for the scanning color when the [START] key ( Mode ) is pressed.
Special modes screen for Scan to HDD When the [Special Modes] key is touched, the following screen appears. For more information on each setting, see "4. SPECIAL MODES" in the Image Send Guide. OK Scan to HDD/Special Modes (1) (2) Erase (4) Special Modes (7) (1) Job Build (5) (5) [Erase] key [Dual Page Scan] key [Card Shot] key This function lets you store the front and reverse sides of a card as a single file.
PERFORMING "Scan to HDD" Place the original. Place the original face up in the document feeder tray, or face down on the document glass. 1 (4) COPY (2) (1) (3) DOCUMENT FILING IMAGE SEND MANUAL FINISHING (1) Touch the [DOCUMENT FILING] key. Ready to scan to HDD. Press [Start] to scan original. File Retrieve File Information Scan to HDD Original Exposure 2 HDD Status Comp. Ratio Medium 8½x11 Store: Text Auto 200X200dpi (2) Touch the [Scan to HDD] tab.
3 USING STORED FILES This chapter explains how to retrieve a file stored by document filing and print or transmit the file. SEQUENCE FOR USING A STORED FILE This section explains the basic procedure for retrieving and using a stored file. The screens and procedures differ depending on whether or not user authentication is enabled. See the sequence that applies to your situation. For information on user authentication procedures, see "USER AUTHENTICATION" in the User's Guide.
Select the file that you wish to retrieve. File Retrieve Scan to HDD HDD Status Ex Data Access Search Main Folder File Name User Name Back Date 1 file-01 Name 1 04/04/2010 file-02 Name 2 04/04/2010 file-03 Name 3 04/04/2010 file-04 Name 4 04/04/2010 file-05 Name 5 04/04/2010 All Files Filter by Job 2 • Select the folder in the folder selection screen. When the folder is selected, the files in the folder will appear. Select the file that you wish to retrieve.
FOLDER AND FILE SELECTION SCREENS To use a file stored by document filing, the folder and file must be selected. The folder selection screen and file selection screen are explained below. FOLDER SELECTION SCREEN Two different screens appear depending on whether or not user authentication is enabled on the machine.
FILE SELECTION SCREEN The file selection screen of the Quick File folder, Main folder, and custom folders is explained below. (1) (2) File Retrieve Scan to HDD (3) HDD Status Ex Data Access Search Main Folder File Name (4) User Name Back Date 1 file-01 Name 1 04/04/2010 file-02 Name 2 04/04/2010 file-03 Name 3 04/04/2010 file-04 Name 4 04/04/2010 file-05 Name 5 04/04/2010 All Files Filter by Job Batch Print (5) (1) (6) File keys (4) The stored files are displayed.
SELECTING A FILE This section explains how to select a file to be used. (2) Select the folder that contains the file you wish to use. (1) COPY IMAGE SEND DOCUMENT FILING File Retrieve Scan to HDD HDD Status MANUAL FINISHING (1) Touch the [DOCUMENT FILING] key. The folder selection screen will appear. If a different tab appears, touch the [File Retrieve] tab.
JOB SETTINGS SCREEN When a file key is touched, the following screen appears. Touch the key of the operation that you wish to perform and select settings. (1) File Retrieve Scan to HDD HDD Status Ex Data Access Cancel Job Settings Search Main Folder Back file-01 File Name User Name (2) Date Name 1 8½x11 B/W Select the job.
PRINTING A STORED FILE A file stored using document filing can be retrieved and printed when needed. The settings used when the file was stored are also stored, and thus the file can be printed again using those settings. The file can also be modified before printing by changing the print settings. After selecting the desired file, follow the steps below. ☞ SELECTING A FILE (page 31) Cancel Job Settings file-01 Name 1 8½x11 Touch the [Print] key. B/W Select the job.
PRINT SETTINGS SCREEN Cancel Job Settings / Print file-01 Name 1 8½x11 B/W Paper Select (1) Auto 1 (2) (3) (4) (1) (5) Number of Prints (1 9999) (7) Special Modes (5) [Paper Select] key key Use these keys to set the number of copies. The number of copies can also be set with the numeric keys. [Output] key (6) [Print and Delete the Data] key Printing begins when this key is touched. When printing is finished, the file will be automatically deleted.
BATCH PRINTING All files in a folder that have the same user name and password can be printed at once. Search User 1 File Name User Name Touch the [Batch Print] key. Back To batch print only the files of a certain job type, touch the [Filter by Job] tab to change the displayed files, and touch the [Batch Print] key.
Cancel Batch Print User 1/ All Files User Name 4 Enter the password with the numeric keys (5 to 8 digits) and touch the [OK] key. Only files that have the same password will be selected. If you do not wish to enter a password, go to the next step. Name 1 Password Delete the Data Print and Delete the Data Print and Save the Data User 1/ Change PRT.No.
SENDING A STORED FILE A file stored by document filing can be retrieved and transmitted whenever needed. The settings used when the file was stored are also stored, and thus the file can be transmitted using those settings. If needed, you can also change the transmission settings to modify the retrieved file. After selecting the desired file, follow the steps below. ☞ SELECTING A FILE (page 31) Cancel Job Settings file-01 Name 1 8½x11 Touch the [Send] key. B/W Select the job.
SEND SETTINGS SCREEN The keys that appear in the send settings are explained below. For more information on each of the settings, see "BASE SCREEN" in the Image Send Guide. Example of scan mode (6) Ready to send. (1) (2) Scan Cancel Internet Fax Address Book (3) Address Entry (4) Send Settings file-01 F.Color Name 1 Resolution 200X200dpi File Format PDF (5) (9) B/W Send (9) Send mode tabs Touch the appropriate tab to select fax mode, scan mode, or Internet fax mode.
PROPERTIES OF STORED FILES FILE PROPERTIES A protect setting can be selected for files saved with the document filing function. This prevents a file from being moved, or automatically or manually deleted. Three properties are available for saved files: [Sharing], [Protect], and [Confidential]. When saved with the [Sharing] property, a file is not protected. When saved with the [Protect] or [Confidential] property, a file is protected. Files saved to the Quick File folder are all saved as [Sharing] files.
Restrictions on changing the property • A file that is set to "Sharing" can be changed to "Protect" or "Confidential". However, a "Sharing" file that is saved in the Quick File folder can only be changed to "Protect". • A file that is set to "Protect" can be changed to "Sharing" or "Confidential". However, a "Protect" file that is saved in the Quick File folder can only be changed to "Sharing". • A file that is saved in the Quick File folder cannot be changed to "Confidential".
MOVING A STORED FILE Use this procedure to change the location of a file (move a file to a different folder). After selecting the desired file, follow the steps below. ☞ SELECTING A FILE (page 31) Job Settings file-01 Name 1 8½x11 Cancel Touch the [Move] key. Cancel Touch the [Move to:] key. B/W Select the job. 1 Print Send Property Change Move Delete Detail Job Settings / Move file-01 Name 1 8½x11 B/W Select the folder the file is moved to.
Cancel Job Settings / Move file-01 Name 1 8½x11 Touch the [Move] key. B/W Select the folder the file is moved to. 4 File Name file-01 Move to: User 2 Move A file whose property is "Protect" cannot be moved. To move a protected file, change its property to "Sharing" or "Confidential".
DELETING A STORED FILE Stored files that are no longer needed can be deleted. Select the file that you wish to delete and touch the [Delete] key. ☞ SELECTING A FILE (page 31) Cancel Job Settings file-01 Name 1 8½x11 Touch the [Delete] key. B/W Select the job. 1 Print Send Property Change Move Delete Detail Check the file and then touch the [Yes] key. Delete the file data? 2 Name 1 file-01 No Yes A file whose property is "Protect" cannot be deleted.
RETRIEVING AND USING A FILE FROM THE JOB STATUS SCREEN Files stored using File and Quick File appear as keys in the job status complete screen. This is convenient when you need to quickly print the saved data of a copy job or quickly send a saved fax to another destination. Press the [JOB STATUS] key.
SEARCHING FOR A STORED FILE When there are many stored files, it may take time to find a file. The search function of document filing mode can be used to find a file quickly. This section explains how to search for a file or folder on the machine's hard drive. Searching is possible even when you only know part of the file name or folder name. A folder can also be specified as a search range.
(B)(D) (C) Using the user name to search (A) Cancel User Name 6 12 18 Default User Direct Entry Name 1 Name 2 Name 3 Name 4 Name 5 Name 6 Name 7 Name 8 Name 9 Name 10 OK 1 2 Name 11 Name 12 ABC User 3 All Users ABCD EFGHI JKLMN OPQRST UVWXYZ There are four ways to select the user name: (A) Touch the key of the user name. The touched user name is highlighted. If you accidentally select the wrong user name, touch the key of the correct name. (B) Touch the [Default User] key.
Search User Name Cancel Start Search Touch the [Start Search] key. The search results will appear in a screen similar to the following screen. A list of the files that match your search criteria will appear. Select the desired file from the list. The job settings screen will appear. Name 1 File or Folder Name file-01 Password Cancel Search File or Folder Name file-01 User Name Name 1 Search Again Date 04/04/2010 1 1 4 To return to the base screen of document filing mode, touch the [Cancel] key.
Searching within a folder You can specify a folder to restrict the search range to that folder. To search within a specified folder, follow the steps below. (2) Open the folder that you wish to search. (1) COPY IMAGE SEND DOCUMENT FILING MANUAL FINISHING File Retrieve Scan to HDD HDD Status Ex Data Access (2) Touch the key of the folder that you wish to search. Search Folder Select 1 (1) Touch the [DOCUMENT FILING] key.
(B)(D) (C) Using the user name to search (A) Cancel User Name 6 12 18 Default User Direct Entry Name 1 Name 2 Name 3 Name 4 Name 5 Name 6 Name 7 Name 8 Name 9 Name 10 OK 1 2 Name 11 Name 12 ABC User 4 All Users ABCD EFGHI JKLMN OPQRST UVWXYZ There are four ways to select the user name: (A) Touch the key of the user name. The touched user name is highlighted. If you accidentally select the wrong user name, touch the key of the correct name. (B) Touch the [Default User] key.
(1) (2) Cancel Search User Name Start Search Start searching. (1) Touch the [Search within Current Folder] checkbox so that it is selected . To search only files that are in the current folder, select the [Search within Current Folder] checkbox . Use this method to search for a file in a confidential folder. Name 1 File or Folder Name file-01 Password Search within Current Folder (2) Touch the [Start Search] key. The search results will appear in a screen similar to the following screen.
4 SYSTEM SETTINGS This chapter explains the system settings for the document filing function that can be configured by general users. For information on configuring the system settings, see the User's Guide. For system settings that require administrator rights, see the Administrator's Guide. ACCESSING THE SYSTEM SETTINGS Make sure that the machine is in the standby state and then press the [SYSTEM SETTINGS] key on the operation panel.
DOCUMENT FILING CONTROL Document Filing Control is used to create, edit, and delete custom folders for document filing. Touch the [Document Filing Control] key to configure the settings. When the [Document Filing Control] key is touched, the following screen will appear. Back Folder List Add New Sort ABC All Folders ABCD EFGHI JKLMN User 1 User 2 User 3 User 4 User 5 User 6 User 7 User 8 User 9 User 10 OPQRST UVWXYZ 1 2 • [Add New] key Use this to add a new custom folder.
5 TROUBLESHOOTING This chapter provides solutions to possible document filing problems. See the following table of contents to locate the appropriate page for your question or problem. PROBLEMS RELATED TO FILING • Document filing does not take place. . . . . . . . . . . . . . . . . . . . . . . . . . . . . . . . . . . . . . . . . . . . . . . . . . . 54 • A filed data can not be printed. . . . . . . . . . . . . . . . . . . . . . . . . . . . . . . . . . . . . . . . . . . . . . . . . . . . . . . .
PROBLEMS RELATED TO FILING Problem Document filing does not take place. Point to check Solution Did you select document filing settings in the printer driver? In print mode, enable document filing on the [Job Handling] tab of the printer driver. In copy mode or image send mode, touch the [Quick File] key or the [File] key and then use the document filing function. Have functions been disabled by the administrator? Some functions may have been disabled in the system settings (administrator).
Problem Point to check Solution A confidential file or confidential folder cannot be opened. Did you enter the wrong password? If you cannot remember the password, it is possible to change the file or folder password to a new password in the system settings (administrator). Ask your administrator. A file name cannot be stored or changed.
Document Filing Guide MODEL: MX-M850 MX-M950 MX-M1100 SHARP ELECTRONICS CORPORATION Sharp Plaza, Mahwah, New Jersey 07430-1163. www.sharpusa.com SHARP ELECTRONICS OF CANADA LTD.
MODEL: MX-M850 MX-M950 MX-M1100 Administrator's Guide
Table of Contents Document Filing Settings . . . . . . . . . . . . . . . . . . . . . 62 • Other Settings. . . . . . . . . . . . . . . . . . . . . . . . . . . . 62 • Document Output Options . . . . . . . . . . . . . . . . . . 64 • Automatic Deletion of File Settings. . . . . . . . . . . . 64 About This Manual . . . . . . . . . . . . . . . . . . . . . . . . . . . 3 • Manuals Provided with the Machine. . . . . . . . . . . . 4 1 SYSTEM SETTINGS (ADMINISTRATOR) List Print (Administrator) . . . . . . . . . .
About This Manual Please note • Considerable care has been taken in preparing this manual. If you have any comments or concerns about the manual, please contact your dealer or nearest SHARP Service Department. • This product has undergone strict quality control and inspection procedures. In the unlikely event that a defect or other problem is discovered, please contact your dealer or nearest SHARP Service Department.
Manuals Provided with the Machine Printed manuals and manuals stored in PDF format on the machine's hard drive are provided with the machine. When using the machine, read the appropriate manual for the feature you are using. Printed manuals Manual name Contents Safety Guide This manual contains instructions for using the machine safely and lists the specifications of the machine and its peripheral devices.
1 SYSTEM SETTINGS (ADMINISTRATOR) This chapter explains the system settings that are configured by the administrator of the machine. System Settings (Administrator) The system settings are used to configure a variety of parameters to suit the aims and needs of your workplace. The system settings are also used to display or print out the current settings and status of the machine. The system settings allow you to make the machine easier to use.
• Procedures for using the settings For the specific procedures for using the system settings, see "TOUCH PANEL" in the User's Guide. For the procedure for entering text, see "7. ENTERING TEXT" in the User's Guide. • Administrator password To maintain security, the administrator of the machine should promptly change the password after the machine is purchased. (For the factory default administrator password, see "TO THE ADMINISTRATOR OF THE MACHINE" in the Safety Guide.
Accessing the System Settings (Administrator) To access the system settings (administrator), the administrator must log in as explained below. When User Authentication is not Enabled When "User Authentication Setting" (page 25) is not enabled, follow the procedure below to log in. 1 System Settings 2 Press the [SYSTEM SETTINGS] key.
When User Authentication is Enabled When "User Authentication Setting" (page 25) is enabled, follow the procedure below to log in. When auto login is enabled, the login screen will not appear. When user authentication is by login name and password (and e-mail address) Administrator login is performed in the user selection screen. For more information on the login procedure when user authentication is enabled, see "USER AUTHENTICATION" in the User's Guide.
Login by user number User Authentication Touch the [Admin Login] key. OK Enter the administrator password in the administrator password entry screen. This completes the administrator login procedure. The system settings (administrator) can be used.
System Settings (Administrator) List The system settings that appear following administrator login are shown below. The default setting for each item is also shown. • Depending on the machine specifications and peripheral devices installed, it may not be possible to use some settings. • For explanations of settings related to the fax function, see "2. SYSTEM SETTINGS FOR FAX (ADMINISTRATOR)" (page 76).
■ Energy save Item Factory default setting Page 38 ■ Energy Save ● Toner Save Mode X Print Disabled X Copy Disabled 38 ● Auto Power Shut-Off Enabled 38 ● Auto Power Shut-Off Timer 90 min. 38 ● Preheat Mode Setting 15 min. 38 ■ Operation Settings Item Factory default setting Page ■ Operation Settings 39 ● Other Settings 39 X Keys Touch Sound Middle 39 Key Touch Sound at Initial Point Disabled X Auto Clear Setting 60 sec.
Item Factory default setting Page X Image Send-Scanner*3 Customize 1 Address Review Customize 2 File Customize 3 Quick File X Image Send-Internet Fax*4 (Same as Scan) X Image Send-Fax*5 41 (Same as Scan) X Image Send-USB Memory Scan Customize 1 – Customize 2 – Customize 3 – X Image Send-Data Entry*6 (Same as Scan) *1 *2 *3 *4 *5 *6 ● Home Screen Settings*2 – 41 ● MFP Display Pattern Setting Pattern 1 41 When the Inserter is installed.
Item Factory default setting Page X Optimization of a Hard Disk – 43 X Clear All Job Log Data – 43 X Original Detection Size Combination Inch-1 44 X Cancel Detection at Document Glass Disabled ● Original Size Detector Setting ● Disabling of Devices *1 *2 *3 *4 *5 *6 *7 *8 *9 45 X Disabling of Document Feeder Disabled 45 X Disabling of Duplex Disabled 45 X Disabling of Large Capacity Cassette*4 Disabled 45 X Disabling of Tray Settings Disabled 45 X Disabling of Bypass-Tray*5 Di
Item Factory default setting ● Other Settings Page 47 X Copy Exposure Adjustment 5 47 X Rotation Copy Setting Enabled 47 X Add or Change Extra Preset Ratios – 47 X Setting a Maximum Number of Copies 9999 47 Side 1 1/2" 47 Side 2 1/2" X Initial Margin Shift Setting X Erase Width Adjustment Edge Clearance Width 1/2" Center Clearance Width 1/2" 47 X Card Shot Settings Original Size X: 3-3/8", Y: 2-1/8" Fit to Page Disabled 47 X Automatic Saddle Stitch* Enabled 47
■ Printer Settings Item Factory default setting Page 51 ■ Printer Settings*1 ● Default Settings 51 X Prohibit Notice Page Printing Enabled 51 X Prohibit Test Page Printing Disabled 51 X A4/Letter Size Auto Change Disabled 51 X Print Density Level 3 51 X Bypass Tray Settings*2 51 Enable Detected Paper Size in Bypass Tray Disabled 51 Enable Selected Paper Type in Bypass Tray Enabled 51 Exclude Bypass-Tray from Auto Paper Select Disabled 51 Enabled 51 X Job Spool Queuing ● I
Item Factory default setting Page Initial Resolution Setting • Apply the Resolution Set when Stored Disabled • Scan*1 200 X 200 dpi • Internet Fax*2 200 X 100 dpi • Fax*3 Standard Default Exposure Settings Auto Default Original Image Type Text 53 54 54 • Moiré Reduction Disabled Must Input Next Address Key at Broadcast Setting Disabled 54 Scan Complete Sound Setting Middle 54 The Number of File Name/Subject/Body Keys Displayed Setting 12 The Number of Direct Address
Item Factory default setting Page Initial File Format Setting • File Type PDF • Black & White MMR (G4) • Color/Grayscale*5 Medium • Specified Pages per File Disabled 56 Compression Mode at Broadcasting • Black & White MH (G3) • Color/Grayscale*5 Medium Maximum Size of E-mail Attachments (E-mail) Unlimited Maximum Size of Data Attachments (FTP/Desktop/Network Folder) Unlimited 56 57 57 Bcc Setting • Enable Bcc Disabled • Display Bcc Address on the Job Status Screen Disabled
Item Factory default setting X I-Fax Send Settings 59 I-Fax Reception Report On/Off Setting Disabled 59 I-Fax Reception Report Request Timeout Setting 1 hour 59 Number of Resend Times at Reception Error 2 59 Maximum Size of E-mail Attachments Unlimited 59 Rotation Sending Setting All Enabled 60 Printing Page Number at Receiver Enabled 60 X I-Fax Receive Settings 60 Auto Receive Reduce Setting Enabled 60 Duplex Reception Setting Disabled 60 Set Address for Data
Item Factory default setting Page X Default Color Mode Settings*1 Mono2 62 X Default Storage Format Setting*2 Hi-Speed Print Mode 62 X Default Exposure Settings Auto 63 X Default Original Image Type Text 63 Moiré Reduction Disabled X Initial Resolution Settings 600 x 600 dpi 63 X Color Data Compression Ratio Setting*1 Medium 63 X Scan Complete Sound Setting Middle 63 X Default Output Tray*3 Offset Tray 63 X Disable Stamp for Reprinting Disabled 63 Selection of [All Users]
Item Factory default setting Page X Fax Send*5 Copy Disabled Scan Send Disabled Internet Fax Send (Incl. PC-I-Fax)*4 Disabled Fax Send (Incl. PC-Fax) Enabled Scan to HDD Disabled 64 ● Automatic Deletion of File Settings *1 *2 *3 *4 *5 – 64 When the color expansion kit is installed. When the color expansion kit is not installed. When a saddle stitch finisher or finisher is installed. When the Internet fax expansion kit is installed. When the facsimile expansion kit is installed.
■ Enable/Disable Settings Item Factory default setting Page 67 ■ Enable/Disable Settings ● User Control 67 X Disabling of Printing by Invalid User Disabled ● Operation Settings 67 67 X Cancel Auto Clear Timer Disabled 67 X Disabling of Job Priority Operation Disabled 67 X Disabling of Bypass Printing Disabled 67 X Disable Auto Key Repeat Disabled 67 X Disabling of Clock Adjustment Disabled 67 X Disabling of Covers/Inserts Mode Disabled 67 X Disable Manual Finishing*1 Disabled 67
Item Factory default setting ● Image Send Settings Page 68 X Other Disabling 68 Disable Switching of Display Order Disabled 68 Disable Scan Function 68 • USB Memory Scan Disabled X Settings to Disable Registration 68 Disable Registering Destination from Operation Panel Disabled 68 Disable Registering Destination on Web Page Disabled 69 Disable Registration Using Network Scanner Tools Disabled 69 X Settings to Disable Transmission 69 Disable [Resend] on Image Send Mode Di
■ Change Administrator Password Item ■ Change Administrator Password Factory default setting Page See "TO THE ADMINISTRATOR OF THE MACHINE" in the Safety Guide.
■ Administrator Adjustment Item Factory default setting Page 74 ■ Administrator Adjustment ● Image Adjustment 74 X Edge Adjustment Copy Edge Adjustment (Original Edge Standard Position) – Copy Edge Adjustment (Registration Motor ON Timing) – SPF Original Edge Adjustment (Original Scan Start Position) – 74 X Off-Center Adjustment Print Off-Center Adjustment – Original Off-Center Adjustment – ● Option Adjustment 74 75 X Finisher*1 Staple Position All 50 Punch Position (Verti
User Control User Control is used to configure settings for user authentication. Touch the [User Control] key to configure the settings. User Authentication Setting These settings enable or disable user authentication and specify the authentication method. When user authentication is enabled, each user of the machine is registered. When a user logs in, settings for that user are applied. This function allows greater control of security and cost management than on previous machines.
Other Settings Actions when the Limit of Pages for Output Jobs Default Network Authentication Server Setting This setting determines whether or not a job will be completed if the page limit is reached while the job is in progress. The following selections are available. • Job is Stopped when the Limit of Pages is Reached • Job is Completed even when the Limit of Pages is Reached Use this to set the default network authentication server.
User List This is used to store, edit, and delete users when user authentication is enabled. When the [User List] key is touched, the following screen appears. Back User List Delete All Users Sort ABC All Users Add New UP ABCD JKLMN EFGHI Administrator User Other User Name 1 Name 2 Name 3 Name 4 Name 5 Name 6 Name 7 OPQRST UVWXYZ 1 2 • User List This shows the factory-stored users and the currently stored users. A user can be selected to open an edit/delete screen for the user.
Settings Item User Name (Required) Apply User Name to Log-in Name.*1 Description Store the name of the user (max. 32 characters). This user name is used as the key name in the login screen, the document filing user name, and the sender name. (The user name must be unique.) Touch this key to enter the entered user name in the login name. Initial (Optional) This determines where the user name will appear in the user list. Up to 5 characters can be entered. Index Select the desired custom index.
Factory-stored users The following users are stored in the machine at the factory. • Administrator: Factory-stored account for the administrator of the machine. • User: This is used when network authentication is used and a login name not stored in the machine is directly entered. (This cannot be selected in the login user screen.) • Other User: This is used when a print job is executed using invalid user information. (This cannot be selected in the login user screen.
Page Limit Group List This is used to store groups of Account Limit Settings. The page limits for each user are specified by selecting one of these stored groups when the user is stored. When the [Page Limit Group List] key is touched, the following screen appears. System Settings Back Page Limit Group List Add New Group 1 Group 2 Group 3 Group 4 Group 5 Group 6 Group 7 Group 8 • [Add New] key Use this to add a new group. • List display This shows the currently stored groups.
Authority Group List Use this to store groups of user authority settings. The authority of each user is specified by selecting one of these stored groups when the user is stored. When the [Authority Group List] key is touched, the following screen appears. System Settings Back Authority Group List Add New Group 1 Group 2 Group 3 Group 4 Group 5 Group 6 Group 7 Group 8 • [Add New] key Use this to add a new group. • List display This shows the currently stored groups.
List of settings and factory default settings of template groups Item Description Group Name Store the name of the group (max. 32 characters). Select the Group Name to be the Registration Model Select one of the previously stored groups for use as a template for the new group. When selected, the group's settings are applied. The factory default groups and their settings are shown below.
Item Description Common Functions Approval Settings for 2-Sided Print 1-Sided/2-Sided Approved 1-Sided/2-Sided Approved 1-Sided/2-Sided Approved Output Approval Settings All allowed All allowed All allowed Allowed However you do not have the authority to set the item below.
Favorite Operation Group List This is used to store favorite operation groups and home screens. This setting can only be configured in the Web pages. It cannot be configured in the touch panel of the machine. Favorite Operation Group Registration Sets of preferred settings can be as groups.
Home Screen List Home screen settings must be previously stored. Select a home screen when storing a favorite operation group. Settings Item Description Home Screen Name Enter a maximum of 32 characters for the home screen name. Select the Home Screen to be the Registration Model Select one of the previously stored home screens as a template for the new home screen. When selected, the home screen's settings are applied. Display Title Show a title on the home screen.
User Count This displays the total number of pages printed by each user. When the [User Count] key is touched, the following screen appears. User Count Back Select All Users Sort ABC All Users Show Reset UP ABCD EFGHI JKLMN Administrator User Other User Name 1 Name 2 Name 3 Name 4 Name 5 Name 6 Name 7 OPQRST UVWXYZ 1 2 • User List This shows the factory-stored users and the currently stored users. To select a user, select the user name.
Resetting user counts Select a user in the setting screen and touch the [Reset] key. A count reset screen for that user will appear. The reset screen will vary depending on whether a single user or multiple users were selected. The items displayed in each case are described in the table below. When a single user is selected Item Description Previous This shows the previous user (in the order of the registration numbers). Next This shows the next user (in the order of the registration numbers).
Energy Save The Energy Save settings help reduce power costs. From an environmental perspective, these settings also help reduce pollution and conserve natural resources. Touch the [Energy Save] key to configure the settings. Toner Save Mode Auto Power Shut-Off Timer You can reduce the amount of toner used for printing. The time until Auto Power Shut-Off activates can be set to any number of minutes from 1 to 240. Select the time that best suits your workplace needs.
Operation Settings Settings related to machine operation can be configured. Touch the [Operation Settings] key to configure the settings. Other Settings Keys Touch Sound MFP Display Language Setting This setting is used to adjust (or turn off) the volume of the beep that sounds when you touch a key. You can also have three beeps sound at initial values when setting the ratio in copy mode or when adjusting the exposure in any mode. The language that appears in the touch panel can be changed.
Disabling of Clock Adjustment This setting is used to prohibit changing of the date and time. Disabling of Covers/Inserts Mode This setting is used to prohibit the use of the covers and inserts function. Disable Manual Finishing (When the Inserter is installed.) This prohibits off-line output. Initial Original Count Setting This specifies whether or not "Original Count" in the special functions is enabled for each function.
Customize Key Setting Short-cuts to functions that are frequently used can be displayed in the base screen of each mode. For more information, see the manuals for each mode. The settings are shown below. Item Description Customized Keys 1 - 3 Enter a name for the customized key (maximum of 14 characters). Item Select the function that you want to assign to the key. The functions that can be selected vary by mode. Return to the Defaults This returns all customized keys to their factory default state.
Device Control These settings control devices installed on the machine. Touch the [Device Control] key to configure the settings. Other Settings Original Feeding Mode Auto Paper Selection Setting The following original feeding modes can be set to operate by default in copy, Scan to HDD, and image send modes. When a mode is frequently used, this saves you from having to select the mode in the special modes each time you need to use it.
Detect Standard in Auto Color Mode Optimization of a Hard Disk This function optimizes the hard drive of the machine by defragmenting data. If a job is in progress, a message will appear and optimization will not begin until the job is finished. During optimization, the following operations are not possible: • Web page access, reception of print data • Use of keys on the operation panel • Turning off the power with the main power switch of the machine.
Original Size Detector Setting One of the 7 groups of standard original sizes shown below can be selected for detection by the original size detection function.
Disabling of Devices Use these settings when a peripheral device on the machine has failed or when you wish to temporarily disable a device. Disabling of Document Feeder Disabling of Stapler Use this setting to prohibit the use of the automatic document feeder, such as when the feeder malfunctions. (When the setting is enabled, scanning is still possible using the document glass.) (When a saddle stitch finisher or finisher is installed.
Copy Settings The following settings are related to copying. Touch the [Copy Settings] key to configure the settings. Default settings selected with these settings apply to all functions of the machine (not just the copy function). Initial Status Settings The copier settings are reset when the [POWER] key ( ) is turned on, when the [CLEAR ALL] key ( ) is pressed, or when the auto clear interval has elapsed. These settings are used to change the default settings for copy mode.
Other Settings Copy Exposure Adjustment Erase Width Adjustment This is used to adjust the exposure level when [Auto] is used for the copy exposure. Select separate settings for the document glass and for the automatic document feeder. This is used to set the default erase width for erase copy. Specify a value from 0" (0 mm) to 1" (20 mm) in increments of 1/8" (1 mm) for both edge erase and center erase.
Initial Tab Copy Setting 600dpi x 600dpi Scanning Mode for Document Feeder This is used to set the default image shift width (tab width) for tab copying. The default width can be set from 0" (0 mm) to 5/8" (20 mm) in increments of 1/8" (1 mm). The resolution used when scanning originals on the document glass can be set to 600 x 600 dpi (high quality mode). When this setting is disabled, originals are scanned at 600 x 300 dpi.
Network Settings Network settings are described below. Touch the [Network Settings] key to configure the settings. When any of these settings are changed, you must exit the system settings, turn off the [POWER] key ( interval, and then turn the [POWER] key ( ) back on to make the new settings take effect. ), wait a brief IP Address Setting Enable TCP/IP When using the machine on a TCP/IP (IPv4) network, use this setting to configure the IP address of the machine. The settings are shown below.
Enable EtherTalk To use the machine on an EtherTalk network, this setting must be enabled. Enable NetBEUI To use the machine on a NetBEUI network, this setting must be enabled. Reset the NIC This returns all "Network Settings" to the factory default settings. Ping Command Use this function to check if the machine can communicate with a computer on the network. Specify the IP address of the desired computer and touch the [Execute] key.
Printer Settings Settings related to the printer function can be configured. Touch the [Printer Settings] key to configure the settings. These settings can be configured when the printer expansion kit is installed. Default Settings Printer condition settings are described below. Prohibit Notice Page Printing Bypass Tray Settings This setting is used to disable printing of notice pages. (When a bypass tray is installed.
Interface Settings These settings are used to control and monitor data transmitted to the USB port or network port of the machine. Hexadecimal Dump Mode Enable Network Port This function is used to print the print data from a computer in hexadecimal format together with the corresponding ASCII text. This allows you to check whether or not print data from the computer is being transmitted to the machine correctly. This is used to enable printing from the network port.
Image Send Settings Settings related to the image send function (scan, Internet fax, etc.) can be configured. Touch the [Image Send Settings] key to configure the settings. For explanations of settings related to the fax function, see "2. SYSTEM SETTINGS FOR FAX (ADMINISTRATOR)" (page 76). Operation Settings The operation settings below apply to all image send functions.
Default Exposure Settings The Number of File Name/Subject/Body Keys Displayed Setting This is used to set the default exposure settings for scanning a document in image send mode. Select [Auto] or [Manual]. When [Manual] is selected, the exposure can be set to one of 5 levels. This setting is used to select the number of file name / subject keys that are displayed in the screen. The number of keys can be set to 6, 12, or 18.
Settings to Disable Registration Settings to Disable Transmission These settings are used to disable the following transmission operations. This is used to prohibit the storing of destinations. Storing from the machine, storing from the Web page, and storing from a computer can each be separately prohibited. Disable [Resend] on Image Send Mode Disable Registering Destination from Operation Panel This setting disables the [Resend] key in the base screen of image send mode.
Scan Settings Settings related to scanning can be configured. These settings can be configured when the network scanner expansion kit is installed. Initial File Format Setting Other Settings This is used to set the default file format for Scan to E-mail and USB memory mode when the e-mail address is entered manually by touching the [Address Entry] key.
Maximum Size of E-mail Attachments (E-mail) Pre-Setting Mail Signature A signature can be automatically appended to the end of the body text of e-mail. This is convenient when it is a corporate policy to append a specific signature at the end of e-mail. The mail signature to be appended is configured in the Web pages. This setting simply enables or disables the signature.
I-Fax Settings These settings can be configured when the Internet fax expansion kit is installed. Original Print on Transaction Report I-Fax Default Settings These settings are used to configure the default settings for Internet fax. When a transaction report is printed, this is used to print part of the first page of the transmitted original on the transaction report. Select one of the settings below.
Activity Report Print Select Setting I-Fax Send Settings This is used to have the Image Sending Activity Report stored in the machine's memory automatically print at specified times. The Image Sending Activity Report can be set to automatically print each time the number of transactions reaches 200, and it can also be set to automatically print at a specified time (once a day only). (The settings can be simultaneously enabled.) I-Fax Send Settings are described below.
Rotation Sending Setting I-Fax Receive Settings When transmitting an image that is one of the following sizes, this function rotates the image counterclockwise 90 degrees. (The setting can be configured separately for each size.) 8-1/2 x 11", 5-1/2" x 8-1/2"R, A4, B5R, A5R, 16K I-Fax Receive Settings are described below. Auto Receive Reduce Setting When a fax is received that includes printed information such as the sender's name and address, the received image is slightly larger than the standard size.
Reception Check Interval Setting Anti Junk Mail/Domain Name Setting This is used to specify the interval at which the machine automatically checks the mail server (POP3 server) for received Internet faxes. The interval can be set from 0 minutes to 8 hours in increments of 1 minute. When 0 hours 0 minutes is specified, the machine does not automatically check the mail server for received Internet faxes. This setting is used to allow or refuse reception from specified addresses/domains.
Document Filing Settings Document filing settings are described below. Touch the [Document Filing Settings] key to configure the settings. Other Settings Default Mode Settings Delete All Quick Files This is used to specify which mode, Sharing or Confidential, is used as the default mode when storing a file. When [Confidential Mode] is selected, the [Confidential] checkbox in the information screen for filing will be selected .
Default Exposure Settings Default Output Tray Default exposure settings for document filing can be configured. Select [Auto] or [Manual]. If you select [Manual], set the exposure to one of 5 levels. (When a saddle stitch finisher or finisher is installed.) "Top Tray" or "Offset Tray" can be selected for the default output tray for printing files saved using Scan to HDD. Default Original Image Type Select the original type beforehand to enable scanning at a resolution suitable for the original.
Document Output Options The use of a stored file can be allowed or prohibited by operation type and by the mode from which the file was stored. The items that appear will vary depending on the functions that have been added to the machine. Item Description Print For each mode, select whether or not printing of stored files is allowed. Scan Send For each mode, select whether or not scan send of stored files is allowed.
List Print (Administrator) This is used to print lists and reports that are only for use by the administrator of the machine. Touch the [List Print (Administrator)] key to configure the settings. It may not be possible to use some settings, depending on the peripheral devices installed. Administrator Settings List Lists of the administrator settings for the following modes can be printed.
Security Settings The following settings are related to security. Touch the [Security Settings] key to configure the settings. SSL Settings SSL can be used for data transmission over a network. SSL is a protocol that enables the encryption of information communicated over a network. Encrypting data makes it possible to transmit and receive sensitive information safely. SSL can be enabled for the following protocols: Server Port • HTTPS: Apply SSL encryption to HTTP communication.
Enable/Disable Settings The following settings are used to prohibit the use of certain functions. Touch the [Enable/Disable Settings] key to configure the settings. The Enable/Disable Settings control the same parameters as the enable/disable settings in other settings. The settings are linked together (changing one setting changes the other).
Disabling of Punch (When a punch module is installed.) This setting is used to prohibit punching, such as when the punch module of the finisher or the saddle stitch finisher malfunctions. Printer Settings Prohibit Notice Page Printing This setting is used to disable printing of notice pages. Prohibit Test Page Printing This setting is used to disable printing of test pages. When this setting is enabled, "Printer Test Page" in the system settings cannot be used to print test pages.
Disable Registering Destination on Web Page This disables address control from the Web pages. Configure the setting for each of the following items: • Group • E-mail • FTP • Desktop • Network Folder • Internet Fax • Fax Select All: Select all items. Clear Checked: Clear all selections. Document Filing Settings Disable Stamp for Reprinting When a stored file is retrieved and printed, this setting prohibits the selection of a "Stamp" setting in the special modes.
Change Administrator Password This is used to change the administrator password. Touch the [Change Administrator Password] key to change the password. When changing the password, be sure to remember the new password. It is recommended that you periodically change the administrator password. Password Enter the new administrator password (5 to 32 characters). Password (confirmation) Enter the new password once again for confirmation purposes.
Product Key The procedures for entering the product keys of the expansion kits are explained below. Touch the [Product Key] key to configure the settings. • It may not be possible to use some settings, depending on the peripheral devices installed. • For the product key to be entered, contact your dealer. Serial Number Application Integration Module This displays the serial number that is required to obtain the product key. Enter the product key of the application integration module.
Data Backup Settings and information stored in the machine can be saved to USB memory. • This function can be enabled when a USB memory device is installed. • This function cannot be used while the system settings are in use or while a job is being executed. • Data cannot be imported to models other than the MX-M850/M950/M1100. Storage Backup Address book information and user information stored in the machine can be saved to and retrieved from USB memory. Export This exports data to USB memory.
Storing/Calling of System Settings The current system settings can be stored, previously stored system settings can be retrieved, and the factory default system settings can be restored. Touch the [Storing/Calling of System Settings] key to configure the settings. Restore Factory Defaults This is used to return the system settings to the factory default settings.
Administrator Adjustment "Administrator Adjustment" is a special adjustment function for the administrator. This lets the administrator correct the position and size of images and perform fine adjustment of the output positions of peripheral devices. Image Adjustment Fine-adjustment of devices related to the image can be performed. Adjustment is performed at the factory prior to shipment, and thus the initial values of the settings will vary on each unit.
Option Adjustment Fine-adjustment of peripheral devices can be performed. Finisher Saddle Unit (When a finisher (MX-FNX5) is installed.) (When a saddle unit is installed.) This adjusts the staple positions and the punch positions of the finisher. Saddle Stitch Position This adjusts the staple position for pamphlet stapling by paper size. Set a number from 35 to 65 (1 = 0.2 mm). A higher number moves the staple position toward the leading edge of the paper.
2 SYSTEM SETTINGS FOR FAX (ADMINISTRATOR) This chapter explains system settings for the fax function that require administrator rights. The system settings for the fax function can only be configured when the facsimile expansion kit is installed. System Settings for Fax (Administrator) List When the system settings for fax are accessed with administrator rights, the following items appear.
Item Factory default setting Page Speaker Volume Details Setting • Speaker / Line Monitor Small: 3, Middle: 6, Big: 8 • Ringer Volume / Fax Receive Complete Signal / Fax Send Complete Signal / Fax Communication Error Signal Small: 2, Middle: 4, Big: 8 78 Remote Reception Number Setting 5 78 Original Print on Transaction Report Print Out Error Report Only 79 Transaction Report Print Select Setting • Single Sending Print Out Error Report Only • Broadcasting Print Out All Report • Rec
Image Send Settings Settings related to the image send function (scan, Internet fax, etc.) can be configured. Touch the [Image Send Settings] key to configure the settings. Fax Settings Pause Time Setting Fax Default Settings Use this to change the length of pauses inserted in fax numbers. The pause can be changed to any number of seconds from 1 to 15. The fax settings can be enabled or disabled to suit the needs of your workplace.
Original Print on Transaction Report Activity Report Print Select Setting This is used to have the Image Sending Activity Report that is stored in the machine's memory printed at regular intervals. The Image Sending Activity Report can be set to automatically print each time the number of transactions reaches 200, and it can also be set to automatically print at a specified time (once a day only). (The settings can be simultaneously enabled.
Date/Own Number Print Position Setting Fax Send Settings Settings for fax transmission can be configured. This setting determines the position of the date and sender information printed at the top of faxes by the receiving machine. To add the information at the top of the page outside the scanned image, select [Outside the Original Image]. To add the information inside the scanned image, select [Inside the Original Image].
Registration of Own Name Select Fax Receive Settings Settings for fax reception can be configured. This is used to store sender names used in "Own Number Select". A maximum of 18 names can be stored. Number of Calls in Auto Reception Add New Store a sender name. A maximum of 20 characters can be entered for the sender name. Control numbers are from 01 to 18. The lowest number not yet in use is automatically assigned when you begin the storing procedure. This number cannot be changed.
Print Style Setting Fax Output Settings This setting determines the paper selection condition when printing received faxes. Select one of the three conditions below. These settings are for printing received faxes. The following items can be configured. Output tray*1 Select the output tray for received faxes. Print Actual Size Cut off Disabled The received fax image is printed at full size without dividing it onto multiple sheets of paper.
Anti Junk Fax Setting Fax Polling Security The following settings are for regular polling memory using the Public Box. This setting is used to block fax reception from specified fax numbers (anti junk fax numbers). Up to 50 anti junk fax numbers can be stored. Set Fax Polling Security When the memory polling function is used, this setting determines whether any machine will be allowed to poll your machine, or only machines that have been stored in your machine. Add New Add a new anti-junk fax number.
3 CONVENIENT FUNCTIONS This chapter describes convenient functions for the administrator of the machine. Control Settings in the Web Pages The Web pages can be used to conveniently perform control tasks. Releasing the Lock on the Machine Operation Panel If a user makes three unsuccessful login attempts in a row when "A Warning when Login Fails" (page 26) is enabled, machine operation will lock.
Administrator's Guide MODEL: MX-M850 MX-M950 MX-M1100 SHARP ELECTRONICS CORPORATION Sharp Plaza, Mahwah, New Jersey 07430-1163. www.sharpusa.com SHARP ELECTRONICS OF CANADA LTD.