
MX-2300G/N/2700G/N Operation-Manual Quick-Start-Guide GB
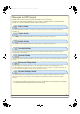
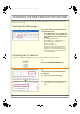


Table Of Contents
- MANUALS PROVIDED WITH THE MACHINE
- ACCESSING THE WEB SERVER IN THE MACHINE
- TABLE OF CONTENTS
- PART NAMES AND FUNCTIONS
- OPERATION PANEL
- USING THE TOUCH PANEL
- USER AUTHENTICATION
- PLACING ORIGINALS
- CHANGING PAPER IN A TRAY
- MAKING COPIES
- 2-SIDED COPYING (Automatic Document Feeder)
- COPYING ON SPECIAL PAPER (Bypass Copy)
- SELECTING THE EXPOSURE MODE
- FITTING THE COPY IMAGE TO THE PAPER (Automatic Ratio Selection)
- ENLARGEMENT/REDUCTION (Preset Ratios / Zoom)
- INTERRUPTING A COPY RUN (Interrupt Copy)
- STORING COPY OPERATIONS (Job Programs)
- SPECIAL MODES
- SELECTING A SPECIAL MODE
- CONVENIENT COPY FUNCTIONS
- Adding margins (Margin Shift)
- Erasing peripheral shadows (Erase)
- Copying each facing page of a bound document (Dual Page Copy)
- Making copies in pamphlet format (Pamphlet Copy)
- Copying a large number of originals at once (Job Build)
- Using two machines to copy a large number of originals (Tandem Copy)
- Using a different paper type for covers (Covers/Inserts)
- Adding inserts when copying on transparency film (Transparency Inserts)
- Copying multiple pages onto one sheet of paper (Multi Shot)
- Copying a pamphlet (Book Copy)
- Copying captions onto tab paper (Tab Copy)
- Copying both sides of a card onto one sheet of paper (Card Shot)
- Printing the date or a stamp on copies (Stamp)
- Repeating photos on a copy (Photo Repeat)
- Creating a large poster (Multi-Page Enlargement)
- Inverting the image (Mirror Image)
- Copying an A3 size original without cutting off the edges (A3 Full Bleed)
- Copying in the centre of the paper (Centring)
- Reversing white and black in a copy (B/W Reverse)
- Adjusting red/green/blue in copies (RGB Adjust)
- Adjusting the sharpness of an image (Sharpness)
- Whitening faint colours in copies (Suppress Background)
- Adjusting the colour (Colour Balance)
- Adjusting the brightness of a copy (Brightness)
- Adjusting the intensity of a copy (Intensity)
- Checking copies before printing (Proof Copy)
- Copying originals that are different sizes (Mixed Size Original)
- Copying thin originals (Slow Scan Mode)
- PRINTING
- CANCELLING A PRINT JOB
- USING PRINTER DRIVER HELP
- PRINTER DRIVERS
- SELECTING PRINTER DRIVER SETTINGS
- CONVENIENT PRINTER FUNCTIONS
- 2-sided printing (Document Style)
- Fitting the print image to the paper (Fit To Paper Size)
- Printing multiple images on one sheet of paper (N-Up Printing)
- Stapling printed pages (Staple)
- Punching holes in output (Punch)
- Printing a colour image in greyscale (Black and White Print)
- The machine also has these functions
- PRINTING FROM A MACINTOSH
- NETWORK SCANNER FUNCTION
- SCANNING AN ORIGINAL
- CHANGING THE RESOLUTION
- SELECTING THE EXPOSURE AND EXPOSURE MODE
- CHANGING THE FILE FORMAT
- STORING A DESTINATION
- SENDING THE SAME IMAGE TO MULTIPLE DESTINATIONS (Broadcast Transmission)
- CONVENIENT TRANSMISSION METHODS
- SPECIAL SCAN MODES
- SELECTING SPECIAL MODES FOR THE SCANNER FUNCTION
- CONVENIENT SCANNER FUNCTIONS
- Erasing peripheral shadows (Erase)
- Scanning the left and right pages of a bound document as two separate pages (Dual Page Scan)
- Whitening faint colours (Suppress Background)
- Scanning both sides of a card onto a single page (Card Shot)
- Sending a large number of pages (Job Build)
- Sending two original pages as a single page (2in1)
- The machine also has these functions
- DOCUMENT FILING
- QUICKLY SAVING DOCUMENT DATA (Quick File)
- APPENDING INFORMATION WHEN STORING A FILE (File)
- ONLY SAVING DOCUMENT DATA (Scan to HDD)
- PRINTING A SAVED FILE
- SYSTEM SETTINGS

8
PART NAMES AND FUNCTIONS
Exterior
(1) Document cover
This holds the original down.
(2) Automatic document feeder
This automatically feeds and scans multiple originals.
Both sides of 2-sided originals can be scanned at
once.
(3) Document feeder tray
Place the originals in this tray when using the
automatic document feeder.
(4) Document glass
This is used to scan books and other originals that
cannot be scanned using the automatic document
feeder.
(5) Front cover
Open to replace a toner cartridge.
(6) Operation panel
(7) Exit tray unit (right tray)
When installed, output can be delivered to this tray.
(8) Output tray (centre tray)
Copy jobs and print jobs are delivered to this tray.
(9) Saddle Stitch Finisher
This can be used to staple output. The saddle stitch
finisher can automatically staple output at the centre
line and fold the pages to create a pamphlet. A punch
module can be installed to punch holes in output.
(10) Tray 1
This holds paper. Up to 500 sheets of paper can be
loaded.
(11) Tray 2
This holds paper. Up to 500 sheets of paper can be
loaded.
(12) Tray 3 (when a stand/1 x 500 sheet paper drawer
or stand/2 x 500 sheet paper drawer is installed)
This holds paper. Up to 500 sheets of paper can be
loaded.
(13) Tray 4 (when a stand/2 x 500 sheet paper drawer
is installed)
This holds paper. Up to 500 sheets of paper can be
loaded.
(14) Tray 5 (when a large capacity tray is installed)
This holds paper. Up to 3500 sheets of paper can be
loaded. When a stand/1 x 500 sheet paper drawer is
installed, this is tray 4.
(15) Finisher
This can be used to staple output. A punch module
can be installed to punch holes in output.
(2)(1) (3)
(4)
(6) (7)(5)
(9) (11)(10) (14) (8)(12) (13)
(15)
mx2700exqck.book8ページ2005年9月20日 火曜日 午前9時46分