
MX-2300N/2700N Operation-Manual Quick-Guide GB
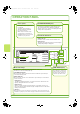
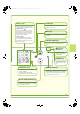
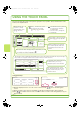
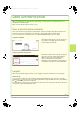
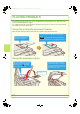
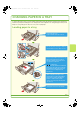
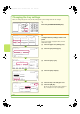
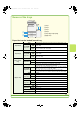
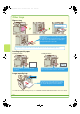
Table Of Contents
- MANUALS PROVIDED WITH THE MACHINE
- ACCESSING THE WEB SERVER IN THE MACHINE
- TABLE OF CONTENTS
- PART NAMES AND FUNCTIONS
- OPERATION PANEL
- USING THE TOUCH PANEL
- USER AUTHENTICATION
- PLACING ORIGINALS
- CHANGING PAPER IN A TRAY
- MAKING COPIES
- 2-SIDED COPYING (Automatic Document Feeder)
- COPYING ON SPECIAL PAPER (Bypass Copy)
- SELECTING THE EXPOSURE MODE
- FITTING THE COPY IMAGE TO THE PAPER (Automatic Ratio Selection)
- ENLARGEMENT/REDUCTION (Preset Ratios / Zoom)
- INTERRUPTING A COPY RUN (Interrupt Copy)
- STORING COPY OPERATIONS (Job Programs)
- SPECIAL MODES
- SELECTING A SPECIAL MODE
- CONVENIENT COPY FUNCTIONS
- Adding margins (Margin Shift)
- Erasing peripheral shadows (Erase)
- Copying each facing page of a bound document (Dual Page Copy)
- Making copies in pamphlet format (Pamphlet Copy)
- Copying a large number of originals at once (Job Build)
- Using two machines to copy a large number of originals (Tandem Copy)
- Using a different paper type for covers (Covers/Inserts)
- Adding inserts when copying on transparency film (Transparency Inserts)
- Copying multiple pages onto one sheet of paper (Multi Shot)
- Copying a pamphlet (Book Copy)
- Copying captions onto tab paper (Tab Copy)
- Copying both sides of a card onto one sheet of paper (Card Shot)
- Printing the date or a stamp on copies (Stamp)
- Repeating photos on a copy (Photo Repeat)
- Creating a large poster (Multi-Page Enlargement)
- Inverting the image (Mirror Image)
- Copying an A3 size original without cutting off the edges (A3 Full Bleed)
- Copying in the centre of the paper (Centring)
- Adjusting red/green/blue in copies (RGB Adjust)
- Adjusting the sharpness of an image (Sharpness)
- Whitening faint colours in copies (Suppress Background)
- Adjusting the colour (Colour Balance)
- Adjusting the brightness of a copy (Brightness)
- Adjusting the intensity of a copy (Intensity)
- Checking copies before printing (Proof Copy)
- Copying originals that are different sizes (Mixed Size Original)
- Copying thin originals (Slow Scan Mode)
- PRINTING
- CANCELLING A PRINT JOB
- USING PRINTER DRIVER HELP
- PRINTER DRIVERS
- SELECTING PRINTER DRIVER SETTINGS
- CONVENIENT PRINTER FUNCTIONS
- 2-sided printing (Document Style)
- Fitting the print image to the paper (Fit To Paper Size)
- Printing multiple images on one sheet of paper (N-Up Printing)
- Stapling printed pages (Staple)
- Punching holes in output (Punch)
- Printing a colour image in greyscale (Black and White Print)
- The machine also has these functions
- PRINTING FROM A MACINTOSH
- NETWORK SCANNER FUNCTION
- SCANNING AN ORIGINAL
- CHANGING THE RESOLUTION
- SELECTING THE EXPOSURE AND EXPOSURE MODE
- CHANGING THE FILE FORMAT
- STORING A DESTINATION
- SENDING THE SAME IMAGE TO MULTIPLE DESTINATIONS (Broadcast Transmission)
- CONVENIENT TRANSMISSION METHODS
- SPECIAL SCAN MODES
- SELECTING SPECIAL MODES FOR THE SCANNER FUNCTION
- CONVENIENT SCANNER FUNCTIONS
- Erasing peripheral shadows (Erase)
- Scanning the left and right pages of a bound document as two separate pages (Dual Page Scan)
- Whitening faint colours (Suppress Background)
- Scanning both sides of a card onto a single page (Card Shot)
- Sending a large number of pages (Job Build)
- Sending two original pages as a single page (2in1)
- The machine also has these functions
- DOCUMENT FILING
- QUICKLY SAVING DOCUMENT DATA (Quick File)
- APPENDING INFORMATION WHEN STORING A FILE (File)
- ONLY SAVING DOCUMENT DATA (Scan to HDD)
- PRINTING A SAVED FILE
- SYSTEM SETTINGS

12
USING THE TOUCH PANEL
The touch keys that appear in the touch panel are grouped for easy operation. The layout and functions of the
touch keys are explained below.
Using general keys
(1) When the displayed screen is one of two or more screens, use the keys to switch through the
screens.
(2) When a checkbox is touched, a checkmark will appear to indicate that the setting is enabled.
(3) The keys can be used to increase or decrease a value. To make a value change quickly, keep your
finger on the key.
Ready to scan for copy.
Full
C
olou
r
C
o
l
our Mo
de
A
uto
Ex
p
osur
e
1
00%
Co
py
Rati
o
Job
D
eta
i
l
Settin
gs
Job Queue
Sets / Progress
Status
S
p
oo
l
Com
p
let
e
D
eta
i
l
Priorit
y
Sto
p
/Delet
e
In
te
rn
et
F
ax
F
a
x
Job
Sca
n
to
Prin
t
Job
Job
Q
ueu
e
Co
py
020
/
00
1
Co
py
in
g
Co
py
020
/
00
0
Waitin
g
Com
p
uter0
1
020
/
00
0
Waitin
g
03
12
3
4
56
7
8
1
2
3
4
002
/
00
0
Waitin
g
1
/1
-
Sided Co
py
Ori
g
ina
l
0
Out
p
u
t
S
p
ecial Mode
s
Fil
e
Q
uick Fil
e
3.
1
.
A
3
A4
A
A4
P
l
B4
Settin
g
s related to the
ori
g
inal are
g
enerally
g
rouped to
g
ether on the
l
e
ft
s
i
de
of th
e
base
sc
r
ee
n
.
This indicates that an ori
g
inal has
been
p
laced in the automatic
d
o
cu
m
e
nt f
eede
r
.
The size of the ori
g
inal appears
automaticall
y.
This a
pp
ears when one or more
s
p
ecial modes are selected
.
To
uc
h th
e
i
c
on to
c
h
ec
k wh
a
t
mo
des
a
r
e
se
l
ec
t
ed.
Advanced settin
g
s are
g
rouped here
.
You can have frequentl
y
used touch
ke
y
s displa
y
ed as shortcuts in this
p
osition.
Settin
g
s related to output are
g
enerally
g
rouped to
g
ether on the top ri
g
ht side
of th
e
base
sc
r
ee
n
.
A selected job can be
g
iven priority and
run ahead of other
j
obs, or a
j
ob
waitin
g
in the queue can be cancelled
.
Jobs are displa
y
ed as a list of touch
ke
y
s. The job ke
y
s appear in the order
that the
y
will be run. A job ke
y
can be
to
uc
h
ed
to
se
l
ec
t it.
The job status screen normally appears behind the base screen of the currently selected mode. Only the left ed
g
e of
the job status screen appears, and this can be touched to brin
g
the screen to the front
.
A4
This shows the status of the paper tra
y
s on the machine.
Yo
u
ca
n
check the paper size, paper type and amount of paper remaining.
The currently selected tray is hi
g
hli
g
hted
.
Special Modes
OK
2/4
Covers/Inserts
Book Copy Tab Copy Card Shot
Transparency
Inserts
Multi Shot
(1)
System Settings
Auto Clear Setting
Set the time for auto clear.
60
OK
Cancel Timer
(10~240)
sec.
(2)
(3)
mx2700exqck.book12ページ2005年10月10日 月曜日 午後3時4分