MX-FR40U Data Security Kit Operation Guide Contents Introduction....................................................................................................................................2 When the data security kit is installed ...........................................................................................4 ● System settings of the data security kit ...................................................................................4 ● Document control function ........................
Warranty While every effort has been made to make this document as accurate and helpful as possible, SHARP Corporation makes no warranty of any kind with regard to its content. All information included herein is subject to change without notice. SHARP is not responsible for any loss or damages, direct or indirect, arising from or related to the use of this operation manual. © Copyright SHARP Corporation 2012. All rights reserved.
Introduction The MX-FR40U adds a security function to the SHARP Digital Full Color Multifunctional System. When the copy function, printer function, network scanner function, or fax function of a SHARP Digital Full Color Multifunctional System with the security function is used, the image data that is generated for the job is encrypted, and when the job is finished, the encrypted data is immediately erased from memory and the hard disk.
■ About passwords for the Web page If an incorrect "users" or "admin" password is entered 3 times in a row when attempting to access the Web pages of a machine that has the data security kit installed, access to pages that require entry of the "users" or "admin" password will be prohibited for 5 minutes. Some of the procedures for operating the machine change when the data security kit is installed.
1 When the data security kit is installed When the data security kit is installed, the following icon appears on the touch panel. Touch the icon ( ) to view information on the data security kit version. When the data security kit is installed, data remaining in the machine is automatically erased after each job. When data clearing begins, the following message appears for 6 seconds*. Data is being cleared.
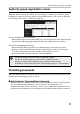
When the data security kit is installed Authority group registration screen When the data security kit is installed, the [Security] key is added to the "Authority Group Registration" menu screen in the system settings (administrator). This screen is displayed by selecting "User Control" > "Authority Group List".
When the data security kit is installed ■ Confidential folders and confidential files of the document filing function If an incorrect password is entered 3 times in a row for a specific confidential folder or file, the folder or file will be locked. To unlock the folder or file, use "Release Lock on File/ Folder Operation" (page 19 of this manual).
When the data security kit is installed ■ Login when user authentication is enabled When "User Authentication Settings" in the system settings (administrator) ( ☞ "USER AUTHENTICATION" in the Start Guide) is enabled, login is required in the login screen before the machine can be used. When "A Warning when Login Fails" is enabled in the system settings (administrator), the machine will lock for 5 minutes if login fails 3 times in a row.
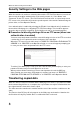
When the data security kit is installed Security Settings in the Web pages When the machine is used as a network printer and the FTP Pull Print function is used, the data security kit enables authentication of the user by means of a "User Name" and "Password" for the FTP server. (The Pull Print function allows a file on a previously stored FTP server to be printed directly from the operation panel of the machine without using the printer driver; see the Operation Guide.
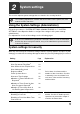
2 System settings This section explains system settings that are related to the security function. The following explanations assume that the machine has the printer, fax, and network scanner functions. Using the System Settings (Administrator) Follow the procedure in "SYSTEM SETTINGS (ADMINISTRATOR)" in "7. SYSTEM SETTINGS" of the Operation Guide to configure the settings in the system settings (administrator). For explanations of each of the settings, see the following pages.
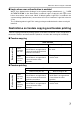
System settings Setting Page Explanation Jobs Completed List Display Setting 18 Use this to select whether or not the job status completed job screen is displayed. Job Status Display Setting 19 Use this to select whether or not filenames of print jobs and destination names of image send jobs are displayed in the job status screen. Release Lock on File/Folder Operation 19 Use this to release locked files and folders. Product Key*2 19 Register the product key.
System settings ■ Clear All Memory This program is used to manually clear all data from the memory and hard disk of the machine. Note, however, that the following types of data are not cleared with this setting. Use "Clear Address Book and Registered Data" (page 14 of this manual) to clear the following types of data.
System settings [Clear screen 1] The confirmation message "Clear all memory. (Exclusive of address book/user list data.)" will appear. ● To return to the previous menu screen, touch the [No] key. ● To clear all memory, touch the [Yes] key. "Please wait." appears, and then the following screen is displayed. If a print job is in progress when "Clear All Memory" is executed, the print job will be canceled. Print jobs in progress and in the job queue are also erased.
System settings ■ Clear Document Filing Data This function is used to clear data stored using the document filing function. Data whose property is set to "Protect" or "Confidential" is also cleared. System Settings Clear Document Filing Data Clear Back Select the data to be cleared and press [Clear].
System settings ■ Clear Address Book and Registered Data This function is used to clear the items indicated below, which cannot be cleared or initialized using "Clear All Memory" (page 11 of this manual) or "Restore Factory Defaults" (➞ System Settings (Administrator) > "Storing/Calling of System Settings" > "Restore Factory Defaults"). System Settings Clear Address Book and Registered Data Clear Back Select the data to be cleared and press [Clear].
System settings ■ Power Up Auto Clear This function is used to automatically clear all data in the machine when the power switch is turned on. System Settings Power Up Auto Clear Cancel OK Select the data to be cleared at power up. All Memory File Data(Including protected/confidential files) Quick File Data(Including protected files) Job Status Jobs Completed List The following types of data can be cleared.
System settings ■ Clearance Time Settings To further strengthen the security settings, you can have data clearing repeated a set number of times in each area. Touch the select box of each item and select the number of times that you wish data clearing to be repeated. When finished, touch the [OK] key.
System settings ■ Disabling of Document Filing This program is used to restrict the filing modes of the document filing function. Document filing modes (Quick File Mode, Sharing Mode, and Confidential Mode) can be separately disabled in each mode in which document filing operates (Copy, Printer, Scan to HDD, and Image Send mode).
System settings ■ Disabling of Print Jobs Other Than Print Hold Job Printing in print mode other than from the operation panel of the machine can be prohibited. This setting can be used to prevent sensitive documents left on the output tray from being taken by a third party, which could result in the leaking of sensitive information.
System settings Job Status Display Setting You can select whether or not filenames of print jobs and destination names of image send jobs are displayed in the job status screen of the touch panel. If you do not want to display this information for security reasons, select the appropriate checkboxes. Release Lock on File/Folder Operation This function is used to release document filing folders and files and encrypted PDF files, that are locked due to the entry of an incorrect password.
3 Document Control Setting Document control The document control function is used to embed a document control pattern on the paper when a copy, print job, received fax, or list print is printed. If a person attempts to scan a document with an embedded document control pattern on a SHARP machine that has the document control function enabled, the message "Document control pattern is detected. This job is canceled." will appear and an e-mail will be sent to the administrator.
Document Control Setting Modes to which the document control function can be added The document control function can be used to print with an embedded document control pattern in the following modes: ● Copy (color / black and white) ● Printer (color / black and white) ● Document Filing Print (color / black and white) ● Internet Fax Receive (black and white only) ● Fax Receive (black and white only) ● List Print (black and white only) Enabling the document control function To enable the document control fu
Document Control Setting ■ Settings for printing files stored by document filing These settings are for printing the data of copy jobs and print jobs that have been stored on the machine's hard drive using the document filing function. To have a document control pattern always printed when a stored file is printed if a document control pattern was printed when the job was originally executed, select the [Always Add the Pattern if You Print with it at Stored] checkbox .
Document Control Setting To select the print color, touch the select box . Touch one of the items to select it. [Bk(Black)] : The document control pattern is always printed in black. [C(Cyan)] : The document control pattern is always printed in cyan (Only when color mode is selected). [Y(Yellow)] : The document control pattern is always printed in yellow (Only when color mode is selected).
Document Control Setting Using the document control function When the document control function is used, a document control pattern is printed on the paper on which copies, print jobs, received faxes, and list prints are printed. ■ Pages on which a document control pattern is printed (all modes) ● The document control pattern is printed on all pages output by a Sharp machine that has the document control function, including the back side of pages printed by 2-sided printing.
Document Control Setting Settings for the document control function in the system settings. Document Control Print Select (Copy) setting [Not Printing] [Always Print] [Allow User to Select] Special Modes screen State of the Print Color [Document Control] Settings (copy) key display checkbox - Following steps Grayed out Not available Highlighted Go to step 2 Highlighted When the key is touched, a beep sounds to indicate that the key is not available.
Document Control Setting Combining the document control function with other functions Function combined with document control Exposure Copy Ratio Duplex Rotation Copy setting Margin Shift Erase Dual Page Copy Pamphlet Copy Job Build Tandem Copy Covers/Inserts Transparency Inserts Multi Shot Book Copy Tab Copy Card Shot Stamp Photo Repeat Multi-Page Enlargement Mirror Image A3 Full Bleed Centering B/W Reverse Other functions 26 Operation of document control pattern printing The pattern is always print
Document Control Setting ■ Using the document control function in printer mode ● When [Always Print] is enabled in [Document Control Print Select] in the system settings, a document control pattern is always printed. ● If [Allow User to Select] is enabled, follow the procedure below to print a document control pattern. Step 1: Select the [Data Security Kit] checkbox in the initial settings screen (properties screen) of the printer driver.
Document Control Setting Step 2: If the [Allow User to Select the Print Color] checkbox is selected in [Document Control Print Select] in the system settings, touch the [Bk (Black)] key, the [C (Cyan)] key or the [Y (Yellow)] key. The key of the color selected in [Print Color Setting] in the system settings is initially selected.
EX1