
Operation Manual, User's Manual
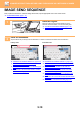


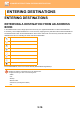
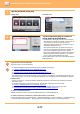
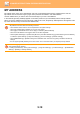

Table Of Contents

5-17
SCANNER/INTERNET FAX►ENTERING DESTINATIONS
1
Tap the [Address Book] key.
In Easy mode In Normal mode
2
Tap the one-touch key of contact or
group that has a destination.
• The destinations displayed on the list can be narrowed
with categories, frequent use, indexes, and keywords. (In
normal mode you can narrow down by job type.)
• Tapping the [Sort] key allows you to change the order of
destinations displayed in the list.
• When adding a destination, tap another one-touch key.
• If two or more destinations are selected or specified, the
total number of addresses appears next to address.
• Even if only a single destination is selected, the number of
addresses appears when the destination is a contact or
group in which multiple addresses are stored.
For the Address Book, refer to the "User's Manual (Address
Book Registration)".
If you select an incorrect destination:
Tap the key again to cancel the selection.
• To select a destination from the transmission log, tap the [Sending History] key.
► USING A TRANSMISSION LOG TO RESEND (page 5-26)
• To check the entered destinations, tap the [Address Review] key.
► VIEWING A LIST OF THE SELECTED DESTINATIONS (page 5-19)
• The destination for transmission can be selected by tapping a stored destination.
• If an address that you do not have permission to use is included in the addresses, a message will appear when you
press the [Start] key. To send only to the permitted addresses, press the [OK] key and then the [Enter for send] key.
In Normal mode
• Tap the one-touch key, and then tap [Display Registered Information] on the action panel to display the detailed
information screen.
• To retrieve a destination by using a search number, tap [Call Search Number] on the action panel.
► USING A TRANSMISSION LOG TO RESEND (page 5-26)
• To retrieve a destination from a global address book, tap [Global Address Search] on the action panel.
► RETRIEVING A DESTINATION FROM A GLOBAL ADDRESS BOOK (page 5-24)
To cancel a specified destination:
Select the address you want to cancel in the address list screen, and tap the [Delete] key.
To enable transmission to addresses of modes other than the current mode:
Remove the checkmark from [System Settings] → [Image Send Settings] → [Common Settings] → [Condition Settings]
→ [Address Book Default Selection] → [Apply Addresses of Sending Modes Only] in "Settings (administrator)".
CA
Preview Auto Set
Original
A4
Address E-mail Address
Detail
B/W
Start
Colour
Start
Address Book
Sending History
Global
Address Search
Local Drive/
USB
Specified by System Settings
Preview
Start
Scan Size
Auto
Colour Mode
Auto/Mono2
Resolution
200x200dpi
File Format
PDF
Original
Auto
Others
A4
A4
100%
Send Size
Address Book
Subject
File Name
Address Touch to input Address
Options
Exposure
CA
Sending History
Call Program
Call Registered settings
Quick File
Store Data Temporarily
Call Search Number
Send Same Image
as Fax Address
Send
Destination Link
Frequent
Use
Address
E-mail
Narrow Down
All
Category
ABC
A
D
G
J
M
P
T
W
Sort
AAA
BBB
CCC
Preview
Start
CA
Call Search Number
Add New
Send Same Image
as Fax Address
Sending History
Send
Destination Link
Global Address Search