
Operation Manual, User's Manual
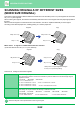
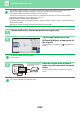

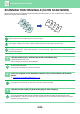
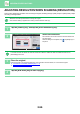
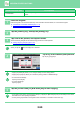
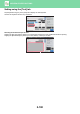
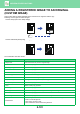
Table Of Contents

2-99
COPIER►OTHER FUNCTIONS
Covers/Inserts
Use the stamp settings to select whether or not the item is printed on inserted covers and
inserts.
1
Place the original.
Place the original in the document feeder tray of the automatic document feeder, or on the document glass.
► AUTOMATIC DOCUMENT FEEDER
(page 1-116)
► DOCUMENT GLASS (page 1-119)
2
Tap the [Others] key, and tap the [Stamp] key.
3
Tap a tab to be printed, and tap the format.
The format of the [Text] tab can be entered using pre-set text or soft keyboard.
► Setting using the [Text] tab
(page 2-100)
When you tap the tab, the display tab is switched.
4
Tap a key of the desired print position.
Tap any of [1] to [6] keys.
• Tapping the [Detail] key allows you to configure setting for each setting position.
• Tapping the [Layout] key allows you to check the printing position or detailed settings.
• To cancel the text settings:
Tap the [Cancel All] key.
• To cancel all settings:
Tap the [CA] key.
5
Tap the [Colour Start] or [B/W Start] key to start copying.
• If you select colour printing, tap the [Colour Start] key. Tapping the [B/W Start] key will print the stamp items in black
and white even if colour printing is specified.
• If colour printing is specified for the original in black and white, it is counted as a full colour copy.
Combined function name Print operation
Off
CA
Preview
B/W
Start
Colour
Start
Back
Change Size/Direction.
Original
Others
Colour Mode
2-Up
2-Sided Copy
Pattern Print
Prevent Unauthorized Copy
Combine Registered Images
Custom Image
Put Multiple Pages in A Page
Stamp
Cancel All
Date
Pages
Stamp
MM DD, YYYY
Detail
Layout
YYYY/MM/DD
MM/DD/YYYY
DD/MM/YYYY