MODEL: MX-B350P MX-B450P LASER PRINTER User's Manual Click to jump to the table of contents of the desired chapter.
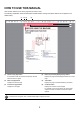
HOW TO USE THIS MANUAL Click a button below to move to the page that you wish to view. The following explanation assumes that Adobe Acrobat Reader is being used (Some buttons do not appear in the default state.). (1) (2) (3) (4) (5) (6) (1) (4) Return to top page button (2) (5) Back one page button Title button Displays the page of the title indicated by the button. Displays the previous page.
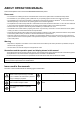
ABOUT OPERATION MANUAL This manual explains how to use the MX-B350P/MX-B450P laser printer. Please note • For information on installing the drivers and software cited in this manual, please refer to the Software Setup Guide. • For information on your operating system, please refer to your operating system manual or the online Help function. • The explanations of screens and procedures in a Windows environment are primarily for Windows® 10.
DIFFERENCES BETWEEN MODELS This manual covers the following models. Model Print Speed Wireless LAN MX-B350P 35PPM Yes MX-B450P 45PPM Yes AB series (metric) and inch series references Both specifications are quoted where applicable. Although AB series size indications are shown on the operation panel of this manual, inch series indications are displayed on the inch series machines.
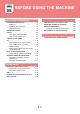
BEFORE USING THE MACHINE MAINTENANCE BEFORE USING THE MACHINE PART NAMES AND FUNCTION . . . . . . . . . . . . . . . 1-2 CHECKING THE TOTAL OUTPUT COUNT . . . . . . 1-28 • EXTERIOR . . . . . . . . . . . . . . . . . . . . . . . . . . . . 1-2 ADJUSTING THE DISPLAY CONTRAST . . . . . . . 1-28 • INTERIOR, SIDE AND BACK . . . . . . . . . . . . . . 1-3 REGULAR MAINTENANCE . . . . . . . . . . . . . . . . . . 1-29 • OPERATION PANEL. . . . . . . . . . . . . . . . . . . . .
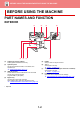
BEFORE USING THE MACHINE►BEFORE USING THE MACHINE BEFORE USING THE MACHINE PART NAMES AND FUNCTION EXTERIOR (1) (5) (6) (2) (7) Output tray (exit tray cabinet) Printed papers are delivered to this tray. (5) (2) Operation panel This panel hosts status indicator, error indicator, and operation keys. ► OPERATION PANEL (page 1-4) (6) (4) (4) (8) (1) (3) (3) (7) USB port (A type) This is used to connect a USB device such as a USB memory device to the machine. Supports USB 2.0 (Hi-Speed).
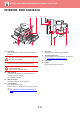
BEFORE USING THE MACHINE►BEFORE USING THE MACHINE INTERIOR, SIDE AND BACK (1) (5) (1) (2) (3) (6) (7) Fusing unit Heat is applied here to fuse the transferred image onto the paper. The fusing unit is hot. Take care not to burn yourself when removing a misfeed. (2) (4) Photoconductive drum unit Images are formed on the photoconductive drum. Do not touch or damage the photoconductive drum and the transfer roller. This may cause a defective image.
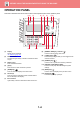
BEFORE USING THE MACHINE►BEFORE USING THE MACHINE OPERATION PANEL This section describes the names and functions of the respective parts of the operation panel. (1) (2) (3) (9) (4) (5) (10) (6) (7) (8) (11) (12) (13) (8) [ENERGY SAVE] key / indicator ( ) Press to enter the energy save mode. (9) [LOGOUT] key ( ) Press this key to log out after you have logged in and used the machine. (1) Display Shows various messages.
BEFORE USING THE MACHINE►BEFORE USING THE MACHINE PERIPHERAL DEVICES Peripheral devices can be installed on the machine to increase its range of functionality. The peripheral devices are generally optional. However, some models include certain peripheral devices as standard equipment. (As of April, 2018) Product name Product number Description 600-sheet paper feed unit MX-CS14 Additional tray. A maximum of 600 sheets of paper can be loaded into the tray. One paper feed unit can be installed.
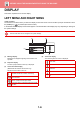
BEFORE USING THE MACHINE►BEFORE USING THE MACHINE DISPLAY This section explains how to use the display. LEFT MENU AND RIGHT MENU HOME SCREEN The machine is set at the factory to return the display to the home screen one minute after a print job is finished or when the [HOME] key ( ) is pressed (auto clear function). In the default state the display shown below appears. The default state of the display may vary depending on settings in the system settings.
BEFORE USING THE MACHINE►BEFORE USING THE MACHINE HOW TO USE THE DISPLAY Selecting an item with the arrow keys (up/down) Use the up/down arrow keys (indicated in this manual by [ ] [ ]) to move to and select (highlight) a setting item in the selection screen. Press the [OK] key to display the screen of the selected setting item. Press [OK] in the setting screen to save your settings. The [ ] [ ] icons appear in the selection screen of settings that use the up/down arrow keys.
BEFORE USING THE MACHINE►BEFORE USING THE MACHINE Status indicator and error indicator The status indicator and the error indicator lights solidly or blinks to indicate the status of the machine. Error indicator (red) Status indicator (green) Pattern 1 Solidly Errors that do not stop machine operation, such as almost out of toner. Job in progress, such as paper feeding or output. Blinks Errors that stop machine operation, such as misfeeds and out of toner.
BEFORE USING THE MACHINE►BEFORE USING THE MACHINE TURNING ON THE POWER This section describes how to turn on/off the machine's power and how to restart the machine. The power switch is located on the left side of the machine. Turning on the power Turn the main power switch to the " " position. Turning off the power Turn the main power switch to the " " position. Restart the machine Turn the main power switch off and then on.
BEFORE USING THE MACHINE►BEFORE USING THE MACHINE Eco ECO FUNCTIONS OF THE MACHINE These functions help save power consumption by managing operations of sections prone to high power consumption. The machine provides two power-saving modes. Function Description Page AUTO POWER SHUT-OFF MODE If no operations take place, this mode will turn off the power to the operation panel and the fusing unit, and makes the machine wait in the lowest power consumption state.
BEFORE USING THE MACHINE►BEFORE USING THE MACHINE PREHEAT MODE This mode lowers the temperature of the fusing unit and makes the machine wait in low power consumption state. Preheat mode will activate when the set duration of time elapses in waiting status without executing a job. Compared to Auto Power Shut-Off Mode, the amount of energy saved is less and the wakeup time is shorter. In preheat mode the display turns off.
BEFORE USING THE MACHINE►BEFORE USING THE MACHINE USER AUTHENTICATION MODE When user authentication mode is enabled, a count is kept of the pages printed by each account. The page counts can be viewed in the display. This function is enabled in the system settings. (User Authentication (page 4-10)) Up to 30 can be stored. USING USER AUTHENTICATION MODE When user authentication mode is turned on, the account number entry screen is displayed.
BEFORE USING THE MACHINE►BEFORE USING THE MACHINE UNIVERSAL DESIGN IN THE MACHINE The structure of the machine and the software are designed to allow all people to use the machine with ease. UNIVERSAL DESIGN RELATED TO OPERATION Grip handle on paper trays The grip-type handles allow easy use from above or below. By simply placing your hand on a handle and gently pulling forward, a tray can be withdrawn. The trays can be manipulated in a natural manner.
BEFORE USING THE MACHINE►BEFORE USING THE MACHINE UNIVERSAL DESIGN FEATURES The machine has design features and settings that are compatible with universal design. Easy-to-use user interface • Multi-language display The language used in the display can be changed to another language such as English or French. Select the desired language in "System Settings (administrator)" → [Operation Setting] → [Language Setting].
BEFORE USING THE MACHINE►LOADING PAPER LOADING PAPER IMPORTANT POINTS ABOUT PAPER NAMES AND LOCATIONS OF TRAYS Bypass tray Tray 1 Tray 2 (when a 600-sheet paper feed unit is installed) APPLICABLE PAPER TYPES This section describes paper types that can be used and those that cannot be used. All types of paper other than plain paper are referred to as special media. • Various types of paper are commercially available, some of which cannot be used on the machine.
BEFORE USING THE MACHINE►LOADING PAPER Useable paper Specifications of plain paper, heavy paper and thin paper Plain Paper Heavy paper Thin paper Plain Paper 1 60 g/m2 to 89 g/m2 (16 lbs. bond to 24 lbs. bond) Plain Paper 2 90 g/m2 to 105 g/m2 (24 lbs. bond to 28 lbs. bond) Heavy paper 1 106 g/m2 to 176 g/m2 (28 lbs. bond to 65 lbs. cover) Heavy paper 2 177 g/m2 to 220 g/m2 (65 lbs. cover to 80 lbs.
BEFORE USING THE MACHINE►LOADING PAPER Types of paper that can be set in each tray • For detailed information on the sizes and types of paper that can be loaded into each tray of the machine, see "SPECIFICATIONS" in the "Start Guide". • Recycled paper, coloured paper and pre-punched paper must meet the same specifications as plain paper. Before using any paper, consult the dealer or nearest authorised service representative.
BEFORE USING THE MACHINE►LOADING PAPER Setting orientation of the print side The setting orientation varies for the print side of paper, depending on the tray used. For "Letter Head" and "Pre-Printed", set the paper in the reverse orientation. Place with the print side facing the direction indicated below.
BEFORE USING THE MACHINE►LOADING PAPER TRAY 1 - 2 A maximum of 500 sheets of paper from size A6 to A4 (5-1/2" x 8-1/2" to 8-1/2" x 11") can be loaded into tray 1. (150 sheets when the paper is A6) A maximum of 600 sheets of paper from size A5 to A4 (5-1/2" x 8-1/2" to 8-1/2" x 14") can be loaded into tray 2. If you loaded paper of a different type or size from the paper previously loaded, be sure to check the settings in "TRAY SETTINGS (page 1-27)".
BEFORE USING THE MACHINE►LOADING PAPER 2 Adjust guide plates A and B to match the longitudinal and transversal dimensions of the paper to be loaded. B The guide plates A and B are slidable. Squeeze the separator plate lever and slide to the desired paper size. Adjust to the non-standard paper size so that the paper will not be too loose or too tight. A • When loading 8-1/2" x 14" paper in tray 2, remove divider plate A.
BEFORE USING THE MACHINE►LOADING PAPER Insert the paper into the tray. 4 Load the paper with the print side facing up. The stack must not be higher than the indicator line (Tray 1: maximum of 500 sheets (Maximum of 150 sheets of A6 paper), tray 2: maximum of 600 sheets). • • • • • If a paper misfeed occurs, turn the paper over and/or around, and reload. If the paper is curled, fix the curl before loading the paper. Adjust the divider plate so that there is no gap between the paper and divider plate.
BEFORE USING THE MACHINE►LOADING PAPER LOADING PAPER INTO THE BYPASS TRAY Use the bypass tray for printing on plain paper, envelopes, label sheets, and other special media. Up to 50 sheets of paper can be loaded (Heavy paper weighing between 106 g/m2 and 256 g/m2 (28 lbs. bond and 80 lbs. Cover): 20 sheets, and envelope: 10 sheets) for continuous printing, just like operation using other trays.
BEFORE USING THE MACHINE►LOADING PAPER Important points when using envelopes • Do not print on both sides of an envelope. This may result in misfeeds or poor print quality. • Restrictions apply to some types of envelopes. For more information, consult a qualified service technician. • Some operating environments may cause creasing, smudging, misfeeds, poor toner fusing, or machine failure. • Fold the flap of the envelope and make a sharp crease at the fold. A misfeed may occur if the flap is up.
BEFORE USING THE MACHINE►LOADING PAPER Fusing unit pressure adjusting levers In some cases damage to the envelopes or smudging may occur even if envelopes within the specifications are used. This problem may be alleviated by shifting the fusing unit pressure adjusting levers from their "normal pressure position" to the "lower pressure position". Follow the procedure on the this page. 1 Open out the side cover.
BEFORE USING THE MACHINE►LOADING PAPER Be sure to return the levers to the "normal pressure position" before printing on paper other than envelopes. Otherwise, fusing problems, paper misfeeds, or equipment failure may occur. The fusing unit is hot. Take care not to burn yourself when operating the fusing unit pressure adjusting levers. Loading paper Open the bypass tray and the extension tray. 1 Do not place heavy objects on the bypass tray or press down on the tray.
BEFORE USING THE MACHINE►LOADING PAPER Set the bypass tray guides correctly to the width of the paper. 4 Adjust the bypass tray guides so that they slightly contact the loaded paper. • Do not forcefully push in paper that you are loading. This may cause misfeeds. • If the bypass tray guides are set wider than the paper, move the bypass tray guides in until they correctly fit the width of the paper. If the bypass guides are set too wide, the paper may skew or be creased.
BEFORE USING THE MACHINE►LOADING PAPER TRAY SETTINGS These programs are used to change the paper size and type setting of a tray, and auto tray switching. Changing the paper size setting of a tray If the size of the loaded paper is different from the size shown in the display, follow the steps below to change the paper size setting of the tray. The paper size setting cannot be changed during printing or when a misfeed has occurred.
BEFORE USING THE MACHINE►MAINTENANCE MAINTENANCE This section explains how to check the total count, adjust the display contrast, clean the machine, and replace the toner cartridge. CHECKING THE TOTAL OUTPUT COUNT You can check by pressing the [SPECIAL FUNCTION] key ( ) and selecting "Total Count" in the function menu screen. The total output count can be used as a guideline for cleaning. When the total output count exceed "99,999,999", the counts return to "0".
BEFORE USING THE MACHINE►MAINTENANCE REGULAR MAINTENANCE To ensure that the machine continues to provide top quality performance, periodically clean the machine. Do not use a flammable spray to clean the machine. If gas from the spray comes in contact with hot electrical components or the fusing unit inside the machine, fire or electrical shock may result. Do not use thinner, benzene, or similar volatile cleaning agents to clean the machine. These may degrade or discolour the housing.
BEFORE USING THE MACHINE►MAINTENANCE REPLACEMENT OF TONER CARTRIDGE Always replace the toner cartridge after the "Change the toner cartridge." message appears. You should keep one set of replacement toner cartridges on hand so that you can replace a toner cartridge immediately when toner runs out. Replacement message When this message appears, prepare a toner cartridge for replacement. Toner Low. (Do not replace cartridge until requested.
BEFORE USING THE MACHINE►MAINTENANCE 1 Open the front cover. 2 Pull the toner cartridge toward you. Gently pull out the toner cartridge horizontally. If the cartridge is pulled out abruptly, toner may spill out. Hold the toner cartridge with both hands as shown and slowly pull it out of the machine. 3 Take out a new toner cartridge from its package and shake it horizontally five or six times. 4 Slowly insert the new toner cartridge on the level. 5 Press in firmly until you hear a "click" sound.
BEFORE USING THE MACHINE►MAINTENANCE Close the front cover. 6 After the toner cartridge is replaced, the machine automatically enters image adjustment mode. Do not open the front cover while this is occurring. • Do not throw a toner cartridge into a fire. Toner may fly and cause burns. • Store toner cartridges out of reach of small children. • If a toner cartridge is stored upright, the toner may harden and become unusable. Always store toner cartridges on their side.
BEFORE USING THE MACHINE►CHARACTER ENTRY CHARACTER ENTRY This section explains how to enter and edit characters for names of rapid dial numbers, Speed Dial numbers, and group keys, as well as account names, program names, and search characters for the address list. CHARACTERS THAT CAN BE ENTERED Characters that can be entered for names The following characters can be entered: • Up to 36 characters can be entered for a name. However, up to 18 characters can be entered for an account name or sender's name.
BEFORE USING THE MACHINE►CHARACTER ENTRY Characters are entered by pressing the numeric keys on the operation panel. The letters entered with each numeric key are shown below. Key Characters that can be entered 1 1 Space 2 abc2ABC 3 def3DEF 4 ghi4GHI 5 jkl5JKL 6 mno6MNO 7 pqrs7PQRS 8 tuv8TUV 9 wxyz9WXYZ 0 0 #@.-_/!"$%&'()+,:;=<>?[]{}* To enter two characters in succession that require the same key, press the [ ] key to move the cursor after entering the first character.
PRINTER The explanations in this chapter are based on American English and the North American version of the software. Software for other countries and regions may vary slightly from the North American version. CONVENIENT PRINTING FUNCTIONS PRINTER FUNCTION OF THE MACHINE CONVENIENT FUNCTIONS FOR CREATING PAMPHLETS AND POSTERS . . . . . . . . . . . . . . . . PRINTING IN A WINDOWS ENVIRONMENT BASIC PRINTING PROCEDURE. . . . . . . . . . . . . . . • PRINTER DRIVER SETTINGS SCREEN / REFERRING TO HELP . . .
PRINTER PRINT FUNCTIONS FOR SPECIAL PURPOSES. . . 2-43 • INSERTING COVERS (COVER PAGE) . . . . . . 2-43 • INSERT PRESET DATA BEFORE OR AFTER EACH PAGE (PAGE INTERLEAVE) . . . . . . . . . 2-45 • CHANGING THE RENDERING METHOD AND PRINTING JPEG IMAGES (USE DRIVER TO RENDER JPEGS) . . . . . . . . . . . . . . . . . . . . . . . 2-46 CONVENIENT PRINTER FUNCTIONS . . . . . . . . . . 2-47 • SAVING AND USING PRINT FILES (RETENTION) . . . . . . . . . . . . . . . . . . . . . . . . . .
PRINTER►PRINTER FUNCTION OF THE MACHINE PRINTER FUNCTION OF THE MACHINE To enable printing from your computer, a printer driver must be installed. See the table below to determine which printer driver to use in your environment. Windows environment Printer driver type PCL6 The machine support the Hewlett-Packard PCL6 printer control languages.
PRINTER►PRINTING IN A WINDOWS ENVIRONMENT PRINTING IN A WINDOWS ENVIRONMENT BASIC PRINTING PROCEDURE The following example explains how to print a document from "WordPad", which is a standard accessory application in Windows. • The menu used to execute printing may vary depending on the application. • The button that is used to open the printer driver properties window (usually [Property] or [Preferences]) may vary depending on the application.
PRINTER►PRINTING IN A WINDOWS ENVIRONMENT Select print settings. 3 (1) Click the [Main] tab. (1) (2) Select the original size. • You can register up to seven user-defined sizes in the menu. To store an original size, select [Custom Paper] or one of [User1] to [User7] from the menu, and click the [OK] button. • To select settings on other tabs, click the desired tab and then select the settings.
PRINTER►PRINTING IN A WINDOWS ENVIRONMENT PRINTER DRIVER SETTINGS SCREEN / REFERRING TO HELP The printer driver settings screen consists of 8 tabs. Click a tab to select the settings on that tab. You can check information on each of the settings in the Help screen. Click the [Help] button at the bottom right of the screen. (1) (2) (3) (4) (5) (6) (7) (8) (1) Tabs: Click to change the tabs shown. • [Main]: • • • • • • • Frequently used functions are grouped on this tab.
PRINTER►PRINTING IN A WINDOWS ENVIRONMENT (6) Print image This lets you visually check how the current settings affect the print image. Finishing settings is indicated by icons. (7) Machine image This shows the options that are installed on the machine, and the paper trays and output trays that are used. (8) [Help] button Displays the Help window of the printer driver. • Help can be displayed for a setting by clicking the setting and pressing the [F1] key.
PRINTER►PRINTING IN A WINDOWS ENVIRONMENT PRINTING ON ENVELOPES The bypass tray can be used for envelope printing. • • • • • For the types of paper that can be used in the bypass tray, see "APPLICABLE PAPER TYPES (page 1-15)". For the procedure for loading paper in the bypass tray, see "LOADING PAPER INTO THE BYPASS TRAY (page 1-22)". For more information on the procedure for loading paper, see "SELECTING THE PAPER (page 2-7)".
PRINTER►PRINTING IN A WINDOWS ENVIRONMENT PRINTING WHEN THE USER AUTHENTICATION FUNCTION IS ENABLED The user information (such as User Number) that must be entered varies depending on the authentication method being used, so check with the administrator of the machine before printing. • If you have configured "Printing Policy" on the [Configuration] tab so that user authentication is always performed, users are required to be authenticated for each print job.
PRINTER►PRINTING IN A WINDOWS ENVIRONMENT FREQUENTLY USED FUNCTIONS SAVING SETTINGS AT THE TIME OF PRINTING Settings configured on each of the tabs at the time of printing can be saved as Favorite. Saving frequently used settings or complex settings under an assigned name makes it easy to select those settings the next time you need to use them. Settings can be saved from any tab of the printer driver properties window.
PRINTER►PRINTING IN A WINDOWS ENVIRONMENT USING SAVED SETTINGS You can specify the saved favorites through just one click to apply frequently used settings or complicated settings to your printing. 1 Select the machine's printer driver from the print window of the application, and click the [Preferences] button. The button that is used to open the printer driver properties window (usually [Property] or [Preferences]) may vary depending on the application. Select favorite settings.
PRINTER►PRINTING IN A WINDOWS ENVIRONMENT Right-click the printer driver icon of the machine and select [Printing preferences]. 2 3 Configure the settings and click the [OK] button. For explanations of the settings, see printer driver Help.
PRINTER►PRINTING IN A Mac OS ENVIRONMENT PRINTING IN A Mac OS ENVIRONMENT BASIC PRINTING PROCEDURE The following example explains how to print a document from the standard accessory application "TextEdit" in Mac OS X. • To install the printer driver and configure settings in a Mac OS environment, see the Software Setup Guide. • The menu used to execute printing may vary depending on the application. Select [Page Setup] from the [File] menu and select the printer.
PRINTER►PRINTING IN A Mac OS ENVIRONMENT 4 Select print settings. (1) (1) Make sure that the correct printer is selected. (2) Select an item from the menu and configure the settings as needed. (3) Click the [Print] button. (2) (3) SELECTING THE PAPER This section explains the [Paper Feed] settings in the print settings window.
PRINTER►PRINTING IN A Mac OS ENVIRONMENT PRINTING ON ENVELOPES The bypass tray can be used for envelope printing. • For the types of paper that can be used in the bypass tray, see "APPLICABLE PAPER TYPES (page 1-15)". • For the procedure for loading paper in the bypass tray, see "LOADING PAPER INTO THE BYPASS TRAY (page 1-22)". • For more information on the procedure for loading paper, see "SELECTING THE PAPER (page 2-14)".
PRINTER►PRINTING IN A Mac OS ENVIRONMENT PRINTING WHEN THE USER AUTHENTICATION FUNCTION IS ENABLED The user information (such as login name and password) that must be entered varies depending on the authentication method being used, so check with the administrator of the machine before printing. The menu used to execute printing may vary depending on the application.
PRINTER►PRINTING IN A Mac OS ENVIRONMENT Enter your user information. 2 (1) Make sure that the machine's printer name is selected. (1) (2) Select [Job Handling]. (3) Click the [Authentication] tab. (4) Enter your user information. (2) When authentication is carried out using the user number, enter your user number (5 to 8 digits) in "User Number". (3) (4) (5) (6) (5) Enter the user name and job name as necessary. • User Name Enter your user name using up to 32 characters.
PRINTER►FREQUENTLY USED FUNCTIONS FREQUENTLY USED FUNCTIONS SELECTING THE RESOLUTION The following two selections are available for "Print Mode" (resolution): 600 dpi This mode is suitable for printing data such as regular text or a table. 600 dpi (High Quality) The print quality of photos and text are high. Windows (1) (2) (1) Click the [Image Quality] tab. (2) Select "Print Mode". Mac OS (1) (2) (1) Select [Printer Features] and then select [Advanced]. (2) Select "Print Mode".
PRINTER►FREQUENTLY USED FUNCTIONS 2-SIDED PRINTING The machine can print on both sides of the paper. This function is useful for many purposes, and is particularly convenient when you want to create a simple pamphlet. 2-sided printing also helps conserve paper. Paper orientation Print results Long Edge Short Edge Short Edge Long Edge Portrait Landscape The pages are printed so that they can be bound at the left or right side. The pages are printed so that they can be bound at the top.
PRINTER►FREQUENTLY USED FUNCTIONS Mac OS (1) (2) (1) Select [Layout]. (2) Select [Long-Edge binding] or [Short-Edge binding]. FITTING THE PRINT IMAGE TO THE PAPER This function automatically enlarges or reduces the print image to match the size of the paper loaded in the machine. This function is convenient when enlarging an A5 or Invoice size document to an A4 or Letter size to make it easier to view, or when printing a document on paper that is different in size from the original document.
PRINTER►FREQUENTLY USED FUNCTIONS Windows (1) (2) (3) (1) Click the [Main] tab. (2) Select the original size from [Original Size] (for example: A5). (3) Select the actual paper size to be used for printing from [Output Size] (for example: A4). If the output size is larger than the original size, the printed image will be automatically enlarged. Mac OS (1) (2) (3) (4) (1) Check the paper size for the print image (for example: A5). (2) Select [Paper Handling]. (3) Select [Scale to fit paper size].
PRINTER►FREQUENTLY USED FUNCTIONS PRINTING MULTIPLE PAGES ON ONE PAGE This function reduces the print image and prints multiple pages on a single sheet of paper. You can print only the first page in the original size and print multiple reduced pages on the subsequent sheets. For example, when [2-Up] (2 pages per sheet) or [4-Up] (4 pages per sheet) is selected, the following print results will be obtained, depending on the selected page order.
PRINTER►FREQUENTLY USED FUNCTIONS Windows (1) (3) (2) (4) (1) Click the [Layout] tab. (2) Select the number of pages per sheet. (3) Select the order of the pages. (4) If you wish to print borderlines, click the [Border] checkbox so that the checkmark appears. • To print the first page normally (as a cover), select the [N-Up with cover] checkbox ( ). (PCL6 only) • When [100% N-Up] is selected ( ) for jobs, the pages will be printed at the full size of the original.
PRINTER►CONVENIENT PRINTING FUNCTIONS CONVENIENT PRINTING FUNCTIONS CONVENIENT FUNCTIONS FOR CREATING PAMPHLETS AND POSTERS CREATE A PAMPHLET (BOOKLET) The pamphlet function prints on the front and back of each sheet of paper so that the sheets can be folded and bound to create a pamphlet. Windows (1) (2) (3) (1) Click the [Layout] tab. (2) Select [Standard] in "Booklet". The printed image will be enlarged or reduced to fit the paper selected in "Output Size".
PRINTER►CONVENIENT PRINTING FUNCTIONS Mac OS (1) (2) (1) Select [Printer Features] and then select [Output]. (2) Select [2-Up (Left)], [2-Up (Right)], [Tiled (Left)] or [Tiled (Right)].
PRINTER►CONVENIENT PRINTING FUNCTIONS PRINTING WITH MARGIN SHIFT SETTING (MARGIN) This function shifts the print image to increase the margin at the left, the right, or the top of the paper. By shifting the image, the part of the image that is outside the print area will not be printed. Windows (1) (3) (4) (2) (1) Click the [Layout] tab. (2) Click the [Print Position] button. (3) Select [Margin Shift]. (4) Select the shift width. Select from the "Margin Shift" menu.
PRINTER►CONVENIENT PRINTING FUNCTIONS Mac OS (1) (2) (1) Select [Printer Features] and then select [Output]. (2) Select "Margin Shift".
PRINTER►CONVENIENT PRINTING FUNCTIONS CREATE A LARGE POSTER (POSTER PRINTING) One page of print data is enlarged and printed using multiple sheets of paper (4 sheets (2 x 2), 9 sheets (3 x 3) or 16 sheets (4 x 4)). The sheets can then be attached together to create a large poster. To enable precise alignment of the edges of the sheets during attachment, borderlines can be printed or overlapping edges can be created (overlap function). This function is available in a Windows environment.
PRINTER►CONVENIENT PRINTING FUNCTIONS FUNCTIONS TO ADJUST THE SIZE AND ORIENTATION OF THE IMAGE ADJUST PRINT POSITION ON ODD AND EVEN PAGES SEPARATELY (PRINT POSITION) This function sets different print positions (margins) separately for odd and even pages and prints the pages. This function is available in a Windows environment. Windows (1) (3) (4) (2) (5) (1) Click the [Layout] tab. (2) Click the [Print Position] button. (3) Select [Custom].
PRINTER►CONVENIENT PRINTING FUNCTIONS ROTATING THE PRINT IMAGE 180 DEGREES (ROTATE 180 DEGREES) This feature rotates the image 180 degrees so that it can be printed correctly on paper that can be loaded in only one orientation (such as envelopes or paper with punch holes). ABCD ABCD Windows (1) (2) (1) Click the [Main] tab. (2) Select [Portrait (Rotated)] or [Landscape (Rotated)] in "Orientation".
PRINTER►CONVENIENT PRINTING FUNCTIONS ENLARGING/REDUCING THE PRINT IMAGE (ZOOM SETTING/ENLARGE OR REDUCE) This function enlarges or reduces the image to a selected percentage. This allows you to enlarge a small image or add margins to the paper by slightly reducing an image. When using the PS printer driver (Windows), you can set the width and length percentages separately to change the proportions of the image. Windows (1) (3) (2) (4) (1) Click the [Main] tab.
PRINTER►CONVENIENT PRINTING FUNCTIONS Mac OS (1) (2) (1) Select [Page Setup] from the [File] menu and enter the ratio (%). (2) Click the [OK] button.
PRINTER►CONVENIENT PRINTING FUNCTIONS PRINT A MIRROR-IMAGE (MIRROR-IMAGE REVERSE/ VISUAL EFFECTS) The image is reversed to create a mirror image. This function is conveniently used to print a design for a woodblock print or other printing medium. B B In a Windows environment, this function is only available when using the PS printer driver. Windows (1) (2) (1) Click the [Detailed Settings] tab. (2) If you wish to reverse the image horizontally, select [Horizontal].
PRINTER►CONVENIENT PRINTING FUNCTIONS IMAGE ADJUSTING FUNCTION ADJUST THE BRIGHTNESS AND CONTRAST OF THE IMAGE (IMAGE ADJUSTMENT) This function adjusts the brightness and contrast in the print settings when a photo or other image is printed. This function makes simple corrections even if image editing software is not installed on your computer. This function is available in a Windows environment. Windows (1) (2) (3) (4) (1) Click the [Image Quality] tab. (2) Click the [Image Adjustment] button.
PRINTER►CONVENIENT PRINTING FUNCTIONS PRINTING FAINT TEXT AND LINES IN BLACK (TEXT TO BLACK/VECTOR TO BLACK) When printing a color image in grayscale, text and lines that are drawn in faint colors are printed in black. This function allows you to bring out color text and lines that are faint and difficult to see when printed in grayscale. ABCD ABCD • Raster data such as bitmap images cannot be adjusted. • This function is available in a Windows environment.
PRINTER►CONVENIENT PRINTING FUNCTIONS SELECTING IMAGE SETTINGS TO MATCH THE IMAGE TYPE Preset settings are available in the machine's printer driver for various uses. Graphics mode Select the graphics mode from "Raster" or "Vector". Bitmap compression The data compression ratio of bitmap is set. If the ratio is higher, the image quality becomes lower. Screening Select the screening to modify the image to suit specific preferences, according to the appropriate image processing method.
PRINTER►CONVENIENT PRINTING FUNCTIONS Mac OS (1) (2) (3) (1) Select [Printer Features]. (2) Click the [Advanced2] tab. (3) Specify the settings.
PRINTER►CONVENIENT PRINTING FUNCTIONS FUNCTIONS TO COMBINE TEXT AND IMAGES ADDING A WATERMARK TO PRINTED PAGES (WATERMARK) CO NF ID EN TI A L This function adds faint shadow-like text as a watermark in the background of the printed image. The size and angle of the watermark text can be adjusted. The watermark text can be selected from the previously registered text in the list. When necessary, you can enter text to create an original watermark. Windows (3) (1) (2) (1) Click the [Stamp] tab.
PRINTER►CONVENIENT PRINTING FUNCTIONS Mac OS (1) (2) (1) Select [Watermarks]. (2) Click the [Watermark] checkbox and configure watermark settings. • Configure detailed watermark settings such as selection of the text. • Adjust the size and angle of the text by dragging the slide bar .
PRINTER►CONVENIENT PRINTING FUNCTIONS PRINTING AN IMAGE OVER THE PRINT DATA (IMAGE STAMP) This function prints a bitmap or JPEG image stored on your PC over the print data. This function prints a frequently used image or an icon of your own creation as if it is stamped on the print data. The size, position, and angle of the image can be adjusted. MEMO MEMO This function is available in a Windows environment. Windows (3) (1) (2) (1) Click the [Stamp] tab.
PRINTER►CONVENIENT PRINTING FUNCTIONS OVERLAY A FIXED FORM ON THE PRINT DATA (OVERLAYS) This function overlays data on a fixed form you have prepared. By creating table rulings or a decorative frame in an application different from that of the text file and registering the data as an overlay file, an attractive print result can be easily obtained without the need for complex manipulations.
PRINTER►CONVENIENT PRINTING FUNCTIONS • When printing is started, a confirmation message will appear. The overlay file will not be created until the [Yes] button is clicked. • When you click the [Open] button, the existing overlay file is registered. Printing with an overlay file (2) (3) (1) Open the driver properties window from the application that is used for printing with an overlay file. (2) Click the [Stamp] tab. (3) Select an overlay file.
PRINTER►CONVENIENT PRINTING FUNCTIONS PRINT FUNCTIONS FOR SPECIAL PURPOSES INSERTING COVERS (COVER PAGE) The front cover of a document is printed on paper that is different from the other pages. Use this function when you wish to print only the front cover on heavy paper. 1 2 3 4 5 Windows (1) (3) (2) (1) Click the [Inserts] tab. (2) Select [Cover Page] from [Inserts Option], and click the [Settings] button. (3) Select the paper insertion settings.
PRINTER►CONVENIENT PRINTING FUNCTIONS Mac OS (1) (2) (3) (1) Select [Printer Features]. (2) Select [Cover Page]. (3) Select the cover insertion settings. Select the print setting, paper tray, and paper type for the front cover.
PRINTER►CONVENIENT PRINTING FUNCTIONS INSERT PRESET DATA BEFORE OR AFTER EACH PAGE (PAGE INTERLEAVE) This function inserts a preset data item into every page during printing. You can easily create documents with opened page spread that is made up of text on the left-hand page and a memo space on the right-hand page. Pre-set data • This function is available in a Windows environment. • This function can be used when the PCL6 printer driver is used.
PRINTER►CONVENIENT PRINTING FUNCTIONS CHANGING THE RENDERING METHOD AND PRINTING JPEG IMAGES (USE DRIVER TO RENDER JPEGS) In some situations, a document containing a JPEG image may not be printed correctly. This can be solved by changing the way the JPEG image is rendered. When you print an original containing JPEG images, this function allows you to select whether the images are rendered in the printer driver or the machine. • This function is available in a Windows environment.
PRINTER►CONVENIENT PRINTING FUNCTIONS CONVENIENT PRINTER FUNCTIONS SAVING AND USING PRINT FILES (RETENTION) This function is used to store a print job as a file on the machine, allowing the job to be printed from the operation panel. When printing from a computer, a PIN code (5 to 8 digits) can be set to maintain the secrecy of information in a stored file. When a PIN code is set, the PIN code must be entered to print a stored file from the machine. • Print data is erased when the power is turned off.
PRINTER►CONVENIENT PRINTING FUNCTIONS Mac OS (2) (1) (1) Select [Job Handling]. (2) Select [Retention]. After you have entered a PIN code (a 5 to 8-digit number), click the set the same PIN code the next time you use it. button to lock the PIN code. This allows you to readily Printing a job stored by retention When retention is performed, the display appears as follows: (1) Select the print job with the [ ][ ] keys. Print Hold List 10:15:31 User Name A file_name_1234567890123456780...
PRINTER►CONVENIENT PRINTING FUNCTIONS (3) Print or delete the print job with the [ ][ ] keys. Select "Print" to print the job. Select "Delete" to delete the job without printing it. Selecting "No Print" returns you to step 1. (4) Press the [OK] key. The print job is printed or deleted. If a pin code is set, the job will be printed or deleted after you enter the pin code with the numeric keys and press the [OK] key. Print Hold List Please enter PIN Code.
PRINTER►PRINTING WITHOUT THE PRINTER DRIVER PRINTING WITHOUT THE PRINTER DRIVER EXTENSION OF PRINTABLE FILES When you do not have the printer driver installed on your PC, or when the application used to open a file that you wish to print is not available, you can print directly to the machine without using the printer driver. The file types (and corresponding extensions) that can be printed directly are shown below.
PRINTER►PRINTING WITHOUT THE PRINTER DRIVER DIRECTLY PRINTING A FILE IN USB MEMORY Files in a USB memory device connected to the machine are printed from the operation panel of the machine without using the printer driver. When the printer driver of the machine is not installed on your PC, you can copy a file into a commercially available USB memory device and connect the device to the machine to print the file directly. Use a FAT32 USB memory device with a capacity of no more than 32 GB.
PRINTER►PRINTING WITHOUT THE PRINTER DRIVER CANCELING A PRINT JOB FROM THE MACHINE When [STOP] key ( ) is pressed while showing "Printing" on the display after starting a print job, the confirmation screen whether or not to cancel the print job will appear. Then select "Yes" to cancel the printing.
PRINTER►PRINTING WITHOUT THE PRINTER DRIVER DIRECTLY PRINTING FROM A COMPUTER FTP PRINT You can print a file from your PC by simply dragging and dropping the file onto the FTP server of the machine. Performing FTP print Type "ftp://" and then the IP address of the machine in the address bar of your PC's Web browser as shown below. Example: ftp://192.168.1.28 In Windows, enter ftp:// in Explorer, and drag and drop the file you want to print to that window.
PRINTER►APPENDIX APPENDIX PRINTER DRIVER SPECIFICATIONS LIST For information on the setting items, refer to printer driver Help.
PRINTER►APPENDIX Function Tab (Windows) PCL6 Item Page Yes Yes Yes Yes Chapter Inserts - No No No No Booklet 2-24 Yes Yes Yes Yes Page No. 2-22 2, 4, 6, 8, 9, 16 2, 4, 6, 8, 9, 16 2, 4, 6, 9, 16 2, 4, 6, 9, 16 Repeat - No No No No Order 2-22 Yes Yes No Yes Border 2-22 Yes Yes No Yes N-Up with cover 2-22 Yes No No No 100% N-Up 2-22 Yes Yes No No 2-28 Yes Yes No No Margin Shift 2-26 10mm to 30mm (0 inch to 1.2 inch) 10mm to 30mm (0 inch to 1.
PRINTER►APPENDIX Function Tab (Windows) Image Quality PCL6 Item PS Page Windows PPD*1 Mac OS PPD*1 Vector To Black 2-35 Yes Yes No No Toner Save *3 - Yes Yes Yes Yes Color Mode - No No No No Image Type - No No No No Advanced Color - No No No No Image Adjustment 2-34 Yes Yes No No Font - Yes Yes Yes No Line Width - No No No No Boldness Adjustment - No No No No Mirror Image 2-33 No Yes Yes Yes PS Error Information - No Yes Yes No PS Pa
TROUBLESHOOTING TROUBLESHOOTING • NETWORK PROBLEMS . . . . . . . . . . . . . . . . . . 3-2 • PRINTING PROBLEMS. . . . . . . . . . . . . . . . . . . 3-3 INDICATORS AND DISPLAY MESSAGES . . . . . . . 3-7 PAPER JAM MISFEED REMOVAL . . . . . . . . . . . . . . . . . . . . . . . . 3-8 • MISFEED IN THE BYPASS TRAY . . . . . . . . . . 3-8 • MISFEED IN THE MACHINE . . . . . . . . . . . . . . 3-10 • MISFEED IN THE PAPER TRAY 1 . . . . . . . . . . 3-14 • MISFEED IN THE PAPER TRAY 2 (Option) . . .
TROUBLESHOOTING►TROUBLESHOOTING TROUBLESHOOTING This chapter describes troubleshooting and misfeed removal. If you encounter a problem when using the machine, check the following troubleshooting guide before calling for service. If you cannot resolve the problem using the troubleshooting guide, turn off the main switch, disconnect the power cord from the power outlet, and contact your dealer.
TROUBLESHOOTING►TROUBLESHOOTING PRINTING PROBLEMS In addition to this section, troubleshooting information can also be found in the README files for each of the software programs. To view a README file, see "SOFTWARE SETUP GUIDE". Problem Cause and solution The machine is not plugged into a power outlet. → Plug the machine into a grounded outlet. The machine does not operate. Page – Power switch OFF. → Turn the power switch ON. 1-9 The machine is warming up.
TROUBLESHOOTING►TROUBLESHOOTING Problem Cause and solution The paper is outside of the specified size and weight range. → Use paper within the specified range. Paper curled or damp. → Do not use curled or crimped paper. Replace with dry paper. During periods when the machine is not used for a long time, remove the paper from the tray and store it in a dark place in a bag to prevent moisture absorption. Paper is not loaded properly. → Make sure the paper is properly installed.
TROUBLESHOOTING►TROUBLESHOOTING Problem The machine does not print. (Status indicator does not blink.) The machine does not print. (Status indicator was blinking.) Cause and solution Page The machine is not correctly connected with your computer. → Check both ends of the printer cable and make sure you have a solid connection. Try a known good cable. For information on cables, see "SPECIFICATIONS (START GUIDE)". 1-3 Your machine is not selected correctly in the current application for the print job.
TROUBLESHOOTING►TROUBLESHOOTING Problem The printed image is dirty. The printed image is skewed or it runs off the paper. Cause and solution Page You are using paper that is outside the specified size and weight range. → Use paper within the specified range. 1-15 Paper curled or damp. → Do not use curled or crimped paper. Replace with dry paper.
TROUBLESHOOTING►TROUBLESHOOTING INDICATORS AND DISPLAY MESSAGES If one of the following messages appears in the display, take prompt action as instructed by the message. Message Action Maintenance It is time for regular maintenance. Contact your authorised service representative. Maintenance required. Call for service. Maintenance required soon. Contact your authorised service representative. Call for service. – Toner Low. (Do not replace cartridge until requested.) Check the toner cartridge.
TROUBLESHOOTING►PAPER JAM PAPER JAM MISFEED REMOVAL When a misfeed occurs during printing, the message " Check the location and remove the misfeed. Clear paper path." and the location of the misfeed will appear. The paper may tear when you remove a misfeed. In this event, be sure to remove all torn pieces of paper from the machine. page 3-10 page 3-10 page 3-8 page 3-15 MISFEED IN THE BYPASS TRAY 1 Remove any paper remaining in the bypass tray. 2 Gently remove the misfed paper from the bypass tray.
TROUBLESHOOTING►PAPER JAM Grasp the side cover open/close handle, and gently open the side cover. 3 4 Turn the paper feed knob and feed out the paper that is inside. ►Misfeed in the paper feed area A (page 3-11) 5 (1) (2) Close the auxiliary tray and then the bypass tray, grasp the side cover open/close handle, and gently open and close the side cover. The message " Clear paper path." will be cleared and printing will be possible.
TROUBLESHOOTING►PAPER JAM MISFEED IN THE MACHINE To remove a misfeed from inside the machine, open the side cover, check whether the misfeed occurred in "A", "B", or "C" below, and follow the misfeed removal procedure. Open the bypass tray and the side cover. 1 If paper remains in the bypass tray, remove the paper. ►MISFEED IN THE BYPASS TRAY (page 3-8) 2 Check the misfeed location. Remove the misfed paper following the instructions for each location in the illustration below.
TROUBLESHOOTING►PAPER JAM Misfeed in the paper feed area A 1 Roller rotating knob Carefully remove the misfed paper. Turn the roller rotating knob in the direction of the arrow to assist in removing it. Fusing unit Be careful not to tear the misfed paper during removal. The fusing unit is hot. Do not touch the fusing unit when removing misfed paper. Doing so may cause a burn or injury. When removing misfed paper, do not touch or damage the photoconductive drum and the transfer roller.
TROUBLESHOOTING►PAPER JAM Misfeed in the fusing area B 1 2 Fusing unit pressure adjusting levers Lift the fusing unit pressure adjusting levers to allow easier removal. Remove the misfed paper. Be careful not to tear the misfed paper during removal. The fusing unit is hot. Do not touch the fusing unit when removing misfed paper. Doing so may cause a burn or injury. • When removing misfed paper, do not touch or damage the photoconductive drum and the transfer roller.
TROUBLESHOOTING►PAPER JAM Close the side cover. 5 The message " possible. Clear paper path." will be cleared and printing will be • When closing the side cover, press on the handle. • If the paper was torn, make sure that no torn pieces remain in the machine. • If the message does not clear, check again to make sure that no pieces of paper remain. Misfeed in the transport area C Remove the misfed paper. 1 2 Be careful not to tear the misfed paper during removal.
TROUBLESHOOTING►PAPER JAM MISFEED IN THE PAPER TRAY 1 Make sure that there is no misfed paper in the tray before pulling it out. ►MISFEED IN THE MACHINE (page 3-10) 1 Open the side cover and remove the misfed paper. ►MISFEED IN THE MACHINE (page 3-10) Lift and pull out the upper paper tray and remove the misfed paper. 2 Be careful not to tear the misfed paper during removal. 3 Push the upper paper tray in completely. Push the tray in completely.
TROUBLESHOOTING►PAPER JAM MISFEED IN THE PAPER TRAY 2 (Option) 1 Open the lower side cover. 2 Remove the misfed paper. 3 Grasp the handle to open the lower side cover. Be careful not to tear the misfed paper during removal. Close the lower side cover. The message " Clear paper path." will be cleared and printing will be possible. If the misfed paper is not seen in step 2, lift and pull out the lower paper tray and remove the misfed paper. 4 Be careful not to tear the misfed paper during removal.
SYSTEM SETTINGS PURPOSE OF THE SYSTEM SETTINGS PROGRAMS RELATED TO ALL FUNCTIONS OF THE MACHINE . . . . . . . . . . . . . . . . . . . . . . . . . . . . . PROGRAMMING AN ADMINISTRATOR PIN CODE . . . . . . . . . . . . . . . . . . . . . . . . . . . . . . . . . . . . • PROGRAMMING AN ADMINISTRATOR PIN CODE . . . . . . . . . . . . . . . . . . . . . . . . . . . . . . . . 4-2 4-2 4-2 SYSTEM SETTINGS LIST USING THE SYSTEM SETTINGS SYSTEM SETTINGS • • • • • • • • • • • Change Admin PIN . . . . . . . . . . . . . .
SYSTEM SETTINGS►PURPOSE OF THE SYSTEM SETTINGS PURPOSE OF THE SYSTEM SETTINGS The system settings are used by the administrator of the machine to enable or disable functions to suit the needs of your workplace. PROGRAMS RELATED TO ALL FUNCTIONS OF THE MACHINE These programs are used to enable user authentication mode, adjust power consumption, and manage peripheral devices. When user authentication mode is enabled for a function, a valid account number must be entered in order to use the function.
SYSTEM SETTINGS►PURPOSE OF THE SYSTEM SETTINGS 4 Use the numeric keys to enter the five-digit administrator PIN code. 5 Press the [OK] key. 6 • If this is the first time you are programming the administrator PIN code, enter the factory default code. (Refer to the Start Guide) • " " appears for each digit that you enter. • The special modes screen will appear with "Change Admin PIN" selected. The administrator PIN code change screen appears.
SYSTEM SETTINGS►SYSTEM SETTINGS LIST SYSTEM SETTINGS LIST Programs for general use of the machine Program name Change Admin PIN Change Admin PIN Initial Setting Date & Time Set Daylight Saving Time Printer Notice Page Network Confirmation of Network Connection Type Wired settings Wireless (Infrastructure) Wireless (Access Point) User Control User Authentication User Registration Function Limit Setting Account Limit Setting User Count Display User Count Reset A Warning when Login Fails Disable Print by Inv.
SYSTEM SETTINGS►SYSTEM SETTINGS LIST Administrator settings menu The system settings are accessed via the following menu structure. Refer to this menu when enabling or disabling the settings that are explained beginning on page 4-8. Some settings contain an additional level of settings (a settings screen).
SYSTEM SETTINGS►SYSTEM SETTINGS LIST Level 1 Operation Setting Level 2 Auto Clear Disable Display Timeout Language Setting Message Time Key Touch Sound Keys Touch Sound At Initial Point Key Press Time Disable Auto Key Repeat Disable Paper Size Set Energy Save Auto Power Shut-Off Auto Power Shut-Off Timer Preheat Mode Enter Auto Power Shut-Off after the Remote Job Toner Save Mode List Print User Info.
SYSTEM SETTINGS►USING THE SYSTEM SETTINGS USING THE SYSTEM SETTINGS 1 Press the [SPECIAL FUNCTION] key ( 2 Select "System Settings" with the [ ] or [ ] key and press the [OK] key. 3 Enter admin PIN Code. ). Enter the administrator PIN code with the numeric keys. • " " appears for each digit that you enter. • The mode selection screen appears. Admin PIN Code: 4 Select the desired mode with the [ ] or [ ] key. Change Admin PIN Initial Setting Printer Network 5 Press the [OK] key.
SYSTEM SETTINGS►SYSTEM SETTINGS SYSTEM SETTINGS Change Admin PIN Confirmation of Network Confirm network settings. Use this function to change administrator PIN code. To change the administrator PIN code, see "PROGRAMMING AN ADMINISTRATOR PIN CODE (page 4-2)". Connection Type You can change the machine's network connection type. Wired settings IPv4 Settings Initial Setting When using the machine on a TCP/IP (IPv4) network, use this setting to configure the IP address of the machine.
SYSTEM SETTINGS►SYSTEM SETTINGS Wireless (Infrastructure) Wireless (Access Point) (Only on models with wireless LAN) (Only on models with wireless LAN) This sets connection using wireless infrastructure mode. This sets connection using wireless access point mode. Manual Input of SSID Enter up to 32 half-width characters for the SSID. Setting of SSID Enter up to 32 half-width characters for the SSID. Security Settings • Setting of Security Type Select the security type.
SYSTEM SETTINGS►SYSTEM SETTINGS User Control User Count Display User Control is used to configure settings for user authentication. Select the [User Control] to configure the settings. User Control User Authentication User Registration Function Limit Setting Account Limit Setting This setting is used to display the print page counts of each account, and the usage limits for printing. Misfed pages are not included in the page counts.
SYSTEM SETTINGS►SYSTEM SETTINGS Device Control Plain Paper Settings These settings are used to configure settings for hardware functions of the machine. To access one of these settings, select "Device Control" in the mode selection screen, select the desired setting in the device control screen, and press the [OK] key. In this machine, paper type is divided between plain paper 1 and plain paper 2.
SYSTEM SETTINGS►SYSTEM SETTINGS Operation Setting Message Time This setting is used to set the length of time that messages appear in the display (this applies to messages that appear for a certain length of time and then automatically disappear.) Select from "Short (3 sec.)", "Normal (6 sec.)", or "Long (9 sec.)". The factory default setting is "Normal (6 sec.)". These settings are used to configure various settings related to the operation panel.
SYSTEM SETTINGS►SYSTEM SETTINGS Energy Save Preheat Mode These settings are used to configure energy saving settings. To access one of these settings, select "Energy Save" in the mode selection screen, and select the desired setting in the energy save screen, and then press the [OK] key. Auto Power Shut-Off This setting is used to set the duration of time until preheat mode, which automatically lowers the fusing unit temperature, activates when the operation panel is not used.
SYSTEM SETTINGS►SYSTEM SETTINGS Grey Adjustment Security Settings Tone Adjustments The following settings are related to security. Select the [Security Settings] to configure the settings. This function is used to adjust each of the density levels (low, mid, and high). (1) Select [Grey Adjustment] on the operation panel and press [OK] key. (2) Select [Tone Adjustments] and press [OK] key, then Tone Adjustments setting screen appears.
WEB PAGES WEB FUNCTIONS IN THE MACHINE ABOUT THE WEB PAGES . . . . . . . . . . . . . . . . . . . 5-2 • HOW TO ACCESS THE WEB PAGE . . . . . . . . 5-2 ABOUT THE WEB PAGES (FOR USERS) . . . . . . . 5-3 CONFIGURING THE PRINTER CONDITION SETTINGS . . . . . . . . . . . . . . . . . . . . . . . . . . . . . . . . 5-4 • HOW TO CONFIGURE THE SETTINGS . . . . . 5-4 • PRINTER CONDITION SETTING MENU . . . . . 5-5 • PRINTER CONDITION SETTINGS. . . . . . . . . .
WEB PAGES►WEB FUNCTIONS IN THE MACHINE WEB FUNCTIONS IN THE MACHINE ABOUT THE WEB PAGES The machine includes a built-in Web server. The Web server is accessed using a Web browser on your computer. The Web pages include both pages for users and pages for the administrator. In the user Web pages, users can monitor the machine, and select printer configuration settings. In the administrator Web pages, the administrator can configure the machine's settings, and passwords.
WEB PAGES►WEB FUNCTIONS IN THE MACHINE ABOUT THE WEB PAGES (FOR USERS) When you access the user Web pages in the machine, the following page will appear in your browser. A menu frame appears on the left side of the page. When you click an item in the menu, a screen appears in the right frame that allows you to configure settings for that item. (1) (2) MX-xxxx (3) MX-xxxx (4) (5) (6) (1) English (5) Menu frame (2) System Information Shows the current status of the machine and model name.
WEB PAGES►WEB FUNCTIONS IN THE MACHINE CONFIGURING THE PRINTER CONDITION SETTINGS The printer condition settings allow basic printer settings to be configured. The following items can be set: • "Default Settings" ►page 5-5: • "PCL Settings" ►page 5-6: Basic settings that are mainly used when the printer driver is not used. PCL symbol set, font, line feed code, and other settings.
WEB PAGES►WEB FUNCTIONS IN THE MACHINE PRINTER CONDITION SETTING MENU Condition Settings Default Settings Condition Settings Factory default settings PCL Settings Factory default settings Orientation Portrait Symbol Set PC-8 Default Paper Size A4 (Letter) Font 0: Courier (internal font) Default Paper Type Plain 1 Line Feed Code CR=CR; LF=LF; FF=FF Default Resolution 600dpi (High Quality) Disable Blank Page Print Disable 2-Sided Print 2-Sided (Book) Fit To Page ON PS Settings Factor
WEB PAGES►WEB FUNCTIONS IN THE MACHINE PCL Settings Item Settings Description Symbol Set Select one of 35 sets. This specifies which country's characters (PCL symbol set) are assigned to certain of the symbols in the character code list. The factory default setting is [PC-8]. Font Select one internal font. This specifies which PCL font to use for printing. One font can be specified from among the internal fonts. The factory default setting is [0: Courier].
WEB PAGES►WEB FUNCTIONS IN THE MACHINE ABOUT THE WEB PAGES (FOR THE ADMINISTRATOR) In addition to the menus that appear for users, other menus that can only be used by the administrator appear in the administrator Web pages. A menu frame appears on the left side of the page. When you click an item in the menu, a screen appears in the right frame that allows you to configure settings for that item. Settings that can only be configured by the administrator are explained here.
WEB PAGES►WEB FUNCTIONS IN THE MACHINE CONFIGURING SMTP AND DNS SERVER SETTINGS The procedures for using [Quick Setup] are explained here. [Quick Setup] is used to quickly configure only the required settings for "SMTP" and "DNS" servers. These settings are normally configured first. SMTP server: DNS server: SMTP is used to transmit e-mail. To use these transmission methods, your SMTP server settings must be configured.
WEB PAGES►WEB FUNCTIONS IN THE MACHINE PROTECTING INFORMATION PROGRAMMED IN THE WEB PAGE ([Passwords]) Passwords can be set (click [Passwords] in the menu frame) to restrict Web page access and protect settings. The administrator must change the password from the factory default setting. The administrator must also take care to remember the new password. The next time the Web pages are accessed, the new password must be entered.
WEB PAGES►WEB FUNCTIONS IN THE MACHINE ADMINISTRATOR SETTINGS The administrator settings are used to prohibit changes to the [Condition Settings] and to configure interface settings. • "Default settings": Select the setting for which you wish to prohibit changes. • "Paper Weight": The temperature of toner fusing is controlled according to the weight of the paper that is used. • "Interface settings": Enable monitoring of data sent to the network port and set restrictions.
WEB PAGES►WEB FUNCTIONS IN THE MACHINE Paper Weight Item Paper Weight Settings 60 - 89 g/m2 (16 - 24 lb) 90 - 105 g/m2 (24+ - 28 lb.) Description These are used to control the toner fusing temperature according to the weight of the paper. Plain Paper Settings Item Plain Paper Settings Settings Plain 1, Plain 2 Description Set the weight of the plain paper to be used. The weight of Plain Paper 1 is 60 - 89 g/m2 (16 - 24 lb.), and the weight of Plain Paper 2 is 90 105 g/m2 (24+ - 28 lb.).
WEB PAGES►WEB FUNCTIONS IN THE MACHINE E-MAIL STATUS AND E-MAIL ALERT SETTINGS These functions send information on machine use (print count, etc.) and error conditions (paper misfeed, out of paper, out of toner, etc.) via e-mail to the administrator of the machine or the dealer. INFORMATION SETUP Machine identification information for the status and alert e-mail functions is configured in the "Information Setup" screen. The entered information will be included in status and alert e-mail messages.
WEB PAGES►WEB FUNCTIONS IN THE MACHINE STATUS MESSAGE SETUP Use the status message function to send the current counter information, including print count and total output count, based on the specified schedule. The destinations can be set for administrators and dealers respectively. 1 Click [Status Message] in the menu frame. 2 Enter the required information, including the destination addresses and time schedule. 3 Click [Submit] to store the entered information.
LICENSE INFORMATION Information on the Software License for This Product Software composition The software included in this product is comprised of various software components whose individual copyrights are held by SHARP or by third parties.
Copyright (c) 1995 - 2008 Kungliga Tekniska Högskolan (Royal Institute of Technology, Stockholm, Sweden). All rights reserved. All rights reserved. Export of this software from the United States of America may require a specific license from the United States Government. It is the responsibility of any person or organization contemplating export to obtain such a license before exporting.
THIS SOFTWARE IS PROVIDED BY THE OpenSSL PROJECT "AS IS" AND ANY EXPRESSED OR IMPLIED WARRANTIES, INCLUDING, BUT NOT LIMITED TO, THE IMPLIED WARRANTIES OF MERCHANTABILITY AND FITNESS FOR A PARTICULAR PURPOSE ARE DISCLAIMED.
The licence and distribution terms for any publically available version orderivative of this code cannot be changed. i.e. this code cannot simply becopied and put under another distribution licence [including the GNU Public Licence.] D3DES License --------------- Copyright (c) 1988,1989,1990,1991,1992 by Richard Outerbridge. (GEnie : OUTER; CIS : [71755,204]) Graven Imagery, 1992. GNU GENERAL PUBLIC LICENSE Version 2, June 1991 Copyright (C) 1989, 1991 Free Software Foundation, Inc.
Finally, any free program is threatened constantly by software patents. We wish to avoid the danger that redistributors of a free program will individually obtain patent licenses, in effect making the program proprietary. To prevent this, we have made it clear that any patent must be licensed for everyone's free use or not licensed at all. The precise terms and conditions for copying, distribution and modification follow.
sections as part of a whole which is a work based on the Program, the distribution of the whole must be on the terms of this License, whose permissions for other licensees extend to the entire whole, and thus to each and every part regardless of who wrote it. Thus, it is not the intent of this section to claim rights or contest your rights to work written entirely by you; rather, the intent is to exercise the right to control the distribution of derivative or collective works based on the Program.
may not impose any further restrictions on the recipients' exercise of the rights granted herein. You are not responsible for enforcing compliance by third parties to this License. 7. If, as a consequence of a court judgment or allegation of patent infringement or for any other reason (not limited to patent issues), conditions are imposed on you (whether by court order, agreement or otherwise) that contradict the conditions of this License, they do not excuse you from the conditions of this License.
THE QUALITY AND PERFORMANCE OF THE PROGRAM IS WITH YOU. SHOULD THE PROGRAM PROVE DEFECTIVE, YOU ASSUME THE COST OF ALL NECESSARY SERVICING, REPAIR OR CORRECTION. 12.
You should also get your employer (if you work as a programmer) or your school, if any, to sign a "copyright disclaimer" for the program, if necessary. Here is a sample; alter the names: Yoyodyne, Inc., hereby disclaims all copyright interest in the program `Gnomovision' (which makes passes at compilers) written by James Hacker. , 1 April 1989 Ty Coon, President of Vice This General Public License does not permit incorporating your program into proprietary programs.
library, you must provide complete object files to the recipients, so that they can relink them with the library after making changes to the library and recompiling it. And you must show them these terms so they know their rights. We protect your rights with a two-step method: (1) we copyright the library, and (2) we offer you this license, which gives you legal permission to copy, distribute and/or modify the library.
The precise terms and conditions for copying, distribution and modification follow. Pay close attention to the difference between a "work based on the library" and a "work that uses the library". The former contains code derived from the library, whereas the latter must be combined with the library in order to run. GNU LESSER GENERAL PUBLIC LICENSE TERMS AND CONDITIONS FOR COPYING, DISTRIBUTION AND MODIFICATION 0.
c) You must cause the whole of the work to be licensed at no charge to all third parties under the terms of this License.
However, linking a "work that uses the Library" with the Library creates an executable that is a derivative of the Library (because it contains portions of the Library), rather than a "work that uses the library". The executable is therefore covered by this License. Section 6 states terms for distribution of such executables.
For an executable, the required form of the "work that uses the Library" must include any data and utility programs needed for reproducing the executable from it. However, as a special exception, the materials to be distributed need not include anything that is normally distributed (in either source or binary form) with the major components (compiler, kernel, and so on) of the operating system on which the executable runs, unless that component itself accompanies the executable.
If any portion of this section is held invalid or unenforceable under any particular circumstance, the balance of the section is intended to apply, and the section as a whole is intended to apply in other circumstances.
YOU OR THIRD PARTIES OR A FAILURE OF THE LIBRARY TO OPERATE WITH ANY OTHER SOFTWARE), EVEN IF SUCH HOLDER OR OTHER PARTY HAS BEEN ADVISED OF THE POSSIBILITY OF SUCH DAMAGES. END OF TERMS AND CONDITIONS How to Apply These Terms to Your New Libraries If you develop a new library, and you want it to be of the greatest possible use to the public, we recommend making it free software that everyone can redistribute and change.
GNU GENERAL PUBLIC LICENSE Version 3, 29 June 2007 Copyright (C) 2007 Free Software Foundation, Inc. Everyone is permitted to copy and distribute verbatim copies of this license document, but changing it is not allowed. Preamble The GNU General Public License is a free, copyleft license for software and other kinds of works. The licenses for most software and other practical works are designed to take away your freedom to share and change the works.
"This License" refers to version 3 of the GNU General Public License. "Copyright" also means copyright-like laws that apply to other kinds of works, such as semiconductor masks. "The Program" refers to any copyrightable work licensed under this License. Each licensee is addressed as "you". "Licensees" and "recipients" may be individuals or organizations. To "modify" a work means to copy from or adapt all or part of the work in a fashion requiring copyright permission, other than the making of an exact copy.
The Corresponding Source for a work in source code form is that same work. 2. Basic Permissions. All rights granted under this License are granted for the term of copyright on the Program, and are irrevocable provided the stated conditions are met. This License explicitly affirms your unlimited permission to run the unmodified Program. The output from running a covered work is covered by this License only if the output, given its content, constitutes a covered work.
d) If the work has interactive user interfaces, each must display Appropriate Legal Notices; however, if the Program has interactive interfaces that do not display Appropriate Legal Notices, your work need not make them do so.
Corresponding Source. The information must suffice to ensure that the continued functioning of the modified object code is in no case prevented or interfered with solely because modification has been made.
relicensing or conveying under this License, you may add to a covered work material governed by the terms of that license document, provided that the further restriction does not survive such relicensing or conveying. If you add terms to a covered work in accord with this section, you must place, in the relevant source files, a statement of the additional terms that apply to those files, or a notice indicating where to find the applicable terms.
A "contributor" is a copyright holder who authorizes use under this License of the Program or a work on which the Program is based. The work thus licensed is called the contributor's "contributor version".
Notwithstanding any other provision of this License, you have permission to link or combine any covered work with a work licensed under version 3 of the GNU Affero General Public License into a single combined work, and to convey the resulting work. The terms of this License will continue to apply to the part which is the covered work, but the special requirements of the GNU Affero General Public License, section 13, concerning interaction through a network will apply to the combination as such. 14.
END OF TERMS AND CONDITIONS How to Apply These Terms to Your New Programs If you develop a new program, and you want it to be of the greatest possible use to the public, the best way to achieve this is to make it free software which everyone can redistribute and change under these terms. To do so, attach the following notices to the program.
---------------------------------------------------------------------------libtiff--------------------------------------------------------------------------Copyright (c) 1988-1997 Sam Leffler Copyright (c) 1991-1997 Silicon Graphics, Inc.
SOFTWARE LICENSE PLEASE READ THIS LICENSE CAREFULLY BEFORE USING THE SOFTWARE. BY USING THE SOFTWARE, YOU ARE AGREEING TO BE BOUND BY THE TERMS OF THIS LICENSE. 1. License The application, demonstration, system and other software accompanying this License, whether on disk, in read only memory, or on any other media (the "Software") and related documentation are licensed to you by SHARP.
6. Limited Warranty on Media. SHARP warrants the disks on which the Software is recorded to be free from defects in materials and workmanship under normal use for a period of ninety (90) days from the date of purchase as evidenced by a copy of the receipt. The entire liability of SHARP and/or its Licensors and your exclusive remedy will be replacement of the disk which fails to meet the limited warranty provided by this Clause 6.
2018D-GB1