MODEL: MX-C250E MX-C250F MX-C250FE MX-C300E MX-C300W MX-C300WE DIGITAL FULL COLOUR MULTIFUNCTIONAL SYSTEM OPERATION GUIDE
INTRODUCTION This manual describes MX-C250E/MX-C250F/MX-C250FE/MX-C300E/MX-C300W/MX-C300WE Digital full colour multifunctional system. Note • Where "MX-XXXX" appears in this manual, please substitute the name of your model for "XXXX". For the name of your model, see p.8. • The screen images and procedures that appear in this manual are mainly for Windows 7. With other versions of Windows, some screen images may be different from those in this manual.
CONTENTS INTRODUCTION ................................................ 2 USING THE MANUAL ....................................... 7 ● ABOUT THE MANUALS ...................................7 ● CONVENTIONS USED IN THIS MANUAL .......7 DIFFERENCES BETWEEN MODELS............... 8 1 2 BEFORE USING THE MACHINE PART NAMES AND FUNCTIONS ..................... 9 NORMAL COPYING ........................................ 26 ● OPERATION PANEL ......................................
3 4 PRINTER ● PRINTER FUNCTION OF THE MACHINE .....39 TO USE THIS PRODUCT CORRECTLY AS A FACSIMILE ...................................................... 79 POINTS TO CHECK AND PROGRAM AFTER INSTALLATION ............................................... 80 PRINTING FROM WINDOWS.......................... 40 ● PRINTER DRIVER PROPERTIES WINDOW ....40 ● BASIC PRINTING PROCEDURE......................41 ● PRINTING WHEN THE USER AUTHENTICATION FUNCTION IS ENABLED .................................
FORWARDING RECEIVED DATA TO A NETWORK ADDRESS (INBOUND ROUTING SETTINGS) ..... 113 6 ● CONFIGURING THE BASIC SETTINGS .....113 ● SETTINGS THE DESTINATION...................115 TROUBLESHOOTING................................... 141 SENDING A FAX DIRECTLY FROM A COMPUTER (PC-Fax) ....................................... 116 CONNECTING AN EXTENSION PHONE.......... 117 ● ● ● ● ● CONNECTING AN EXTENSION PHONE ....117 ● USING AN EXTENSION PHONE .................
8 9 SYSTEM SETTINGS WEB FUNCTIONS IN THE MACHINE PURPOSE OF THE SYSTEM SETTINGS ...... 168 ABOUT THE WEB PAGES ............................ 190 ● PROGRAMS RELATED TO ALL FUNCTIONS OF THE MACHINE .......................................168 ● PROGRAMMING AN ADMINISTRATOR PASSWORD .................................................168 ● HOW TO ACCESS THE WEB PAGE .......... 190 ABOUT THE WEB PAGES (FOR USERS) .... 191 CONFIGURING THE PRINTER CONDITION SETTINGS..............................................
USING THE MANUAL This machine has been designed to provide convenient copying features in a minimum amount of office space and with maximum operational ease. To get full use of all machine features, be sure to familiarise yourself with this manual and the machine. For quick reference during machine use, SHARP recommends printing out this manual and keep it in a handy location.
DIFFERENCES BETWEEN MODELS This manual covers the following models. Model Copy Speed MX-C300W 30CPM MX-C300WE MX-C250F 25CPM MX-C250FE MX-C250E 25CPM MX-C300E 30CPM Wireless LAN FAX Function Yes Document Feeder 2-sided Yes 1-sided No No 1-sided 2-sided AB series (metric) and inch series references Both specifications are quoted where applicable.
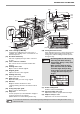
1 BEFORE USING THE MACHINE This chapter contains basic information that should be read before using the machine. PART NAMES AND FUNCTIONS (17) (15) (16) (1) (2) (3) (4) (18) (8) (9) (10) (11) (12) (13) (5) (4) (14) (19) (4) (6) (7) (1) (2) (3) (4) Note (5) (6) (7) (8) (9) (10) Front cover Open to replace the toner cartridge etc. (11) Side cover handle Pull to open the side cover. (12) Side cover Open to remove misfed paper.
BEFORE USING THE MACHINE (23) (24) (25) (26) (27) (28) (21) (30) (29) (32) (20) (33) (22) (31) (20) Toner cartridge (Y/M/C/Bk) Contains toner. When the toner runs out in a cartridge, the cartridge of the colour that ran out must be replaced. (21) Document feeder tray Place the original(s) that you wish to scan face up here. (22) Toner collection container This collects excess toner that remains after printing. (23) Feeding roller cover Open to remove misfed originals.
BEFORE USING THE MACHINE OPERATION PANEL (1) (2) (3) (4) (5) (6) (7) (8) (14) (1) (2) (3) (4) (5) (6) (7) (8) (9) (9) (10) (11) (12) (13) (15)(16) (10) [EXPOSURE] key ( ) Use to select the exposure mode. (p.28) (11) [ENERGY SAVE] key / indicator ( ) Press to enter the energy save mode. (12) [BACK] key ( ) Press to return the display to the previous screen. (13) [SPECIAL FUNCTION] key ( ) Press to select special functions. (14) [C] key Press to clear the set number of copies or stop a copy run.
BEFORE USING THE MACHINE (17) (18) (19) (24) (20) (21) (25) (22) (26) (27) (28) (29) (23) (30) (25) Numeric keys Enter characters/numbers. (26) [READ-END] key ( ) When copying in sort mode from the document glass, press this key when you have finished scanning the original pages and are ready to start copying. (27) [CA] key Clears all selected settings and returns the machine to the default settings. (p.15) (28) [STOP] key ( ) Press this key to stop a copy job or scanning of an original.
BEFORE USING THE MACHINE DISPLAY This section explains how to use the display. LEFT MENU AND RIGHT MENU The display on the machine has a right menu containing frequently used settings and a left menu for display of the settings and setting screens of each function. Left Menu Right Menu Left Menu (Example: Copy mode) (1) (2) (3) (6) (4) (5) (1) (2) (3) Message display Messages are displayed regarding machine status and operation.
BEFORE USING THE MACHINE Right Menu (7) (7) (8) Connection status display (Models with the wireless LAN function only) Displayed when wireless LAN is on. Wireless infrastructure mode: Connecting Wireless infrastructure mode: Not connected Wired + wireless access point mode: With handset connected Wired + wireless access point mode: Without handset connected (9) Connection failure of wireless LAN device inside machine (8) (9) Number of copies display Shows the number of copies set.
BEFORE USING THE MACHINE POWER ON AND OFF The power switch is located on the left side of the machine. POWER ON POWER OFF Turn the power switch to the "ON" position. Make sure that the machine is not in operation and then turn the power switch to the "OFF" position. While the machine is warming up, the message "Warming Up" will appear in the message display.
BEFORE USING THE MACHINE LOADING PAPER The message "TRAY< >:Add paper." will be displayed when there is no copy paper in the selected paper tray. (< > is the tray number.) Load paper in the indicated paper tray. PAPER For best results, use only SHARP recommended paper.
BEFORE USING THE MACHINE PRINT SIDE FACE UP OR FACE DOWN Paper is loaded with the print side face up or face down depending on the paper type and tray. The loading orientation of punched paper, letterhead paper, and pre-printed paper differs from that of other paper. For details, see "Example: Placement orientations of punched paper, letter head paper, and pre-printed paper" (p.17). Trays 1 to 2 Load the paper with the print side face up.
BEFORE USING THE MACHINE Paper that cannot be used • • • • • Irregularly shaped paper Stapled paper Damp paper Curled paper Paper on which either the print side or the reverse side has been printed on by another printer or multifunction device. • Paper with a wave-like pattern due to moisture absorption • Special media for inkjet printers (fine paper, glossy paper, glossy film, etc.
BEFORE USING THE MACHINE LOADING PAPER Make sure that the machine is not copying or printing, and then follow these steps to load paper. Loading the paper tray 1 Gently lift and pull out the paper tray until it stops. 2 Push the pressure plate down, and adjust the plates in the tray to the length and width of the paper. (2) (2) (2) Plate B 3 (1) Push the centre of the pressure plate down until it locks into place. (2) The plate A and B are slide-type guides.
BEFORE USING THE MACHINE Loading the bypass tray To feed an envelope, first press down the fixing unit release levers (2 places) to release the pressure, and then follow the steps below. 1 Unfold the bypass tray. Open out the bypass tray extension. 2 Push the centre of the pressure plate down until it locks into place. 3 Set the paper guides to the copy paper width. 4 Insert the paper (print face down) all the way into the bypass tray.
BEFORE USING THE MACHINE Important points when inserting paper in the bypass tray • Up to 50 sheets of standard copy paper can be set in the bypass tray. • Be sure to place A6, B6 or 5-1/2" x 8-1/2" size paper or envelopes horizontally as shown in the following diagram.
BEFORE USING THE MACHINE Inserting transparency film • Use SHARP-recommended transparency film. • Do not touch the print side of transparency film. • When loading multiple sheets of transparency film in the bypass tray, be sure to fan the sheets several times before loading. • When printing on transparency film, be sure to remove each sheet as it exits the machine. Allowing sheets to stack in the output tray may result in curling.
BEFORE USING THE MACHINE CHANGING THE PAPER TYPE OF A TRAY To change the paper type setting for a tray, follow the steps below. Press the [SPECIAL FUNCTION] key ( ), select "Paper Type", select the tray with the [ the [OK] key. Select the desired paper type and press the [OK] key. ] or [ ] key, and press See "PAPER" (p.16) for information on the specifications for the types and sizes of paper that can be loaded in the paper trays.
BEFORE USING THE MACHINE ENTERING CHARACTERS This section explains how to enter and edit characters for names of rapid dial numbers, Speed Dial numbers, and group keys, as well as account names, program names, and search characters for the address list. CHARACTERS THAT CAN BE ENTERED Characters that can be entered for names The following characters can be entered: • Up to 36 characters can be entered for a name. However, up to 18 characters can be entered for an account name or sender's name.
BEFORE USING THE MACHINE Characters are entered by pressing the numeric keys on the operation panel. The letters entered with each numeric key are shown below.
2 COPY FUNCTIONS This chapter explains how to use the copy functions. NORMAL COPYING This section explains how to make a regular copy. If "User authentication" has been enabled (p.178), enter your 5-digit account number. 1 Make sure that the operation panel shows the copy screen. If the machine is not in copy mode, press the [COPY] key ( 2 ). Place the original on the document glass or in the automatic document feeder. To place the original, see "Place the original on the document glass." (p.
COPY FUNCTIONS PLACING THE ORIGINAL Place the original on the document glass. Models with the one-sided scanning function Set the originals face up in the document feeder tray. Use the peep hole (see Peep hole the illustration at right) to check the position of the original. There is an original top edge mark in the peep hole. Align the top edge of the original with this mark. Open the document feeder and place the original face down on the document glass.
COPY FUNCTIONS Note • Specify the original size after placing the original. (p.29) • Do not place originals of different sizes together in the document feeder tray. This may cause misfeeds. • The following icons appear when the original is placed. None: Document Glass : Automatic document feeder (one-sided scanning).
COPY FUNCTIONS SELECTING THE ORIGINAL SIZE When you want to change the original size, select "Original Size" on the right menu and press the [OK] key. Select AB or inch with the [ ][ ] keys, and select the size with the [ Press the [OK] key. You will return to the base copy screen. ][ ] keys. USING THE BYPASS TRAY TO COPY A SPECIAL SIZE ORIGINAL Select "Original Size" in the right menu of the base screen of copy mode and press the [OK] key.
COPY FUNCTIONS AUTOMATIC DUPLEX COPYING Two originals placed on the document glass can be copied onto each side of a single sheet of paper. In addition, a document feeder (Models with the two-sided scanning function) can be used to copy two originals onto one sheet of paper, or one duplex original onto two sheets of paper, or one duplex original onto each side of one sheet of paper. This function is convenient for making copies for identification purposes and helps save paper.
COPY FUNCTIONS CONVENIENT COPY FUNCTIONS This section explains major convenient copy functions. SORT COPY ● Copies of multiple original pages can be sorted into sets. (Sort) ● Copies of multiple original pages can be grouped by page. (No Sort) Sort No Sort When the document glass is used, "No Sort" is automatically selected. When the automatic document feeder is used, "Sort" is automatically selected.
COPY FUNCTIONS ID CARD COPY You can copy the front and back sides of ID card onto a page through this function. The layout of the ID card copy, set the "ID Card Setting" of SYSTEM SETTINGS (p.182). Original Copies Front Back Set Horizontally • Set Horizontally • Set Vertically Set Vertically Copies in the horizontal orientation (fixed position), regardless of the paper size. Copies in the vertical orientation (fixed position), regardless of the paper size.
COPY FUNCTIONS RESOLUTION SETTINGS You can adjust the resolution for scanning an original on the document glass or in the auto document feeder, and select high image quality or high speed as appropriate for your needs. With the base screen of copy mode displayed, press the [SPECIAL FUNCTION] key ( the [ ][ ] keys, and press the [OK] key to display the resolution screen. ), select "Resolution" with 1 Select "Document glass" or "Document Feeder" with the [ ] [ ] keys and press the [OK] key.
COPY FUNCTIONS SPECIAL MODES To display the special functions menu, press the [SPECIAL FUNCTION] key ( displayed, and press the [ ][ ] keys to select "SPECIAL FUNCTIONS". ) with the base copy screen COPYING MULTIPLE ORIGINALS ONTO A SINGLE SHEET OF PAPER (2 IN 1 / 4 IN 1 COPY) Multiple originals can be copied onto a single sheet of paper in a selected layout pattern.
COPY FUNCTIONS CARD SHOT When copying a card, this function allows you to print the front and back sides of the card next to each other on a single sheet of paper. This function creates 2 in 1 images of the front and back side of the card and centres them on the paper. Original Copy Original CARD CARD CARD Front of card Front of card Back of card Select Card Shot with the [ • • • • CARD Back of card ][ ] keys and press the [OK] key. Specify the card size in the Card Shot screen.
COPY FUNCTIONS ADJUSTING THE SHARPNESS OF AN IMAGE (Sharpness) This is used to sharpen an image or make it softer. Select "Sharpness" with the [ ][ ] keys and press the [OK] key. Select "Off", "Soft", or "Sharp" with the [ ][ ] keys and press the [OK] key. WHITENING FAINT COLOURS IN COPIES (Suppress Background) This feature is used to suppress light background areas. Select "Suppress BG" with the [ ][ ] keys and press the [OK] key. : Only light backgrounds are suppressed.
COPY FUNCTIONS FREQUENTLY USED SETTINGS (PROGRAMS) A group of copy settings can be stored together as a program. A stored program can be easily invoked. STORING A PROGRAM The following copy settings can be stored: Duplex, Zoom, Exposure, Resolution, Orig. Size Enter, Paper Size, Sort, 2in1/4in1, Card Shot, RGB Adjust, Sharpness, Suppress BG With the copy base screen displayed, press the [SPECIAL FUNCTION] key ( ), select "Register Program" with the [ ][ ] keys, and press the [OK] key.
COPY FUNCTIONS DELETING A PROGRAM 1 Select the number of the program that you want to delete with the [ ][ ] keys and press the [OK] key. 2 Select "Delete" with the [ ][ ] keys and press the [OK] key. The selected program location changes to "No Store". USING A PROGRAM Select "Program" in the right menu of the base screen of copy mode and press the [OK] key. Select the number of the program you want to use with the [ ][ ] keys and press the [OK] key.
3 PRINTER PRINTER FUNCTION OF THE MACHINE The machine is equipped standard with a full colour printing function. To enable printing from your computer, a printer driver must be installed. See the table below to determine which printer driver to use in your environment. Environment Printer driver type Windows PCL6 The machine supports the Hewlett-Packard PCL6 printer control languages.
PRINTER PRINTING FROM WINDOWS PRINTER DRIVER PROPERTIES WINDOW (1) (2) (1) Select the printer driver of the machine. • If the printer drivers appear as icons, click the icon of the printer driver to be used. • If the printer drivers appear as a list, select the name of the printer driver to be used from the list. (2) Click the [Preferences] button.
PRINTER BASIC PRINTING PROCEDURE The following example explains how to print a document from "WordPad", which is a standard accessory program in Windows. 1 Select [Print] from the [File] menu of WordPad. (1) Click the [Paper] tab. (2) Select the paper size. 2 Open the printer driver properties window. (3) Click the [OK] button. 3 Select print settings. (1) To select settings on other tabs, click the desired tab and then select the settings.
PRINTER PRINTING ON ENVELOPES The bypass tray can be used to print on special media such as envelopes. The procedure for printing on an envelope from the printer driver properties screen is described below. For the types of paper that can be used in the bypass tray, see "PAPER" (P.16) in "BEFORE USING THE MACHINE". For the procedure for loading paper in the bypass tray, see "Loading the bypass tray" (P.20) in "BEFORE USING THE MACHINE".
PRINTER PRINTING WHEN THE USER AUTHENTICATION FUNCTION IS ENABLED When the user authentication function is enabled in the machine's system settings (administrator), your user information (login name, password, etc.) must be entered in the printer driver properties window before you can print. The information that must be entered varies depending on the authentication method being used, so check with the administrator of the machine before printing.
PRINTER VIEWING PRINTER DRIVER HELP When selecting settings in the printer driver, you can display Help to view explanations of the settings. 1 Open the printer driver properties window from the print window of the software application. 2 Click the [Help] button. The Help window will open to let you view explanations of the settings on the tab. To view Help for settings in a dialog box, click the underlined text at the top of the Help window.
PRINTER SAVING FREQUENTLY USED PRINT SETTINGS Settings configured on each of the tabs at the time of printing can be saved as user settings. Saving frequently used settings or complex colour settings under an assigned name makes it easy to select those settings the next time you need to use them. SAVING SETTINGS AT THE TIME OF PRINTING Settings can be saved from any tab of the printer driver properties window.
PRINTER USING SAVED SETTINGS 1 Open the printer driver properties window from the print window of the software application. 2 Select the print settings. (1) Select the user settings that you wish to use. (2) Click the [OK] button. (1) 3 (2) Start printing. Deleting saved settings Select the user settings that you want to delete in (1) of step 2 above, and click the [Delete] button.
PRINTER CHANGING THE PRINTER DRIVER DEFAULT SETTINGS The default settings of the printer driver can be changed using the procedure below. The settings selected using this procedure are saved and become the default settings when printing from a software application. (Settings selected in the printer driver properties window when printing from an application remain in effect only while the application is in use.
PRINTER PRINTING FROM A MACINTOSH BASIC PRINTING PROCEDURE The following example explains how to print a document from the standard accessory program "TextEdit" in Mac OS X. Note To use the machine as a printer for the Macintosh, the machine must be connected to a network. To install the PPD file and configure printer driver settings, see Software Setup Guide. SELECTING PAPER SETTINGS Select paper settings in the printer driver before selecting the print command.
PRINTER 3 4 Select print settings. Click next to [Copies & Pages] and select the settings that you wish to configure from the pull-down menu. The corresponding setting screen will appear. If the settings do not appear in Mac OS X v10.5, 10.6 and 10.7, click " " next to the printer name. Click the [Print] button. Printing begins. SELECTING THE PAPER This section explains the [Paper Feed] settings in the print settings window.
PRINTER PRINTING ON ENVELOPES The bypass tray can be used to print on special media such as envelopes. The procedure for printing on an envelope from the printer driver properties screen is described below. For the types of paper that can be used in the bypass tray, see "PAPER" (P.16). For the procedure for loading paper in the bypass tray, see "Loading the bypass tray" (P.20).
PRINTER PRINTING WHEN THE USER AUTHENTICATION FUNCTION IS ENABLED When the user authentication function is enabled in the machine's system settings (administrator), you must enter your user number in order to print. 1 3 Select [Print] from the application's [File] menu. Start printing. (1) (2) (3) (1) Enter your user information. Note 2 When authentication is by user number Enter your user number (5 digits) in "User Number".
PRINTER FREQUENTLY USED FUNCTION This section explains frequently used functions. • "SELECTING THE COLOUR MODE" (P.52) • "TWO-SIDED PRINTING" (P.55) • "FITTING THE PRINT IMAGE TO THE PAPER" (P.56) • "PRINTING MULTIPLE PAGES ON ONE PAGE" (P.57) The explanations assume that the paper size and other basic settings have already been selected.
PRINTER BLACK AND WHITE PRINTING [Black and White] can be selected on the [Main] tab as well as on the [Color] tab. Click the [Black and White Print] checkbox on the [Main] tab so that a checkmark appears. The [Black and White Print] checkbox on the [Main] tab and the "Color Mode" setting on the [Color] tab are linked. When the [Black and White Print] checkbox is selected on the [Main] tab, [Black and White] is also selected on the [Color] tab. Macintosh (2) (1) Select [Color].
PRINTER SELECTING A PRINT MODE SETTING This section explains the procedure for selecting a print mode setting. The "Print Mode Settings" consist of the following two items: Normal: High Quality: This mode is suitable for printing data such as regular text or a table. The print quality of colour photos and text is high. Windows (1) (2) (1) Click the [Advanced] tab. (2) Select the "Print Mode". (1) (1) Select [Color]. (2) Select the "Print Mode".
PRINTER TWO-SIDED PRINTING The machine can print on both sides of the paper. This function is useful for many purposes, and is particularly convenient when you want to create a simple pamphlet. Two-sided printing also helps conserve paper.
PRINTER FITTING THE PRINT IMAGE TO THE PAPER This function is used to automatically enlarge or reduce the printed image to match the size of the paper loaded in the machine. This is convenient for such purposes as enlarging an A5 or letter size document to A4 or ledger size to make it easier to view, and to print when the same size of paper as the document image is not loaded in the machine. A5 A4 The following example explains how to print an A5 size document on A4 size paper.
PRINTER PRINTING MULTIPLE PAGES ON ONE PAGE This function can be used to reduce the print image and print multiple pages on a single sheet of paper. This is convenient when you want to print multiple images such as photos on a single sheet of paper, and when you want to conserve paper. This function can also be used in combination with two-sided printing for maximum conservation of paper.
PRINTER Windows (1) Configure the settings on the [Main] tab. (2) Select the number of pages per sheet. (3) If you wish to print borderlines, click the [Border] checkbox so that a checkmark appears. (4) Select the order of the pages. (1) (2) (3) (4) Macintosh (1) (1) (2) (3) (4) (2) (4) (3) 58 Select [Layout]. Select the number of pages per sheet. Select the order of the pages. If you wish to print borderlines, select the desired type of borderline.
PRINTER CONVENIENT PRINTING FUNCTIONS This section explains convenient functions for specific printing objectives. • "FUNCTIONS THAT COMBINE TEXT AND IMAGES" (P.68) • "PRINT FUNCTIONS FOR SPECIAL PURPOSES" (P.71) • "CONVENIENT PRINTER FUNCTIONS" (P.72) • "CONVENIENT FUNCTIONS FOR CREATING PAMPHLETS AND POSTERS" (P.59) • "FUNCTIONS TO ADJUST THE SIZE AND ORIENTATION OF THE IMAGE" (P.62) • "COLOUR MODE ADJUSTMENT FUNCTION" (P.
PRINTER Macintosh (1) (1) Select [Printer Features]. (2) Select the "Binding Edge". (3) Select [Tiled Pamphlet] or [2-Up Pamphlet]. (2) (3) INCREASING THE MARGIN (Margin Shift) This function is used to shift the print image to increase the margin at the left, right, or top of the paper. This is convenient when you wish to staple or punch the output but the binding area overlaps the text. Windows (1) (1) Configure the settings on the [Main] tab. (2) Select the "Binding Edge".
PRINTER CREATING A LARGE POSTER (Poster Printing) (This function is only available in Windows.) One page of print data can be enlarged and printed using multiple sheets of paper (4 sheets (2 x 2), 9 sheets (3 x 3) or 16 sheets (4 x 4)). The sheets can then be attached together to create a large poster. To enable precise alignment of the edges of the sheets during attachment, borderlines can be printed and overlapping edges can be created (overlap function). Windows (1) Click the [Paper] tab.
PRINTER FUNCTIONS TO ADJUST THE SIZE AND ORIENTATION OF THE IMAGE ROTATING THE PRINT IMAGE 180 DEGREES (Rotate 180 degrees) This feature rotates the image 180 degrees so that it can be printed correctly on paper that can only be loaded in one orientation (such as envelopes or paper with punch holes). (In Mac OS X, a portrait image cannot be rotated 180 degrees.) ABCD ABCD Windows (1) (1) Select the setting on the [Main] tab.
PRINTER ENLARGING/REDUCING THE PRINT IMAGE (Zoom/XY-Zoom) This function is used to enlarge or reduce the image to a selected percentage. This allows you to enlarge a small image or add margins to the paper by slightly reducing an image. When using the PS printer driver (Windows), you can set the width and length percentages separately to change the proportions of the image. (XY-Zoom) Windows (1) Click the [Paper] tab. (2) Select [Zoom] and click the [Settings] button.
PRINTER COLOUR MODE ADJUSTMENT FUNCTION ADJUSTING THE BRIGHTNESS AND CONTRAST OF THE IMAGE (Colour Adjustment) The brightness and contrast can be adjusted in the print settings when printing a photo or other image. These settings can be used for simple corrections when you do not have image editing software installed on your computer. Windows Macintosh (This function can only be used in Mac OS X v10.4.) (1) (1) (2) (2) (3) (3) (1) Click the [Color] tab. (2) Click the [Color Adjustment] button.
PRINTER PRINTING FAINT TEXT AND LINES IN BLACK (Text To Black/Vector To Black) (This function is only available in Windows.) • When printing a colour image in greyscale, colour text and lines that are faint can be printed in black. (Raster data such as bitmap images cannot be adjusted.) This allows you to bring out colour text and lines that are faint and difficult to see when printed in greyscale. • [Text To Black] can be selected to print all text other than white text in black.
PRINTER SELECTING COLOUR SETTINGS TO MATCH THE IMAGE TYPE (Advanced Colour) Preset colour settings are available in the machine's printer driver for various uses. These enable printing using the most suitable colour settings for the colour image type. Advanced colour settings can also be configured to match the objective of the colour image, such as colour management settings and the screening setting for adjustment of colour tone expression. Windows (1) (1) Click the [Color] tab.
PRINTER Macintosh (1) (4) (2) (3) (1) Select [Color]. (2) Select colour print settings. (4) Select advanced colour settings. If you wish to select detailed settings, click the [Advanced] tab. To configure colour management settings, select the desired settings from the menus. To use "CMYK Simulation", select the [CMYK Simulation] checkbox and then select the desired setting. To use the Mac OS Color Management function, select the [ColorSync] checkbox .
PRINTER FUNCTIONS THAT COMBINE TEXT AND IMAGES ADDING A WATERMARK TO PRINTED PAGES (Watermark) CO NF ID EN TI A L Faint shadow-like text can be added to the background of the printed image as a watermark. The size, colour, density, and angle of the watermark text can be adjusted. The text can be selected from a pre-stored list, or entered to create an original watermark. Windows (1) (1) Click the [Watermarks] tab. (2) Select the watermark settings.
PRINTER PRINTING AN IMAGE OVER THE PRINT DATA(Image Stamp) (This function is only available in Windows.) A bitmap or JPEG image stored on your computer can be printed over the print data. The size, position, and angle of the image can be adjusted. This feature can be used to "stamp" the print data with a frequently used image or an icon of your own creation. MEMO MEMO Windows (1) (1) Click the [Watermarks] tab. (2) Select the image stamp setting.
PRINTER CREATING OVERLAYS FOR PRINT DATA (Overlays) (This function is only available in Windows.) The print data can be printed in a previously created overlay. By creating table rulings or a decorative frame in an application different from that of the text file and registering the data as an overlay file, an attractive print result can be easily obtained without the need for complex manipulations.
PRINTER PRINT FUNCTIONS FOR SPECIAL PURPOSES PRINTING SPECIFIED PAGES ON DIFFERENT PAPER (Different Paper) • Using this function in a Windows environment The front cover can be printed on paper that is different from the other pages. Use this function when you wish to print the front cover on heavy paper, or different paper such as coloured paper. • Using this function in a Macintosh environment The front cover and last page can be printed using paper that is different from the other pages.
PRINTER CONVENIENT PRINTER FUNCTIONS SAVING AND USING PRINT FILES (Retention) This function is used to store a print job as a file on the machine, allowing the job to be printed from the operation panel. The location for storing a file can be selected to prevent the file from being mixed together with files of other users. When printing from a computer, a password (5 to 8 digits) can be set to maintain the secrecy of information in a stored file.
PRINTER Printing a job stored by retention When retention is performed, the display appears as follows: 1 2 Press the [ 3 Press the [OK] key. 4 Print or delete the print job with the [ ] key to display the list of print hold jobs. Select the print job with the [ ][ ] keys. ][ ] keys. Select "Print" to print the job. Select "Delete" to delete the job without printing it. Selecting "No Print" returns you to step 1. 5 Press the [OK] key. The print job is printed or deleted.
PRINTER PRINTING WITHOUT THE PRINTER DRIVER When you do not have the printer driver installed on your computer, or when the software application used to open a file that you wish to print is not available, you can print directly to the machine without using the printer driver. The file types (and corresponding extensions) that can be printed directly are shown below.
PRINTER DIRECTLY PRINTING A FILE IN USB MEMORY A file in a USB memory device connected to the machine can be printed from the operation panel of the machine without using the printer driver. When the printer driver of the machine is not installed on your computer, you can copy a file into a commercially available USB memory device and connect the device to the machine to print the file directly. 1 Connect the USB memory device to the machine.
PRINTER DIRECTLY PRINTING FROM A COMPUTER Settings can be configured in the Web pages of the machine to enable direct printing from a computer without using the printer driver. For the procedure for accessing the Web pages, see "ABOUT THE WEB PAGES" (P.190). FTP PRINT You can print a file from your computer by simply dragging and dropping the file onto the FTP server of the machine.
PRINTER APPENDIX PRINTER DRIVER SPECIFICATION LIST Available functions and output results may vary depending on the type of printer driver being used.
PRINTER PCL6 PS Windows PPD*1 Macintosh PPD*1 Print Mode Normal/ High Quality Normal/ High Quality Normal/ High Quality Normal/ High Quality Graphics Mode Selection Yes No No No Toner Save Yes Yes Yes Yes Resident font 80 fonts 136 fonts 136 fonts 136 fonts Selectable download font bitmap, TrueType, Graphics bitmap, TrueType, Type1 bitmap, TrueType, Type1 No Auto Configuration Yes Yes No Yes User Authentication Yes Yes No Yes Function Image Quality Font Other functi
4 FAX FUNCTIONS TO USE THIS PRODUCT CORRECTLY AS A FACSIMILE Several points must be kept in mind when using this product as a facsimile. Please note the following. Line connection Be sure to use the provided telephone line cord to connect the machine to a telephone line jack. Insert one end of the telephone line cord into the LINE jack on the left side of the machine as shown. Insert the other end of the telephone line cord into a telephone line jack. Insert the plug firmly until you hear a "click".
FAX FUNCTIONS POINTS TO CHECK AND PROGRAM AFTER INSTALLATION After installing the machine and before using it as a fax machine, check the following points and program the required information. Set the date and time The machine has an internal clock. It is important to set the correct date and time because they are used for such features as Timer Transmission (p.98). The date and time are set in the system settings. (p.176) The date and time appear in the display.
FAX FUNCTIONS FAX MODE (BASE SCREEN) The base screen of fax mode is displayed by pressing the [FAX] key ( screen appears. ) when the copy mode, or scan mode The base screen of fax mode (6) (1) (9) (2) (3) (7) (10) (4) (8) (11) (12) (5) Left Menu (1) (2) (3) (4) (5) (6) Right Menu (7) Reception mode display (p.96) There are two modes for receiving faxes: automatic reception and manual reception. This shows the currently selected reception mode. (8) Original display (p.
FAX FUNCTIONS ORIGINALS ORIGINALS THAT CAN BE FAXED Original sizes Using the document Scanning width is fixed to A4 width (210mm) or 8-1/2" (216mm). Scanning length is automatically adjusted from 148mm to 500mm. feeder Using the document All are scanned at A4 or 8-1/2" x 11". glass Note • There are restrictions on originals that can be scanned using the document feeder. For more information, see "NORMAL COPYING" (p.26).
FAX FUNCTIONS CONVENIENT DIALLING METHODS (AUTO-DIALLING) The fax function includes a convenient auto dial feature (Speed dialling and group dialling). By programming frequently dialled numbers, you can call and send faxes to these locations by means of a simple dialling operation (p.87). There are two types of auto-dialling: Speed dialling, and group dialling. To program auto-dial numbers, see p.103.
FAX FUNCTIONS FAX TRANSMISSION METHODS There are three basic methods for fax transmission: memory transmission, direct transmission, and manual transmission. When memory transmission is used, the document is temporarily stored in memory before being transmitted. When direct transmission or manual transmission is used, the document is transmitted without being stored in memory. The default transmission setting can be set to "Memory TX" or "Direct TX" using "Send Mode" (p.186) in the system settings.
FAX FUNCTIONS SENDING A FAX BASIC PROCEDURE FOR SENDING FAXES 1 Make sure that the machine is in fax mode. The FAX indicator is lit when the machine is in fax mode. If the indicator is not lit, press the [FAX] key ( ). If user authentication has been enabled for the fax function in the system settings, a message will appear prompting you to enter your user number when you switch to fax mode. Enter your account number (5 digits) with the numeric keys. (p.
FAX FUNCTIONS Entering a pause If a pause is necessary when dialling out from a PBX or when dialling an international number, press the [REDIAL] key ( ). (This key functions as a pause key when entering a number.) If you press the [PAUSE] key ( ) once, a hyphen ("-") appears and a 2-second pause* is inserted. After entering a number, you can also press the [PAUSE] key ( ) to enter a hyphen and then enter another number using the numeric keys.
FAX FUNCTIONS TRANSMISSION BY AUTO-DIALLING (SPEED DIALLING AND GROUP DIALLING) Instead of entering a full fax number with the numeric keys, you can send a fax by pressing the [SPEED] key ( ) and entering a 3-digit number. To use an automatic dialling, the 3-digit number and name and fax number of the destination must first be stored. See p.83 for information on auto-dialling and p.103 for information on programming auto-dial destinations. 1 Enter the 3-digit number with numeric keys.
FAX FUNCTIONS FAXING A TWO-SIDED ORIGINAL Follow the steps below to automatically transmit both sides of a two-sided original. (Only on models with the two-sided scanning function.) 1 2 Press the [DUPLEX] key ( Select "Portrait-Booklet", "Portrait-Tablet", "Landscape-Booklet", and "Landscape-Tablet" with the [ ] or [ ] key. Note 3 ) on the operation panel and select "2-Sided".
FAX FUNCTIONS Transmission settings (memory transmission mode and direct transmission mode) Transmission modes include memory transmission, where the original is temporarily scanned into memory before transmission, and direct transmission, where the original is transmitted directly without being scanned into memory. There are two types of memory transmission: "Storing transmission jobs (memory transmission)" (p.
FAX FUNCTIONS Faxing by manual transmission (using the [SPEAKER] key ( 1 Press the [SPEAKER] key ( )) ). When this key is pressed, a message regarding volume adjustment will appear briefly followed by the dial entry screen. You can adjust the speaker volume (high, middle, or low) by pressing the [ ] or [ ] key. Note that this will not change the volume setting in the system settings. Ringing will be heard from the speaker on the rear side of the machine when the [SPEAKER] key ( ) is used for dialling.
FAX FUNCTIONS Quick On-line When you use the document feeder to send a multi-page document and there are no previously stored jobs waiting or in progress (and the line is not being used), the machine dials the destination after the first page is scanned and begins transmitting scanned pages while the remaining pages are being scanned. This transmission method is called Quick On-line. When a quick online transmission is being performed, the message display shows "Reading" "Dialling" - "Comm.
FAX FUNCTIONS HOW TO SELECT THE RESOLUTION The resolution can be changed to match the text size of the original, and the original type, such as a photo. Select "Resolution" in the right menu of the base screen of fax mode and press the [OK] key. Standard Select for an original with normal size text. Fine Select for an original with small text or detailed diagrams. The original will be scanned at twice the density of "Standard". Super Fine Select for an original with intricate pictures or diagrams.
FAX FUNCTIONS CANCELLING A FAX TRANSMISSION To cancel a transmission that is in progress or a stored transmission job, follow the steps below. A transmission in progress or a stored transmission job is cancelled from the fax status screen. (Printing of a received fax cannot be cancelled.
FAX FUNCTIONS Cancelling a stored transmission job If you do not wish to cancel a stored transmission job and only wish to check its status, press the [BACK] key ( instead of the [C] key in step 4 to exit. 1 Press the [FAX STATUS] key ( ) ). The fax job status screen is displayed. Note 2 3 When a transmission is in progress, the job being transmitted is displayed. Press the [BACK] key ( the fax status selection screen. ) to display Select "TX/RX Reserve" with the [ ] or [ ] key.
FAX FUNCTIONS RECEIVING FAXES When another fax machine sends a fax to your machine, your machine will ring*, automatically receive the fax, and begin printing. (This is called automatic reception.) If you do not wish to have received faxes printed immediately, use the print hold function to hold received faxes in memory for printing at your convenience (all received faxes will be printed at once). To enable this function and print received faxes, see "FAX PRINT HOLD FUNCTION" (p.97).
FAX FUNCTIONS If received data cannot be printed If the machine runs out of paper or toner, or a paper misfeed occurs, or if the machine is printing a print or copy job, received faxes will be held in memory until printing becomes possible. The received faxes are automatically printed when printing is possible. When received faxes are held in memory, the FAX [DATA] light ( ) blinks. You can also use the forwarding function to have another fax machine print the received faxes. (See "FORWARDING FUNCTION" (p.
FAX FUNCTIONS FUNCTION KEY This is the initial setting that appears when the [SPECIAL FUNCTION] key ( ) is pressed in fax mode. FAX PRINT HOLD FUNCTION Faxes are normally printed as soon as they are received. This function is used to hold received faxes in memory rather than printing them as they are received. Faxes held in memory are printed manually all at once. Settings required for fax print hold If a fax is received when auto power shut-off mode has activated ("POWER ON AND OFF" (p.
FAX FUNCTIONS AUTOMATIC TRANSMISSION AT A SPECIFIED TIME This feature enables you to set up a transmission or polling operation to be performed automatically at a specified time up to a week in advance. This is convenient when you will be out of the office or for transmission at off-peak nighttime rates. A combined total of 50 timer transmission and memory transmission jobs can be stored. Note 1 • After a timer transmission is performed, the information (image, destination, etc.
FAX FUNCTIONS SENDING THE SAME DOCUMENT TO MULTIPLE DESTINATIONS IN A SINGLE OPERATION This feature is used to send a fax to multiple destinations in a single operation. The original to be transmitted is scanned into memory and then successively transmitted to the selected destinations. This feature is convenient for such purposes as distributing a report to company branches. Up to 100 destinations can be selected.
FAX FUNCTIONS SENDING OPTIONS This function allows your machine to call another fax machine and initiate reception of a document in that machine. A timer setting can also be specified to have the operation take place at night or at another specified time. (See "AUTOMATIC TRANSMISSION AT A SPECIFIED TIME" (p.98).
FAX FUNCTIONS Serial polling mode Setting for polling reception from multiple fax machines. Select "Serial polling" steps 1 to 2 of the polling procedure "POLLING" (p.100). Before pressing the [BLACK & WHITE START] key in step 3, repeat steps 1 and 2 for each machine that you wish to poll. Note The receiving machine bears the expense (phone charges) of polling transmission.
FAX FUNCTIONS Scanning a document into polling memory This section explains how to scan a document into the polling memory. If other documents have already been stored in the polling memory, the new document will be appended to those documents. If the previous documents are no longer needed, they can be replaced. 1 Select "Memory Polling" 2 Press the [OK] key and select "1 Time" or "Repeat" If you select "1 Time", the document data is automatically cleared from memory after your machine is polled once.
FAX FUNCTIONS Deleting documents from the polling memory This procedure is used to delete documents from the polling memory when they are no longer needed. 1 2 Select "Delete". Press the [OK] key. A screen appears asking you to confirm the deletion. 3 Select "Yes" with the [ ] or [ ] key and press the [OK] key. The documents are deleted from the polling memory. Note Deletion is not possible while the polling memory is being used.
FAX FUNCTIONS 6 To finish the storing procedure, press the [BLACK & WHITE START] key. If you wish to program an option such as chain dialling, transmission speed, or international transmission mode, press the [OK] key. • If you pressed the [BLACK & WHITE START] key, you will return to step 3. If you wish to store another or Speed Dial number, repeat steps 3 to 6. If you have finished storing auto-dial numbers, press the [BACK] key ( ).
FAX FUNCTIONS ● International transmission mode setting To set the international transmission mode, complete "Editing and deleting auto-dial numbers" (p.106). Note 1 2 • When sending a fax to a foreign country, telephone line conditions can sometimes distort the fax or interrupt the transmission. Selecting the right international transmission mode can help alleviate these problems.
FAX FUNCTIONS ● Editing and deleting auto-dial numbers To edit or delete an auto-dial number, follow steps 1 through 6 on p.103 and then follow the steps below. Note The Speed Dial number is being used in a transmission in progress or in a stored transmission, a Speed Dial number cannot be edited or cleared. ● Editing a Rapid key or Speed Dial number 1 2 Select "Speed" and Select "Change" with the [ ] or [ ] key. Press or the [SPEED] key ( numeric keys.
FAX FUNCTIONS STORING, EDITING AND DELETING PROGRAMS You can store a address setting, transmission method, original size enter, duplex scanning, resolution and exposure, own number sending, transmission settings. This will allow you to use the settings for a transmission by means of a simple operation (see "USING SETTINGS STORED AS A PROGRAM" (p.112)). * Transmission methods: normal transmission, broadcast transmission, polling, serial polling.
FAX FUNCTIONS ● EDITING PROGRAMS If you need to edit a previously stored program, follow these steps. 3 4 Select the program that you wish to edit with the [ ] or [ ] key. Edit the program name (see "ENTERING CHARACTERS" (p.24)). • See step 3 of . • If you do not wish to edit the program name, go to the next step. 5 Select the stored setting that you wish to edit with the [ ] or [ ] key. • See steps 4 of .
FAX FUNCTIONS PRINTING LISTS OF PROGRAMMED INFORMATION AND SETTINGS You can print lists showing programmed information and settings. The following lists can be printed. • Destination Lists: Shows the destinations stored in auto dial numbers in the order of their search characters. • Group List: Shows the destinations stored in each group dial number. • Program List: Shows the operations stored in each program. • Timer List: Shows timer transmissions and recall transmissions. • Mem.
FAX FUNCTIONS FORWARDING FUNCTION When printing is not possible because of a paper, toner, or other problem, you can forward received faxes to another fax machine if that machine has been appropriately programmed in your machine. This function can be conveniently used in an office or other workplace where there is another fax machine connected to a different phone line. When a fax has been received to memory, the FAX [DATA] light blinks (see "If received data cannot be printed" (p.96)).
FAX FUNCTIONS USING THE FORWARDING FUNCTION Programming the fax number of the forwarding destination The number of the forwarding destination is programmed in the system settings (see "Received Data FW. Station Set" (p.188)). Only one fax number can be programmed. The forwarding function cannot be used unless a number is programmed. Forwarding received faxes 1 Select "FW. RX Data" with the [ ] or [ ] key and press the [OK] key. 2 Select "Transfer" with the [ ] or [ ] key and press the [OK] key.
FAX FUNCTIONS USING SETTINGS STORED AS A PROGRAM This function allows you to store the steps of an operation, including the destination and scanning settings, into a program. This function is convenient when you frequently send documents, such as a daily report, to the same destination. Up to 9 programs for fax transmission can be stored. When storing a program, a name (maximum 36 letters) can be assigned to the program.
FAX FUNCTIONS FORWARDING RECEIVED DATA TO A NETWORK ADDRESS (INBOUND ROUTING SETTINGS) You can have received faxes automatically forwarded to a specified shared folder. As an example, this function can be used to route received faxes to a specified folder without printing the faxes. All Inbound Routing settings are configured in the Web page. The following explanation assumes that the Web page has been accessed with administrator rights.
FAX FUNCTIONS Set a file name for forwarding received data Select from the pull-down menu of items used for the file name. To add a desired text string, select the "Characters" and enter the string in "Preset of Character" using up to 64 characters. Select the item to be used as the file name in "File Name Setting". Item Description Serial Number Selecting Serial Number adds the unit serial number to the file name. Sender Name Selecting Sender Name adds the sender name to the file name.
FAX FUNCTIONS SETTINGS THE DESTINATION Specify a sending source of received data and forwarding destination network folder to configure a forwarding table. Up to 10 forwarding tables can be configured.
FAX FUNCTIONS Forward Condition Item Settings Forward Condition Description Enable, Disable Enable or disable the destination to be set in this screen. Forward (All), Forward (Sender) Select the determination condition for forwarding the received FAX data. Sender Number Item Description Fax No. Enter the sender's fax number if you have selected "Forward (Sender)" in "Forward Conditions" setting. Up to 20 digits can be entered.
FAX FUNCTIONS CONNECTING AN EXTENSION PHONE You can connect a telephone to the machine and use it as an extension phone to place and receive calls like any normal phone. Fax reception can also be activated from an extension phone connected to the machine. (remote operation) CONNECTING AN EXTENSION PHONE Insert the end of the extension phone cord into the extension phone jack on the left side of the machine.
FAX FUNCTIONS USING AN EXTENSION PHONE Using an extension phone for voice calls An extension phone connected to the machine can be used to place and receive voice calls just like a normal phone. A extension phone can be used while another mode is being used (copying, etc.). Note • It may not be possible to make a call on your line during a power outage. This depends on the type of line (optical line, etc.).
FAX FUNCTIONS Sending a fax after talking on the phone (Manual transmission) If the other fax machine is set to manual reception, you can talk to the other party and then send a fax without breaking the connection. Note Automatic redialing (p.91) will not take place if the line is busy. 1 Follow steps 1 to 4 of "BASIC PROCEDURE FOR SENDING FAXES" (p.85) and then follow the steps below. 2 3 4 5 Lift the extension phone. Dial the number of the other party. Speak to the other party when they answer.
FAX FUNCTIONS WHEN A TRANSACTION REPORT IS PRINTED The machine has been set to automatically print a transaction report to notify you of the result when a transmission is not successful or when the Broadcast transmission function is used. When transmission is not successful and a transaction report similar to the following is printed, "FOLLOWING DATA CANNOT BE SENT. PLEASE HAND THIS REPORT TO XXX.", read the report and take appropriate action.
FAX FUNCTIONS Reception result Explanation OK Reception was completed successfully P. FAIL The power was turned off or a power failure occurred. MEMORY FULL The image memory became full during substitute reception to memory. LENGTH OVER The transmitted document was over 800 mm long and therefore could not be received. NO RX ROLL When polling was attempted, (1) Your fax number (sender's number) was not programmed in your machine.
FAX FUNCTIONS WHEN AN ALARM SOUNDS AND A WARNING MESSAGE IS DISPLAYED When an error occurs during a transaction, an alarm will sound and a message will appear in the display. If one of the following messages appears, follow the instructions in the table. If another messages appears, see "INDICATORS AND DISPLAY MESSAGES" (p.151). Message (alarm sounds) XXXXXX Line error. Meaning of message Solution An error prevented completion of the Try the transaction again. transaction.
5 SCANNER FUNCTIONS ABOUT THE SCANNER FUNCTIONS With this machine a document or photo can be scanned into an image file. Installing the network expansion kit on the machine enables you to scan documents, photos, or other originals to create a data file. You can then send the data file to the file server or your computer using the inter-corporate network (Intranet) or the Internet.
SCANNER FUNCTIONS 1 Scanning from a TWAIN-compliant application A TWAIN-compliant application on a computer connected to the same network as the machine is used to scan a document or image. To use PC Scan, the scanner driver must be installed from the "Software CD-ROM" that accompanies the machine. For more information on scanning from a TWAIN-compliant application, see "SCANNING FROM YOUR COMPUTER (PC SCAN)" (p.
SCANNER FUNCTIONS THE BASE SCREEN OF SCANNER MODE The base screen of scan mode is displayed by pressing the [SCAN] key ( fax mode. ) from the base screen of copy mode or hz Note If a screen appears asking you what type of connection you are using after you press the [SCAN] key ( select "Network" with the [ ] or [ ] key and press the [OK] key. ), Base screen of scan mode (1) (2) (6) (7) (8) (9) (3) (4) (5) (1) Message display Messages appear here to indicate the current status of the machine.
SCANNER FUNCTIONS SENDING AN IMAGE BASIC TRANSMISSION PROCEDURE 1 Make sure the machine is in scan mode. When the SCAN indicator is lit, the machine is in scan mode. If the indicator is not lit, press the [SCAN] key ( ) . If auditing mode has been enabled for the scan function in the system settings, a message will appear prompting you to enter your account number when you switch to scan mode. Enter your account number (five digits) with the numeric keys. (p.
SCANNER FUNCTIONS Using the document feeder 9 Press the [COLOUR START] key or [BLACK & WHITE START] key. Scanning begins. If scanning is completed normally, the following screen is appears briefly and then the display returns to the base screen. Using the document glass 9 Press the [COLOUR START] key or [BLACK & WHITE START] key. Scanning begins. 10 If you have another page to scan, change pages and then press [COLOUR START] key or [BLACK & WHITE START] key.
SCANNER FUNCTIONS SELECTING A DESTINATION (USING THE [ADDRESS] KEY ( )) A destination can be selected using one of three methods: Selecting from "ADDRESS BOOK", using "ADDRESS ENTRY", or "ADDRESS SEARCH". Note • Multiple destination scan be selected for a Scan to E-mail transmission. (Maximum of 20.) • Only one destination can be selected for a Scan to Network, Scan to FTP or Scan to Desktop transmission. ADDRESS BOOK 1 2 Press the [ADDRESS] key ( ), and select the "Address Book".
SCANNER FUNCTIONS TRANSMITTING A TWO-SIDED ORIGINAL The original field of the display shows the original scanning size. The current original scan mode setting is indicated by an icon. : : One-sided scanning in the document feeder. Two-sided scanning in the document feeder (Models with the two-sided scanning function). None: Document glass Follow these steps to automatically transmit a two-sided original. (Only models with the two-sided scanning function.
SCANNER FUNCTIONS STORING SCANNING SETTINGS Sets of scanning settings (scan size, resolution, file type, etc.) can be changed for use in various scanning applications. SETTING THE SCANNING SIZE The default scanning size is A4. (If "SCANNING BUSINESS CARDS (BUSINESS CARD SCAN)" (p.133) has been selected, the scanning size is set to business card size.
SCANNER FUNCTIONS SELECTING THE FILE FORMAT After selecting scan mode and placing the original (steps 1 to 3 on p.126), perform the procedure below. The factory default settings are "PDF" for the file type and "Multi" for the file creation method (multiple scanned images are combined into one file). If you need to change the file format, follow these steps. 1 Select "Format" with the [ ] or [ ] key, and select "Colour / Greyscale" or "B/W", and press the [OK] key.
SCANNER FUNCTIONS ADJUSTING THE SCANNING EXPOSURE The exposure for an image can be adjusted. The larger the value, the darker the image. Select scan mode, place the original (steps 1 to 3 on p.126), and then follow the procedure below. The scanning exposure is set to "Txt/Prt Photo Auto" by factory default. 1 Press [EXPOSURE] key ( ) with the [ ] or [ ] key, and select "Text", "Txt/Prt Photo", or "Photo" for the original type.
SCANNER FUNCTIONS SCANNING BUSINESS CARDS (BUSINESS CARD SCAN) (Models with the two-sided scanning function) Business cards can be scanned. Only when using this feature, it is possible to read the business card from the automatic document feeder. Original glass 1 Document feeder tray Press the [SPECIAL FUNCTION] key ( Card Scan". ) , and press the [ ] or [ ] key to select "Bus. The original size is set to business card size (custom). 2 Press the [OK] key.
SCANNER FUNCTIONS STORING AND EDITING/DELETING A PROGRAM This function lets you store a transmission address and scanning settings. The address and settings can be called up when you scan a document, saving you the trouble of selecting the address and settings. Up to two programs can be stored for scanning. • Address Setting • Original Size Enter • Resolution • Format • Exposure • Original scanning mode can be stored in a program. 1 Press the [SPECIAL FUNCTION] key ( or [ ] key, and press the [OK] key.
SCANNER FUNCTIONS SCANNING FROM YOUR COMPUTER (PC SCAN) The machine supports the TWAIN standard, making it possible to scan from TWAIN-compliant applications. SCANNING FROM A TWAIN-COMPLIANT APPLICATION Scanning in PC scan mode is only possible when the scanner driver has been installed from the "Software CD-ROM" using the integrated installer. For the procedures for installing the scanner driver and configuring settings, see the Software Setup Guide.
SCANNER FUNCTIONS 6 Click the "Preview" button. The preview image will appear. Note 7 • If the angle of the image is not correct, reset the original, and click the "Preview" button again. • If the preview image is not oriented correctly, click the "Rotate" button in the preview screen. This rotates the preview image 90 degrees clockwise, allowing you to correct the orientation without resetting the original. "Preview screen" (p.
SCANNER FUNCTIONS Scanner driver settings The scanner driver setup screen consists of the "Set-up screen", which lets you select scan settings, and the "Preview screen", which shows the scanned image. For details on the scan settings, click the "Help" button in the preview screen to display Help. Set-up screen (1) (2) (3) (4) (5) (6) (7) (1) "Scanning Position" menu ("Scanning Source" in some regions) Select the location where the original is placed.
SCANNER FUNCTIONS Preview screen (1) (2) (3) (4) (5) (1) Preview screen Click the "Preview" button in the Set-up screen to display the scanned image. You can specify the scanning area by dragging the mouse inside the window. The inside of the frame that is created when you drag the mouse will be the scanning area. To cancel a specified scanning area and clear the frame, click anywhere outside the frame. (2) "Rotate" button Click to rotate the preview image 90 degrees clockwise.
SCANNER FUNCTIONS USB MEMORY SCAN USING THE USB MEMORY SCAN FUNCTION A scanned image can be sent (save) to a commercially available USB memory device that has been connected to the machine. 1 Make sure the machine is in scan mode. When the SCAN indicator is lit, the machine is in scan mode. If the indicator is not lit, press the [SCAN] key ( ).
SCANNER FUNCTIONS 5 Connect the USB memory device to the machine. Note If a USB memory device is inserted into the machine prior to step 4, the following screen will appear. Instead of performing steps 3 and 4, you can select "Scan to the memory device" with the [ above screen and press the [OK] key to select the USB memory device as the destination. Using the document feeder 6 Press the [COLOUR START] key or [BLACK & WHITE START] key. Scanning begins. If scanning is completed normally, "Complete.
6 TROUBLESHOOTING This chapter describes troubleshooting and misfeed removal. If you encounter a problem when using the machine, check the following troubleshooting guide before calling for service. If you cannot resolve the problem using the troubleshooting guide, turn off the main switch, disconnect the power cord from the power outlet, and contact your dealer. If you experience difficulty using the machine, check the following troubleshooting guide before calling for service.
TROUBLESHOOTING FAX PROBLEMS The machine does not operate. ............................................................................................................... 149 Dialling is not possible. ............................................................................................................................ 149 Cannot send a fax....................................................................................................................................
TROUBLESHOOTING TROUBLESHOOTING NETWORK PROBLEMS Problem Cause and solution Page The LAN cable is disconnected. → Make sure that he LAN cable is firmly inserted in the connectors on the machine and your computer. To connect the cable, see the "Software setup guide". The machine does not connect to the network.
TROUBLESHOOTING Problem The text is blurred when I make a copy. Blank copies. Cause and solution Page Select a suitable exposure for the original in the copy exposure screen. → Change the exposure to "Text" with the [EXPOSURE] key ( 28 ). The original is not placed face up in the document feeder or face down on the document glass. → Place the original face up in the document feeder or face down on the document glass. The original was not placed in the correct position.
TROUBLESHOOTING Problem Paper misfeed. Cause and solution The bypass paper feed roller is dirty. → Clean the roller. The document glass or the underside of the document feeder is dirty. Copies are smudged or dirty. Original smudged or blotchy. 163 – The scanner glass for the document feeder is dirty. → Clean the long, narrow scanning glass. Press the [COPY] key ( ) to select copy mode. Copying or printing is performed. Paper size for a paper tray cannot be set. 164 → Clean regularly.
TROUBLESHOOTING PRINTING AND SCANNING PROBLEMS In addition to this section, troubleshooting information can also be found in the README files for each of the software programs. To view a README file, see "SOFTWARE SETUP GUIDE". Problem Cause and solution Page The machine is set to off-line mode. → If the ONLINE indicator ( ) is not on, press the [SPECIAL FUNCTION] key ( ) to switch to printer mode and then use the [ ] key to select "Online/Offline".
TROUBLESHOOTING Problem The printed image is light and uneven. Cause and solution Page The paper is loaded so that printing takes place on the back side of the paper. → Some paper types have a front and back side. If the paper is loaded so that printing takes place on the back side, toner will not adhere well to the paper and a good image will not be obtained. You are using paper that is outside the specified size and weight range. 19 16 → Use copy paper within the specified range.
TROUBLESHOOTING Problem Cause and solution The document glass or the underside of the document feeder is dirty. Page 163 → Clean regularly. Original smudged or blotchy. → Use a clean original. – You have not specified a suitable resolution. → Make sure that the resolution setting in the scanner driver is appropriate for the original. – You have not specified a suitable value for the "B/W Threshold" setting. Poor scanning quality.
TROUBLESHOOTING Problem Cause and solution Check the Web page to see if a limit has been set for the size of image files sent using Scan to E-mail (the factory default setting is "Unlimited"). A limit can be set from 1 MB to 10 MB. Consult the administrator of the Web page to select a suitable limit. The recipient does not receive data sent by e-mail (Scan to E-mail). Transmission takes a long time. The [COLOUR START] or [BLACK & WHITE START] indicator is not lit in the USB Memory Scan mode.
TROUBLESHOOTING Problem Cause and solution Does the receiving fax machine have paper? → Check with the operator of the receiving machine. Is the receiving machine ready to receive? → Check with the operator of the receiving machine. Are you using a transmittable original size? → Check the transmittable sizes. Cannot send a fax. Was the original size detected correctly? → Check size of the original. Page – – 82 82 The message "Reading cancelled. Please retry sending operation." appears.
TROUBLESHOOTING Telephone Problem Cause and solution A dial tone is not heard through the speaker. Is the volume set to "low"? The machine does not ring. → Set the ringer volume to "low", "middle", or "high". Dialling is not possible. → Check the connections. Page → Set the speaker volume to "middle" or "high".
TROUBLESHOOTING And if one of the following error codes appears in the display at communication error when sending the scanned image, take corresponding solution as mentioned below. Error Code Solution Page CE-00 CE01 Turn off the power and then turn it back on. Consult with your network administrator to make sure that no problems exist on the network or in the server. If the error is not cleared after turning the power off and on, turn off the power and contact your dealer.
TROUBLESHOOTING MISFEED REMOVAL When a misfeed occurs during copying, the message " Check the location and remove the misfeed. Note Clear paper path." and the location of the misfeed will appear. The paper may tear when you remove a misfeed. In this event, be sure to remove all torn pieces of paper from the machine. (See below) (p.156) (p.159) (p.155) (p.159) (p.159) (p.159) MISFEED IN THE DOCUMENT FEEDER 1 Remove the misfed original. Remove the original from the document feeder.
TROUBLESHOOTING Section B Open the document feeder and rotate the release roller in the direction of the arrow to feed the original out. Close the document feeder and then remove the original. Roller If you are unable to remove the original, remove from part C. Section C Remove the misfed original from the exit area. If the original misfed in the reversing unit, open the document out unit and gently remove the misfed original. 2 Press the [OK] key to make the misfeed location indicator stop blinking.
TROUBLESHOOTING MISFEED IN THE BYPASS TRAY 1 Remove any paper remaining in the bypass tray. 2 Gently remove the misfed paper from the bypass tray. If you were able to remove the misfed paper 3 Close the auxiliary tray and then the bypass tray, grasp the side cover open/close handle, and gently open and close the side cover. If you are unable to remove the misfed paper 3 Grasp the side cover open/close handle and gently open the side cover.
TROUBLESHOOTING MISFEED IN THE MACHINE To remove a misfeed from inside the machine, open the side cover, check whether the misfeed occurred in "A", "B", or "C" below, and follow the misfeed removal procedure. 1 Open the bypass tray and the side cover. Note 2 If paper remains in the bypass tray, remove the paper. Check the misfeed location. Remove the misfed paper following the instructions for each location in the illustration below.
TROUBLESHOOTING Misfeed in the fusing area B 1 Lower the fusing unit release levers to allow easier removal. Fusing unit release levers 2 Lower the part with the green label that protrudes from the fixing unit paper guide, and open the fixing unit paper guide. 3 Remove the misfed paper. Be careful not to tear the misfed paper during removal. Warning The fusing unit is hot. Do not touch the fusing unit when removing misfed paper. Doing so may cause a burn or injury.
TROUBLESHOOTING 7 Close the side cover. The message " possible. Note Clear paper path." will be cleared and copying will be • When closing the side cover, press on the handle. • If the paper was torn, make sure that no torn pieces remain in the machine. • If the message does not clear, check again to make sure that no pieces of paper remain. Misfeed in the transport area C 1 Lift up the duplex conveyor lever and open the reversing unit. 2 Remove the misfed paper.
TROUBLESHOOTING MISFEED IN THE PAPER TRAY 1 Note Make sure that there is no misfed paper in the tray before pulling it out. (p.156) 1 Open the side cover and remove the misfed paper. (p.156) 2 Lift and pull out the upper paper tray and remove the misfed paper. Be careful not to tear the misfed paper during removal. MISFEED IN THE PAPER TRAY 2 1 Open the lower side cover. Grasp the handle to open the lower side cover. 2 Remove the misfed paper. Be careful not to tear the misfed paper during removal.
TROUBLESHOOTING REPLACING THE TONER CARTRIDGE When the "Prepare a new toner." appears, little toner remains. Be sure to replace the toner cartridge when the message "Change the toner cartridge." appears. Note If you continue to use the machine without replacing the cartridge, the following message will appear when the toner runs out. Warning Colours that are running low or have run out of toner are indicated in ( ).
TROUBLESHOOTING 4 Insert the toner cartridge along the guides until it locks in place. If there is any dirt or dust on the toner cartridge, remove it before installing the cartridge. Note A toner cartridge of a different colour cannot be installed. Be sure to install a toner cartridge of the same colour. 5 Press the centre of the toner cartridge until the cartridge locks into place. 6 Close the front cover. The toner cartridge replacement required indicator ( Note ) will go out.
TROUBLESHOOTING 2 Open the front cover. 3 Pull out the toner collection container. Hold the toner collection container with both hands and slowly pull it out. Note 4 When removing the toner collection container, it is easier to draw one side at a time. Place the toner collection container on a flat surface. Spread newspaper on the surface before placing the toner collection container. Note 5 • Do not tilt the part with the hole down, as waste toner will spill out.
7 ROUTINE MAINTENANCE This chapter explains how to keep the machine operating smoothly, including viewing copy count, and cleaning the machine. CHECKING THE TOTAL OUTPUT COUNT AND TONER REMAINING To check the total number of pages output in copy, print, and fax modes hold down the [COPY] key ( ) when the machine is in the standby state. The counts will appear while the key is held down. The total output count can be used as a guideline for cleaning.
ROUTINE MAINTENANCE CLEANING THE ORIGINAL SCANNING GLASS (ONLY WHEN AN DOCUMENT FEEDER IS INSTALLED) If white or black lines appear in copies made with using the document feeder, use a soft clean cloth to clean the original scanning glass. (If white or black lines appear in copies or printed pages when the document feeder is not used, see "CLEANING THE LASER UNIT" ).
ROUTINE MAINTENANCE 3 To clean the removed rollers, wipe each roller with a clean cloth. When cleaning the rollers, be careful not to injure your Warning hands. Note 4 Close the document conveyor cover on the automatic document feeder. Note 5 Do not touch the surface of the roller if your hands are dirty. Take care that your fingers are not pinched when closing the cover. Turn on the power.
ROUTINE MAINTENANCE CLEANING THE LASER UNIT When the laser unit inside the machine becomes dirty, line patterns (coloured lines) may form in the printed image. Identifying lines (coloured lines) caused by a dirty laser unit. If the above problems occur, follow the steps below to clean the laser unit. 1 2 3 Turn the power switch off. Procedure of "REPLACING THE TONER COLLECTION CONTAINER" (p.161). Take out the cleaning tool for the laser unit. The cleaning tool is attached to the front cover.
ROUTINE MAINTENANCE 5 Repeat step 4 to clean all holes in the laser unit (4 holes). There are a total of 4 places to be cleaned in the laser unit, including the hole cleaned in step 4. Clean all holes. Cover 6 Replace the cleaning tool. (1) Rotate the charger cleaner after putting it on the boss and hook its edge (the side that does not have a handle) to the claw on the left side. Hook the charger cleaner with the clean side face up.
8 SYSTEM SETTINGS PURPOSE OF THE SYSTEM SETTINGS The system settings are used by the administrator of the machine to enable or disable functions to suit the needs of your workplace. This manual explains only the system settings that are common to all the functions of the machine, (copy and printer functions), as well as system settings that are specifically for the copy function.
SYSTEM SETTINGS PROGRAMMING AN ADMINISTRATOR PASSWORD 1 Press the [SPECIAL FUNCTION] key ( ). The special function screen will appear. 2 3 Select "System Settings" with the [ ] or [ ] key. Press the [OK] key. The administrator password entry screen appears. 4 Use the numeric keys to enter the five-digit administrator password. • If this is the first time you are programming the administrator password, enter the factory default code.
SYSTEM SETTINGS SYSTEM SETTINGS LIST This is a list of the machine's system settings.
SYSTEM SETTINGS Programs for Fax Mode Program name Programs for Scanner Mode Page Program name List Setting Print Selection 183 Auto Listing 184 Initial Setting Dial Mode 184 Pause Time 184 Own Passcode Set 184 Set Volume 184 TX/RX End Sound 185 End Sound Length 185 Remote Reception 185 PBX Setting Mode 185 Disable Fax Print Hold 185 Sending Function Original Size Enter 186 Set Res. Con.
SYSTEM SETTINGS ADMINISTRATOR SETTINGS MENU The system settings are accessed via the following menu structure. Refer to this menu when enabling or disabling the settings that are explained beginning on p.176. Some settings contain an additional level of settings (a settings screen).
SYSTEM SETTINGS Level 1 Level 2 Rcv. Function Level 3 #Of Rings At. RX #Of Rings Man.RX Tray Selection Received Data Print Condition Auto Rcv Reduce To Regular Size Duplex Reception 8 1/2x11 RX Reduce Print FW. RX Data Received Data FW.
SYSTEM SETTINGS Level 1 Operation Setting Level 2 Auto Clear Disable Display Timeout Language Setting Message Time Key Touch Sound Keys Touch Sound At Initial Point Key Press Time Disable Auto Key Repeat Disable Paper Size Set Energy Save Auto Power Shut-Off Timer Preheat Mode Enter Auto Power Shut-Off after the Remote Job Toner Save Mode (Copy) Toner Save Mode (Print) List Print Fax Settings Inbound Routing User Usage List Activity Report Junk Fax # List User Info. Print AutoColourCalib.
SYSTEM SETTINGS USING THE SYSTEM SETTINGS 1 2 3 Press the [SPECIAL FUNCTION] key ( ). Select "System Settings" with the [ ] or [ ] key and press the [OK] key. Enter the administrator password with the numeric keys. • " " appears for each digit that you enter. • The mode selection screen appears. 4 Select the desired mode with the [ ] or [ ] key. 5 6 7 Press the [OK] key. Select the desired setting with the [ ] or [ ] key. Press the [OK] key and follow the instructions in the setting screen.
SYSTEM SETTINGS Change Admin PW Use this function to change administrator password. To change the administrator password, see "PROGRAMMING AN ADMINISTRATOR PASSWORD" (p.169). Wired Settings IPv4 Settings When using the machine on a TCP/IP (IPv4) network, use this setting to configure the IP address of the machine. The settings are shown below. Enable DHCP Use this setting to have the IP address obtained automatically using DHCP (Dynamic Host Configuration Protocol).
SYSTEM SETTINGS Wireless (Infrastructure) Wireless (Access Point) (Only on models with wireless LAN) (Only on models with wireless LAN) This sets connection using wireless infrastructure mode. This sets connection using wireless access point mode. Manual Input of SSID Enter up to 32 half-width characters for the SSID. Setting of SSID Enter up to 32 half-width characters for the SSID. Security Type Select the security type.
SYSTEM SETTINGS User Control User Control is used to configure settings for user authentication. Select the [User Control] to configure the settings. User Authentication These settings enable or disable user authentication and specify the authentication method. When user authentication is enabled, each user of the machine is registered. When a user logs in, settings for that user are applied. User Registration Users can be added, deleted, and changed.
SYSTEM SETTINGS Device Control Operation Setting These settings are used to configure settings for hardware functions of the machine. To access one of these settings, select "Device Control" in the mode selection screen, select the desired setting in the device control screen, and press the [OK] key. These settings are used to configure various settings related to the operation panel.
SYSTEM SETTINGS Key Touch Sound This setting is used to set the length of the key touch sound that is heard each time a key is pressed. The initial factory setting is "Short". Select the desired length with the [ ] or [ ] key. To turn the key touch sound off, select "Off". Energy Save These settings are used to configure energy saving settings.
SYSTEM SETTINGS Enter Auto Power Shut-Off after the Remote Job This function works in Auto Power Shut-Off mode. When the machine completes a print job received from the PC or outputs received fax data, the machine immediately returns to the Auto Power Shut-Off mode. Toner Save Mode (Copy) Toner Save Mode (Print) You can reduce the amount of toner used for copying/printing. Note AutoColourCalib. This is used to perform automatic colour correction when the colour in colour copies is off.
SYSTEM SETTINGS Security Settings Copier The following settings are related to security. Select the [Security Settings] to configure the settings. These settings are used to enable various copy functions. To access one of these programs, select "Copier" in the mode selection screen, select the desired setting in the copy settings screen, and press the [OK] key. IPsec Settings IPsec can be used for data transmission/reception on a network. IKEv1 Settings Configure the IKEv1 settings.
SYSTEM SETTINGS Sort Auto Select This setting is used to select the default output mode when the document feeder is used for copying. The initial factory setting is "Sort". Fax System settings for the fax function are explained below. Limit Of Copies List Setting This setting is used to set the limit for the number of copies that can be set (and that can appear in the display) for one copy job. The factory default setting is "999 copies".
SYSTEM SETTINGS Auto Listing Initial Setting This setting is used to have the activity report that is stored in the machine's memory printed out at regular intervals. You can choose to have the report automatically printed each time the number of stored transactions exceeds 50, or have the report printed at a specified time every day (only once per day). You can also enable both print methods. The report is normally set to not print out.
SYSTEM SETTINGS TX/RX End Sound PBX Setting Mode (Varies depending on country and region) This setting is used to select the beep pattern that signals the end of transmission or reception. "Pattern 1", "Pattern 2" or "Pattern 3" can be selected. Before pressing the [OK] key to store your selection, you can press the key to listen to the selected pattern. End Sound Length This setting is used to select the length of the end sound in seconds. Selections are "2.0 sec", "2.5 sec", "3.0 sec", "3.
SYSTEM SETTINGS Sending Function Address Review These settings are used to change the default settings (initially set at the factory) for the various fax transmission functions to settings that better meet your needs. Select the [Sending Function] to configure the settings. You can specify whether a screen appears for confirmation of the destination when sending a fax. Note Original Size Enter Set the size of originals scanned on the document glass. Normally A4 is set. Set Res. Con.
SYSTEM SETTINGS Rcv. Function Received Data Print Condition These settings are used to change the default settings (initially set at the factory) for the various fax reception functions to settings that better meet your needs. Select the [Rcv. Function] to configure the settings. This setting determines the selection condition for paper when printing received documents. Select one of the three conditions below. "Reduction" is normally selected.
SYSTEM SETTINGS 8 1/2x11 RX Reduce Print Enter Junk Fax # (This may not be available for some region.) This setting is used to program fax numbers from which you wish to block reception. Up to 50 fax numbers can be stored (maximum of 20 digits each). To block reception from the programmed fax numbers, the "Anti Junk Fax" setting must be enabled. This setting is used to select whether received 8-1/2" x 11"-size faxes are reduced.
SYSTEM SETTINGS Polling Passcode # Mode When "Polling Security" is enabled, use this setting to program (or delete) the fax numbers of the machines that are allowed to poll your machine. Programmed fax numbers are called passcodes. Up to 10 fax numbers can be programmed. To check the programmed numbers, print the "List Print" (p.181). If you make a mistake, move the cursor to the mistake with the [ ] or [ ] keys and enter the correct number.
9 WEB FUNCTIONS IN THE MACHINE ABOUT THE WEB PAGES The machine includes a built-in Web server. The Web server is accessed using a Web browser on your computer. The Web pages include both pages for users and pages for the administrator. In the user Web pages, users can monitor the machine, and select printer configuration settings. In the administrator Web pages, the administrator can configure the machine's e-mail settings, settings for print by e-mail, and passwords.
WEB FUNCTIONS IN THE MACHINE ABOUT THE WEB PAGES (FOR USERS) When you access the user Web pages in the machine, the following page will appear in your browser. A menu frame appears on the left side of the page. When you click an item in the menu, a screen appears in the right frame that allows you to configure settings for that item. (1) (2) (3) (4) (5) (6) (1) Menu frame Click a setting in the menu to configure it. (2) System Information Shows the current status of the machine and model name.
WEB FUNCTIONS IN THE MACHINE CONFIGURING THE PRINTER CONDITION SETTINGS The printer condition settings allow basic printer settings to be configured. The following items can be set: ● "Default Settings" (p.193): Basic settings that are mainly used when the printer driver is not used. ● "PCL Settings" (p.194): PCL symbol set, font, line feed code, and other settings.
WEB FUNCTIONS IN THE MACHINE PRINTER CONDITION SETTING MENU Condition Settings Condition Settings Default Settings Factory default settings PCL Settings Factory default settings Orientation Portrait Symbol Set PC-8 Default Paper Size A4 Font 0: Courier (internal font) Default Paper Type Standard Line Feed Code CR=CR; LF=LF; FF=FF Default Resolution 600dpi (High Quality) Disable Blank Page OFF Print 2-Sided Print 1-Sided Colour Mode Auto Fit To Page ON PS Settings Print PS Errors
WEB FUNCTIONS IN THE MACHINE PCL Settings Item Selections Description Symbol Set Select one of 35 sets. This specifies which country's characters (PCL symbol set) are assigned to certain of the symbols in the character code list. The factory default setting is [PC-8]. Font Select one internal font. This specifies which PCL font to use for printing. One font can be specified from among the internal fonts. The factory default setting is [0: Courier].
WEB FUNCTIONS IN THE MACHINE CONFIGURING THE SCANNER CONDITION SETTINGS STORING DESTINATIONS To store scanning destinations, click [Destination] in the Web page menu frame. This screen can also be used to edit or delete stored destinations. (p.200) A total of 200 destinations* can be stored, including E-mail, Network folder FTP, Desktop, and Group destinations.* * Multiple e-mail addresses can be stored as a group (up to 100).
WEB FUNCTIONS IN THE MACHINE Storing destinations for Scan to FTP Click [FTP], and enter the destination information. For the settings, see the following table. FTP destination information Item Description Name (Required) Enter the name of the destination (up to 36 characters). Initial (Optional) Enter initial text for the destination (maximum of 10 characters). When the destination list is displayed in the destination control screen, the initial text is used to group the destinations.
WEB FUNCTIONS IN THE MACHINE Storing destinations for Network folder Click [Network folder], and enter the destination information. For the settings, see the following table. Network folder destination information Item Description Name (Required) Enter the name of the destination (up to 36 characters). Initial (Optional) Enter initial text for the destination (maximum of 10 characters).
WEB FUNCTIONS IN THE MACHINE Storing destinations for Scan to Desktop The destination for Scan to Desktop is stored by the Sharp Network Scanner Tool Setup Wizard when "Network Scanner Tool" is installed in your computer. For this reason, there is no need to store the Scan to Desktop destination in the Web page. (The Network Scanner Tool is on the "Sharpdesk" CD-ROM.
WEB FUNCTIONS IN THE MACHINE Storing Groups (Scan to E-mail) You can send a scanned image to multiple e-mail destinations in a single Scan to E-mail operation. If you frequently transmit to a fixed group of destinations, you can store the destinations as a group. Note Up to 100 destinations can be stored in one group. Click [Group(E-mail)], and enter the destination information. For the settings, see the following table.
WEB FUNCTIONS IN THE MACHINE Editing and deleting programmed transmission destinations To edit or delete programmed destinations, click [Destination] in the menu frame of the Web page. To edit the selected destination, click [Edit] at the bottom of the Destinations List. The programming screen of the destination selected appears. Edit the information in the same way as you initially stored it. To delete the selected destination, click [Delete] at the bottom of the Destinations List.
WEB FUNCTIONS IN THE MACHINE BASIC SETTINGS FOR NETWORK SCAN (FOR THE ADMINISTRATOR) To use the Network Scan function, setting from the Web page is required. Click the menu frame and configure the required settings. A password is required to access this screen. These settings should only be configured by the network administrator. 1 Click [Network Scanning] in the menu frame. The Network Scanning setup page appears. 2 Select the scanner mode.
WEB FUNCTIONS IN THE MACHINE ABOUT THE WEB PAGES (FOR THE ADMINISTRATOR) In addition to the menus that appear for users, other menus that can only be used by the administrator appear in the administrator Web pages. A menu frame appears on the left side of the page. When you click an item in the menu, a screen appears in the right frame that allows you to configure settings for that item. Settings that can only be configured by the administrator are explained here.
WEB FUNCTIONS IN THE MACHINE CONFIGURING SMTP, DNS AND LDAP SERVER SETTINGS The procedures for using [Quick Setup] are explained here. [Quick Setup] is used to quickly configure only the required settings for "SMTP", "DNS", and "LDAP" servers. These settings are normally configured first. SMTP server: DNS server: LDAP server: SMTP is used to transmit e-mail that is sent using Scan to E-mail. To use these transmission methods, your SMTP server settings must be configured.
WEB FUNCTIONS IN THE MACHINE PROTECTING INFORMATION PROGRAMMED IN THE WEB PAGE ([Passwords]) Passwords can be set (click [Passwords] in the menu frame) to restrict Web page access and protect settings. The administrator must change the password from the factory default setting. The administrator must also take care to remember the new password. The next time the Web pages are accessed, the new password must be entered. A password can be set for the administrator and a password can be set for users.
WEB FUNCTIONS IN THE MACHINE ADMINISTRATOR SETTINGS The administrator settings are used to prohibit changes to the [Condition Settings] and to configure interface settings. ● "Default settings": Select the setting for which you wish to prohibit changes. ● "Fusing Control" : The temperature of toner fusing is controlled according to the weight of the paper that is used. ● "Interface settings": Enable monitoring of data sent to the network port and set restrictions.
WEB FUNCTIONS IN THE MACHINE Interface settings Item Settings Description I/O Timeout 1- 60 - 999 (sec) During reception of a print job, if remaining data is not received after the time set here elapses, the port connection is broken and the next print job is begun. Port Switching Method Switch at End of Job, Switch after I/O Timeout Select the method for switching network ports. Emulation Switching Auto*, PostScript, PCL Select the printer language.
WEB FUNCTIONS IN THE MACHINE STATUS MESSAGE SETUP Use the status message function to send the current counter information, including the copy count, print count, and total output count, based on the specified schedule. The destinations can be set for administrators and dealers respectively. To set up the status message, follow these steps. 1 Click [Status Message] in the menu frame. The "Status Message Setup" screen will appear.
Information on the Software License for This Product Software composition The software included in this product is comprised of various software components whose individual copyrights are held by SHARP or by third parties.
TRADEMARK ACKNOWLEDGMENTS The following trademarks and registered trademarks are used in conjunction with the machine and its peripheral devices and accessories. • Microsoft®, Windows®, Windows® XP, Windows Server® 2003, Windows Vista®, Windows Server® 2008, Windows® 7, Windows® 8, Windows Server® 2012 and Internet Explorer® are either registered trademarks or trademarks of Microsoft Corporation in the United States and/or other countries. • Intel® is a trademark of Intel Corporation in the U.S.
OPERATION GUIDE MXC300W-EX1