
Instruction manual


(2)
..
J""",tin,
..
the
d!,,-,
iJ'l.;~~i$k
dri".,:
" . '
...
,
..•.
'
..•.
,'
'.
Reachhe
notes
on
the
instructiOn
sheet
in
a pft!l<ing
ease'.
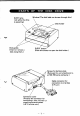
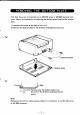
Disk holder
1)
Press the EJECT button
to
open the disk holder.
2)
Insert the disk along the disk guides with
the
head window
at
the front.
(Hold the disk
by
the
edge
of
its jacket.) Data can be read or written
on side A or side
B.
Check
the
side
to
be used - it
is
indicated on
the
jacket.
3) Push the disk
in
lightly until it stops, then close the disk holder.
Be
sure
to
insert the disk along the disk guides. Never close the disk holder unless
the disk
is
fully inserted.
(3)
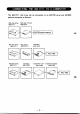
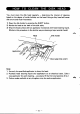
Write-protect
tab
This
tab
is
removed
to
prevent 'data on the disk from being deleted
ac-
cidentally. When this
tab
is
removed, no data can
be
saved
to
the disk,
although data can
be
read.
Some master disks are supplied by SHARP with their tabs already removed.
Sides A and B
have
one write protection
tab
each, so each side can
be
write
protected independently.
The write-protect
tab
is
on
the
right side of
the
side
of
the
disk it protects
(as
shown
in
the figure on page
3).
Write.protect
tab
for side A
~
name ;nd;cat;on
-4-
Side name indication for side A
Recording surface A
1
J
,I
J