Check Your Voice Mail 1 2 3 4 Press JUMP to go to the Jump screen, then press the trackball to open the Phone application. Press and hold the 1 key (the speed dial shortcut assigned to voice mail) to call your voice mailbox. Follow the prompts to retrieve your messages.* To hang up, select , or press END CALL . To check your voice mail from another phone, call your mobile number. Let it ring through to voice mail, then press the (*) star key to interrupt the greeting. At the prompt, type your password.
Import Contacts from Your SIM Card If you already have a SIM card from T-Mobile, you can import the phone numbers you have stored on the SIM card into your device’s Address Book. First, insert the SIM card with the contacts into your device, then: 1 2 3 Press JUMP to go to the Jump screen. Scroll to highlight Address Book, then press the trackball to open the application. Press MENU to open the menu. Select Settings > Import SIM Contacts. The SIM Import dialog will alert you when the import is complete.
Web Browser Browse the Web 1 2 3 4 Press JUMP to go to the Jump screen. Scroll to highlight Web Browser, then press the trackball to open the application. Start typing the address of the Web page you wish to visit. The Go To dialog box opens automatically, showing the address you are typing. The characters you type appear in the top field of the Go To dialog box. Possible URL matches, and the option to search for the text you type, appear in the drop-down menu.
Email Send an Email Message 1 2 3 4 5 Press JUMP to go to the Jump screen. Scroll to highlight Email, then press the trackball to open the application. Press MENU to open the menu. New Message is selected by default; press the trackball to go to the Compose screen. The text cursor is in the To field; type the name or email address of the person to whom you wish to send an email. If you type a name, the Address Book will try to pull the correct email address from your contact data.
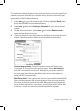
The instructions below explain how to use your device to receive email from external accounts. Note that you can also set up accounts from the Email application on the Desktop Interface. 1 2 3 4 Press JUMP to go to the Jump screen. Scroll to highlight Email, then press the trackball to open the application. Press MENU then select Settings > Accounts to open the Accounts screen. On the Accounts screen, press MENU then select New Account to open the New Account screen.
Some popular Web-based email providers and their Mail Server names are provided below for your convenience. If you have an email account through your ISP, contact them for assistance. Note that some ISPs (including Yahoo!) require additional configuration or charge a fee to download email. Web Email Provider Yahoo!® Mail Mail.com Softhome.net Gmail Comcast 5 6 7 44 Mail Server Name pop.mail.yahoo.com pop1.mail.com mail.SoftHome.net pop.gmail.com mail.comcast.
If you leave these fields blank, your default POP or IMAP account name and address will be used. Specify alternative names or addresses in these fields as you wish. 8 Select the Copy Outgoing Messages check box to have every message sent from this account copied to another email address. Specify either CC or BCC (from the pop-up menu), then type the email address in the field. 9 Save your information by selecting Create; or simply press DONE .
Attach a Photo to an Email Message 1 2 3 4 5 Press JUMP to go to the Jump screen. Scroll to highlight Email, then press the trackball to open the application. Press MENU + N to open the Compose screen. Complete the To, Subject, and Message fields. Press to open the Photo Album. Roll the trackball to highlight, then press to select a photo to send. You can select multiple photos. All selected photos will have check marks.
6 7 8 A smaller version of the photo now appears on the Identity screen and will be used to identify that contact on incoming call notifications. When finished with the Identity screen, select DONE . You advance to the next New Contact screen, in which you can type or select additional contact information. Scroll through the New Contact fields (Personal Info, Phone, Email, and so on), selecting Add or Edit to open screens in which you can add contact information.
6 After you click the Import button, your contacts are imported to your Web Address Book then sent to your device via the network. Make sure your device has a wireless connection; then, after two to three minutes, check your device to confirm that your new contacts have arrived. Set and Send “My vCard” You can set one of your contacts to be “you”, so that you can send “My vCard” to others easily. 1 2 3 4 Press JUMP to go to the Jump screen.
Calendar Add an Event to Calendar You can create and store up to 1000 events in Calendar. 1 2 3 4 5 6 Press JUMP to go to the Jump screen. Scroll to highlight Organizer, then press the trackball to open the second-level ring of applications. Highlight Calendar, then press the trackball. Press MENU to open the menu. New Event is selected by default. Press the trackball to go to the Event Details screen. Name your event, type a location, assign a duration, add repetitions, reminders, and notes as applicable.
Send a Note You can send one of your notes via Email: 1 2 3 Press JUMP to go to the Jump screen. Scroll to highlight Organizer, then press the trackball to open the second-level ring of applications. Highlight Notes, then press the trackball. Create a new note or highlight an existing note. Press MENU and select Send Note or press MENU + M. A compose screen opens; complete the message and Send. To Do Add a Task You can create and store up to 50 To Do tasks. 1 2 3 4 5 Press JUMP to go to the Jump screen.
3 4 If there are more attachments in this or other messages, save them to the Album in the same way. When finished, close your message, JUMP to go to the Jump screen. Scroll to highlight Photo Album, then press the trackball to view the Album contents. Send Photos by Email To send a photo that you’ve stored in your Photo Album, do the following from the Email application: 1 2 3 In the Photo Album, press the trackball over each photo you want to send.
Download Catalog Download Items from the Catalog Download ringtones, applications, games, and more from the Catalog! You’ll find that browsing the Catalog and purchasing items is easy and fun: 1 2 3 4 5 6 52 Press JUMP to go to the Jump screen. Scroll to highlight Download Catalog, then press the trackball to open the application. Wait while the latest Catalog contents load... then use the trackball to scroll through the categories.
Manage Your Downloaded Items To remove or uninstall/reinstall a downloaded item, check the download status of a purchased item, or view a list of all the downloads you have made through the Catalog (including details such as price, subscription term, upgrade information), go to the Downloads screen: 1 2 3 4 5 Press JUMP to go to the Jump screen. Scroll to highlight Download Catalog, then press the trackball to open the application.
Send an Instant Message 1 2 3 4 Press JUMP to go to the Jump screen. Scroll to highlight Instant Messaging, then press the trackball to open the second-level ring of applications. Highlight your instant messaging application, then press the trackball. The Sign On screen appears. Sign on with your username and password; the screen listing all your IM friends’ usernames displays.
Keyboard Shortcuts Call a speed dial number Press and hold the speed dial number on the keyboard while in the Phone or Jump screen. Redial last number Press JUMP Answer an incoming call Press the trackball or Ignore an incoming call (call will forward) Press . Hang up active call Press . Mute your device when ringing Press any key, except Create a new note, message, event, task, to do, or contact Press MENU Insert special Unicode character Press the SYM key.
Troubleshooting How do I know when my account has been activated? Once your account has been activated by T-Mobile, you will see a “Welcome” message on your screen. If the Welcome message doesn’t appear on your device within 48 hours after registering, contact T-Mobile’s Customer Care department. In order to comply with airline regulations, how can I temporarily disable wireless connectivity when traveling? Remember to power off your device during aircraft takeoffs and landings.
I needed to remove my battery, so I did. After I put the battery back in my device, it powered up, but all my messages and other data were gone. Is it all gone for good? No, all your data is regularly saved to the Danger service so it is safe. If you wait a few minutes, all your data will be restored to your device. (Note, however, that any data you entered or modified between the last save to the Danger service and when you removed the battery will be lost.
Why do the Web pages I open using the device’s Web Browser application appear different from the pages I open on my desktop computer? The Web pages displayed on your device have been reformatted so they are easier to read on a small display. The same or similar information displays; it’s just laid out on the screen so that it’s easier to view on your device.
What Web browsers do you support on the Desktop Interface? Web browsers IE 5+ are supported on both the Windows and Macintosh operating systems. What should I do if I need a replacement part for my device or if I need to have my device repaired? Contact T-Mobile’s Customer Care department for troubleshooting support.
Handling and Safety Precautions The Sidekick is a mobile computing device that may break if dropped, subjected to severe shock, or exposed to water. Please handle the device carefully and read the precautions listed below. These precautions provide essential information for the safe handling of the product and for the protection of the users and others from possible harm. During a call, the sound level on your device may vary, depending on how you are routing the sound.
Device Handling and Use Never attempt to disassemble, repair, or modify your device. Such action may result in bodily injury, or damage to the unit or other property, and void the warranty. Never touch liquid that might leak from a broken liquid crystal display (LCD), because doing so may cause a skin rash. Keep the volume at a moderate level to avoid damage to your hearing. Never dispose of your device with ordinary waste.
Battery Charger Handling ! The device is intended for use when supplied with power from the battery charger included in the box with your device. Other usage will invalidate any approval given to this device and may be dangerous. Charge the device within the temperature range of 5º to 35º Celsius, or 41º to 95º Fahrenheit, for the fastest charging time.
Regulatory and Compliance Information Regulatory Compliance Information for North America FCC Declaration of Conformity Model PV150, manufactured by Sharp Corporation, complies with part 15 of the FCC Rules. Operation is subject to the following two conditions: (1) This device may not cause harmful interference, and (2) this device must accept any interference received, including interference that may cause undesired operation.
does cause harmful interference to radio or television reception, which can be determined by turning the equipment off and on, the user is encouraged to try to correct the interference by one or more of the following measures: Reorient or relocate the receiving antenna. Increase the separation between the equipment and receiver. Connect the equipment into an outlet on a circuit different from that to which the receiver is connected.
Recycling Information The RBRC™ Battery Recycling Seal on the Lithium-ion (Li-ion) battery/battery pack indicates UTStarcom is voluntarily participating in an industry program to collect and recycle these battery/battery packs at the end of their useful life, when taken out of service in the United States or Canada. The RBRC™ program provides a convenient alternative to placing Li-ion batteries into the trash or municipal waste stream, which is illegal in some area.
Legal Information Danger® Service and End-User License Agreement IMPORTANT: PLEASE CAREFULLY READ THIS SERVICE AND END-USER LICENSE AGREEMENT (THE “AGREEMENT”) BETWEEN YOU AND DANGER, INC. (“DANGER”) BEFORE YOU USE YOUR WIRELESS DEVICE (THE “DEVICE”). YOUR USE OF THE DEVICE OR THE SERVICE FOR THE DEVICE SHALL CONSTITUTE YOUR BINDING ACCEPTANCE OF ALL OF THE TERMS AND CONDITIONS OF THIS AGREEMENT.
3. Use of the Service 3.1 Wireless Service Provider. In addition to Danger’s terms and conditions set forth in this Agreement, you agree and acknowledge that your use of the Service is subject to your wireless carrier’s terms and conditions of service. 3.2 Privacy Policy. Danger believes strongly in protecting user privacy and providing you notice of Danger’s collection and use of data, including personally identifying information.
4. Intellectual Property Rights 4.1 Copyright. All content included on the Device, including graphics, text, images, logos, button icons, images, audio and video clips and software, as well as the compilation of the content, is the property of Danger and/or its licensors (“Danger Material”) and is protected by U.S. and international copyright laws. Any unauthorized use of Danger Material may violate copyright, trademark or other laws.
SERVICE WILL BE FREE FROM UNAUTHORIZED ACCESS (INCLUDING THIRD PARTY HACKERS OR DENIAL OF SERVICE ATTACKS). FURTHER, AS THE WIRELESS CARRIER IS NOT CONTROLLED BY DANGER, NO WARRANTY IS MADE AS TO COVERAGE, AVAILABILITY OR GRADE OF SERVICE PROVIDED BY THE WIRELESS CARRIER. PLEASE NOTE THAT SOME JURISDICTIONS MAY NOT ALLOW THE EXCLUSION OF IMPLIED WARRANTIES, SO SOME OF THE ABOVE EXCLUSIONS MAY NOT APPLY TO YOU. 8. LIMITATION OF LIABILITY.
Danger® Service Privacy Notice Danger, Inc. (“Danger”) operates a service on behalf of your wireless carrier that enables certain features on your wireless device, including email, Internet access, instant messaging, address book, and calendar functions (the “Danger Service”). The Danger Service also includes a Web site operated by Danger (the “Danger Service Web Site”) that subscribers may use to access these features, as described more fully in the Reference Guide accompanying your wireless device.
Anonymous Information Danger collects and stores Anonymous Information relating to the use of the Danger Service. For example, Danger’s servers automatically gather information regarding which Web pages are visited by users of the Danger Service.
WITH WHOM DOES DANGER SHARE THE INFORMATION THAT IS COLLECTED? Personal Information Danger may share Personal Information with your wireless carrier to further the purposes described in the “How Does Danger Use the Information it Collects” section above.
WHAT TYPES OF SECURITY MEASURES ARE IN PLACE TO PROTECT YOUR INFORMATION? Danger maintains a variety of physical, electronic, and procedural safeguards to guard your information. For example, information transmitted from your wireless device to the Danger Service is automatically encrypted for your protection. Once your information reaches us, it resides on a server that is heavily guarded both physically and electronically.
One-Year Limited Warranty UTStarcom Personal Communications (the Company) warrants to the original retail purchaser of this UTStarcom handheld portable cellular telephone, that should this product or any part thereof during normal consumer usage and conditions, be proven defective in material or workmanship that results in product failure within the first twelve (12) month period from the date of purchase, such defect(s) will be repaired or replaced (with new or rebuilt parts) at the Company’s option, witho
ANY IMPLIED WARRANTIES, INCLUDING ANY IMPLIED WARRANTY OF MERCHANTABILITY OR FITNESS FOR A PARTICULAR PURPOSE, SHALL BE LIMITED TO THE DURATION OF THIS WRITTEN WARRANTY. ANY ACTION FOR BREACH OF ANY WARRANTY MUST BE BROUGHT WITHIN A PERIOD OF 18 MONTHS FROM DATE OF ORIGINAL PURCHASE. IN NO CASE SHALL THE COMPANY BE LIABLE FOR AN SPECIAL CONSEQUENTIAL OR INCIDENTAL DAMAGES FOR BREACH OF THIS OR ANY OTHER WARRANTY, EXPRESS OR IMPLIED, WHATSOEVER.
Java and all Java based trademarks and logos are trademarks or registered trademarks of Sun Microsystems, Inc. in the U.S. or other countries. Copyright (c) 1985, 1986, 1988, 1992, 1993, 1999 The Regents of the University of California. Redistribution and use in source and binary forms, with or without modification, are permitted provided that the following conditions are met: 1. Redistributions of source code must retain the above copyright notice, this list of conditions and the following disclaimer. 2.