Sidekick ID Reference Guide ® 27-4001-01 Rev. 16 - R3.3 - Dec 5, 2006 Copyright © 2006 Danger, Inc. All rights reserved.
Contents Welcome! 6 Device Basics 8 Opening and Closing the Display 8 Phone Controls 9 Control Buttons 10 Volume Controls 12 Wireless On/Off Control 12 Display Controls 13 Battery Charger 13 Removable Battery 14 SIM Card Slot 15 USB 1.
The Jump Screen 27 Menus 28 Title Bar and Indicators 28 Type and Edit Text 30 Navigate in Text Boxes 30 Delete Text 30 Cut, Copy, Paste, Undo 30 AutoText 31 Type Special Unicode Characters 31 The Desktop Interface 33 Using the Applications 35 myFaves Add a Contact to myFaves 35 Call a myFaves Contact 36 Assign an Icon to a myFaves Contact 36 Replace a myFaves Phone Number 36 Phone Make a Phone Call 37 Answer a Phone Call 38 Add a Number to Your Speed Dial List 38 Set Up Your Voice Mail 38 Check Your Voice M
Web Browser Browse the Web 41 Bookmark a Web Page 41 Email Send an Email Message 42 Receive Email from External Accounts 42 Save a Photo Attachment to Your Device 45 Receive Email Using Your Device’s Web Browser 45 Attach a Photo to an Email Message 46 Address Book Add a Contact to the Address Book 46 Import Address Book Contacts 47 Set and Send “My vCard” 48 Send any Contact’s vCard 48 Calendar Add an Event to Calendar 49 Notes Create a Note 49 Send a Note 50 To Do Add a Task 50 Photo Album Add Photos to Y
Download Catalog Download Items from the Catalog 52 Manage Your Downloaded Items 53 Instant Messaging Sign On 53 Send an Instant Message 54 Switch Between IM Conversations 54 Keyboard Shortcuts 55 Troubleshooting 56 Handling and Safety Precautions 60 Battery Handling 60 Device Handling and Use 61 Battery Charger Handling 62 Regulatory and Compliance Information 63 Regulatory Compliance Information for North America 63 FCC Notice 63 Exposure to Radio Frequency (RF) Signals 64 Recycling Information 65 Legal I
Welcome! Thank you for buying a Sidekick® ID device. Your Sidekick will change the way you communicate, get organized, and stay connected. Your Sidekick connects seamlessly to wireless networks, allowing you to browse the Internet, exchange instant messages*, and send and receive email with photo attachments. Other features include a full-featured phone, personal information management (PIM) applications, access to a personal Web portal (the “Desktop Interface”), and entertainment applications.
Here’s what you’ll find in the box: Sidekick ID device ® SIM card Removable battery Battery charger (wall adapter) Hands-free mono headset Wrist strap Carrying case Sidekick Start Guide Sidekick Reference Guide If any of these items are missing, please contact your T-Mobile Customer Care department.
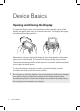
Device Basics Opening and Closing the Display To open the display, press your left thumb on the lower-left corner of the display and gently push up in a clockwise direction. The display will spring smoothly into the open position. Alternatively, use your right index finger to push down gently on the upperright corner of the display. The screen will spring into the open position. The normal operating position of the device is horizontal, with the trackball on the right, as shown above.
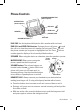
Phone Controls SPEAKERPHONE BUTTON (while on phone) MUTE BUTTON (while on phone) END CALL SEND CALL SPEAKER HEADSET JACK VOLUME BUTTONS + - DIAL PAD DIAL PAD Use the keyboard dial pad to dial a number with one hand. END CALL and SEND CALL buttons During a phone call, press to end the call or to clear the screen of a number you’ve typed. Press to call the phone number you’ve typed or highlighted in a list. Press with no number typed to display a list of recently-dialed numbers.
Control Buttons MENU JUMP CANCEL TRACKBALL + SEND/END DONE TRACKBALL Pressing the trackball selects a highlighted item or opens a pop-up menu. Roll the trackball up/down/left/right to reverse/advance the current selection through the “selectable” items on a screen or Web page. Rolling the trackball right/left with a folder highlighted will open/collapse the folder contents. Adjust the vertical and horizontal speed of the trackball from the Jump Menu > Settings > Trackball screen.
LEFT SHOULDER BUTTON RIGHT SHOULDER BUTTON POWER JACK STRAP HOLDER DIRECTIONAL PAD USB 1.1 PORT + VOLUME BUTTONS POWER ON / OFF BUTTON DIRECTIONAL PAD (D-pad) Press up/down/left/right to scroll or move within text fields, and navigate in games. The D-pad “rocks” in four different directions and generally mirrors the behavior of the trackball. LEFT AND RIGHT SHOULDER buttons The function of these buttons depends on which application you’re using.
Volume Controls There are two ways you can open the volume controls: Press MENU + DONE . Roll the trackball left/right to step through your sound profiles. Left is louder, right is softer. (Read more in “Sound Profiles” on page 25.) Press the + or - volume buttons on the lower-left edge of your device. Continue pressing the buttons to step through your sound profiles: If you are on the phone, the volume control panel includes separate volume controls for the phone call.
Display Controls To adjust the display backlight brightness, open the Display Control from the Jump screen by pressing MENU then selecting Settings > Battery & Display. Scroll down to highlight the Brightness slider. Press the trackball to open the slider for adjustment. Roll right to increase brightness; left to decrease. Battery Charger Your device comes with a removable, rechargeable lithium-ion battery.
2 Let the device charge for at least four (4) hours, until fully charged. Rest the device in a safe place and let the battery charge for at least four hours. When you first receive your device, you must fully charge the battery for the system to perform battery-reading calibration and deliver full capacity. As the device is charging, you will see the bars in the battery icon fill repeatedly from left to right.
3 Push the battery in slightly, then lift the battery from the bottom edge and remove. 4 Replace with new battery by first inserting the long edge with the three tabs, then pushing the battery down to lock into place. Replace the cover. Once the battery makes contact, the power-on sequence begins. 5 SIM Card Slot To insert or remove your SIM card, you must first remove the battery. 1 2 3 4 Remove the battery cover and battery by following “Removable Battery”, steps 1-3, on pages 14-15.
USB 1.1 Port The USB port is located on the right edge of your device. The USB port is primarily used by developers as they create new device applications, ringtones, and services. Wrist Strap Holder Carry your device securely by using a wrist strap with a flexible loop on one end. Thread the loop under the strap holder and through the “tunnel” on the right edge of your device next to the power jack. Replaceable Bumpers Customize your Sidekick by changing the bumpers.
3 Pull the bumper tabs up to separate the bumper from the device. 4 Pull each of the two bumpers free by gently peeling and lifting away from the device. 5 To install the new bumpers, turn your device face-up. You can tell which bumper goes on top and which goes below by orienting the control button icons. For each bumper, position the bumper tabs on the front then the back of the device. Insert the tabs into the slots. Press the bumpers in, making sure the tabs snap in securely.
7 Once the bumpers are securely fastened, replace the end-cover by first lining up the two tabs, then pushing the cover into place. Make sure the tabs are seated correctly. 8 Replace the battery and back cover as described in “Removable Battery”, steps 4 and 5 on page 15. Your device will power on once you insert the battery. 9 ! 18 Due to the nature of the bumper design, the materials used, and their replaceable nature, the bumpers are not covered by the device warranty.
Registering Your Device Before you can start using your Sidekick, you must complete the registration steps, as explained in step 3 in the Start Guide. This section of the Reference Guide takes you through the registration process in more detail. Note that these instructions are for new users, not returning users. Returning users can simply sign in using their existing username and password. 1 2 Wait for account activation. Before you can use your account, your account must be activated.
3 Select a username. The username you type will become the first part of your email address (for example, username@example.com). Before you select a username, read the following guidelines: Usernames must start with an alphabetic character (A-Z) and can include numbers (0-9), dashes (-), periods (.), and underscores ( _ ), but no other punctuation. Although you can use periods within a username, do not use a period at the beginning or end of the name, or use two periods (..) in a row.
For enhanced security, do choose a password that is more than seven characters long, mixes letters and numerals, and uses upperand lower-case letters. Passwords are case-sensitive. For example, if you set your password to be “Hard2Guess”, then you will not be authenticated if you sign in by typing “hard2guess”. Type the password in the text box, then type it again to confirm. Select your time zone. Open the pop-up menu to see a list of time zones. Select yours from the list, then select Next.
9 Congratulations! Once your account has been set up, you’ll see the Congratulations screen: Select the Start button to begin! 22 Device Registration
Setting Up Your Device Backgrounds To customize the backgrounds on all the application splash screens, do the following: 1 2 Press JUMP to open the Jump screen. Press MENU then select Backgrounds. Highlight your choice of background from the submenu, then press the trackball to set it. Backlighting For better screen visibility in poor light, enable backlighting: 1 2 3 Press JUMP to open the Jump screen. Press MENU to open the menu, then select Settings > Battery & Display.
Key Guard Mode You can effectively lock the controls by entering key guard mode. By default, your device is set to enter key guard mode after one minute of idle time. Enter Key Guard Mode 1 2 Press JUMP to go to the Jump screen. Press MENU to open the menu, scroll to highlight Key Guard, then press the trackball. You can also enter key guard mode quickly by pressing and holding DONE for two seconds. Your device control buttons lock and the key guard screen appears.
Device Privacy Code If you want to secure your device from unauthorized access once your device has gone into key guard mode, you will first need to set up a privacy code: 1 2 Press JUMP to open the Jump screen. Press MENU then select Settings > Key Guard & Security. Scroll down to the Privacy Lock group box. Highlight , then press the trackball to select it. 3 Enter a three-digit code using the keyboard or the dial: 4 5 At the prompt, re-enter your code to verify.
Application Customization Set application-specific preferences using the Settings screens found within the applications.
The Device Interface The Jump Screen The Jump screen is your entry point to all device applications. Applications are arranged on the left-side of the screen in a “ring”. Some applications are grouped into a second-level folder. The Jump screen menu provides device-wide settings and controls: 1 2 3 Go to the Jump screen from any screen by pressing JUMP . The myFaves splash screen is selected by default.
Menus Almost every screen on your device has a set of actions you can take while on that screen. These actions are listed in a floating window, which you open by pressing the Menu button MENU . Menu items with submenus are noted with a right-pointing arrowhead. The Email Settings submenu is shown below. Frequently-used menu items also have keyboard shortcuts that use the Menu button plus a shortcut key. Take a look at the menu shown above.
Wireless signal strength indicator. The number of signal bands showing to the right of the radio tower icon represents the strength of the signal at your current location. If you see an X flashing over the radio tower icon, you’ve temporarily lost network connection and can make no calls. Service connectivity indicators. One dot=device is connecting to the GPRS network; two dots=getting IP address; three dots=connecting to the data service; “G”=fully connected to the data service. GSM (Phone) service only.
Type and Edit Text It’s easy to type and edit text in any text box using the keyboard and the advanced text editing features described below. Navigate in Text Boxes Use the control buttons and keyboard to navigate within a text box: To move character-by-character, press the D-pad or roll the trackball left/ right. To jump to the beginning/end of a word, press ALT + D-pad or trackball left/right. To jump to the beginning/end of a line, press MENU + trackball left/ right.
Note the standard shortcuts: Cut MENU + X Copy MENU + C Select All MENU + A You can paste text that you have copied to the device clipboard to any other text box in any application. Simply position your cursor where you want to paste the text, then use the Paste shortcut MENU + V. (You can also open the menu and select Edit Text > Paste.) Note that the device clipboard only stores one set of copied or cut text at a time. If you make a text edit and want to undo it, simply press MENU + Z.
Use the D-pad or trackball to navigate through the list: left-right to flip through the Favorites, Recent, alphabet, and symbol sets; up-down to select specific characters. Press the trackball to insert a highlighted character. Here are some useful tips in using the Special Character selector: 32 With the selector open, you can show the same characters capitalized by pressing Shift + the character (like “a”). Toggle back to lowercase by pressing the letter again.
The Desktop Interface The data you store in your device’s Email, To Do, Calendar, Address Book, Notes, and Photo Album applications are also available for viewing or editing on the Web from any computer connected to the Internet. Information in your account is stored on servers in a data center with enhanced security and firewall features. To reach the Desktop Interface, use the Web navigation and sign-in instructions provided in the Start Guide, included in the box.
Desktop Interface Jump Page Remember! When you’ve finished using the Web applications, always click the Sign Out link to exit the Web site securely.
Using the Applications myFaves Assign up to five phone numbers to be part of your “myFaves” service plan. When you call a myFaves contact phone number, you are not charged for minutes! Add a Contact to myFaves Create a new myFaves contact, or assign a phone number already in your Address Book to your myFaves plan: 1 2 3 4 5 Press JUMP to go to the myFaves application, then press or roll the trackball right to go into the application. To add a new contact, press MENU + N.
Call a myFaves Contact 1 2 Press JUMP to go to the myFaves application, then press or roll the trackball right to go into the application. Roll the trackball to highlight the myFaves contact you want to call, then press SEND CALL to place the call. Assign an Icon to a myFaves Contact 1 2 3 4 5 Press JUMP to go to the myFaves application, then press or roll the trackball right to go into the application.
Phone Make a Phone Call 1 2 Type the number you want to call by using any of these dialing methods: To dial using your list of speed dials and recently-dialed numbers: From the Jump or Phone screen, press SEND CALL . Highlight the number, then place the call by pressing SEND CALL . To dial with numbers: From the Jump or Phone screen, open the display and type the number using the embedded dial pad, or use the numbers on the top row. Press SEND CALL to place the call.
Answer a Phone Call When your device signals an incoming phone call, the display will show the name of the caller and the icon or photo associated with that caller in your Address Book (see “Add a Contact to the Address Book” on page 46). 1 2 Press the trackball to select the Answer button or press SEND CALL Your call connects. To hang up, select or press END CALL . .