TABLE OF CONTENTS CHAPTER 1. BEFORE USING YOUR AT&T STX-2 PACKAGE CONTENTS............................................................................................ 8 HANDSET DESCRIPTION........................................................................................ 9 THE FUNCTION KEYS ........................................................................................................ 10 DISPLAY INDICATORS........................................................................................
TABLE OF CONTENTS WAIT/PAUSE FEATURE ...................................................................................................... 31 3-WAY CALLING................................................................................................................ 32 CALLER ID FUNCTION ....................................................................................................... 32 CALL WAITING FUNCTION ............................................................................................
TABLE OF CONTENTS BROWSING TIPS ................................................................................................................ 49 MUSIC TIPS ....................................................................................................................... 49 CAMERA TIPS.................................................................................................................... 50 GENERAL TIPS.......................................................................................
TABLE OF CONTENTS AT&T NAvIGATOR ............................................................................................................. 70 WHERE.............................................................................................................................. 71 ALLSPORT GPS .................................................................................................................. 71 YP MOBILE..........................................................................................
TABLE OF CONTENTS RECENT HISTORY ................................................................................................ 96 RECENT HISTORY .............................................................................................................. 96 SETTINGS ............................................................................................................ 97 DISPLAY ........................................................................................................................
TABLE OF CONTENTS CHAPTER 6. PC CONNECTIvITY PC CONNECTIvITY ............................................................................................ 132 SET UP BLUETOOTH MODE FOR THE STX-2 ...................................................................... 132 PAIRING THE STX-2 WITH A PC ........................................................................................ 132 MAKING DIAL-UP NETWORKING....................................................................................
CHAPTER 1 BEFORE USING YOUR AT&T STX-2 CHAPTER 1.
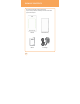
PACkAGE CONTENTS This package should include all items pictured below. If any are missing or different, immediately contact the retailer where you purchased the phone.
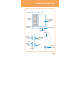
HANDSET DESCRIPTION Earpiece QWERTY keypad Main Display with Touch Screen Microphone Power/END key SEND key Shortcut key Camera Lens volume Up/Down keys Hold/Screen Lock Mode key Data Cable or Charger slot Camera key External Speaker Ear Jack 9
HANDSET DESCRIPTION THE FUNCTION kEYS kEY Descriptions Send key Press to make or receive a call or in idle mode, press to access the All calls list. Power/End key Press and hold to turn the phone on/off. Press to terminate a call or to return to idle mode. Shortcut key Press to launch the Quick List such as Main Menu, Call, Messaging, Browser, Music Player. Screen Lock Mode key Short press to screen lock mode the phone.
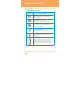
HANDSET DESCRIPTION DISPLAY INDICATORS The idle mode display appears when you are not on a call or using the menu. You must be in idle mode to dial a phone number. Display Indicators Displays various icons. Text & Graphic Area Signal Strength Current signal strength: the more lines, the stronger the signal. GPRS Signal Strength GPRS service is available. EDGE Signal Strength Edge service is available. 3G Signal Strength 3G service is available. 3G+ Signal Strength 3G+ service is available.
HANDSET DESCRIPTION Battery Battery charging level — the more blocks, the stronger the charge. Battery charging Indicates the battery is charging. Missed call Data call Calling Calling+ Data call TTY Indicates your STX-2 is active in TTY mode. Alarm on Appears when an alarm is set. Scheduler on Appears when a Scheduler event is set. Profile Icon Status Indicates General, Meeting, Car, Headset or Outdoor mode is active.
HANDSET DESCRIPTION Bluetooth on Indicates Bluetooth mode is active. Bluetooth connected Indicates Bluetooth Connected. USB connected Indicates USB Connected. External memory Indicates a microSD card is inserted. SD card Indicates a SD card is inserted. Music player Indicates Music player is active.
BATTERY USAGE BATTERY INSTALLATION 1. Make sure that your device is turned off, and then remove the back cover. 2. Align the battery’s exposed copper contacts with the battery connectors inside the battery compartment. 3. Insert the contact’s side of the battery first and then gently push the battery into place. 4. Replace the back cover. BATTERY REMOvAL 1. Make sure that your device is turned off, and then remove the back cover. 2.
BATTERY USAGE BATTERY CHARGING POWER CONNECTION 1. Plug the AC Charger into a standard outlet. 2. To access the charging port located on the left side of your STX-2, as seen on page 9, open the flap and plug the other end of the AC Charger into the charging port. The battery must be installed onto the phone to work properly. 3. The clearly marked, USB icon on the AC Charger adapter should always be face-up on the same side as the display screen when it is inserted into the STX-2 phone.
USING AT&T SIM CARD INSERTING THE AT&T SIM CARD You’ll always need an AT&T SIM card to use your mobile phone. This contains important information about your mobile phone and network. The message “Insert SIM“ appears when the AT&T SIM card is not installed. Please take care of your AT&T SIM card and don’t keep it near magnetic and electronic devices as this can interfere with data storage and network operations. 1. Make sure that your device is turned off, and then remove the back cover. 2.
USING microSD CARD INSERTING THE microSD CARD The microSD card stores sounds, images, photos and videos, music, and other files. To install your microSD card: 1. Make sure that your device is turned off, and then remove the back cover. 2. Locate the microSD card slot on the upper part of the exposed right panel. 3. Insert the microSD card into the slot with its gold contacts facing down until it clicks into place. 4. Replace the back cover. REMOvING THE microSD CARD To remove the microSD card: 1.
USING QWERTY kEYPAD Your STX-2 features a specifically designed QWERTY keyboard that provides a superior typing experience for easy and comfortable text writing for SMS or e-mail messages, notes and other functions. You can use all of the phone functions with the keyboard either closed or open. When you open the keyboard you have the extra benefit of a full messaging keyboard. Caps/Shift key To type upper-case letters, hold down the Caps/Shift key and then press one or more letter keys.
USING QWERTY kEYPAD Fn key To type the special character or numbers that appear in orange on the keys, press the applicable key while holding down the FN key. T o type special characters or numbers consecutively, use the FN-LOCK mode. To change to the FN-LOCK mode, double-tap the FN key. You can type special characters or numbers only in this mode. To deactivate, double-tap the FN key again. To type a special characte r or number for the first letter of a word only, simply press the FN ke y once.
BLOCkING ANTENNA WHILE MAkING A CALL CORRECT/INCORRECT FINGER POSITION CORRECT FINGER POSITION Note 20 INCORRECT FINGER POSITION Your STX-2 is equipped with an intenna. For optimal call quality, hold the phone by the gripped edges on the side and avoid touching the top and bottom of the phone.
BATTERY HANDLING INFORMATION IEEE STANDARD FOR RECHARGEABLE BATTERIES FOR CELLULAR TELEPHONES • Do not disassemble or open, crush, bend or deform, puncture, or shred. • Do not modify or remanufacture, attempt to insert foreign objects into the battery, immerse or expose to water or other liquids, or expose to fire, explosion, or other hazard. • Only use the battery for the system for which it was specified.
MEMO 22
CHAPTER 2 BASIC OPERATION CHAPTER 2.
BASIC OPERATION TURNING THE PHONE ON/OFF 1. To turn on the phone, press and hold the Power/END Key for a few seconds until the AT&T animation appears and the melody begins to play at same time. 2. To turn off the power, press and hold the Power/END Key for a few seconds. 3. Power off AT&T animation appears and the melody begins to play at same time. TOUCH SCREEN LOCk MODE Pressing the Side Look Key temporarily turns off the display and locks your device.
BASIC OPERATION IDLE SCREEN From the Idle screen, you can access Main Menu, Call, Address Book and AT&T Tv. From the Landscape mode screen, you can access Inbox, AT&TSocial Net, E-mail, IM, Browser, Address Book and More. USING THE TOUCHSCREEN CAUTIONS FOR TOUCH kEYS • Make sure your hands are clean and dry. • You do not need to press hard on the touch keys to make them work. Do not subject the product to severe impact, as this may damage the touch key sensors.
BASIC OPERATION TO USE THE SCROLL BAR: 1. Tap and hold the scroll bar and drag up or down. On some screens such as webpages, you can also scroll side to side. TOUCH SCREEN SCROLLING 1. You may touch and drag text on the screen up or down in the direction you want to move it, or use your finger to quickly flick the text in the direction you want it to move. TO RETURN TO THE PREvIOUS SCREEN: 1. Tap the Return button. MAkING A CALL WITH THE SCREEN DIAL BUTTON 1.
MENU SUMMARY 9-Up Center Menu 1. AT&T Tv 2. Messaging 2.1. Create New Message 2.2. Inbox 2.3. Outbox 2.4. Sent 2.5. Drafts 2.6. IM 2.7. E-mail 2.8. voice Mail 3. AT&T Social Net 4. Mobile Web 5. App Center 6. MyLocker 7. AT&T GPS 7.1. AT&T Navigator 7.2. Where 7.3. AllSport GPS 8. YPmobile 9. Address Book 9-Up Left Menu 1. Mobile Email 2. IM 3. PicDial 4. AT&T Music 4.1. Music Player 4.1.1. Now Playing 4.1.2. All Music 4.1.3. Albums 4.1.4. Artists 4.1.5. Playlists 4.1.6. Genres 4.1.7. Settings 4.2.
MENU SUMMARY 9. Recent History 9.1. All Calls 9.2. Received Calls 9.3. Dialed Calls 9.4. Missed Calls 9-Up Right Menu 1. Settings 1.1. Display 1.1.1. Wallpaper 1.1.2. Style 1.1.3. Greeting Banner 1.1.4. Backlight 1.1.5. Theme 1.1.6. Auto Lock 1.2. Date & Time 1.2.1. Time Zone Update 1.2.2. Date Format 1.2.3. Time Format 1.3. Phone 1.3.1. Language 1.3.2. Network Selecting 1.3.3. Network Profile 1.3.4. Headset Type 1.3.5. USB Connection Mode 1.3.6. Memory Meter 1.3.7. Phone Information 1.4. Call 1.4.1.
MENU SUMMARY 3.4. Unit Converter 3.5. voice Memo 3.6. Stopwatch 4. Calendar 5. Alarm Clock 6. Calculator 6.1. Calculator 6.2. Tip Calculator 7. Sound Profile 7.1. General 7.2. Outdoor 7.3. Meeting 7.4. Headset 7.5. Flight 8. Bluetooth 8.1. Bluetooth 8.2. Search Device 8.3. Paired Device List 8.4. My Phone’s visibility 8.5. My Phone’s Name 8.6. Supported Services 9. Camera 9.1. Camera 9.2. Camcorder LANDSCAPE MODE MENU 5. Mobile Web 6. Address Book 7. More 7.1. Call 7.2. AT&T Tv 7.3. AT&T Social Net 7.
BASIC FUNCTIONS MAkING A CALL MAkE A CALL FROM DIALPAD 1. In Idle mode, tap the Call icon. 2. On the Phone keypad, simply touch the number key with your finger to enter the phone number. If you tap a wrong number, tap Clear to erase a number. To erase the entire number, press and hold Clear. 3. Tap Call on your device to place the call or press the SEND Key. MAkE A CALL FROM PHONE BOOk 1. In Idle mode, tap the Address Book icon. Your Phone Book list appears. 2.
BASIC FUNCTIONS ANSWERING CALLS 1. When your STX-2 rings or vibrates, tap Answer or press the SEND Key to answer the incoming call. (Depending on your phone’s settings, you may also answer incoming calls by opening the phone or by pressing any digit key.) To ignore incoming calls, tap Ignore or press the Power/END Key. WAIT/PAUSE FEATURE Pauses are used for automated systems (i.e., voicemail, calling cards). Insert a pause after a phone number then enter another group of numbers.
BASIC FUNCTIONS 3-WAY CALLING With 3-Way Calling, you can talk to two people at the same time. When using this feature, the normal airtime rates will be applied for each of the two calls. 1. Enter the number you wish to call then tap Call or press the SEND Key. 2. Once you have established the connection, enter the second number you wish to call then tap Call or press the SEND Key. 3. When you’re connected to the second party, tap 3-Way call icon again to begin your 3-Way call.
BASIC FUNCTIONS Note Call Waiting is a system dependent feature. Please contact your service provider for details. ADJUSTING vOLUME Adjusts the volume of the ringer, key beep and earpiece. 1. In idle mode, press the Side volume Key up or down. Choose from “General“, “Outdoor“, “Meeting“, “vibrate“, “Silent“or “Level 1 ~ Level 7“. Note • To adjust the conversation phone volume, you must do it during a call. Adjusting the volume at another time will affect the ring, notification, and Music sound levels.
DURING A CALL MUTE (UNMUTE) If you press Mute during a call, the person you are speaking with cannot hear you or any sounds from your side of the conversation. However, you can still hear them. To activate Mute during a call, tap Mute. • To deactivate, tap Unmute. • The phone will automatically unmute in “Emergency Call“ or “Callback Mode“. SPEAkERPHONE To activate speakerphone during a call: 1. To activate the speakerphone while in answering or calling modes, tap SPK On (Speakerphone On/Off).
DURING A CALL MESSAGING To send a text message during a call: 1. Tap Options, then tap Messaging. BLUETOOTH To connect to a Bluetooth-enabled device, such as a wireless headset (sold separately): 1. Tap Options, then tap Bluetooth.
MAkING AN EMERGENCY CALL The 911 feature puts the phone in the Emergency Call Mode when you dial the preprogrammed emergency number 911. It also operates in Lock Mode and outside the service area. 911 IN LOCk MODE The 911 call service is available even in Lock Mode. 1. Enter “911“, then tap Call. 2. The call connects. 3. When the call ends, the phone returns to Lock Mode. 911 USING ANY AvAILABLE SYSTEM 1. Enter “911“, then tap Call. 2. The call connects. 3.
vIDEO SHARE Share events the moment they happen. video Share allows you to stream one-way live or pre-recorded video while on a mobile-to-mobile voice call. video Share is a one-way video, two-way audio connection. Only the sender is charged. START A vIDEO SHARE CALL 1. Make a normal voice call. 2. Once the call is connected, if video Share is available, the video Share button becomes available on each device.
vIDEO SHARE END A vIDEO SHARE CALL 1. To end a video Share session and continue the voice call, tap the video icon and continue talking. 2. To end both the video Share session and the voice call, tap the END button. 38 Note Only the person who initiated the video Share is charged. Note video Share is a one way video and two way audio connection between two video Share devices.
CHAPTER 3 MEMORY FUNCTION CHAPTER 3.
STORING A PHONE NUMBER The phone book stores up to 500 entries. 1. In Idle mode, tap the Call icon. 2. From the Phone Screen, enter the phone number, then tap Options > Save Contact. 3. Tap “Phone (“New Entry“ or “Existing Entry“)“ or “SIM (“New Entry“ or “Existing Entry“)“. 4. If “Existing Entry“ is selected, your contact list is displayed. Choose the entry to add the number, then tap Done. Select the type of numbe you are adding from the icon list. Tap Save.
STORING A PHONE NUMBER Tap Options the Add Optional Field to access the following options: • Mobile • Home • Office • Pager • Etc Number • Home FAX • Office FAX • E-mail • URL • Instant Message • Picture • Birthday • Company • Job Title • Address • Memo 6. To store the entry in your contact list, tap Save.
ENTERING LETTERS, NUMBERS & SYMBOLS The input mode will automatically be activated when it is necessary to enter letters and numbers. There are 4 available modes: Alphabet mode (Abc/ABC), Numeric mode (123), Symbol mode (Symbols) and Emoticon mode (Emoticon). The input mode indicator appears on the lower portion of the display when letters and numbers are entered. Using the touch screen keypad: 42 Tap Options To change the entry mode - [Abc] [123] [Symbols] [Emoticon] Tap Del Tap to delete a character.
ENTERING LETTERS, NUMBERS & SYMBOLS USING QWERTY kEYBOARD Your device has a specifically designed QWERTY keyboard that provides a superior typing experience on a small handheld for easy and comfortable input. You can use all of the handset functions with the keyboard either closed or open. When you open the keyboard you have the extra benefit of a full messaging keyboard. The handheld includes a fully-functional QWERTY keyboard you can use to compose text for email messages, notes, and so on.
ENTERING LETTERS, NUMBERS & SYMBOLS Note For best performance in low-light environments, your handset includes a backlight feature that can illuminate both the display and the keyboard so you can keep reading and typing. STANDARD INPUT MODE Use the QWERTY keyboard to enter letters, numbers and characters. 1. Enter letters using the keypad. To change the input mode, tap Options. 2. To enter a space, press SYM Key. The cursor will automatically move to the next column. 3.
ENTERING LETTERS, NUMBERS & SYMBOLS SYMBOL MODE To enter symbols: 1. Tap Options > Symbols. 2. Tap the / keys to locate the symbol you want to enter then press Done. EMOTICON MODE To enter Emoticons: 1. Tap Options > Emoticon. 2. Tap the / keys to locate the Emoticon you want to enter then press Done.
MAkING A CALL THROUGH THE CONTACT LIST ONE-TOUCH DIALING Ideal for frequently dialed numbers, this feature allows entries in your contact list to be dialed via the keypad with only one key press. ONE-TOUCH DIALING 2-9: Press and hold the corresponding memory number for more than 1 second. Note 46 • If no phone number is stored in the location entered, “Empty Speed Dial Assign Now?“ will appear on the screen. • Location 1 is reserved for voicemail. Location 2-9 are unassigned.
CHAPTER 4 STX-2 TIPS & TRICkS CHAPTER 4.
STX-2 TIPS & TRICkS NAvIGATING & TOUCH SCREEN TIPS • For optimal touch screen performance, use the tip of your finger to touch the center of a touch key. A light tap will do. (Do not use a foreign object or your fingernail on the screen.) • Press and drag your finger up or down to scroll. A beep will sound when you’ve reached the top or bottom of a menu. To return to the previous screen tap the BACK icon.
STX-2 TIPS & TRICkS BROWSING TIPS • To access the mobile web from idle mode, tap the Menu icon then tap Mobile Web icon and select Media Net Home. • To personalize your Media Net home page, from the MEdia Net home page, tap EDIT (next to “My Links”). Tap the content you would like added, moved, or deleted from your MEdia Net home page. • To increase or decrease the size of the onscreen text, Tap select your viewing size.
STX-2 TIPS & TRICkS CAMERA TIPS • To take a picture, press and hold the Side Camera Key or, in Idle mode, tap the Menu icon, Drag Leftward and select Camera > Camera. Rotate the phone horizontally. Press the Side Camera Key to take the picture. • To record video, in Idle mode, tap the Menu icon, Drag Leftward and select Camera > Camcorder. Rotate the phone horizontally. Press the Side Camera Key to start/stop recording.
STX-2 TIPS & TRICkS GENERAL TIPS • To turn your STX-2 on/off, press the Power/END Key. • Quickly pressing the Side Lock Key temporarily turns off the display and locks your device. Unlock the device by press and hold the Side Lock Key. Or, simply open the QWERTY keyboard. • To personalize your STX-2, in idle mode, tap the Menu icon then tap App Center icon. From here, you can shop for and download ringtones, games, graphics, multimedia files, applications and videos.
MEMO 52
CHAPTER 5 MENU FUNCTION CHAPTER 5. MENU FUNCTION This chapter addresses accessing the menu and using its functions and features to customize your STX-2.
AT&T Tv AT&T Tv The AT&T Mobile Tv (Mobile Tv) service allows you to watch an exciting lineup of live, simulcast or time-shifted full-length episodes of entertainment, news, sports, and kids' programming from some of the most popular networks, including CBS Mobile, CNBC, CNN Mobile Live, Comedy Central, Crackle, ESPN Mobile Tv, FOX Mobile, FOX News, MSNBC, MTv, NBC 2Go, and Nickelodeon. Subscribe to and start watching your favorite programs immediately.
MESSAGING CREATE NEW MESSAGE To send a new message: 1. In Idle mode, tap the Menu icon then tap Messaging icon and select Create New Message. 2. Input your message. From the Message screen, tap Options to choose from: • Symbols: Allows you to enter symbols. • Emoticon: Allows you to enter emoticons. • Add Contacts: Allows you to insert contact information into the message. • Add Format: Allows you to access the Text Templates, Subject, vCard and vCalendar.
MESSAGING From the To screen, tap Options to choose from: • Recent Message: Look up a number from your recent message list. • Recent Calls: Look up a number from your recent call list. • Change to To: Tap to access the “To“ field. • Change to CC: Tap to access the “CC“ field. • Change to BCC: Tap to access the “BCC“ field. • Sending Settings: - Priority: Select “High“, “Normal“ or “Low“. - Validity Period: Select “1 Hour“, “2 Hours“, “1 Day“, “1 Week“ or “Maximum“. - Delivery Report: Select “On“ or “Off“.
MESSAGING From the Inbox screen, tap Options to choose from: • Reply: Replies to the message. • Forward: Send the message to another person. • Save contact: Save the phone number in contacts. • Extract data: Extract phone number, e-mail, URL included in the message. • Save item: Select to save a graphic, sound or other object included in MMS. • Information: To show received message information.
MESSAGING SENT To manage Sent messages: 1. In Idle mode, tap the Menu icon then tap Messaging icon and select Sent. 2. To delete a message, tap Options. Tap Select & Delete or Delete All > Yes or No. 3. Tap a message. The message is displayed. To forward the message to another recipient, tap Forward. To delete the message, tap Delete. From the Sent screen, tap Options to choose from: • Information: To show sent message information. • Forward: Send the message to another person.
MESSAGING From the Drafts screen, tap Options to choose from: • Symbols: Allows you to enter symbols. • Emoticon: Allows you to enter emoticons. • Add Contacts: Allows you to insert contact information into the message. • Add Format: Allows you to access the Text Templates, Subject, vCard and vCalendar. • Default Slide Duration: Enter the slide duration time. (1~30sec) • Save as Drafts: To save a message to “Drafts“ folder. • Sending Settings: - Priority: Select “High“, “Normal“ or “Low“.
MESSAGING SIGN IN 1. Tap and type your existing ID. 2. Tap the password field and type your password. 3. Tap Sign In. 4. A list of contacts appear on the screen. 5. Tap Options to change your status or add a contact. You can sign in multiple communities. 6. To sign into another community, tap Home and tap the other IM community service you want to use. 7. Tap and type your existing ID. 8. Tap the password field and type your password. SEND IM 1. Select a contact who you want to send IM. 2.
MESSAGING RECEIvE IM 1. Select a conversation that you want to join. 2. Tap Options > Open. Once you’re signed in, you can receive an IM even if you are not in the IM menu. SIGN OUT 1. Tap the IM community service you want to sign out of. 2. Tap Options > Sign Out. EMAIL Email allows you to access your Yahoo! Mail, AOL Mail, AIM Mail, Windows Live Hotmail, AT&T Yahoo!, BellSouth and Other provider’s accounts on your STX-2. SET UP EMAIL 1. Slide open the QWERTY keyboard. Tap the Email icon. 2.
MESSAGING 5. Tap Options to select Read, Delete or Compose New. OPENING AN EMAIL 1. Tap Read after highlighting the email subject line you want to open by scrolling the bar. 2. Once the email opens, tap Options to “Reply“, “Forward“, “Delete“. DELETING AN EMAIL 1. Tap the email you want to delete by scrolling the bar. 2.
AT&T SOCIAL NET AT&T SOCIAL NET Allows you to access your favorite social networks such as Facebook, Twitter, Myspace, and the News. 1. Slide open the QWERTY keyboard. Tap the AT&T Social Net icon.
MOBILE WEB MEDIA NET HOME MEdia Net is one of the services provided by AT&T and it gives you access to all the cool things you can do with your wireless phone. Once connected, the homepage is displayed. The content depends on the service provider. With MEdia Net you can access your local weather, news & entertainment, sports scores, tones, games, apps, and so much more.
MOBILE WEB Tap Options to access the following options: • Add Folder: Allows you to add a new folder to your Favorites List. • Add Favorite: Allows you to add a new URL address to your Favorites List. • Delete All: “All Items will be deleted. Delete all?“ will be display > Yes or No. 3. Tap Go to launch the website. Tap Options to access the following options: • Send: Send the URL address via text message. ENTER URL 1. Slide open the QWERTY keyboard. Tap the Browser icon and select Enter URL. 2.
MOBILE WEB 3. To clear the History, tap Delete All. “All Items will be deleted. Delete all?“ will appear. Tap Yes or No. SETTINGS 1. Slide open the QWERTY keyboard. Tap the Browser icon and select Settings. Select from the following options: • Help: Displays the browser version and copyright information about the browser. • Certificates: Accesses certificate information from your STX-2. • Preferences: Changes the settings for the web browser to suit your preference. • Clear Cache: Clear the cache.
APP CENTER The App Center topics covered in this section are shopping for Ringtones, Games, Graphics, Multimedia, Applications, Themes, videos and MEdia Net Home the MEdia Home site. SHOP RINGTONES This menu option connects to AT&T’s ringtone download site. 1. In Idle mode, tap the Menu icon then tap App Center icon and select Shop Ringtones. SHOP GAMES This menu option connects to AT&T’s game download site. This allows users to download the various games by connecting to the Internet.
APP CENTER 1. In Idle mode, tap the Menu icon then tap App Center icon and select Shop Multimedia. SHOP APPLICATIONS This allows you to connect to AT&T’s application download site where you can shop for applications. Downloaded files appear in your Applications folder. 1. In Idle mode, tap the Menu icon then tap App Center icon and select Shop Applications. SHOP vIDEO This allows you to connect to AT&T’s video download site where you can shop for videos. Downloaded videos appear in your My Stuff folder.
MYLOCkER MYLOCkER 1. In Idle mode, tap the Menu icon then tap MyLocker icon.
AT&T GPS AT&T NAvIGATOR AT&T Navigator, with GPS enabled directions, is the fastest way to get where you are going - whether across town or across the country. You can always find your way with turn-by-turn voice and on-screen directions. Find whatever you need on the road, including restaurants, and business listings. Get where you’re going faster! Save your favorite locations, get traffic updates, and one-click re-routing. 1. In Idle mode, tap the Menu icon then tap AT&T GPS icon. 2.
AT&T GPS WHERE WHERE™ is a downloadable mobile application that uses your current location (obtained via the built-in GPS) to help you find places of interest, things to do, and local information while you’re on the go. 1. In Idle mode, tap the Menu icon then tap AT&T GPS icon. 2. Select Where. ALLSPORT GPS The AllSport GPS application turns your phone into a GPS trainer for biking, running, walking and other sports activities.
YP MOBILE FIND. MAP. SAvE. GO. Selecting YELLOWPAGES.COM Mobile from the Games & Apps sub menu launches a preinstalled java application. The Yellowpages Mobile application provides quick and ready access to businesses, map locations, and storage of your favorite searches (My Place). This application allows you to tap into local businesses, locations, and events, connecting you to your search in real-time. 1. In Idle mode, tap the Menu icon then tap YP Mobile icon.
ADDRESS BOOk Stores up to 500 entries, each of which can be assigned to a group. Entries can be retrieved by name or group. 1. In Idle mode, tap the Menu icon then tap Address Book icon. FIND NAME Retrieves an entry by name and calls the primary number by simply pressing the SEND Key. You can review all the entries stored in your contacts list or quickly find an entry by entering a name or its character string. 1. The list of names in your contacts is displayed alphabetically. 2.
ADDRESS BOOk • Settings GROUP LIST This menu allows you to manage group information. By default, there are 4 existing groups: “No Group,“ “Business,“ “Family“ and “Friends.“ You can also configure a ring tone for a group so that the group ring tone sounds when a call from a specific contact address within that group arrives and there is no ring tone configured for the specific contact address. A maximum of 20 groups is allowed. 1.
ADDRESS BOOk Change group name 1. Select the group you want to rename. Only new groups you added can be changed. 2. Tap Options > Rename Group. 3. Input a new group name. 4. To change the name, tap Save. Select & Delete 1. Select an existing group name. (Except No Group) 2. Tap Options > Select & Delete. 3. Tap the contact you want to delete, tap Check or Uncheck. Or, tap All. 3. Tap Done, then“Delete?“ will appear. Tap Yes or No. Delete group 1. Select an existing group name.
ADDRESS BOOk SPEED DIAL LIST This menu allows you to configure the speed dial numbers. You can select a number from 2 to 9 as a speed dial. You can configure speed dial numbers for any of the 8 numbers for a specific contact address so that a contact address may have multiple speed dial numbers. 1. In Idle mode, tap the Menu icon then tap Address Book icon > Options > Speed Dial List. 2. To assign a phone number to a location, select the location. Note “Empty“ appears if the location is available. 3.
ADDRESS BOOk COPY TO This menu allows you to copy all of the information from your SIM card to your handset and vice versa. If a name is duplicated during the copying operation, the information is also duplicated. Options include: • Phone to SIM: You can copy the entry from the handset memory to the SIM card (not all the data will be copied). • SIM to Phone: You can copy the entry from the SIM card to the phone memory. 1. In Idle mode, tap the Menu icon then tap Address Book icon > Options > Copy to. 2.
ADDRESS BOOk 4. “Delete selected contacts?“ will appear. Tap Yes or No. SERvICE DIAL NUMBER You can view the list of Service Dialing Numbers (SDN) assigned by your network provider. Such numbers could include the emergency, directory assistance and voice mail numbers. 1. In Idle mode, tap the Menu icon then tap Address Book icon > Options > Service Dial Number. 2. Scroll through the available numbers. MY NUMBER Displays and edit your phone number. 1.
ADDRESS BOOk Tap Options to access the following options: • Save Location: Tap “Always Ask“, “Phone“ or “SIM“ then tap Save. • View: Tap “All“, “Phone“ or “SIM“ then tap Save. • Memory Status: Displays the current status of the phone memory and the SIM card. • SIM Number Type: Tap Add. Input the new number then tap Save. • Change Hidden key: Input the new hidden key. (This is used to Lock your SIM Card address book. The default hidden key code is “00000000”.
ADDRESS BOOk • Ringtone: Tap “AT&T Ringtone“, Basic Ringtone 1 ~ Basic Ringtone 3“, “Sky lounge“, “Rainforest“, “Fighters“, “Love“, “Funny guy“ or “Happiness“ > Save. Tap Options to access the following options: Add Optional Field, Delete Optional Field 4. To save the entry, tap Save. To return to the previous page, tap the BACK icon at the top of the screen. Note See page 40 for more detailed information about storing a number. Phone Book fields(SIM): • Name: Enter first name > Done.
MOBILE EMAIL MOBILE EMAIL Allows you to access your Yahoo! Mail, AOL Mail, AIM Mail, Windows Live Hotmail, AT&T Yahoo!, BellSouth and Other provider’s accounts on your STX-2. 1. In Idle mode, tap the Menu icon, Drag Rightward then tap Mobile Email icon.
IM IM IM allows you to use your AIM, Windows Live and Yahoo! Messenger on your STX-2. You can exchange messages with your friends and check their online status while you're away from the computer. SET UP IM 1. Slide open the QWERTY keyboard. Tap the IM icon. 2. Tap the IM community service you want to use. SIGN IN 1. Tap and type your existing ID. 2. Tap the password field and type your password. 3. Tap Sign In. 4. A list of contacts appear on the screen. 5.
IM SEND IM 1. Select a contact who you want to send IM. 2. Tap Options > Send IM. 3. Type your message in the input field, then tap Send. 4. Tap Options to insert emoticon or quick text. RECEIvE IM 1. Select a conversation that you want to join. 2. Tap Options > Open. Once you’re signed in, you can receive an IM even if you are not in the IM menu. SIGN OUT 1. Tap the IM community service you want to sign out of. 2. Tap Options > Sign Out.
PICDIAL PICDIAL For Windows Mobile. We didn't invent Caller ID, we just made it social. Automatically see your friends' Facebook/MySpace profile pics/status every time they call! Oh yeah, and when your friends update their profile pics, it automatically updates on your phone; pretty cool huh? PicDial also gives you a “Favorites Screen,“ a grid w/ friends profile pics and their most recent status updates. 1.) Check us out at picdial.com to learn more 2.) Download PicDial to your phone 3.
AT&T MUSIC MUSIC PLAYER The built in Music Player is an application that can play music files. The music player supports files with extensions AAC, AAC+, eAAC+, MP3, WMA, 3GP, MP4(Audio only), and M4A. Launching the Music Player allows you to navigate within your Music Player folders and select playback material. 1. In Idle mode, tap the Menu icon, Drag Rightward then tap AT&T Music icon and select Music Player. Menu options include: • • • • • Now Playing: Opens the current play list.
AT&T MUSIC MUSIC ID MusicID is an application which uses the onboard microphone to analyze a song sample and then compare it to a remote database of songs. Once the application completes the analysis of the song sample, it then provides you with the name of the song, artist and album art as well as opportunities to buy related content. 1. In Idle mode, tap the Menu icon, Drag Rightward then tap AT&T Music icon and select Music ID2. 2. Follow the on-screen prompts.
AT&T MUSIC MOBIvJ Selecting MobivJ from the AT&T Music sub menu launches a browser which takes you directly into the Music video section of Mobile video. From this menu, you will have access to music videos from the latest artist as well as programming from AT&T, MTv, vHI and CMT among others. Simply click on a video and begin watching! Note Additional charges may incur when downloading music video contents. Contact your service provider for further information. 1.
MOBILE vIDEO Your STX-2 is equipped with a browser which allows you to access the Internet and upload media files directly to your phone. These media files display using the built-in Media Player. Accessing the browser is data intensive and additional charges may apply. Mv brings you quick, on-demand access to news, sports, weather and entertainment video clips. Catch up on Tv’s hottest shows, funniest comedians, biggest headlines and latest sports scores.
MY STUFF ONLINE LOCkER 1. In Idle mode, tap the Menu icon, Drag Rightward then tap My Stuff icon and select Online Locker. RINGTONES & AUDIO 1. In Idle mode, tap the Menu icon, Drag Rightward then tap My Stuff icon and select Ringtones & Audio. 2. Tap Phone or SD Card. Tap Options to access the following options: • Copy to SD Card: To copy the selected ringtone or audio. • Move to SD Card: To move the selected ringtone or audio. • Delete Multimedia: To delete a selected ringtone or audio.
MY STUFF IMAGES 1. In Idle mode, tap the Menu icon, Drag Rightward then tap My Stuff icon and select Images. 2. Tap Phone or SD Card. Tap Options to access the following options: • Send Via Mobile Share: To upload the selected image to Mobile Share server. • Copy to SD Card: To copy the selected image. • Move to SD Card: To move the selected image. • Delete Multimedia: To delete a selected image. 3.
MY STUFF vIDEOS 1. In Idle mode, tap the Menu icon, Drag Rightward then tap My Stuff icon and select videos. 2. Tap Phone or SD Card. Tap Options to access the following options: • Send Via Mobile Share: To upload the selected video clip to Mobile Share server. • Copy to SD Card: To copy the selected video clip. • Move to SD Card: To move the selected video clip. • Delete Multimedia: To delete a selected video clip. 3. Tap the video you want to view. 4. Tap Play, to play a video.
MY STUFF OTHER FILES This feature provide additional storage of other miscellaneous file types that may not fit into any of the previous categories. 1. In Idle mode, tap the Menu icon, Drag Rightward then tap My Stuff icon and select Other Files.
GAMES GAMES The Games menu option allows you to access games that are on the phone and also shop for games using AppCenter. You can download new games and then save them to the Games folder. 1. In Idle mode, tap the Menu icon, Drag Rightward then tap Games icon. 2. Tap the game you want to play then follow the on-screen directions.
APPLICATIONS MOBILE BANkING Mobile Banking is an application that allows you to quickly and easily access your financial accounts. You can check account balances, view and pay bills and review your transactions. 1. Access your bank's Online Banking site and enroll in Mobile Banking. 2. Download the Mobile Banking application to phone. You will receive a text message shortly to complete the download. 3. Tap the link in the message to download. 4.
APPLICATIONS LOOPT Tap in to your social scene with Loopt, the ultimate social networking tool. See where your friends are and what they're doing through detailed, interactive maps on your cell phone. Stay connected - share your location, photos, or comments with your friends, favorite web communities, social networks, or blogs. Find new nearby places and events, recommended by your friends. Make it public or keep it private, you decide. 1.
RECENT HISTORY RECENT HISTORY 1. In Idle mode, tap the Menu icon, Drag Rightward then tap Recent History icon. 2. Tap All Calls, Received Calls, Dialed Calls or Missed Calls. Tap Options to access the following options: • Call Timer: Shows the total length of time for Last call, Received Calls, Dialed Calls, All Calls and Life Time. • Data Counter: Shows the total length of time for All Data Calls, Sent Data Calls or Received Data Calls. • Select & delete: “Delete Selected Items?“ > Yes or No.
SETTINGS DISPLAY WALLPAPER Allows you to choose the kind of background to be displayed on the phone. 1. In Idle mode, tap the Menu icon, Drag Leftward then tap Settings icon and select Display > Wallpaper. 2. Tap Phone or SD Card. 3. Tap “AT&T Globe ~ Sandy Beach“. If you have taken any pictures and saved them to your device, they will appear here as well. 4. Tap Save. STYLE Allows you to choose how the Idle screen will appear. 1.
SETTINGS 2. Tap “On“ or “Off“. 3. If you select “On“, the current greeting text is displayed. Tap Del to delete the greeting, then enter your new greeting. Tap Options to change the input mode. 4. Tap Save. BACkLIGHT Turn on the backlight on the display and keypad for easy viewing in dark places. DISPLAY 1. In Idle mode, tap the Menu icon, Drag Leftward then tap Settings icon and select Display > Backlight > Display. 2. Tap “10 secs“, “15 secs“, “30 secs“, “1 min“ or “3mins“. 3. Tap Save. kEYPAD 1.
SETTINGS 2. Tap “Gray“ or “Blue“. 3. Tap Save. AUTO LOCk 1. In Idle mode, tap the Menu icon, Drag Leftward then tap Settings icon and select Display > Auto Lock. 2. Tap “Off“, “1 min“, “2 mins“ or “5 mins“. 3. Tap Save. DATE & TIME Allows you to change the date and time settings. TIME ZONE UPDATE Select Auto Update to set the phone to automatically update the time and date according to the current local time zone. Select Manually to update the information (Time, Date, Daylight Saving) yourself. 1.
SETTINGS 2. Tap “Fri Feb 22“, “Feb 22 Fri“, “Fri Feb.22.1980“ or “1980.Feb.22 Fri“. 3. Tap Save. TIME FORMAT To select a time format: 1. In Idle mode, tap the Menu icon, Drag Leftward then tap Settings icon and select Date & Time > Time Format. 2. Tap “12 Hour“ or “24 Hour“. 3. Tap Save. PHONE LANGUAGE Selects the language in which letters are displayed on the screen. 1. In Idle mode, tap the Menu icon, Drag Leftward then tap Settings icon and select Phone > Language. 2. Tap “English“ or “Spanish“. 3.
SETTINGS 3. Tap Save. NETWORk PROFILE To set the network profile. 1. In Idle mode, tap the Menu icon, Drag Leftward then tap Settings icon and select Phone > Network Profile. 2. Tap one of these options: MEdia Net, video Share 3. To delete all network profile, tap Delete All. “Delete All?“ will appear. Tap Yes or No. 4. Tap Add to add a new network profile. • Title: Enter a profile title name. • Auth Type: Select the type of authentication used for this WAP connection: None, Normal, or Secure.
SETTINGS USB CONNECTION MODE To set the USB connection mode: 1. In Idle mode, tap the Menu icon, Drag Leftward then tap Settings icon and select Phone > USB Connection Mode. 2. Tap “Music Sync“, “Mass Storage“ or “Data Service“. 3. Tap Save. MEMORY METER To view your STX-2’s memory meter: 1. In Idle mode, tap the Menu icon, Drag Leftward then tap Settings icon and select Phone > Memory Meter. 2. Tap “Phone“ or “SD Card“. 3.
SETTINGS PHONE INFORMATION Displays your STX-2’s information: 1. In Idle mode, tap the Menu icon, Drag Leftward then tap Settings icon and select Phone > Phone Information. 2. Your STX-2’s My Mobile Number, IMEI, S/W ver, H/W ver, Config version, Network band, Manufacturer, Model and JAvA Information are displayed. CALL ANSWER MODE This feature allows you to select the answer mode. 1. In Idle mode, tap the Menu icon, Drag Leftward then tap Settings icon and select Call > Answer Mode. 2.
SETTINGS MINUTE MINDER This option allows you to specify whether the phone will beep every minute during an outgoing call to keep you informed of the length of the call. 1. In Idle mode, tap the Menu icon, Drag Leftward then tap Settings icon and select Call > Minute Minder. 2. Tap “On“ or “Off“. 3. Tap Save. CALL FORWARDING When this network service is activated, you can direct your incoming calls to another number, for example, to your voice mailbox number. For details, contact your service provider.
SETTINGS CALL WAITING Call Waiting will notify you of a new incoming call while you have a call i progress. 1. In Idle mode, tap the Menu icon, Drag Leftward then tap Settings icon and select Call > Call Waiting. 2. Tap All Calls, voice Call or Data Call. • Activate: To activate call waiting. • Deactivate: To deactivate call waiting. • Check Status: To check if the function is active or not. CALLER ID To select if your phone number will appear when making a call: 1.
SETTINGS • Activate: To activate call barring. • Deactivate: To deactivate call barring. • Check Status: To check if the function is active or not. Tap Deactivate All to cancel all active Call Barring options or Change Password to change your password. TTY Allows you to attach a TTY device enabling you to communicate with parties also using a TTY device. A phone with TTY support is able to translate typed characters to voice. voice can also be translated into characters and then displayed on the TTY. 1.
SETTINGS SECURITY Prevents others from using the phone without permission and allows access to security features only after inputting a password. PHONE LOCk Turn on the lock to prevent the phone from being used without entering the password first. 1. In Idle mode, tap the Menu icon, Drag Leftward then tap Settings icon and select Security > Phone Lock. 2. Tap “On“ or “Off“. 3. Tap Save. 4. When locking the device for the first time, enter ”0000“ to lock.
SETTINGS CHANGE PHONE PASSWORD To change your password: 1. In Idle mode, tap the Menu icon, Drag Leftward then tap Settings icon and select Security > Change Phone Password. 2. Enter your New Password > Done, then enter your verify Password > Done. Enter your Current Password > Done. CHANGE PIN CODE FOR YOUR SIM CARD To change your PIN code: 1. In Idle mode, tap the Menu icon, Drag Leftward then tap Settings icon and select Security > Change PIN Code. 2. Tap PIN1 or PIN2.
SETTINGS MASTER RESET Performing a Master Reset restores the settings (e.g.: Audio, Display, Language, Date & Time, Bluetooth Settings) stored in the handset memory to default values. 1. In Idle mode, tap the Menu icon, Drag Leftward then tap Settings icon and select Security > Master Reset. 2. “Intialize all settings to default value. Proceed?“ will appear. Tap Yes or No. MASTER CLEAR Performing a Master Clear deletes downloaded/user created contents (e.g.
SETTINGS APPLICATIONS MESSAGING SETTINGS To select your message settings: 1. In Idle mode, tap the Menu icon, Drag Leftward then tap Settings icon and select Applications > Messaging Settings. • Text Message - Message Center Number: If you want to send a text message, you can get the address of the SMS center by using this menu. - Email Gateway: You can send the text message to an Email Address via this gateway. - Text Templates: view and edit the template messages or create new messages.
SETTINGS BROWSER SETTINGS To view and/or edit your Browser settings: 1. In Idle mode, tap the Menu icon, Drag Leftward then tap Settings icon and select Applications > Browser Settings. 2. Tap MEdia Net > Activate. Selects a connection profile to be used when connecting to the Internet. 3. To create a new connection, tap Add. • Account Name: Enter a account name. • Homepage: Enter the URL address of the page to be used as your homepage. • Proxy Address: Set the proxy server address.
SETTINGS • Save Location: Tap “Always Ask“, “Phone“ or “SIM“ > Save. • View: Tap “All“, “Phone“ or “SIM“ > Save. • Memory Status: Check the current status of the external memory card in this menu. • SIM Number Type: Tap Add. Input the new number then tap Save. • Change Hidden key: Input the new hidden key. (The default hidden key code is “00000000”. Please contact AT&T Customer Service for your Hidden Key code.). CAMERA SETTINGS 1.
SETTINGS • Word Prediction: To predictive text input mode which displays a word candidate list as you enter the first few characters so you just select the word that you want. • Spell Correction: Lets you correct typographical errors by selecting from a list of possible words that reflect the characters of the keys you have tapped as well as characters of nearby keys.
SETTINGS vIDEO SHARE The video Share feature allows you to share live or recorded video during a voice call. 1. In Idle mode, tap the Menu icon, Drag Leftward then tap Settings icon and select video Share. 2. Tap “Alerts“, “Auto Record“ or “Service“. • Alerts: Allows you to turn On or Off the video Share Alerts which displays a message and a tone. • Auto Record: Allows you to turn On or Off the Auto Record which records the video Share call.
MY ACCOUNT MY ACCOUNT 1. In Idle mode, tap the Menu icon, Drag Leftward then tap My Account icon.
TOOLS TO DO This feature allows you to save and manage a to do list. 1. In Idle mode, tap the Menu icon, Drag Leftward then tap Tools icon and select To Do. 2. Tap Add to set a new To Do item. Enter the following fields: • • • • • Title: Enter the title > Save. Due Date: Tap to choose a date in the Scheduler. Summary: Enter the summary > Save. Priority: Tap “High“, “Normal“, “Low“ > Save. Status: Tap “In Progress“, “Completed“ > Save. 3. Tap Save.
TOOLS 3. Tap Done. 4. Tap Delete All to delete world time. “Delete all Items?“ will appear. Tap Yes or No. NOTEPAD To access the notepad: 1. In Idle mode, tap the Menu icon, Drag Leftward then tap Tools icon and select Notepad. ADD MEMO 1. Tap Add to add a new memo. 2. Input the memo then tap Save. 3. Tap Delete All to delete the memos. “Delete All?“ will appear. Tap Yes or No. vIEW MEMO 1. The list of all memos, in saved order is displayed. 2. Tap a memo. EDIT MEMO 1.
TOOLS DELETE MEMO 1. The list of all memos, in saved order is displayed. 2. Tap a memo. 3. Tap Delete. “Delete this memo?“ will appear. Tap Yes or No. UNIT CONvERTER This function converts any measurement into a unit you want. There are 5 types of units that can be converted: Distance, Area, volume, mass and Temperature. 1. In Idle mode, tap the Menu icon, Drag Leftward then tap Tools icon and select Unit Converter. • Unit: Tap “Distance“, “Area“, “volume“, “Mass“ or “Temperature“ > Done.
TOOLS 3. To stop recording a voice memo, tap Stop > Save. • Save: The saved memo appears in the My Stuff folder. (Menu icon > Drag Rightward > My Stuff > Ringtones & Audio) • Save & Send Msg: To save and send the memo in a message. • Cancel: To cancel voice memo. STOPWATCH You can simultaneously time up to 10 different events. 1. In Idle mode, tap the Menu icon, Drag Leftward then tap Tools icon and select Stopwatch. 2. To measure a time period: • To start, tap Start. • To stop the timing, tap Stop.
CALENDAR CALENDAR Sets an event and reminds you of that event. 1. In Idle mode, tap the Menu icon, Drag Leftward then tap Calendar icon. ADD NEW EvENT 1. Tap to choose a date in the Scheduler. Tap Add to add an event to the Scheduler. • • • • • • • • Title: Enter the event title > Save. Start: Enter the start date > Done. Time: Enter the time. Tap AM/PM > Done. End: Enter the end date > Done. Time: Enter the time. Tap AM/PM > Done. Summary: Enter the Summary > Save. Location: Enter the location > Save.
CALENDAR Tap Options to access the following options: • Select & Delete: “Delete Selected Items?“ will appear. Tap Yes or No. • Delete All: “Delete all Items?“ will appear. Tap Yes or No. 3. Tap event to see the details for the event. 4. Tap Edit to edit the event, then tap Save to save the event. 5. Tap Delete to delete event in the Scheduler. “Delete Schedule?“ will appear. Tap Yes or No. TODAY SCHEDULER To view the Today Scheduler: 1. Tap Today.
ALARM CLOCk ALARM CLOCk The alarm function allows you to set up multiple separate alarms. You can also set the time, repetition interval and alarm sound. 1. In Idle mode, tap the Menu icon, Drag Leftward then tap Alarm Clock icon. 2. Tap Add to set a new alarm. • Set: Tap “On“ or “Off“ > Done. • Time: Enter the time. Tap AM/PM > Done. • Repeat: Tap “Once“, “Mon to Fri“, “Mon to Sat“, “Sat to Sun“ or “Daily“ > Done. • Snooze: Tap “5 min“, “10 min“, “15 min“ or “20 min“ > Done.
CALCULATOR CALCULATOR The calculator allows you to perform general mathematical functions, such as addition, subtraction, multiplication and division. 1. In Idle mode, tap the Menu icon, Drag Leftward then tap Calculator icon and select Calculator. 2. Enter the numbers to get the value you want. To cancel a calculation, tap C . To clear the display, tap 0 key.
SOUND PROFILE SOUND PROFILE 1. In Idle mode, tap the Menu icon, Drag Leftward then tap Sound Profile icon. 2. Tap General, Outdoor, Meeting or Headset. • Call Alert Type: Tap Ring, vibrate, Ring & vibrate, Ring After vibrate or Silence > Save. • Ring Tone: Tap Phone or SD Card. Tap AT&T Ringtone, Basic Ringtone 1 ~ Basic Ringtone 3, Sky lounge, Rainforest, Fighters, Love, Funny guy, Happiness > Save. • Ring Volume: Tap Off or volume 1 ~ volume 7 > Save.
BLUETOOTH BLUETOOTH Your STX-2 has built-in Bluetooth wireless technology, which makes it possible for you to connect your STX-2 wirelessly to a hands free device, PC or PDA. Only one of the devices registered in your STX-2 can be connected at a time. (To make a connection to the same type of device or change Bluetooth preferences, disconnect the existing device first.) You can have a conversation via a cordless Bluetooth hands-free phone or browse the Internet, wirelessly connected via a mobile phone.
BLUETOOTH SEARCH DEvICE Searches for Bluetooth devices in possible range. 1. In Idle mode, tap the Menu icon, Drag Leftward then tap Bluetooth icon and select Search Device. PAIRED DEvICE LIST This function allows you to view the list of all devices that are paired with your STX-2 at once. 1. In Idle mode, tap the Menu icon, Drag Leftward then tap Bluetooth icon and select Paired Device List. MY PHONE’S vISIBILITY Selecting “On“ exposes your STX-2 to other Bluetooth devices.
BLUETOOTH SUPPORTED SERvICES Shows you all services that your device supports. 1. In Idle mode, tap the Menu icon, Drag Leftward then tap Bluetooth icon and select Supported Services. 2. Tap “Headset“, “Stereo Headset“, “Handsfree“, “Dial up Networking“, “A/v Remote Control“ or “Serial Port“.
CAMERA CAMERA Taking pictures with your STX-2’s built-in camera is as simple as choosing a subject, pointing the lens and pressing a button. 1. In Idle mode, tap the Menu icon, Drag Leftward then tap Camera icon and select Camera or press and hold Camera Key. 2. Point the camera lens at your subject. You can check the picture framing through the display screen. Tap Options to choose from: • View Photos: The list of the photos in the currently selected memory appears.
CAMERA CAMCODER Taking video with your STX-2’s built-in camera is as simple as choosing a subject, pointing the lens and pressing a button. 1. In Idle mode, tap the Menu icon, Drag Leftward then tap Camera icon and select Camcorder. Tap Options to choose from: • View Videos: The list of the videos in the currently selected memory appears. • Image Effect: Tap / to select from “Gray“, “Negative“, “Sepia“ or “No Effect“. • Resolution: To select resolution “320x240“ or “176x144“.
MEMO 130
CHAPTER 6 PC CONNECTIvITY CHAPTER 6.
PC CONNECTIvITY SET UP BLUETOOTH MODE FOR THE STX-2 TURNING ON BLUETOOTH To enable Bluetooth: 1. In Idle mode, tap the Menu icon, Drag Leftward then tap Bluetooth icon and select Bluetooth > Select Bluetooth On/Off. 2. Select On. You can see the Bluetooth icon at the top of the screen. MAkING THE STX-2 vISIBLE TO A PC This step enables your PC to find the STX-2 when searching for Bluetooth devices. 1. In Idle mode, tap the Menu icon, Drag Leftward then tap Bluetooth icon and select Bluetooth. 2.
PC CONNECTIvITY 4. On the “Bluetooth Settings“ window, click “New Connection“ to start “Add New Connection Wizard“. 5. Click the “Next“ button on the “Add New Connection Wizard“ window to search for the Bluetooth device. 6. After searching, “STX-2“ or the name you assigned to your device will appear. 7. Select “STX-2“ and click the “Next“ button. 8. Enter the PIN number then click “OK“ button. 9. Click the “Yes“ button. 10. Enter the same PIN number you entered in step 8. 11.
PC CONNECTIvITY 3. Follow the instructions in the dialog boxes. Select UTStarcom USB modem. To view the option, your device should be connected to the PC. If device is not connected correctly, the above option will be skipped to the following screen. In case this option is skipped, you can change this option in the start up screen using the properties button described in step #6. 4. The new icon for ATT dial-up connection will appear. 5. Double click the ATT icon to the start dial-up connection.
PC CONNECTIvITY 4. After searching, a list of Bluetooth devices will appear. 5. Select your headset. 6. Enter “Pass Code“ for the headset, which may be found in the user manual for the headset. MAkING DIAL-UP NETWORkING vIA USB Your device can be used as a network device for Internet sharing. You can share files with a computer or use an Internet connection, etc. 1. Before you connect the device, set your device to Data Service Mode.
PC CONNECTIvITY MUSIC SYNC The phone communicates with a computer via ActiveSync. Note To transfer music to your device, you will need: • Microsoft® ActiveSync® installed on your PC. • Windows Media® Player 10 (or higher) installed on your PC. You can download this at: http://www.microsoft.com/mediaplayer. • You will need a microSD card to use Music Sync. If you attempt to connect to Music Sync without a card, "SD not found, cannot access to Music Sync" will appear. 1.
PC CONNECTIvITY MASS STORAGE DEvICE Your device can be used as an external memory device. 1. Before you connect the device, set your device to Mass Storage Mode. To do this, tap the Menu icon, Drag Leftward then tap Settings icon and select Phone > USB Connection Mode > Mass Storage > Save. Note You will need a microSD card to use Mass Storage. If you attempt to connect to Mass Storage via USB without a card, "SD not found, cannot access to Mass Storage" will appear. 2.
MEMO 138
CHAPTER 7 SAFETY INFORMATION CHAPTER 7. SAFETY INFORMATION Read this information before using your handheld portable Cellular Telephone.
SAFETY SAFETY INFORMATION FOR WIRELESS HANDHELD PHONES Read This Information Before Using Your Handheld Portable Cellular Telephone DRIvING SAFETY Talking on the phone while driving is extremely dangerous and is illegal in some states. Remember, safety comes first. Check the laws and regulations on the use of phones in the areas where you drive. Always obey them.If you must use your STX-2 while driving, please: • Give full attention to driving. Driving safely is your first responsibility.
SAFETY ELECTRONIC DEvICES Your wireless handheld portable telephone is a low power radio transmitter and receiver. When it is ON, it receives and also sends out radio frequency (RF) signals. Most modern electronic equipment is shielded from RF energy. However, certain electronic equipment may not be shielded against the RF signals from your wireless phone. Therefore, use of your STX-2 must be restricted in certain situations.
SAFETY HEARING AIDS Some digital wireless phones may interfere with some hearing aids. In the event of such interference, you may want to consult your service provider (or call the customer service line to discuss alternatives). OTHER MEDICAL DEvICES If you use any other personal medical device, consult the manufacturer o your device to determine if they are adequately shielded from external RF energy. Your physician may be able to assist you in obtaining this information.
SAFETY AIRCRAFT FCC regulations prohibit using your STX-2 while in the air. Turn your phone OFF before boarding an aircraft. Always request and obtain prior consent and approval of an authorized airline representative before using your phone aboard an aircraft. Always follow the instructions of the airline representative whenever using your phone aboard an aircraft, t prevent any possible interference with airborne electronic equipment.
SAFETY SAFETY INFORMATION FOR FCC RF EXPOSURE Warning! Read this information before using your STX-2. In August 1996 the Federal Communications Commission (FCC) of the United States with its action in Report and Order FCC 96-326 adopted an updated safety standard for human exposure to radio frequency electromagnetic energy emitted by FCC regulated transmitters. Those guidelines are consistent with the safety standard previously set by both U.S. and international standards bodies.
SAFETY SAR INFORMATION THIS MODEL PHONE MEETS THE GOvERNMENT’S REQUIREMENTS FOR EXPOSURE TO RADIO WAvES. Your wireless phone is a radio transmitter and receiver. It is designed and manufactured not to exceed the emission limits for exposure to radiofrequency (RF) energy set by the Federal Communications Commission of the U.S. Government. These limits are part of comprehensive guidelines and establish permitted levels of RF energy for the general population.
SAFETY The tests are performed in positions and locations (e.g., at the ear and worn on the body) as required by the FCC for each model. The highest SAR value (GSM850) for this model phone when tested for use at the ear is 0.468 W/kg and when worn on the body, as described in this user guide, is 1.18W/kg.(Body-worn measurements differ among phone models, depending upon available accessories and FCC requirements).
SAFETY FDA CONSUMER UPDATE U.S. Food and Drug Administration Cell Phone Facts Consumer Information on Wireless Phones 1. What kinds of phones are the subject of this update? The term “wireless phone“ refers here to handheld wireless phones with built-in antennas, often called “cell,“ “mobile,“ or “PCS“ phones. These types of wireless phones can expose the user to measurable radiofrequency energy (RF) because of the short distance between the phone and the user’s head.
SAFETY Many studies of low level RF exposures have not found any biological effects. Some studies have suggested that some biological effects may occur, but such findings have not been confirmed by additional research. In some cases, other researchers have had difficulty in reproducing those studies, or in determining the reasons for inconsistent results. 3 .
SAFETY • National Institute for Occupational Safety and Health • Environmental Protection Agency • Federal Communications Commission • Occupational Safety and Health Administration • National Telecommunications and Information Administration The National Institutes of Health participates in some interagency working group activities, as well. FDA shares regulatory responsibilities for wireless phones with the Federal Communications Commission (FCC).
SAFETY However, many of the studies that showed increased tumor development used animals that had been genetically engineered or treated with cancer-causing chemicals so as to be pre-disposed to develop cancer in the absence of RF exposure.Other studies exposed the animals to RF for up to 22 hours per day. These conditions are not similar to the conditions under which people use wireless phones, so we don’t know with certainty what the results of such studies mean for human health.
SAFETY The interpretation of epidemiological studies is hampered by difficulties in measuring actual RF exposure during day-to-day use of wireless phones. Many factors affect this measurement, such as the angle at which the phone is held, or which model of phone is used. 6. What is FDA doing to find out more about the possible health effects of wireless phone RF? FDA is working with the U.S.
SAFETY 7. What steps can I take to reduce my exposure to radiofrequency energy from my wireless phone? If there is a risk from these products--and at this point we do not know that there is--it is probably very small. But if you are concerned about avoiding even potential risks, you can take a few simple steps to minimize your exposure to radiofrequency energy (RF).
SAFETY For example, the government in the United Kingdom distributed leaflets containing such a recommendation in December 2000. They noted that no evidence exists that using a wireless phone causes brain tumors or other ill effects. Their recommendation to limit wireless phone use by children was strictly precautionary: it was not based on scientific evidence that any health hazard exists. 9.
SAFETY Studies have shown that these products generally do not work as advertised. Unlike “hand-free“ kits, these so-called “shields“ may interfere with proper operation of the phone. The phone may be forced to boost its power to compensate, leading to an increase in RF absorption. In February 2002, the Federal trade Commission (FTC) charged two companies that sold devices that claimed to protect wireless phone users from radiation with making false and unsubstantiated claims.
SAFETY FDA continues to monitor the use of wireless phones for possible interactions with other medical devices. Should harmful interference be found to occur, FDA will conduct testing to assess the interference and work to resolve the problem. Updated July 29, 2003 For more information, please visit the FDA website at http://www.fda. gov/cellphones. EMERGENCY CALLS Never rely solely upon your wireless phone for essential communications (e.g.
SAFETY Generally, the rules require that carriers identify an E911 caller’s location within 50 meters of the actual location for 67 percent of calls and within 150 meters of the actual location for 95 percent of calls. STX-2’s ALI Capability The STX-2 is an ALI-capable phone equipped with a GPS (Global Positioning System) receiver supporting a satellite-based GPS ALIcapable network to comply with the FCC’s ALI requirements.
SAFETY To call “911“ in “Phone Lock“ or “Restrict“ mode. 1. In Idle mode, tap Call icon, tap “9 Key“, “1 Key“, “1 Key“. 2. Tap Call or the SEND Key. “911“ and “Emergency“ will appear on the screen. COMPLIANCE WITH OTHER FCC REGULATIONS OPERATING PROCEDURES Never violate any of the following Rules and Regulations of the FCC when using your Cellular Phone. Such violations are punishable by fine, imprisonment or both. • Never use obscene, indecent, or profane language.
SAFETY GENERAL SAFETY PRECAUTIONS Your Handheld Portable Telephone is a high quality piece of equipment. Before operating, read all instructions and cautionary markings on the product, battery and adapter/charger. Failure to follow the directions below could result in serious bodily injury and/or property damage due to battery liquid leakage, fire or rupture. • DO NOT use or store this equipment in a place where it will be exposed to high temperatures, such as near an open flame or heat-emitting equipment.
SAFETY ANTENNA ANTENNA SAFETY Use only the supplied or an approved replacement antenna. Unauthorize antennas, modifications, or attachments could impair call quality, damag the phone, or result in violation of FCC regulations. Please contact your local dealer for replacement antenna. Do not use the phone with a damaged antenna. If a damaged antenna comes into contact with the skin, a minor burn may result. Please contac your local dealer for replacement antenna.
SAFETY • Completely drain the battery before recharging. It may take one to four days to completely drain. • Store the discharged battery in a cool, dark, and dry place. • Purchase a new battery when its operating time gradually decreases after fully charging. • Properly dispose of the battery according to local regulations. DON’Ts • Don’t attempt to disassemble the battery – it is a sealed unit with no serviceable parts. • Don’t expose the battery terminals to any other metal object (e.g.
SAFETY ADAPTER/CHARGER CHARGER The charger designed by Personal Communications Devices for this unit requires the use of a standard 120 v AC power source for its operation. • Never attempt to disassemble or repair a charger. • Never use a charger if it has a damaged or worn power cord or plug. Always contact a Personal Communications Devices authorized service center, if repair or replacement is required. • Never alter the AC cord or plug on your charger.
SAFETY GAMES SEIZURES/BLACkOUTS Warning A very small percentage of individuals may experience epileptic seizures when exposed to certain light patterns or flashing lights. Exposure to certain patterns or backgrounds on a computer screen, or while playing video games, may induce an epileptic seizure in these individuals. Certain conditions may induce previously undetected epileptic symptoms even in persons who have no history of prior seizures or epilepsy.
SAFETY Repetitive Motion Injuries When you play games on your phone, you may experience occasional discomfort in your hands, arms, shoulders, neck, or other parts of your body. Follow these instructions to avoid problems such as tendonitis, carpal tunnel syndrome, or other musculoskeletal disorders: • Take a minimum 15-minute break every hour of game playing. • If your hands, wrists, or arms become tired or sore while playing, stop and rest for several hours before playing again.
SAFETY -ORDrop the phone off at a local collection center. For a list of collection centers, visit www.wirelessfoundation.org/CalltoProtect/dropoff.cfm Before returning any wireless device for recycling purposes, please remember to terminate your service on the device, clear the device of any stored information and remove the device’s SIM card, if it has one (please contact your wireless provider to find out if your device contains a SIM card and for assistance on how to remove it).
SAFETY If this equipment does cause harmful interference to radio or television reception, which can be determined by turning the equipment off and on, the user is encouraged to try to correct the interference by one or more of the following measures: - Reorient or relocate the receiving antenna. - Increase the separation between the equipment and receiver. - Connect the equipment into an outlet on a circuit different from that to which the receiver is connected.
WARRANTY MANUFACTURER’S WARRANTY 12 MONTH LIMITED WARRANTY Personal Communications Devices, LLC.
WARRANTY (f) Product damaged from external causes such as fire, flooding, dirt, sand, weather conditions, battery leakage, blown fuse, theft or improper usage of any electrical source. The Company disclaims liability for removal or reinstallation of the produc for geographic coverage, for inadequate signal reception by the antenna o for communications range or operation of the cellular system as a whole.
WARRANTY To obtain repairs or replacement within the terms of this Warranty, the product should be delivered with proof of Warranty coverage (e.g. dated bill of sale), the consumer’s return address, daytime phone number and/ or fax number and complete description of the problem, transportation prepaid, to the Company at the address shown below or to the place of purchase for repair or replacement processing.
WARRANTY Some states or provinces do not allow limitations on how long an implied warranty lasts or the exclusion or limitation of incidental or consequential damage so the above limitation or exclusions may not apply to you. This Warranty gives you specific legal rights, and you may also have other rights, which vary from state to state or province to province. IN USA: Personal Communications Devices, LLC. 555 Wireless Blvd. Hauppauge, NY 11788 (800) 229-1235 IN CANADA: PCD Communications Canada Ltd.