SE-02 User Manual 1 of 33
1 INTRODUCTION Congratulations and thank you for choosing the SE-02 phone. About This User Guide This user guide is carefully designed to help you learn about your phone’s features and operations quickly and effectively. NOTICE • We strongly recommend that you keep separate permanent written records of all important data. Data may be lost or altered in virtually any electronic memory product under certain circumstances.
T9® is a trademark and/or a registered trademark of Nuance Communications Inc. and/or its affiliates in the United States and/or other countries. T9 Text Input is licensed under one or more of the following: U.S. Pat. Nos. 5,187,480, 5,818,437, 5,945,928, 5,953,541, 6,011,554, 6,286,064, 6,307,548, 6,307,549, and 6,636,162, 6,646,573, 6,970,599; Australia Pat. Nos. 727539, 746674, 747901; Austria Pat. Nos.AT225534, AT221222; Brazil P.I. No. 9609807-4; Canada Pat. Nos.
microSD Logo and microSDHC Logo are trademarks of SD-3C, LLC. This product is licensed under the MPEG-4 Visual Patent Portfolio License for the personal and non-commercial use of a consumer to (i) encode video in compliance with the MPEG-4 Video Standard (“MPEG-4 Video”) and/or (ii) decode MPEG-4 Video that was encoded by a consumer engaged in a personal and non-commercial activity and/or was obtained from a licensed video provider. No license is granted or implied for any other use.
• A WAP browser for accessing information on the wireless internet. • Java™ applications. You can also download various applications via the mobile Internet. • A melody editing function for creating original ringtones using up to 10 voices. • A sound recorder function for recording and playing back sound clips. • A Bluetooth® wireless technology interface for establishing contact and transmitting data with certain devices.
Table of Contents 1 INTRODUCTION……………………………….…2 19 TROUBLESHOOTING…………………………….30 2 YOUR PHONE…………………………………….7 20 SAFETY PRECAUTIONS AND 3 GETTING STARTED……………………………..8 CONDITIONS OF USE……..…………………….31 4 HOME SCREEN………………………………….11 21 OUT OF WARRANTY LIST……………………..36 5 USING MAIN MENU……………………………..12 6 CALL FUNCTION………………………………..14 7 ENTERING CHARACTERS…………………….14 8 CALL MANAGER………………………………..15 9 CAMERA………………………………………….17 10 MESSAGE………………………………………18 11 SERVICES………………………………………20 12 GALLERY……………………………………….
2 YOUR PHONE Please make sure that all of the following items are included in your package: • GSM/GPRS/EDGE phone • Rechargeable Li-ion battery • AC Adapter • Stereo Headset • User Manual • Warranty Card • 1G Micro SD memory card • Stylus with lanyard • USB Data Cable 7 of 33
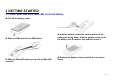
3 GETTING STARTED 3.1 Insert your SIM card, MicroSD card and battery n Pull off the battery cover. Micro SD memory card o Slide the SIM card into the SIM holder. q Hold the battery so that the metal contacts of the battery are facing down, slide the guides on the top of the battery into the battery slot and then insert it. SIM Card p Slide the MicroSD memory card into the MicroSD card slot. r Replace the battery cover and slide it in as shown below.
Note • Make sure that only 3V SIM cards are used. • Make sure that the standard accessory battery is used. 3.2 Remove your SIM card, MicroSD memory card and battery n Pull off the battery cover. *When changing the MicroSD memory card, first make sure that the phone has been turned off and then change out the card. If the MicroSD memory card is changed while the phone is still turned on, the data stored on the card may be destroyed or become unreadable. p Slide the SIM card out.
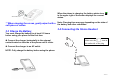
MicroSD Card When the phone is charging, the battery status icon in the upper right of the screen displays the current status. Note: Charging time may vary depending on the state of ** When cleaning the screen, gently wipe it with a the battery and other conditions. soft piece of cotton. 3.3 Charge the Battery 3.4 Connecting the Stereo Headset You must charge the battery for at least 2.5 hours before using your phone for the first time.
4 HOME SCREEN 4.1 Widgets The following widgets can be added to the Home Screen, Clock, Calendar, Event inbox, Signal indicator, User profiles, Memo, Radio, Alarm, Date, TV, Screen saver toys, Music Play List, Pictures and Video Gallery. n To open a widget list, pull out or tap the arrow on the left side of the idle screen. o Scroll and select the widget and drag it anywhere on the screen. p The white dots at the bottom right of the screen show that the home screen extends beyond what you see.
5 USING THE MAIN MENU 5.1 Access the Main Menu n On the home screen, tap to open the Main Menu. o Tap any of the onscreen menu buttons. p You can tap Next/Enter Key / Back/Exit Key to move to the next/previous screen. You also can press the Back/End Key to return to the home screen at any time. 5.2 Status indicators Status indicators show at the top of the screen.
5.3 Menu Function 1. Games 1. Java 2. Java settings 3. Java network 4. Games 5. Motion games 2. Services 1. SIM Application tool* 2. Internet service 3. Opera Mini™ 4. License manager 3. Digital TV 1. TV 2. Recorded Files 3. Settings 4. Camera 1. Switch to Still camera/Video camera 2. Miscellaneous settings 5. Message 1. 2. 3. 4. 5. 6. 7. 8. 9. 10. Write message Inbox Drafts Outbox Sent messages Delete messages Email Broadcast message Templates Message settings 6. Gallery 1. 2. 8. Call manager 1. 2.
6 CALL FUNCTION 6.1 Make calls n On the home screen, tap to open the onscreen dial keypad. o Enter a number and press the Call/Answer Key. . 6.2 Answer calls Press the Call/Answer Key vibrates. when your phone rings or Hold single call End single call New Call Phonebook Message Sound recorder Mute DTMF Note: This is the standard main menu layout. Your phone’s menu may be different. 6.3 End calls Press the End/Back Key y y y y y y y y . 6.
with your phone’s touch screen, you can enter text and create messages or notes. n When you open the text input field, an onscreen keypad appears at the bottom of the screen. o You can change the text input method by tapping Settings > Phone settings > Pref. input methods. Your phone provides many input methods. y Smart ABC/abc/Abc y ABC/abc/Abc y ES/es/Es y PT/pt/Pt y Numeric To delete letters, tap onscreen “back key” . To enter a space, tap onscreen “space key” .
o Press “OK” and “Yes”, when finished. Adding Pictures or Ringtones to Entries (only valid when storing a contact to the phone). Call manager > Add New Contact n Select the desired entry “Caller picture” & “Caller ringtone”. o Select one picture or ringtone. p Select “Options” and press “Done”, touch “Yes” in order to save the entry data. 8.5 Copying Phonebook Entries between SIM and Phone Call manager > Advanced > Copy contacts Select “SIM to phone” or “Phone to SIM”. 8.8.
Your phone has an integrated digital camera. This allows you to take and send pictures or video clips wherever you are. 9.1.1Taking Pictures You can using a shortcut on the screen or Scene Mode Exit Self-timer Camera > setting > Camera n Select “Camera” In “Switch to”. o Press Camera key to take the picture. Switch to Digital/Video The shutter sounds and the still image of the picture taken is displayed. Camera Zooming Brightness 9.1.
Camera > setting > Camera Select “Continuous shot” in “Capture mode”. 9.2 Video Camera Video clips are saved in “.3gp” format in the following two modes: 9.2.1 Recording Video Clips Select “Fine”, “Good” or “Normal” in “Video quality”. 9.2.4 Recording Video Clips with Sound Camera > setting > Misc. Select “On” or “Off” in “Record audio”. 10 MESSAGE Camera > You can use a shortcut on the screen or Your phone allows you to send and receive text (SMS), Multimedia (MMS) and email messages .
oTo insert a picture, sound, video or subject, tap Options. p When you finish the message, tap Options > Send to. You can enter one or more recipients or choose from your phonebook. 10.2 Receive & read a SMS/MMS message When you receive a message, your phone plays an alert at the top of the and shows a message indicator screen. You can read the message from using notification on the screen, or you can also read all received messages in your inbox by tapping > Inbox. Main Menu > Message 10.
n Highlight the file you wish to use as a ringtone. o Press [Options] > Use as > User profiles. p Select “OK”. 12.2 Photos Pictures that are taken by your camera phone or images can be viewed, edited and organized. 12.2.1 Viewing Pictures Gallery > Phone (or Memory card) > Picture Gallery Select the file you wish to view. The selected picture will be displayed. 12.2.2 Using Images as Wallpaper Gallery > Phone (or Memory card) > Picture Gallery The list of pictures will display.
Enjoy games and Java Applications by tapping open the Main Menu, then tap to Icons Previous Channel Move up to the previous channel Next Channel Move down to the next channel Capture Capture the onscreen image 13.2 Java settings Record Record the onscreen video You can change audio, backlight and vibration settings for your Java game. Settings Set options such as Favorite Setting Audio Language, Channel Scan, Storage Location etc. 13.
n On the home screen, tap to open the Main Menu, then tap Multimedia > Media player > My playlists > Options > New. o Enter a name for the playlist, then tap Options > Done. p Tap the playlist you want to edit, then tap Options > Add to add music or video files from your phone or memory card. 15.1.2 Play a playlist In My Playlists, tap the playlist you want to play, then tap one of the music or video files. 15.1.
If you receive a call while playing music, the music pauses automatically. You can answer or reject the call and send the caller to voicemail. Playing will resume when you end the call. 16.1 Calendar Calendar allows you to easily schedule appointments or events at any given date or time. 15.2 FM Radio Listen to your favorite channels. n Plug a wired headset into your phone. Note: The FM radio works only when the headset is plugged in.
date and time before setting the alarm function if it has not been done already. 16.3.1 Setting the Alarm Main Menu > Organizer > Notes n Press “Add” to start taking notes. o When finished, select “Option” and press “Done”. Main Menu > Organizer > Alarm n Select an available setting. o Enter the desired time. p Press “Done” and touch “Yes” in order to save the entry data 16.6 Calculator The calculator function performs the 4 arithmetic calculations using up to 12 digits. 16.4 World clock 16.4.
16.7 Currency converter You can also use the currency converter to convert from/to a home currency using a conversion rate that you enter. Main Menu > Organizer > Currency converter n Enter “Exchange Rate” and press “OK”. o Enter local currency amount to be exchanged and press ”OK”. To delete all digits, press [Clear]. 16.8 Ebook reader This function allows you to view E-Book files (XMDF or Text files) stored on a memory card. Organizer > Ebook reader Select the desired file and you can read the text file.
o Select a profile and tap Options> Customize to set the desired ring tones and alert types. y Tone settings: Set the ring tones of incoming calls and messages. You can also select different types of ring tones for power on/off. y Volume: Adjust the volume of ring tones and key tones. y Alert type: Select an alert type (Ring only, Vib. only, Vibrate and Ring, Vibrate then ring). y Ring type: Select a ring type (Single, Repeat, Ascending).
In order to use the Bluetooth wireless function, you must search for other Bluetooth enabled devices, then establish a connection. You should be within 10 meters of the other device before searching. 18.1.1 Use the Bluetooth Wireless Function Connectivity > Bluetooth > Power Select “On” or “Off”. When “On” is selected, the Bluetooth wireless setting is activated, and is displayed in the top-left corner of the screen. q Transfer files to your desired folder in phone memory and memory card.
20 SAFETY PRECAUTIONS AND CONDITIONS OF USE Your phone conforms to international regulations insofar as it is used under normal conditions and in accordance with the following instructions. 20.1 Conditions of Use Electromagnetic waves • Do not switch on your phone aboard an aircraft (as your phone may interfere with the aircraft’s electronic systems). Current legislation forbids this use and legal action can be taken against the user. • Do not switch on your phone in a hospital, except in designated areas.
• Network configuration and phone usage will affect talk-time and stand-by time. • Using the camera or playing games will hasten battery consumption. • When the battery charging alert is displayed on the screen, charge the battery as soon as possible. If you continue using your phone ignoring the alert, the phone may cease to function, and all data and settings you have stored may be lost at any moment. • Before removing the battery from the phone, make sure the phone is switched off.
battery disposal: • Take the used battery to your local waste depot, dealer or customer service centre for recycling. • Do not expose the used battery to an open flame, into water or dispose with the household waste. 20.4 AC Adapter • Do not unplug the AC Adapter with wet hands. Doing so may cause electric shock. • Do not place containers with liquids on or next to the AC Adapter or main unit.
oils, etc. on the lens cover hinder clear focusing. Wipe them off with a soft cloth before taking a picture. 20.7 Others • As with any electronic storage unit, data may be lost or corrupted under various circumstances. • Before connecting the phone to a PC or a peripheral unit, read the operation manual for the other unit carefully. • If the phone’s battery has been removed for some time, or if the phone has been reset, the unit’s clock and calendar may be reinitialized.
and tested so as not to exceed the limits for exposure to electromagnetic fields as required by the FCC. These limits are part of comprehensive guidelines developed by independent scientific organizations. The guidelines include a substantial safety margin designed to assure the safety of the phone user and others and to take into account variations in age and health, individual sensitivities and environmental conditions.
accordance with the instructions, may cause harmful interference to radio communications. However, there is no guarantee that interference will not occur in a particular installation. If this equipment does cause harmful interference to radio or television reception which can be determined by turning the equipment off and on, the user is encouraged to try to correct the interference by one or more of the following measures: -- Reorient or relocate the receiving antenna.