ADS1 Conventions used in this guide Thank you for choosing ADS1, our latest 3G mobile phone. ADS1 has many features designed to enhance your mobile experience. From its unique, stylish design and Best-in-class QWERTY keypad, 3.2” HVGA LCD with Touch Screen, Android OS 2.2(Froyo), Wi-Fi, we know you will enjoy the entire ADS1 experience with. This User Guide contains important and useful information that will maximize your familiarity with all that ADS1 has to offer.
Conventions used in this guide In this user guide, we use the following symbols to indicate useful and important information: NOTE NOTE Notes, usage tips or additional information. Warning Situations that could cause injury to yourself or others. Caution Situations that could cause damage to your device or other equipment. AT&T LEGAL Devices purchased for use on AT&T’s system are designed for use exclusively on AT&T’s system.
Contents Specifications ................................................................................................................................ 6 Basics ............................................................................................................................................. 7 In Box .......................................................................................................................................................................................
Account Setting ......................................................................................................................................................................49 Groups ....................................................................................................................................................................................50 Messaging ..............................................................................................................................
Live TV ..................................................................................................................................................................................107 AT&T myWireless Mobile ......................................................................................................................................................108 AT&T Code Scanner................................................................................................................................
Specifications Design Android Quick Messaging Device with Touch & QWERTY Displays 3.2” HVGA (480*320) Melodies AAC, AMR, MIDI, SP-MIDI, MP3, WAV(8bit/16bit PCM), MP4 Camera 3MP AF Dimensions & Weight ħDimensions : 120 x 59.9 x 13.
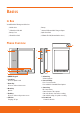
Basics In Box You will find the followings inside the box: ħMobile device ħUSB to Micro USB cable ħBattery ħUniversal USB standard AC charger adaptor ħBattery Cover ħCD with User Guide ħQuick Start Guide ħ2GB microSD Card (Mounted in the device) Phone Overview 10 1 U S B 6 8 + 7 - Qwerty 2 3 4 5 9 Menu Home Back Search Menu Home Back Search 1. QWERTY keypad 7. Volume key Volume up/down 2. Search key All screen : Quick Search 8.
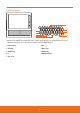
Menu Home Back Search QWERTY mode view 6 Q W Qwerty A 1 2 3 4 5 Fn E S Z R D X Shift Sym T F C @ Y G V B , I U H M N . O K J P Delete L ؿ ረ Return ف 7 8 ሪ 9 Your phone has a QWERTY keypad which provides a superior typing experience on a small handheld for easy and comfortable texting. You can use all of the phone functions with the QWERTY keypad. 1. Function key 6. A-Z 2. Shift key 7. Delete key 3. Symbol key 8. Return key 4. @ 9. Navigation keys 5.
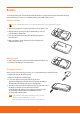
Battery To extend your battery’s life, do not browsing web frequently. Also poor signal area and extreme temperature discharge battery easily. If not necessary, it is recommended that you turn off Wi-Fi, Bluetooth, etc. Battery installation Please use only original batteries and accessories that came with your phone or replacements that we recommend. 1. Make sure that your device is turned off, and then remove the battery cover. 2.
SIM Card The SIM card contains your phone number, service details, and phonebook/message memory. Inserting SIM card 1. Make sure that your device is turned off, and then remove the battery cover. 2. Lift the battery out of the device. 3. Locate the SIM card slot, then insert the SIM card with its gold contacts facing down and its cut-off corner facing out the card slot. 4. Slide the SIM card completely into the slot. 5. Replace the battery and battery cover. NOTE t Only AT&T SIM card can work on ADS1.
microSD Card Use the microSD card to store your photos, videos, and music. You can save, move and delete the files between your device and the external memory card. You can also move and copy the files to computer from your device. Inserting the microSD card 1. Remove the battery cover. 2. Locate the microSD card slot. 3. Insert the microSD card into the slot with its gold contacts facing down until it clicks into the place. 4. Replace the battery cover. Removing the microSD card 1.
Turning the Phone On or Off Turning your phone on 1. Press Power/Lock. NOTE When you turn on the phone for the first time, you’ll need to set it up. See the Getting Started chapter for details. Turning your phone off 1. If the display is off, press any button to turn it back on. 2. Press and hold Power/Lock for a few seconds. 3. When Phone options menu appears, tap Power off > OK. Phone Options Silent mode 1. Press and hold 2. Tap Power/Lock. Silent mode.
Finger Gestures Tap Tap and hold Swipe or slide Drag Flick Rotate To select onscreen items such as application and settings icons or press onscreen buttons, simply tap them with your finger. To open available options for the item, simply tap and hold the item. Quickly drag your finger vertically or horizontally across the screen. Tap and hold your finger with some pressure before you start to drag. While dragging, do not release your finger until you have reached to the target position.
Keyboard Using the Onscreen Keyboard You enter text using the onscreen keyboard. Some applications open the keyboard automatically. In others, you tap the text field where you want to enter text to open the keyboard. You can choose the keyboard which suits your typing style among two different keyboard layouts. Android keyboard This layout is similar to a desktop computer keyboard. This is the default keyboard layout. Swype Swype lets you enter a word with one continuous motion.
2. Tap the keys on the keyboard to type. The characters you’ve entered appear in a strip above the keyboard with suggestions for the word you are typing to the ħ right. Tap a suggested word to enter it. 4. Use the to erase characters to the left of the cursor. Back to close the keyboard. 5. When you’ve finished typing, press To enter numbers, symbols, and other characters To switch to the numeric and symbol keyboard. Tap To view additional symbols, tap it again to switch back.
ħYou can also tap and hold 3.Tap Voice input. on the onscreen keyboard. In the dialog that opens, tap Android keyboard settings. 4. Tap the option for where you want to use (On main keyboard or On symbols keyboard). Or tap Off to turn off voice input. Entering text by speaking You can enter text by speaking, in most places that you can enter text with the Android keyboard. 1. Tap a text field. 2.Tap the on the keyboard. Or just swipe your finger across the keyboard from left to right. 3.
Using the Swype Keyboard Enter text using the Swype keyboard Swype lets you enter a word with one continuous motion. To enter a word, just drag your finger over the letters of the word. 1. Place your finger on the key with the first letter of the word and drag your finger to the following letters without releasing the finger from the screen. 2. Continue until you have finished the word. lift your finger on the last letter. 3.
ħ 123... : To enter characters on the upper half of the key, tap and hold the key. When the character list appears, you can enter special characters, symbols, and numbers. Or, tap SYM to enter several symbols. ħ I’ll: To enter apostrophes in common words, drag through the n as though it was an apostrophe. ħIf Swype doesn’t know the word, you can tap the letter keys to enter it.
Using the QWERTY keypad Your device has a specifically designed QWERTY keypad that provides a superior typing experience on this small handheld device for easy and comfortable input. You can use all of the phone functions with the QWERTY keypad. When you open the keypad, you have the extra benefit of a full messaging keypad. 6 Q W A 1 2 3 4 5 Fn E S Z R D X Shift Sym T F C @ Y G V H B , I U K J M N . O P Delete L ؿ ረ Return ف 7 8 ሪ 9 1.
Editing Text You can select, copy, or cut the text you’ve entered, then paste it in another text field within or across applications. NOTE Some applications may offer their own way of selecting or copying text. Selecting text You select text that you want to cut or copy. 1. Tap the text field of the screen that contains the text to select. 2. Use the navigation keys on QWERTY keypad to move the cursor to the beginning or end of the text to select.
Getting started Google Account You must sign into a Google Account to use Gmail, Google Talk, Google Calendar, and other Google Apps; to download applications from Android Market, to back up your settings to Google servers and to take advantage of other Google services on your phone. Registering the account if you initially use the phone 1. Tap the android to begin. 2. Tap Begin after you are prompted to know about how to use your mobile phone. If you want to ignore it, tap Skip. 3.
Registering the account if you initially use Google’s services If you don’t register a Google Account, you are prompted to sign in or to create a Google Account the first time you start an application that requires one, such as Gmail or Market. 1. Tap Sign in to register your Google account. ħ If you don’t have a Google account, tap Create. And then you can create a new one. 2. Enter your Google Account Username and Password > Tap Sign in. Creating a new Google account 1.
Getting to know the Home screen When the device is in idle mode, you will see the home screen. You can add your favorite apps, shortcuts, folders and widgets so they’re always just taps away. You can use up to seven extra screens. Slide your finger horizontally to the left or right and you’ll discover more space for Home to return to the main Home screen (that is, the center home screen). adding icons, widgets, and more. Press Previewing the Home screen 1. From the Home Screen, tap and hold Apps. 2.
Third Icon Menu You can set and use three applications at most on the third icon from the left among four Dock menu, which are at the bottom of the Home Screen. Using the Third icon menu 1. Swipe the third icon of the Home screen’s Dock menu lightly up/down/left/right. ħYou can check the icons of applications has been configured. 2. Tap the icon of the application you want to run. You will be also able to see which application has been configured by holding down on the icon. 1.
Customizing the Home Screen You can add Home screen menu, Shortcuts, Widgets, Folders and Wallpapers to any part of the Home screen. You can also change the wallpaper. Adding an item to the Home screen 1. Open the Home screen where you want to add the item. 2. Press Menu > Add. Or just tap and hold an empty location on the Home screen. 3. In the menu that opens, tap the type of the item to add.
Renaming a folder 1. Tap the folder to open it. 2. Tap and hold the title bar of the folder window. 3. Enter a new name in the dialog box that appears, and then tap OK. Essential Display Indications Status icons You can tell a lot about your phone by checking the icons in its status bar.
Notification icons Notification icons on the status bar make it easy for you to keep on top of your messages, calendar events and alarms.
Notifications Panel When you get a new notification, you can open the Notifications panel to see the message, reminder or event notification. Opening the Notifications panel 1. Tap and hold the status bar, and then slide your finger downward to open the Notifications panel. If you get several notifications, you can scroll down the screen to see them all. Responding to a notification 1. Open the Notifications panel. 2. Your current notifications are listed in the panel.
Opening and Switching Applications The Launcher, which you open from the Home screen, holds icons for all of the applications on your phone, including any applications that you downloaded and installed from Android Market or other sources. Opening and closing the Launcher 1. From the Home screen, tap 2. Press Home or Apps. Back to close the Launcher. Switching to a recently used application 1. From the Home screen, press and hold Home. 2. Tap the icon to open its application. 3.
Sleep mode Sleep mode saves battery power by putting your phone into a low power state while the display is off. You’ll still receive messages and calls though. Switching to Sleep mode Press Power/Lock to turn off the display and switch your phone to Sleep mode. Or, your phone is automatically switched to Sleep mode if you don’t use it for a while. To set screen timeout, from the Home Display > Screen timeout.
Adjusting the Volume Adjusting the ringer volume changes the volume level of the phone ringtone, while adjusting the media volume changes the volume level of sound notifications and music or video playback. Adjusting the ringer volume From the Home screen, press volume to your desired level. Volume up or Volume down on the left panel of the phone to adjust the ringer While in the lowest ringer volume level, press Volume down once to set your phone to Silent mode.
Searching Your Phone and the Web You can find all types of information on your phone and the Web. Search anywhere to sift through different files, information, and apps on your phone. You can also choose to search the Web using your favorite web search service. 1. Press Search. Or tap Apps > Google Search. 2. Start entering what you want to search for, or tap a previously chosen search result.
Connecting Your Phone to a Computer 1. Connect your phone to your computer using the supplied USB cable. ħCharge : Select this option if you only want to charge the battery while your phone is connected to your computer. ħUSB Mass storage : This mode is available only when a microSD card is inserted into the slot of your phone. Select this mode when you want to copy files between your phone’s microSD card and your computer.
Phone Calls Making Calls You can either dial the number directly, or call a stored contact or a phone number from your call log, Contacts or Groups. NOTE Most SIM cards come with a PIN (personal identification number) set by your mobile operator. If you’re asked for a PIN, Enter it and then Tap OK. Your phone’s antenna is placed underneath the bottom cover. Making a call on the Phone dialer screen 1. From the Home screen, tap Phone . 2. Tap the number you wish to dial. to erase a single character.
Making a call from the Call log Your phone logs received and missed call numbers. 1. From the Home screen, tap Phone > Call log. Or tap 2. Tap at the right of the entry or select a contact > tap Apps > Contacts > Call log. . ħIf you want to edit a number before calling, tap and hold the desired number, and then tap Edit number before call. ħCalls are listed with the most recent at the top. ħCalls exchanged sequentially with the same number are grouped. ħScroll to view earlier entries in the log. 3.
Answering or rejecting calls When you receive a phone call, the Incoming call screen displays the caller ID icon, name, and phone number. When you receive a phone call from someone who is not stored in your Contacts, only the default caller ID icon and phone number appear on the Incoming call screen. All incoming calls are recorded in the Call log. If you miss a call, you receive a notification. Answering or rejecting an incoming call 1. Drag the icon to the right to answer the call.
Using In-call Options When a call is in progress, there are several options available by tapping a corresponding item. Hold You can place the current call on hold at any point during a conversation. . Tap Unhold to resume the call. When you put a call on hold, the status bar displays the Bluetooth When a Bluetooth headset is paired and connected to your phone, you can conduct all calls on the headset for hands-free conversation.
Managing Multiple Calls With a conference or multiparty call, you can have a joint conversation with two or more persons. Switching Between Calls When you have an active call and a call on hold, you may switch between the two calls by changing locations with each other. 1. From the Home screen, tap Phone. 2. Dial the number to the first participant and tap . 3. During the call, tap Add call. 4. Dial the number to the second participant and tap . 5.
Using the Call log The phone stores the numbers of the calls you have dialed, received, or missed in the Call log. The Call log displays the details of the call. Opening the Call log 1. From the Home screen, tap Phone > Call log. Or tap Apps > Contacts > Call log. Calls are listed with the most recent at the top. Calls exchanged sequentially with the same number are grouped. Scroll ħ to view earlier entries in the log.
Sending a text message in the Call log 1. From the Home screen, tap Phone > Call log. 2. Tap and hold the contact > Send text message. 3. Enter your message and tap Send. Clearing the Call log 1. From the Home screen, tap 2. Press Menu > Phone > Call log. Clear call log. To remove just one entry from the Call log, tap and hold the entry. In the menu that opens, tap Remove from call log .
Listening to your voicemail When you have a new voicemail message, you can get to know it by the text message. And appears in the Status bar. If you have not set up your voicemail number, or if you need to change it, you can do that with the Call settings. Entering your voicemail number 1. From the Home screen, tap 2. Tap Apps > Settings. Or press Menu > Settings. Call settings > Voicemail settings > Voicemail number. 3. Enter your voicemail number > OK. Calling your voicemail service 1.
Contacts About Contacts Contacts give you quick and easy access to the people you want to reach. When you first turn on your phone and sign into your AT&T Address Book Account, any existing AT&T Address Book contacts are downloaded to your phone. Contacts from Google accounts are also downloaded and synced in this way. You can manage your communications with your contacts via phone, messaging, and email without the need to jump from one app to another.
Adding a new contact 1. From the Home screen, tap 2. Press Menu > Apps > Contacts. New contact. 3. If you have more than one account, tap the account you want to register > Enter the information for the contact. ħTap > Select Take photo or Select photo from Gallery to add a picture.
Importing contacts from your SD card 1. From the Home screen, tap 2. Press Menu > Apps > Contacts. Import/Export. 3. Tap Import from SD card. 4. If you have more than one account on your phone, tap the account to import its contacts into the phone the contacts. 5. Tap the option to Import one vCard file, Import multiple vCard files, or Import all vCard files on the SD card. The contacts are imported.
Viewing details about a Contact 1. From the Home screen, tap Apps > Contacts. 2. Tap the contact whose details you want to view. 3. Tap the communication method to start dialing, texting, or emailing the contact by using the listed phone numbers, addresses, and so on. 1 2 3 4 5 6 7 1 2 3 4 5 6 7 Tap to open Quick Contact. Add to favorites : Tap the star. the star turns gold. To remove a contact from your favorites list, tap the gold star to the right of the contact’s name again.
Adding ICE Contacts 1. From the Home screen, tap 2. Tap Groups > ICE. 3. Press Menu > Apps > New contacts, Contacts. Select contacts or Send message. ħ New Contact : Enter the information for the contact. ħ Select Contacts : Check on a desired checkbox from the contacts list. ħ Send message : Send message to the selected contacts(select Message or Email). 3. Tap Done. ħOn the ICE screen, you can see an added Contact. Editing/ Deleting Contacts Editing contact 1.
Setting a ringtone for a contact 1. From the Home screen, tap Apps > Contacts. 2. Tap the contact that you want to set a ringtone for. 3. Press Menu > Options > Ringtone. ħIn the scrolling ringtones list that opens, tap one to play when the contact calls. The ringtone plays a sample. 4. Tap OK. Adding a contact to your favorites 1. From the Home screen, tap Apps > Contacts. 2. Tap and hold contact you want to add to the favorites > Add to favorites.
Communicating Sending Text Message 1. From the Home screen, tap Apps > Contacts. 2. Tap and hold the contact you want to send > Text contact. 3. Open Message Composer and use Primary Number. Making a Call 1. From the Home screen, tap Apps > Contacts. 2. Tap and hold the contact you want to call > Call contact. 3. Open Calling Application and dial Primary Number. Map of Contacts 1. From the Home screen, tap Apps > Contacts. 2. Tap the desired contact > Tap the place icon 3.
Account Setting Interworking with Google/AT&T Address Book accounts 1. From the Home screen, tap 2. Press Menu > Apps > Contacts. More > Accounts. ħOnce a Google/AT&T account is registered, the address book in the Google/AT&T account is downloaded to the phone. At this time, the address book of the phone gets synchronized with the online address book in your Google/AT&T account. The address book of the phone will be shared in all menus that can be used with Google/AT&T accounts.
Groups Assign contacts to groups so that you can easily send a message or email to a whole group. You can also sync groups on your phone with the groups in your Google account, accessible via the web browser of your computer. Viewing contact groups 1. From the Home screen, tap 2. Tap Apps > Contacts. Groups > Tap the Group you want to view. ħ‘Favorites’ is always shown at top of groups list.
Sending a message to a group NOTE You will be charged by your mobile provider for each message sent. For example, if you send a message to a group of five people, you will be charged for five messages. 1. From the Home screen, tap 2. Tap Apps > Contacts. Groups. 3. Tap the group you want to send a message > Press Menu > Send message. Or, tap and hold group you want to send a message > Send message. 4. Select Message or Email. When the list is shown, all contacts are unselected in default settings.
Messaging About Messaging You can use Messaging to exchange text messages (SMS) and multimedia messages (MMS) with your friends on mobile phones. 1. From the Home screen, tap Messaging. Or tap Apps > Messaging. On the All messages screen, all your sent and received messages are neatly grouped into conversations, by contact names or phone numbers. You can: ħScroll up or down the list of conversations by swiping your finger on the screen. ħTap a contact name or number to view the exchange of messages.
NOTE Your text message automatically becomes a multimedia message when you enter receiver’s email address, add a message subject, attach an item, or compose a very long message. Sending a multimedia message (MMS) To compose a multimedia message, start by creating a new text message. Then choose the type of attachment to include in your message. 1. From the Home screen, tap 2. Tap New message. Or press Messaging. Menu > Compose. 3. Enter the phone number in the To field. Fill in one or more recipients.
Reading a Message 1. From the Home screen, tap Messaging. 2. Tap the a message thread you want to read. 3. Tap and hold a message in a message window to see more options. Lock/Unlock message Forward Copy message text View message details Delete message Call *** Send message to *** To lock/unlock a message. To forward a message, enter a recipient and edit the content of the message if you want >Tap Send. To copy a message text To view details about a message. To delete message.
Changing Messaging Settings 1. From the Home screen, tap 2. Press Menu > Messaging. Settings. Storage settings Delete old messages Text message limit Multimedia message limit Check to delete older messages in a thread when the Text message limit or Multimedia message limit is reached. Uncheck to keep all messages. Tap to set the number of messages to save per thread of text messages. When the limit is reached, older messages are deleted if Delete old messages is checked.
Google Gmail Opening Gmail Inbox The Inbox is your default Gmail view. All your received emails are delivered to your Inbox. 1. From the Home screen, tap Apps > Gmail. Apps > Gmail. Reading your mail 1. From the Home screen, tap 2. In the Inbox or in another labeled list, tap a mail you want to read. ħTap to star the mail. If the sender is a friend in Google Talk, you can know your friend’s online status. ħ ħTap Archive to archive the message. ħTap Delete to delete the mail from your Inbox.
Working with mails in batches You can archive, delete or labeled a batch of mails at once, in your Inbox or in another labeled list of mails. 1. From the Home screen, tap Apps > 2. In the Inbox or in another labeled list, Gmail. check the mails you want to work on. Tap Archive to move them out of your Inbox without deleting. Archived mails are assigned the All Mail label. ħ ħTap Delete to delete selected mails. ħTap Labels > Select the labels that you want to assign > Tap OK.
Viewing mails by label 1. From the Home screen, tap Apps > 2. In the Inbox or in another labeled list, press Gmail. Menu > Go to labels. 3. Tap a label to view. You can view a list of the mails that have the same labels. Starring/unstarring a mail You can star an important mail to make it easy to find again. Starred mails are assigned the Starred labels. 1. From the Home screen, tap Apps > Gmail. 2. In the Inbox or in another labeled list, ħTap ħTap to star the mail. to unstar the mail.
Talk Talk is Google’s instant messaging program. It lets you communicate with other people who also use Google Talk, on a phone, on the web, or with a desktop application. Signing in or out of Talk Opening Talk and Signing in 1. From the Home screen, tap Apps > Talk. When you first open Talk, your Friends list is displayed. When you first turn on your phone and sign into your Google Account, you are already signed in to Google Talk.
Accepting chat invitations When a contact invites you to become a friend, you receive a notification and the Chat invitation appears in your Friends list. 1. From the Home screen, tap Apps > Talk. 2. On your Friends list, tap Chat invitation in the friends list. Tap Accept to accept the invitation. The friend is added to your friend list. ħ Tap Cancel if you don’t want to chat with and share your Talk status with the sender. ħ Tap Block to block the sender and add to the blocked friends list.
Switching between active chats You can switch between chats if you have more than one chat going. 1. When you’re chatting with friend, Menu > Switch chats > in the list of all active chats, tap the friend you want to chat with. ħPress ħSwipe left or right across the screen. Ending your current chat 1. From the Home screen, tap Apps > Talk. 2. When you’re chatting with friend, press Menu > End chat. Talk Settings 1. From the Home screen, tap Apps > 2.
Maps You use Maps to find current location and get directions to places you want to go to. You can search addresses, landmarks, places of business and place of interest directly on a street map or satellite image. NOTE You need an active mobile data or Wi-Fi connection to use Maps. In order to find your location on your phone, you need to enable location services. From the Home screen, tap Location & security. And select one or both of the Use wireless networks, Use GPS satellites.
Starring or unstarring a location You can star a location on a map, to bookmark places and be able to find them quickly later. 1. From the Home screen, tap Apps > Maps. 2. While viewing detail information for a location, ħTap ħTap to star the location. to unstar the location. Viewing starred places Once you star a place, you can easily find it again on the phone or the web. 1. From the Home screen, tap Apps > Maps. 2. ħStarred places will visible on the map in default settings.
Viewing map layers Initially, Google Maps opens with a street map. You can view additional map layers, such as satellite images, traffic information, your Google Latitude friends’ locations, and Wikipedia information on locations. You can also view maps that you and other people have created in Google Maps on the web. You can add multiple layers or remove only certain layers so you control exactly what information you want visible on the map at the same time. 1. From the Home screen, tap 2.
Places Use Places to find places of interest near your current location. NOTE You need an active mobile data or Wi-Fi connection to use Places. In order to find your location on your phone, you need to enable location services. From the Home screen, tap Location & security. And select one or both of the Use wireless networks, Use GPS satellites. Apps > Settings > Searching for a place 1. From the Home screen, tap Apps > Or, While viewing a map, tap . Places. 2.
Navigation Navigation is an internet-connected GPS navigation system with voice guidance. You can use Navigation to get turn-by-turn driving directions, both spoken and displayed on your screen. NOTE You need an active mobile data or Wi-Fi connection to use Navigation. In order to find your location on your phone, you need to enable location services. From the Home screen, tap Location & security. And select one or both of the Use wireless networks, Use GPS satellites.
Previewing your route You can preview each turn in your route in Navigation, Satellite, and other views. 1. From the Home screen, tap Apps > Navigation. 2. Tap the banner at the top of the screen. 3. Tap or to preview the next or previous segment of your route. When you preview a route, tap 4. Tap Pegman to switch to the street-level view of your route. In street-level view. to return to your current location and next turn direction.
Latitude Latitude allows you to share your location with friends and view their locations on a map. Your location is not shared automatically. You must join Latitude, and then invite your friends to view your location or accept their invitations. Only friends that you have explicitly invited or accepted can see your location. NOTE You need an active mobile data or Wi-Fi connection to use Latitude. In order to find your location on your phone, you need to enable location services.
Viewing friends’ locations and managing friends Viewing friends’ locations You can view your friends’ locations on a map or in a list. When you open Latitude, you can see a list of your Latitude friends, with a summary of their last known locations, ħ status, and so on. When you open Maps, your friends’ locations are shown. Each friend is represented by their picture from Contacts with ħ an arrow pointing to their approximate location.
Calendar Calendar on the phone works with the web-based Google Calendar calendaring service for creating and managing events, meetings, and appointments. It also works with the Microsoft Exchange ActiveSync calendaring service. Opening Calendar 1. From the Home screen, tap Apps > Calendar. Events from each calendar are displayed in a different color. For information about which calendars are displayed on your phone.
Changing calendar view When you open Calendar, the Month view is the default option. You can also display the Calendar in Agenda, Day, or Week view. 1. From the Home screen, tap Apps > Calendar. Menu > Choose the type of view that you want. 2. Press Day Week Month Agenda Displays a chart of the events of one day, in a table of one-hour rows. A red line indicates the current time. All-day and multiday events are displayed at the top.
Synchronizing and displaying calendars You can select which calendars to show or hide on your phone’s Calendar, and which ones to keep synchronized. 1. From the Home screen, tap 2. Press Menu > Apps > Calendar. More > Calendars. Calendars screen displays all the calendars you’ve added or subscribed to for each account that is configured to synchronize events to your phone, organized by account. (Calendars for accounts you’ve configured not to synchronize Calendar events are not included in the list.
News & Weather News & Weather offers weather forecasts and news stories about common topics. Viewing the weather information 1. From the Home screen, tap Apps > News & Weather. 2. Tap Weather at the top of the screen. Or swipe left across the screen to switch Weather view. 3. Tap the weather summary for a more detailed forecast. ħTap a time on the weather graph for a detailed, hour-by-hour forecast. ħTap the weather detail screen to return the weather summary.
Market Android Market provides direct access to applications and games to download and install on your phone. To access Market, you must first connect your phone to the Internet with Wi-Fi or data connection and sign in to your Google Account. Paid apps are currently only available in certain countries. When you open Android Market for the first time, you must read and accept the terms of service to continue.
Creating a Google Checkout account You must have a Google Checkout account associated with your Google Account to purchase items from Android Market. You can set one up the first time you purchase an item on Android Market, or ahead of time in a web browser. ħIn a web browser, go to http://checkout.google.com to establish a Google Checkout account.
YouTube YouTube is Google’s online video streaming service for viewing, discovering, and sharing videos. Opening and signing into YouTube Signing into YouTube You can discover and watch YouTube videos without a YouTube account, but if you want to comment on videos, add them to your Favorites, upload videos, or take advantage of many other YouTube features, you must sign into your YouTube account. 1. From the Home screen, tap 2. Press Apps > YouTube. Menu > My Channel.
Uploading video To shoot a new video and upload 1. From the Home screen, tap Apps > 2. Tap . Camera opens in video mode. 3. Tap or press YouTube. Camera to start recording > Tap or press Camera to stop recording. 4. Enter the title for the video and more details if you want > tap Upload. To upload an existing video 1. From the Home screen, tap 2. Press Apps > YouTube. Menu > Upload. Gallery opens, with albums of your videos. 3. Tap the video you want to upload. 4.
About Help Feedback Google Mobile Terms of Service Open the YouTube Help Center in Browser. Open a YouTube feedback form in Browser. Display the Google Mobile Terms of Service. YouTube Terms of Service Google Mobile Privacy Policy Display the YouTube Terms of Service. Display the Google Mobile Privacy Policy. YouTube Privacy Policy Application version Display the YouTube Privacy Policy. The version of the YouTube application installed on your phone.
Web Email You use the Email application to read and send email from services other than Gmail. Email includes a wizard that makes it easy to configure it for several popular email service providers. Email account To set up email 1. From the Home screen, tap Email. Or tap Apps > Email. 2. Enter the Email address and Password for your email account > Next. 3. Select POP3, IMAP or Exchange. ħIn registering an account, check if POP3/IMAP/Exchange functions are supported per email account server.
Reading an email You can read messages in your Combined Inbox or in the Inbox or other folders for individual accounts. 1. From the Home screen, tap Email. Menu to see more options ( ħPress 2. Tap an email you want to read. Refresh, Press Menu to see more options ( ħ to contacts). Delete, Compose, Forward, Folder, Reply, Accounts, Reply all, Account settings). Mark as unread, Add Replying to a message 1. From the Home screen, tap Email. 2. Tap an email you want to read. 3.
Inbox in Email Viewing your starred messages 1. From the Home screen, tap Menu > 2. Press Email. Accounts > Starred. Combined Inbox 1. From the Home screen, tap Menu > 2. Press Email. Accounts > Combined Inbox. ħTap the checkboxes of email messages > Select Mark read/ Mark unread, Add star/ Remove star or Delete. Resuming a draft email message 1. From the Home screen, tap 2. Press Menu > Email. Folders or Accounts > Drafts.
Email account settings 1. From the Home screen, tap 2. Press Menu > Account name Your name Signature Email check frequency Default account Email notifications Select ringtone Vibrate Incoming settings Outgoing settings 3. Press Email. Account settings. The name of the account as it appears in the Accounts and Folders screens. Your name as it appears to others when they receive email from you. You can enter a signature to append to the messages you send from this account.
Browser You can search for information and surf webpages on the internet. To access internet service, you must have an active data connection or Wi-Fi connection. Opening Browser 1. From the Home screen, tap Browser. Or tap Apps > Browser. ħWhen you open Browser, specified homepage is displayed. If you have used Browser recently, the last webpage you’ve opened is displayed. Select a link in a webpage to surf web pages.
Finding the text on the current page 1. On the Browser screen, 2. Press Menu > More > Find on page. Or press Menu + f at the same time. 3. Enter the search word. or As you type, matching characters will be highlighted. Tap ħ to scroll to the previous or next matching word. Selecting and copying the text from the webpage 1. On the Browser screen, 2. Press Menu > More > Select text. Or press Menu + e at the same time. 3. Drag across the text you want to copy.
Switching between Browser windows 1. From the Home screen, tap 2. Press Menu > Browser. Windows. 3. Tap a window you want to view. You can also tap on the window to close it. Viewing bookmarks You can store bookmarks on your phone. You can also view the pages that you visit most often or quickly access a History list of the sites you have visited. Bookmarking a webpage 1. From the Home screen, tap Browser. 2. While viewing a webpage to bookmark, press Menu + a at the same time.
Facebook When you initially use Facebook, you must agree to End-User Licence Agreement to start using it. 1. From the Home screen, tap Apps > Facebook. 2. Enter the Email and Password > Login. ħBe first to sign up on the website can be used. Twitter Adding a Twitter account 1. From the Home screen, tap Apps > Twitter. 2. Enter the Username or email and Password > Sign in. ħYou can post and read tweets, send and receive direct messages, search for new Twitter users to follow using the Peep app.
4. Select the network certificate needed to connect to the EAP-TLS network. 5. Follow the steps in the previous section to connect to the Wi-Fi network. Checking the wireless network status 1. From the Home screen, tap 2. Tap Apps > Settings. Wireless & networks > Wi-Fi settings. 2. Tap the wireless network that the phone is currently connected to. A message box is then displayed showing the Wi-Fi network name, status, speed, signal strength, and more. Connecting to another Wi-Fi network 1.
Bluetooth Using Bluetooth Bluetooth is a short-range wireless communications technology that devices can use to exchange information over a distance of about 8 meters. The most common Bluetooth devices are headphones for making calls or listening to music, hands-free kits for cars, and other portable devices, including laptops and cell phones. Turning Bluetooth on or off 1. From the Home screen, tap 2. Tap Apps > Settings. Wireless & networks. 3. Check or uncheck Bluetooth to turn it on or off.
Disconnecting or Unpairing from a Bluetooth Device Disconnecting a Bluetooth device 1. From the Home screen, tap 2. Tap Apps > Settings. Wireless & networks > Bluetooth settings. 3. In the Bluetooth devices section, tap and hold the device to disconnect. 4. Tap Disconnect. Unpairing from a Bluetooth device You can make your phone forget its pairing connection with another Bluetooth device. To connect to the other device again, you may need to enter or confirm a passcode again. 1.
Sending and Receiving Information Using Bluetooth You can use Bluetooth to transfer information between your phone and another Bluetooth-enabled device such as a phone or notebook computer. You can send the following types of information, depending on the device you are sending to: ħImages and videos ħContacts ħAudio files To Send Files, you need to have an SD Card installed in your phone.
Entertainment Camera/Camcorder You can take pictures and shoot videos with Camera/Camcorder. Photos and videos captured with the camera will be stored on the phone’s microSD card. So you must install your microSD card to use Camera/Camcorder. Opening Camera Camera. ħFrom the Home screen, tap Apps > Camera. Or press When you’re in Camcorder mode, drag the to the Camera position. Or, press ħ Menu > Switch to video.
Taking a picture 1. From the Home screen, tap Apps > Camera. 2. Frame your subject on screen. Press Camera ħ picture. or tap . The camera brings the image into focus. When the image is in focus, the camera takes a Press and hold Camera or tap and hold ħ focused picture more quickly. to focus first, before taking a picture. Then lift your finger to take a The picture you just took is displayed for a moment, and then displayed as a thumbnail at the top right.
Gallery You use Gallery to view pictures and play videos that you’ve taken with Camera/Camcorder, downloaded from the web, or copied onto your microSD card. You can edit and add effects to your photos. You can also easily turn a photo as your contact icon, location icon, or wallpaper. Opening Gallery and viewing album list Opening Gallery ħFrom the Home screen, tap Apps > Gallery. ħWhen you’re in Camera/Camcorder mode, tap the thumbnail image at the top right. You can view your album list.
Tap More > Tap Details to get details about selected items. ħ The controls available depend on the mix of items you’ve selected. Viewing pictures Viewing a picture 1. From the Home screen, tap Apps > Gallery. 2. Tap the album you want to open, and then tap a thumbnail image of picture to view it. ħSwipe left or right across the screen to view previous of next picture in the album. Turn the your phone left or right to view the picture in upright (portrait) or sideways (landscape) orientation. ħ 3.
Videos Opening Videos and viewing video list You use Videos to play videos that you’ve taken with Camcorder, downloaded from the web, or copied onto your microSD card. From the Home screen, tap Apps > Video. ħ You can view your video list. If you tap and hold the file, you can play or delete it. Playing videos 1. From the Home screen, tap Apps > Video. 2. When you’re in video list, tap a video to view it. Video is always displayed in landscape mode when you play it. 3.
Music Player You can play music and audio files with Music Player. NOTE You need to copy music files to your microSD card first to use the Music Player to play music. Viewing your music library 1. From the Home screen, tap Apps > Music Player. 2. Drag the tap at the top of the screen to the left or right to select the library you want to open. you can view the lists of music in the microSD card. ħ The lists are automatically organized according to information that each music file has.
Playing music 1. From the Home screen, tap Apps > Music Player. 2. Drag the tap at the top of the screen, and then tap the library you want to open. 3. Tab a song or press mode. Menu > According to the library’s setting, music can be played in Play all mode or Shuffle all ħTap the on screen icons to control music playback, select a song to play, repeat songs, and more. 1 2 3 4 5 6 1 2 3 4 5 6 7 8 7 8 Open the current playlist. Turn shuffle on or off. (Shuffle is off when button is gray.
Adding a song to a playlist 1. From the Home screen, tap Apps > Music Player. 2. Tap and hold a desired Music > Add to playlist > Current playlist, New or tap the playlist you want. Current playlist New The selected Music is added to the current playlist. When you enter the name of a playlist and tap Save, the Music is added to the new playlist. Removing a song from a playlist 1. From the Home screen, tap Apps > Music Player. 2. Tap the Playlists > tap a desired playlist. 3.
Tools Clock Opening the Clock 1. From the Home screen, tap Apps > Clock. ħClock opens with date and time, local weather and other useful information. 1 3 2 5 4 6 1 Tap to dim the screen 2 3 5 Set an alarm and check the old alarms Music Player 4 6 The battery charge level, which is viewed only while it is being charged. View a slideshow Home screen Setting an alarm Adding new alarm 1. From the Home screen, tap 2. Tap Apps > Clock. > Add alarm. 3.
Changing alarm settings 1. From the Home screen, tap 2. Tap > Press Menu > Alarm in silent mode Alarm volume Snooze duration Volume and Camera Apps > Clock. Settings. Check to play alarms even when the phone is in Silent mode. Set the volume of alarms. Set how long Clock waits before playing an alarm again. Set the button behavior to have None, to snooze, or to dismiss it. Stopping an alarm 1. When the alarm sounds, tap Dismiss to stop the alarm.
Memo Adding a new memo 1. From the Home screen, tap 2. Tap the Add New Memo . Apps > Memo. 3. Enter the text > Save. Viewing and editing a memo 1. From the Home screen, tap Apps > 2. Tap the memo you want to view. 3. Tap the Memo screen to edit it. Memo. 4. Edit the text > Save. Sending a memo 1. From the Home screen, tap Apps > Memo. 2. Tap the memo you want to send > Press Menu > Send to. 3. Tap the application to use to send the selected memo. Deleting a memo 1.
3. Select the target folder or location folder > Move here. Renaming a file or a folder 1. From the Home screen, tap Apps > My Files. 2. Move to the location where the file or the folder you want to rename is > Tap and hold the file or folder you want to rename > Rename. 3. Enter the file or folder Name > OK. Deleting a file or a folder 1. From the Home screen, tap Apps > My Files. 2.
Polaris® Office Polaris® Office is divided into a word processor, spreadsheet editor, presentation editor, and a file viewer. It is capable of reading and exporting in Microsoft Office file formats, viewing PDF and image files, and decompressing ZIP files. Opening the Polaris® Office 1. From the Home screen, tap Apps > Polaris® Office. 2. Enter the name and e-mail address > Register. When you start to use the Polaris® Office, the user is asked to be registered.
3. To use the additional options, press Zoom Edit mode Find Bookclip Reflow text More Menu while you are viewing the document. Select one out of Fit to page, Fit to width, Custom zoom, 25%, 50%, 75%, 100%, 125%, 200%, 300% and 400% to see the screen in the selected view. File formats available for Edit mode: Microsoft Word, Microsoft Excel, Microsoft PowerPoint. Enter desired letters, they can be searched for. Create a new bookclip or view the stored lists of the bookclips. Show a text in full view.
AT&T(Web) AT&T Navigator The AT&T Navigator™ application on your device uses GPS positioning technology and your carrier’s data network to provide you with driving directions and a host of other services, including: ħGPS navigation that gives you turn-by-turn directions to any address in the continental United States. If you miss a turn or get off track, AT&T Navigator will calculate a new route for you.
5. To end the session, tap the Back key. 6. To exit AT&T Navigator, tap the Menu from the AT&T Navigator Home page, and then Tap the Menu, then Tap Exit. Search using voice 1. From the Home screen, tap 2. Tap Apps > AT&T Navigator. . 3. Tap and then speak the desired name or business category to search. 4. Select from the results. 5. Select the desired option. 6.To end the session, tap the Back key. 7.
YPmobile You can use YPmobile to find, get information about, and get directions to businesses in your area. Find a business 1. From the Home screen, tap Apps > YPmobile. 2. The End User License Agreement displays. 3. Read the agreement and tap Accept to continue. 4. Do one of the following: ħEnter a search term and tap FIND. Open the application menu and tap Browse. In Popular Businesses, scroll left or right through a list of businesses.
AT&T myWireless Mobile AT&T myWireless Mobile enables you to view usage for minutes, data, and messaging from your phone. With this application you can also access support through FAQs (frequently asked questions). NOTE In order to access myWireless Mobile, you first need to register your phone with My ATT. Visit http://www.att.com for more information. To access myWireless Mobile 1. From the Home screen, tap Apps > AT&T myWireless. 2. The End User License Agreement displays. 3.
Settings Settings on your phone Control and customize phone settings on the Settings screen. 1. From the Home screen, tap Apps > Settings. Wireless & networks Airplane mode Wi-Fi/ Wi-Fi settings Bluetooth/ Bluetooth Settings Tethering VPN settings Mobile networks Airplane mode On / Off. Check to turn off all the phone’s radios that transmit voice or data. Wi-Fi On / Off. Set up and manage Wi-Fi networks.(Network notification, Add Wi-Fi network) Bluetooth On / Off.
Sound Silent mode Vibrate Volume Phone ringtone Notification ringtone Audible touch tones Audible Selection Screen lock sounds Haptic feedback When set to silent, your phone doesn’t play any ring, alert, and effects sounds. You must silence media and alarms in their own applications. Configure when you want the phone to vibrate when you receive a phone call or notification. Set the volume of ringtones that sound when you receive a phone call or notification, media (music, videos, and so on), and alarms.
Accounts & sync Background data Auto-sync Manage accounts Set applications can sync, send and receive data at any time. Applications sync data automatically. Lists the Google Accounts and other accounts you’ve added to the phone. If you tap an account, its account screen opens. Privacy Back up my data Automatic restore Factory data reset Back up my settings and other application data. If I reinstall an application, restore backed up settings or other data. Erases all data on phone.
Date & time Automatic Set date Select time zone Set time Use 24-hour format Select date format Use network-provided values. If Automatic is unchecked, manually set the phone’s date. If Automatic is unchecked, set the phone’s time zone. If Automatic is unchecked, set the phone’s time. Display the time using 24-hour format. Select the format for displaying dates.
Safety information Safety information for wireless handheld phones Read this information before using your handheld portable cellular telephone Driving safety Talking on the phone while driving is extremely dangerous and is illegal in some states. Remember, safety comes first. Check the laws and regulations on the use of phones in the areas where you drive. Always obey them. If you must use your SHARP ADS1 while driving, please: Give full attention to driving. Driving safely is your first responsibility.
Hearing AIDS Some digital wireless phones may interfere with some hearing aids. In the event of such interference, you may want to consult your service provider (or call the customer service line to discuss alternatives). Other medical devices If you use any other personal medical device, consult the manufacturer of your device to determine if they are adequately shielded from external RF energy. Your physician may be able to assist you in obtaining this information.
have the rating on their box or a label on the box. The ratings are not guarantees. Results will vary depending on the user’s hearing device and hearing loss. If your hearing device happens to be vulnerable to interference, you may not be able to use a rated phone successfully. Trying out the phone with your hearing device is the best way to evaluate it for your personal needs.
designed to operate at multiple power levels so as to use only the power required to reach the network. In general, the closer you are to a wireless base station antenna, the lower the power output. Before a phone model is available for sale to the public, it must be tested and certified to the FCC that it does not exceed the limit established by the government adopted requirement for safe exposure. The tests are performed in positions and locations (e.g.
effects causes no known adverse health effects. Many studies of low level RF exposures have not found any biological effects. Some studies have suggested that some biological effects may occur, but such findings have not been confirmed by additional research. In some cases, other researchers have had difficulty in reproducing those studies, or in determining the reasons for inconsistent results. 3 .
mean for human health. Three large epidemiology studies have been published since December 2000. Between them, the studies investigated any possible association between the use of wireless phones and primary brain cancer, glioma, meningioma, or acoustic neuroma, tumors of the brain or salivary gland, leukemia, or other cancers. None of the studies demonstrated the existence of any harmful health effects from wireless phone RF exposures.
to take steps to lower exposure to radiofrequency energy (RF), the measures described above would apply to children and teenagers using wireless phones. Reducing the time of wireless phone use and increasing the distance between the user and the RF source will reduce RF exposure. Some groups sponsored by other national governments have advised that children be discouraged from using wireless phones at all.
Emergency calls Never rely solely upon your wireless phone for essential communications (e.g., medical emergencies), if it can be avoided, since a wireless phone requires a complex combination of radio signals, relay stations and landline networks for its operation. Consequently, emergency calls may not always be possible under all conditions on all wireless phone systems. Your wireless phone, however, may sometimes be the only available means of communication at the scene of an accident.
Never make any anonymous calls to annoy, harass, or molest other people. ħ Never charge another account without authorization, to avoid payment for service. ħ Never willfully or maliciously interfere with any other radio communications. ħ Never refuse to yield the line when informed that it is needed for an Emergency Call. Also, never take over a line by stating ħ falsely that it is needed for an emergency.
Antenna Antenna safety Use only the supplied or an approved replacement antenna. Unauthorized antennas, modifications, or attachments could impair call quality, damage the phone, or result in violation of FCC regulations. Please contact your local dealer for replacement antenna. Do not use the phone with a damaged antenna. If a damaged antenna comes into contact with the skin, a minor burn may result. Please contact your local dealer for replacement antenna.
cause injury to the skin or eyes. Should the liquid come into contact with the eyes, irrigate the eyes thoroughly with clean water and immediately seek medical attention. In the event the liquid comes into contact with the skin or clothing, wash it away immediately with clean water. Adapter/Charger Charger The charger designed by Sharp for this unit requires the use of a standard 120 V AC power source for its operation.
t 5BLF B NJOJNVN NJOVUF CSFBL FWFSZ IPVS PG HBNF QMBZJOH t *G ZPVS IBOET XSJTUT PS BSNT CFDPNF UJSFE PS TPSF XIJMF QMBZJOH TUPQ BOE SFTU GPS TFWFSBM IPVST CFGPSF QMBZJOH BHBJO t *G ZPV DPOUJOVF UP IBWF TPSF IBOET XSJTUT PS BSNT EVSJOH PS BGUFS QMBZ TUPQ QMBZJOH BOE TFF B EPDUPS Recycle your cell phone! Carriers marketing this cell phone have an in-store phone take-back program. Consumers can drop off their used wireless devices to specified carrier retail outlets for recycling purposes.
the FCC Rules. These limits are designed to provide reasonable protection against harmful interference in a residential installation. This equipment generates, uses and can radiate radio frequency energy and, if not installed and used in accordance with the instructions, may cause harmful interference to radio communications. However, there is no guarantee that interference will not occur in a particular installation.
COPYRIGHT & PATENT Software Copyright Notice All Intellectual Property, as defined below, owned by or which is otherwise the property of Sharp or its respective suppliers relating to the Sharp Phone, including but not limited to, accessories, parts, or software relating there to (the “Phone System”), is proprietary to Sharp and protected under federal laws, state laws, and international treaty provisions.
Warranty Manufacturer’s warranty 12 month limited warranty Personal Communications Devices, LLC.
THE EXTENT OF THE COMPANY’S LIABILITY UNDER THIS WARRANTY IS LIMITED TO THE REPAIR OR REPLACEMENT PROVIDED ABOVE AND, IN NO EVENT, SHALL THE COMPANY’S LAIBILITY EXCEED THE PURCHASE PRICE PAID BY PURCHASER FOR THE PRODUCT. ANY IMPLIED WARRANTIES, INCLUDING ANY IMPLIED WARRANTY OF MERCHANTABILITY OR FITNESS FOR A PARTICULAR PURPOSE, SHALL BE LIMITED TO THE DURATION OF THIS WRITTEN WARRANTY. ANY ACTION FOR BREACH OF ANY WARRANTY MUST BE BROUGHT WITHIN A PERIOD OF 18 MONTHS FROM DATE OF ORIGINAL PURCHASE.