
Service manual


5
R-360EG
R-360ES
R-360EW
R-360EZ
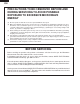
contact a qualified electrician and have it replaced with a properly
grounded three-pronged wall receptacle or have a grounding adapter
properly grounded and polarized. If the extension cord must be used, it
should be a 3-wire, 15 amp. or higher rated cord. Do not drape over a
countertop or table where it can be pulled on by children or tripped over
accidentally.
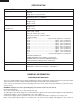
CAUTION: DO NOT UNDER ANY CIRCUMSTANCES CUT OR RE-
MOVE THE ROUND GROUNDING PRONG FROM THIS
PLUG.
3-Pronged Plug
Grounded
Receptacle Box
Grounding Pin
3-Pronged Receptacle
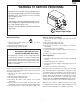
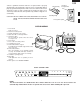
OVEN DIAGRAM
1. Door handle
Pull to open door.
2. Auto-Touch control panel
3. Display: 99 minutes, 99 seconds
4. Oven door with see-through window
5. Safety door latch
The oven will not operate unless the door is
securely closed.
6. Door hinges
7. Door seals and sealing surface
8. Turntable motor shaft
9. Removable turntable support
Carefully place the turntable support in the center
of the oven floor.
10. Removable turntable
Place the turntable on the turntable support
securely. The turntable will rotate clockwise or
counterclockwise. Only remove for cleaning.
11. Ventilation openings (Rear)
12. Oven light
It will light when oven is operating or door is
opened.
13. Wave guide cover: DO NOT REMOVE.
NOTE:
The directed features are disabled after three minutes when the oven is not in use. These features are
automatically enabled when the door is opened and closed or the STOP/ CLEAR pad is pressed.
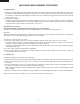
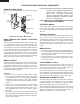
TOUCH CONTROL PANEL
11
12
7
5
3
2
1
9
4
8
13
6
10
Instant Action
Popcorn
Vegetables
Casserole Beverage
Baked
Potatoes
Dinner
Plate
Ground
Meat
Chicken
Breast
MIcrowave
Pizza
Kitchen Timer
Clock
STOP
Clear
Rolls &
Muffins
Frozen
Entrees
Compu
Defost
Power
Level
Minute Plus
START
12345
67890
COOK DEFROST
NO.
LBS.
CUPS
OZ