Operating Instructions Organizer Link 4 from Version 2.0 The computer link between SHARP Organizers and Personal Computers with integrated data processing and synchronization option to Microsoft Outlook Copyright 1999 - 2000 by Yellow Computing Computersysteme GmbH Postfach 1136 D-74173 Bad Friedrichshall Germany Hardware and software required: Personal computer running MS Windows 95, 98 or NT 4.0 / 2000, CD ROM drive, Pentium 60, 16 MB RAM for MS Windows 95 or 32 MB RAM for MS Windows 98 / NT 4.
Organizer Link 4 Contents 1 General .............................................................................................................. 5 1.1 1.2 1.3 1.4 1.5 1.5.1 1.5.2 1.6 1.6.1 1.6.2 1.6.3 1.6.4 1.7 2 Introduction ...................................................................................................................................... 5 New functions in version 1.1 .......................................................................................................
Organizer Link 4 4.2 4.2.1 4.2.2 4.2.3 4.2.4 4.2.5 4.2.6 4.2.7 4.2.8 4.3 4.3.1 4.3.2 4.3.3 4.3.4 4.3.5 4.3.6 4.4 4.5 4.6 4.7 4.8 5 4 General function ........................................................................................................................... 19 Register a new Organizer ..................................................................................................... 19 Loading data ........................................................................................
Organizer Link 4 1 1.1 General Introduction Congratulations on purchasing Organizer Link 4, a powerful package which, together with a SHARP Organizer, will open up the world to you on a personal computer. This programme operates under Microsoft Windows 95 or higher and gives you maximum convenience in your data processing. The functionality of the SHARP Organizer has been integrated according to the Windows standard so that only a short familiarisation period is required.
Organizer Link 4 1.4 • • • • • • • 6 Minimum PC requirements Microsoft Windows 95 or higher or Microsoft Windows NT 4.0 / 2000 Pentium 60 MHz processor or faster 16 MB RAM for Windows 95 or 32 MB RAM for Windows 98 or NT 4.0 / 2000 VGA or higher resolution CD ROM drive at least 20 MB free hard disk space a free serial interface • Synchronization with MS Outlook requires versions MS Outlook 98 or MS Outlook 2000. 1.
Organizer Link 4 1.6 7 Using online Help Our online help will make it considerably easier for you to start working with the program, initially as an introduction and later as a clear reference work. Online help can be opened in the following ways: • The menu option ‘Help topics’ in the menu ,Help’ displays the list of topics in which you can search for the help topic you want.
Organizer Link 4 8 Operating the search function Enter a keyword as search text in the text field. With each letter entered, online help will immediately attempt to find a suitable keyword. When you have found your keyword via the search text, select it with the mouse and open the corresponding help page via [Display]. If there are several help pages on a keyword, you are asked to select one of them via another selection window. 1.6.
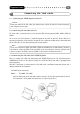
Organizer Link 4 2 2.1 Connecting the link cable Connecting the SHARP Organizer to the PC Caution: Before you connect the link cable, you should always switch off your PC to avoid damaging your computer or the cable. 2.1.1 Connecting the link cable to the PC The link7 cable is connected to the serial interface (RS 232) designated COM1, COM2, COM3 or COM4. The 9 or 25 pin serial interface is normally found on the back of your PC. Please observe its operating instructions.
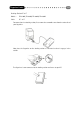
Organizer Link 4 10 Docking-Station CE- 61T Models : ZQ-570M, ZQ-630M, ZQ-640M, ZQ-650M Cable: CE – 61T For connection via a docking station, first remove the removable cover from the underside of your Organizer. Now place the Organizer on the docking station as illustrated so that it engages in the station. The Organizer is now connected to the docking station and hence to your PC.
Organizer Link 4 3 3.1 Preparations Installation Installation under Windows 95/98 After switching on your computer, wait until Windows 95/98 has finished loading. Now insert the program CD into the drive. The automatic start function ‘Autorun’ then begins the installation. If you have disabled this function, start Windows Explorer and switch to your CD ROM drive. On the CD you will the installation program “Setup.exe” which helps you set up Organizer Link 4 on your hard disk with clear instructions.
Organizer Link 4 12 3.3.2 Registering a new Organizer With Organizer Link 4 the various SHARP Organizers can interoperate. You therefore need to tell Organizer Link 4 which Organizer you are currently using. Organizer Link 4 then creates a file in which not only your data is stored, but also your settings. When registering, the following dialogue box first appears: Operation of the dialogue box First select the type of device you are using.
Organizer Link 4 13 Chapter 4.4 contains comprehensive instructions for data backup. Note: For maximum security, always make a copy of your file e.g. on a diskette. The file will be found in the directory “My Documents” with the extension “*.szq”. 3.3.4 Transferring the Organizer data You have certainly already stored some telephone numbers etc. in your SHARP Organizer.
Organizer Link 4 14 2 As the preparations for the transfer are now complete, select the menu option ‘Receive from Organizer’ in the ‘Link’ menu. 3 With data transfer you have the option of transferring specific individual data ranges or all data ranges. To do this, select either the data range(s) or [All]. Then select the [Add without Duplicates] mode. More details on the settings can be found in your online help or in Chapter 4.2.8. 4 Start data transfer by clicking on the [Receive] button.
Organizer Link 4 4 4.1 15 Working with Organizer Link 4 The user interface 4.1.1 Summary When the program is started, Organizer Link 4 initially displays the user interface (main window). The main elements of this window are the application bar (left-hand side), which corresponds to the application buttons on your SHARP Organizer, and the application window which corresponds to the display on your Organizer.
Organizer Link 4 16 represented here as icons and each icon has a help function. If you move the mouse pointer over an icon, its name and function are briefly displayed. Application bar The application bar is one of the most important elements in the user interface. Depending on the SHARP Organizer set up, each application is represented here by an icon. You can move directly between the individual applications with just a mouse click.
Organizer Link 4 17 4.1.3 Main window The application window, which displayed all the data in the individual applications, takes are central position in the main window. It consists of a view field and a list field. List field The list field displaying the records in the current data range forms the lower part of the application window. In each case only one line of a record is displayed. Select a record by clicking on the corresponding line. The selected record is then displayed in the view field.
Organizer Link 4 18 The “Configure list” dialogue box has a menu on the left in which you can select the column you want to configure. Once you have clicked on the appropriate field names, you can decide whether the name should be visible or invisible as a column. For each visible field name you can use the [Up] and [Down] buttons to specify the position at which it should be displayed at the width of the column. Confirm your settings with the [OK] button. 4.1.
Organizer Link 4 4.2 19 General function 4.2.1 Register a new Organizer Besides the data you have entered and the backups, an Organizer Link 4 file also contains specific information about the selected SHARP Organizer and your personal settings. For this reason a new file must be created for every new SHARP Organizer and every new user of Organizer Link 4. To register a new Organizer and create a new file, select the ‘New’ menu option under the ‘File’ menu. The main window then appears on your screen.
Organizer Link 4 20 4.2.4 Deleting data records To delete a record, select the appropriate entry in the list field by clicking on it once with the mouse and then select ‘Clear’ in the ‘Edit’ menu or press the key. 4.2.5 Using categories In some applications (e.g. ‘Telephone’, ‘User’, ‘To Do’) it is possible to assign individual records to specific categories and thereby create data groups.
Organizer Link 4 21 You can delete the password by deleting the characters (asterisks) in the appropriate text field at the same place you set up the password. Using password protection To classify an entry as secret, select the ‘Hide’ menu option under the ‘Edit’ menu. The secret status is then identified by the corresponding icon in the toolbar. The entry is secret if it has a closed padlock next to it. You can also disable the secret status via the same menu option.
Organizer Link 4 4.3 22 Functions and applications 4.3.1 Calender The calendar in Organizer Link 4 resembles the one in your SHARP Organizer. Hence, once you have moved to the ‘Calendar’ application, it always displays the last view selected.
Organizer Link 4 23 Appointments A date as well as a start, end and/or alarm time can be defined in the editor for every appointment. Appointments are entered and edited via an editor which can be opened either via the ‘Edit’ menu or the icons and or directly from the calendar views (see above). The appointment is entered in the various views according to its date and its start and end time.
Organizer Link 4 Note: An exception is the SHARP Organizers ZQ-700 and ZQ-750 which do not have a user database, only a telephone database. Both types of database are started via the application bar, or alternatively you can select the ‘Telephone’ or ‘User’ menu options in the ‘View’ menu. The view field always displays the record selected in the list field and only data fields and names which actually contain information are displayed in the view field.
Organizer Link 4 Entering a new memo: 1 Change to the ‘Memo’ function via the application bar. 2 Click on the icon. The editor opens for entry of a new record. 3 Enter your text in the input field. 4 Specify whether the record is to be defined as “secret”. To do this click on the closed padlock indicates that the entry will now be saved as “secret”. 5 The entry is saved by closing the editor using the button. The button. 4.3.4 Expenses Use the expenses manager to record your expenses clearly.
Organizer Link 4 4 Enter the amount. 5 If you wish, select the method of payment and the status of the expense and assign it to any category. 6 Specify whether the record is to be defined as “secret”. To do this click on the closed padlock indicates that the entry will now be saved as “secret”. 7 The entry is saved by closing the editor using the button. The button. 4.3.5 Search Organizer Link 4 provides many ways of finding individual records.
Organizer Link 4 27 In order to delete programs again, highlight the appropriate program in the list field and press the key on the keyboard. The programs are then moved from Organizer Link 4 to the recycling bin. Note: The Microsoft Internet Explorer v4.0 or later should be installed for proper operation of the [Community] button. Connect your organizer properly and press the [Send] button to transmit all programs previously marked in the selection window to your organizer.
Organizer Link 4 28 The function is opened via the application bar. Select the [Backup/Restore] icon with the mouse, or alternatively you can select the ‘Backup/Restore’ menu option in the ‘View’ menu. Although the backed up data is stored in compressed form in Organizer Link 4, you may require some space on your hard disk which is why you must decide how many backups Organizer Link 4 should keep stored. The corresponding setting can be found in the ‘Backup/Restore application’ above the list field.
Organizer Link 4 Conflicts may arise during synchronisation e.g. if an appointment which has already been entered and synchronised has been moved to different times on the Organizer and in Organizer Link 4. In this case the synchronisation process asks which appointment is correct. Organizer Link 4 gives you three options here: • The Organizer overwrites the PC. • The PC overwrites the Organizer. • Automatic. (The conflict is solved without data loss.
Organizer Link 4 30 4 If you choose the ‘Replace data’ option, note that the data previously stored on the Organizer is irreversibly overwritten! 5 Start the data transfer by clicking on the [Send] button. 4.7 Import and Export In order for data from external applications to be used in Organizer Link 4 and reverse, Organizer Link 4 has an import and an export function. These functions support the main data formats of the individual data ranges in Organizer link 4. A summary can be found in Chapter 5.2.
Organizer Link 4 With the exception of the ‘Text’ (TXT/RTF), ‘Business card files’ (vCard) and ‘Calendar file’ (vCALENDAR) data formats, you can assign the individual data fields in Organizer Link 4 to a specific data field in the import file. To do this, edit the field name in the right-hand column. 7 Now start the import process with the [Next] button. 4.
Organizer Link 4 5 5.1 Appendix Link cable Name Description Models Link cable 4-PIN cable ZQ – 700M ZQ – 750M CE – 61T Docking-Station ZQ – 570M ZQ – 630M ZQ – 640M ZQ – 650M 5.2 Data compatibility list Description Abbreviation Calender Formatted text CSV dBaseIV DBF Text TXT/RTF Calender files vCALENDAR Business card files vCARD 5.
Organizer Link 4 5.
Organizer Link 4 T To Do list 22 V View field 17, 20, 24, 25 W Week view 22 Windows 95/98 11 Windows NT 11 Word break 18, 24 34
Organizer Link 4 Note Copyright © 1999-2000 by Yellow Computing Computersysteme GmbH. The instructions and program are protected by copyright. They may only be amended, reproduced, translated into other languages or recorded in data processing systems with the written permission of Yellow Computing Computersysteme GmbH. It is recommended that several copies are made of all important data, preferably in written form, and kept separately from one another.