DIGITAL VOICE RECORDER DIGITALES DIKTIERGERÄT ENREGISTREUR VOCAL NUMÉRIQUE GRABADORA DE VOZ DIGITAL REGISTRATORE VOCALE DIGITALE PA-VR10E PA-VR5E OPERATION MANUAL BEDIENUNGSANLEITUNG MODE D’EMPLOI MANUAL DE MANEJO MANUALE DI ISTRUZIONI SHARP CORPORATION • ENGLISH ...................... Page 1 • DEUTSCH .................... Seite 33 • FRANÇAIS ................... Page 69 • ESPAÑOL .................... Página 104 PRINTED IN CHINA / IMPRIMÉ EN CHINE / IMPRESO EN CHINA • ITALIANO .....................
ENGLISH Warnings Using the Product Never use the earphones or operate the digital voice recorder while driving a car or riding a motorcycle or bicycle. Doing so could result in a traffic accident. DEUTSCH While walking, never turn up the volume so high that you cannot hear what is going on around you. (Be particularly careful when crossing railroad tracks or crossing the street.) Failure to exercise appropriate caution could result in a traffic accident.
Do not turn up the volume excessively. Listening through earphones at a very high volume for extended periods of time can damage your hearing. Be sure to exercise appropriate caution. Do not place magnetic cards, etc., near the speaker. The speaker contains magnets. Do not place magnetic media such as credit cards with magnetic strips, magnetically encoded prepaid cards, videocassettes, etc., near the speaker. Doing so could corrupt the digital data encoded in the magnetic media.
DEUTSCH ENGLISH Information Stored in Memory Information stored by the user in the product’s memory can be altered or erased due to improper use of the product, exposure to static electricity or electromagnetic noise, malfunction and repair, or if the batteries are replaced incorrectly. Be sure to make a permanent note on paper, etc., of important information stored in the product’s memory.
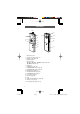
Part names 1 23 13 7 4 18 8 5 6 9 必 ず お 読 み く だ さ い 1. 2. 3. 4. 5. 6. 7. 8. 9. 10. 11. 12. 13. 14. 15. 16. 17. 18.
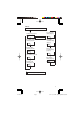
ENGLISH Display 1 9 10 2 11 3 4 12 5 6 14 13 13 35 25 15 16 FRANÇAIS 7 DEUTSCH 8 17 ITALIANO ESPAÑOL 1. Folder no.: Indicates the number of the folder in which recorded data files are stored (page 14). 2. Date/File no.: Indicates the month/file no. of each recorded audio file (page 15). 3. Date/Event marking no.: Indicates the day/event marking number (page 16). 4. Settings mode: Displayed when making settings (page 10). 5.
Screen displays and examples • The screens actually displayed on the recorder may differ from the example screens shown in this manual. Using the PA-VR10E/5E for the first time Before you attempt to use the recorder, insert the batteries and reset (initialize) the recorder to initialize its status. 必 ず お Inserting the batteries and resetting (initializing) 読 theみrecorder く だ Remove the battery cover as shown in the diagram below. さ い 1 2 Insert the batteries provided with the recorder.
ENGLISH FRANÇAIS Press the OK button. When “OK?” appears on the display, press the OK button again. The “RESET…” message appears on the display briefly and changes to “RESET!”, then the screen for setting the date and time appears. To set the date and time, follow from step 5 of the procedure on page 10. ESPAÑOL 5 DEUTSCH RESET? 2005Y ITALIANO • If the display does not appear, try pressing the reset button again.
Standby mode screen This screen shows the folder number, file number and the recording date/ event marking time. Pressing the OK button switches to a screen showing the recording time for marked events. Subsequent presses of the OK button toggle between the two screen displays.
ENGLISH ● Menus Press the STOP/MENU button once or twice. ▲ ▲ Press the OK button.
Setting the date and time (Clock setting) You must set the date and time before using the recorder for the first time and after installing new batteries. 1 Press the STOP/MENU button once or twice to display the menu screen. SET the OK button. 2 ず必Press The settings mode screen appears. 3 お 読 み く Press the ▲ (+) or ▼ (-) cursor button until the “CLOCK” だ (time settings) screen appears. さ い CLOCK 4 Press the OK button. The “year” display flashes.
Press the OK button to confirm the selected month setting. Next, the “day” display flashes. 9 Press the ▲ (+) or ▼ (-) cursor button to select the day. Press the OK button to confirm the selected day setting. Then use the same procedure to set the “hour” and “minute” settings. ESPAÑOL 10 ENGLISH 8 DEUTSCH Press the ▲ (+) or ▼ (-) cursor button to select the month. FRANÇAIS 7 11 After you have confirmed the “minute” setting by referring to an accurate clock, press the OK button.
Settings In this section it is explained how to select the settings required to use the recorder’s various functions. Screen display Recording mode setting ............................... CODEC Microphone sensitivity setting ..................... SENSE Silence skip recording setting ...................... VAFON Date and time setting ....................................
Select a recording mode and press the OK button. ENGLISH 4 Setting the microphone sensitivity Press the STOP/MENU button once or twice to display the menu screen. 2 Press the OK button. The settings mode screen appears. 3 Press the ▲ (+) or ▼ (-) cursor button until the “SENSE” (microphone sensitivity settings) screen appears, then press the OK button. The microphone sensitivity settings screen appears. The setting switches between HIGH and LOW each time you press the ▲ (+) or ▼ (-) cursor button.
Press the ▲ (+) or ▼ (-) cursor button to select ON or OFF. ON: Enables silence skip recording. OFF: Returns to normal voice recording. 4 ON Press the OK button. Icon display SET 必 ず お 読 Setting the date and time み See く “Setting the date and time” on page 10 for information on だ setting さ the date and time. い Recording The PA-VR10E/PA-VR5E has four folders for storing voice recordings, which allows you to group recordings by category or occasion.
Recording display Folder display File number 08 15 27 To stop recording, press the STOP/MENU button. DEUTSCH 3 ENGLISH Remaining recording time Recording mode Notes on recording voice ESPAÑOL FRANÇAIS • You can record up to 127 files in each folder. • When no available recording time remains, “FULL” appears on the display and you cannot make any more recordings. Erase some unwanted files and then try again.
contains event marking numbers, you can skip backwards or forwards to the part you want to hear by pressing the 1 (5) or 0 (4) cursor button during playback. • Up to 50 event marking numbers can be inserted into each file. 1 Press the OK button during recording or during playback. A new event marking number appears on the display. Recording or playback continues after the marking number has been inserted. You can insert additional marking numbers in the same way.
2 Press the ▲ (+) or ▼ (-) cursor button until the “SPEED” (playback speed settings) screen appears, then press the OK button. The settings screen appears. 3 Press the ▲ (+) or ▼ (-) cursor button to select “FAST,” “REG” or “SLOW.” ENGLISH DEUTSCH Icon display FAST: Fast playback REG: Playback. SLOW: Slow playback Press the OK button.
Skip/Search File skip You can skip to the previous or next file by briefly pressing the 1 (SKIP/SEARCH 5) or 0 (SKIP/SEARCH 4) cursor button. If the current file contains event marking numbers, this procedure skips to the previous or next event marking number. Mode status SKIP/SEARCH button pressed Stopped 必 5 or 4 ず お 読 み く だ Playback さ い 4 (File advance) 5 (File rewind) Result Displays the previous or next file number.
5 (Fast rewind) ENGLISH DEUTSCH Scans forward through the current file. When you release the right (4) skip/ search button, normal playback resumes. If the current recording contains event marking numbers, the recorder scans forward to the end of the current event and then skips forward one event marking number at a time. When the last event marking number in the file is reached, the recorder starts skipping forward one file at a time.
Deleting Deleting event marking numbers 1 Press the FOLDER/REPEAT button, select a folder and then press the OK button. 2 5) or 0 (4 4) cursor button and select the Press the 1 (5 desired file number. 5 ) or 0 (4 4) cursor button and select the the 1 (5 3 必Press event marking number to be deleted. Flashing ず the ERASE button. 4 読おPress “DEL.?” appears and the selected event 5 marking number flashes. み く だ さ DEL. ? い Press the OK button. “DELETE!” appears and the event marking number is deleted.
ENGLISH • The remaining file numbers are adjusted after the file is deleted. Deleting during playback DEUTSCH • Follow steps 3 and 4 above while the file number appears on the display. Deleting all the files in a folder 1 Press the FOLDER/REPEAT button, select a folder and then press the OK button. 2 Hold down the ERASE button for approximately 5 seconds or longer. “DEL.?” appears and the selected folder number flashes. 3 Press the OK button.
4 Press the OK button to confirm the displayed hour. The “minutes” setting then starts flashing. 5 Press the ▲ (+) or ▼ (-) cursor button to select the minutes. 13 30 FR Press the OK button to confirm the displayed minutes. The “hour” setting for the end time then starts flashing. Use the same procedure to select the hour and minute settings for the 14 30 TO end time. 必 ず After you have confirmed the “minutes” setting, press the お OK button.
Press the STOP/MENU button once or twice to display the menu screen. 2 Press the ▲ (+) or ▼ (-) cursor button until the “ALARM” (message alarm function) screen appears on the display, then press the OK button. The ALARM 1 screen appears. • To select ALARM 2 or ALARM 3, press ALARM 1 the ▲ (+) or ▼ (-) cursor button. DEUTSCH 1 ENGLISH Playing a message Icon display Press the OK button to display the ALARM settings screen.
7 Press the ▲ (+) or ▼ (-) cursor button to select the “hour” setting for the start time and then press the OK button. Next, the “minutes” setting flashes. Use the same procedure to select the minutes setting and then press the OK button. 8 Press the ▲ (+) or ▼ (-) cursor button to select “ONCE” or “DAILY” and then press the OK button. (The “ONCE” setting plays the alarm message one time only. The “DAILY” setting plays the alarm message every day.
Press the ▲ (+) or ▼ (-) cursor button to select a timer delay (1 to 99 minutes), then press the OK button. The timer starts running. ENGLISH 3 • To stop the timer while it is running, press the STOP/MENU button. DEUTSCH Hold function FRANÇAIS Setting the HOLD switch to the locked position locks the recorder in its current status and disables the other buttons. Use this feature to prevent the recorder’s buttons from being pressed by mistake.
• Microsoft and Windows are either registered trademarks or trademarks of Microsoft Corporation in the U.S. and/or other countries. Connecting the digital voice recorder to a personal computer To connect to a PC, purchase a commercially available USB cable (USB (A) male-USB (Mini-B) male). • Do only connect USB cable less than 1.2 m to the digital voice recorder. the smaller connector of the USB cable into the USB 1 必Plug jack of the digital voice recorder.
Backing up recorded audio data ENGLISH The audio recordings are stored as data files in folders 1 to 4. To store these files on your PC, copy folders 1 to 4 to a folder of your choice. Refer to the Microsoft Windows User’s Manual for instructions on copying files and folders.
• Recorded data is stored in the audio files in a proprietary format. It is not possible to play audio files recorded using the recorder on your PC using Windows Media Player or similar applications. • Do not connect the recorder to your PC when the batteries are dead or if there are no batteries in the recorder. Doing so could cause the recorder to malfunction or could result in the recorder not being recognized as an external drive by the PC.
ENGLISH Notes: • The batteries supplied with the recorder were included at shipment and may become exhausted before their suggested operating time. DEUTSCH When to replace the batteries The icon in the top-right corner of the display indicates when the batteries are becoming exhausted and should be replaced soon. FRANÇAIS Battery level icons : Full : Low Battery operating times • Continuous recording time (in LP mode): Approx. 8 hours • Continuous playback time (in LP mode): Approx.
Dealing with problems In very unusual circumstances, such as exposure to strong external electrical interferences or a strong impact, all the buttons on the recorder may cease to function. If this happens, reset the recorder as described below. Reset procedure Using a ballpoint pen or similar tool, press the reset button on the back of the recorder. The “RESET?” message appears on the display. 必 ず Press the STOP/MENU button. お The screen for setting the date and time appears on the 読 display.
ENGLISH Troubleshooting If the problems described below occur, it does not necessarily mean that the recorder is faulty. Check the suggested items before requesting repairs. The recorder will not record. • Are the batteries exhausted? • If the “FULL” indication is displayed, try deleting some unwanted files. The recorded voice is not audible. • Is the earphone connected? • Is the volume set too low? The recorded voice is too low.
Specifications Model Name Internal memory 必 ず お 読 み く だ Input/output terminals さ い Speaker Clock accuracy Operating temperature Maximum power Power supply Continuous battery operation time Dimensions Accessories 32 < REVISED > Earphone: 3.5 mm dia.; impedance: 32 Ω Microphone: 3.5 mm dia.; impedance: 2.4 kΩ USB jack (Mini-B) (PA-VR10E only) 23 mm dia. Average ±1 min./month (at 25°C) 0°C to 40°C 70 mW 3V (DC): AAA-size alkaline batteries (LR03) (2) Approx.
In Europe: This equipment complies with the requirements of Directive 89/336/EEC as amended by 93/68/EEC. Dieses Gerät entspricht den Anforderungen der EGRichtlinie 89/336/EWG mit Änderung 93/68/EWG. Ce matériel répond aux exigences contenues dans la directive 89/336/CEE modifiée par la directive 93/68/CEE. Dit apparaat voldoet aan de eisen van de richtlijn 89/336/ EEG, gewijzigd door 93/68/EEG. Dette udstyr overholder kravene i direktiv nr. 89/336/EEC med tillæg nr. 93/68/EEC.
DIGITAL VOICE RECORDER DIGITALES DIKTIERGERÄT ENREGISTREUR VOCAL NUMÉRIQUE GRABADORA DE VOZ DIGITAL REGISTRATORE VOCALE DIGITALE PA-VR10E PA-VR5E OPERATION MANUAL BEDIENUNGSANLEITUNG MODE D’EMPLOI MANUAL DE MANEJO MANUALE DI ISTRUZIONI SHARP CORPORATION • ENGLISH ...................... Page 1 • DEUTSCH .................... Seite 33 • FRANÇAIS ................... Page 69 • ESPAÑOL .................... Página 104 PRINTED IN CHINA / IMPRIMÉ EN CHINE / IMPRESO EN CHINA • ITALIANO .....................