
Instruction manual

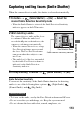


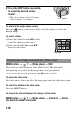

Table Of Contents
- Notes on using your camera
- Table of Contents
- Preparing the camera
- Before your operation
- Shooting images
- Using the shooting function
- Selecting the focus method
- Zooming in in one step
- Using the flash
- Adjusting the brightness of the image (Exposure, Flash compensation, Metering)
- Shooting with fixed brightness (AE Lock)
- Using brightness compensation for the entire image (Exposure compensation)
- Adjusting the amount of flash light (Flash compensation)
- Selecting the flash control mode to set the amount of flash light (Flash control)
- Selecting the method for measuring the brightness of a subject (Metering mode)
- Compensating for the brightness and contrast automatically (D-Range)
- Image processing
- Setting ISO
- Adjusting the color tones (White balance)
- Selecting the drive mode
- Capturing smiling faces (Smile Shutter)
- Using the viewing function
- Changing your setup
- Viewing images on a computer
- Printing images
- Others
- Index

116
To return to the normal playback screen
Press the button.
Note
• When you copy rotated images to a computer, “PMB” contained on the CD-ROM
(supplied) can display the rotated images correctly. However, the images may not be
rotated depending on the software.
An image can be enlarged for closer examination. This is convenient to
check the focus condition of a recorded image.
Rotating an image
1 Display the image you want to
rotate, then press the button.
button
2 Press the center of the controller.
The image is rotated counter-clockwise. When you want to do another
rotation, repeat step 2.
• Once you rotate the image, the image is played back in the rotated position,
even if you turn off the power.
Enlarging images
1 Display the image you want to
enlarge, then press the button.
button