
Instruction manual


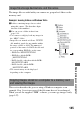

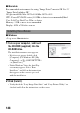
Table Of Contents
- Notes on using your camera
- Table of Contents
- Preparing the camera
- Before your operation
- Shooting images
- Using the shooting function
- Selecting the focus method
- Zooming in in one step
- Using the flash
- Adjusting the brightness of the image (Exposure, Flash compensation, Metering)
- Shooting with fixed brightness (AE Lock)
- Using brightness compensation for the entire image (Exposure compensation)
- Adjusting the amount of flash light (Flash compensation)
- Selecting the flash control mode to set the amount of flash light (Flash control)
- Selecting the method for measuring the brightness of a subject (Metering mode)
- Compensating for the brightness and contrast automatically (D-Range)
- Image processing
- Setting ISO
- Adjusting the color tones (White balance)
- Selecting the drive mode
- Capturing smiling faces (Smile Shutter)
- Using the viewing function
- Changing your setup
- Viewing images on a computer
- Printing images
- Others
- Index

Viewing images on a computer
141
Stage 1: Connecting the camera and your computer
1 Insert a memory card with recorded images into the camera.
2 Select the type of memory card you want to copy images from
using the memory card switch.
3 Insert the sufficiently charged battery pack in the camera, or
connect the camera to a wall outlet (wall socket) with the AC
Adaptor (sold separately).
• When you copy images to your computer using an insufficiently charged
battery pack, copying may fail or image data may become corrupted if the
battery pack shuts down too soon.
4 Turn on the camera and the computer.
5 Check that [USB connection] in 2 is set to [Mass Storage].
6 Connect the camera and your
computer.
The AutoPlay wizard appears on the
desktop.
1 To the USB
terminal
USB cable
2 To the
USB terminal