MODEL LC-32D53X LC-37D53X LCD COLOUR TELEVISION OPERATION MANUAL Cover_D53X.
Blank page Cover2_D53X.
LC-32D53X LC-37D53X LCD COLOUR TELEVISION OPERATION MANUAL Dear SHARP customer Thank you for your purchase of the SHARP LCD colour TV product. To ensure safety and many years of trouble-free operation of your product, please read the Important Safety Precautions carefully before using this product. Contents Dear SHARP customer........................................... 1 Contents .................................................................. 1 Trademarks ..............................................
Contents Basic adjustment settings (Digital) ......................29 DTV input mode menu items..............................29 Selecting DTV mode ..........................................29 EPG ...................................................................30 Selecting a programme using EPG ....................30 Programme Guide .............................................32 Info ....................................................................32 Favourite Programme List ..........................
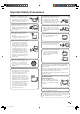
Important Safety Precautions • Cleaning — Unplug the AC cord from the AC outlet before cleaning the product. Use a damp cloth to clean the product. Do not use liquid cleaners or aerosol cleaners. • Water and moisture — Do not use the product near water, such as bathtub, washbasin, kitchen sink, laundry tub, swimming pool and in a wet basement. • Do not place vases or any other water-filled containers on this product. The water may spill onto the product causing fire or electric shock.
Supplied accessories Make sure the following accessories are provided with the product. Remote control unit “AAA” size battery (g2) AC cord Page 12 Page 5 Page 7 AC cord clamp Cable clamp Cable tie Page 7 Page 7 Stand unit Stand base Stand post Page 7 Operation manual Short screws (g4) Long screws (g4) Hex key Cloth Page 6 NOTE • Always use the AC cord supplied with the TV.
Preparation Inserting the batteries Before using the TV for the first time, insert two “AAA” size batteries (supplied). When the batteries become depleted and the remote control fails to operate, replace the batteries with new “AAA” size batteries. 1 Open the battery cover. 2 Insert two supplied “AAA” size batteries. 3 Close the battery cover. • Place batteries with their terminals corresponding to the (e) and (f) indications in the battery compartment.
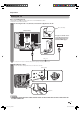
Preparation Attaching the stand • Before attaching (or detaching) the stand, unplug the AC cord from the AC INPUT terminal. • Before performing work spread cushioning over the base area to lay the TV on. This will prevent it from being damaged. CAUTION • Attach the stand in the correct direction. • Be sure to follow the instructions. Incorrect installation of the stand may result in the TV falling over. 1 Confirm the 8 screws supplied with the TV.
Preparation Setting the TV Notes on installing the TV • Avoid direct sunlight and place the TV in a well-ventilated location. • Place the TV in a level location. 1 Connecting the AC cord, antenna, and external equipment to the TV AC cord clamp TV (rear view) See pages 8 and 55—58 for connecting antennas and external equipment, such as VCR and DVD player. AC outlet AC cord • Place the TV close to the AC outlet, and keep the power plug within reach.
Preparation Simple operations for watching a TV programme Basic connection Connecting to an antenna To enjoy a clearer picture, use an outdoor antenna. The following is a brief explanation of the types of connections that are used for coaxial cable.
Preparation Setting the TV on the wall • You can mount the TV on the wall, using the optional AN-37AG2 bracket. • For details, refer to the instructions supplied with the optional bracket. CAUTION • This TV should be mounted on the wall only with the AN-37AG2 (SHARP) wall mount bracket. The use of other wall mount brackets may result in an unstable installation and may cause serious injuries.
Part names TV (Front) Channel up (r)/down (s) buttons TV/VIDEO button Volume up (e)/down (f) buttons POWER (On/Off) button Remote control sensor OPC indicator* OPC sensor SLEEP timer indicator POWER indicator *OPC: Optical Picture Control (See page 23.) 10 D53X_en_a.
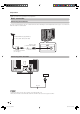
Part names TV (Rear) RS-232C terminal INPUT 4 (HDMI) terminal INPUT 3 (HDMI) terminal INPUT 5 terminals Headphone jack DIGITAL AUDIO OUTPUT terminal AC INPUT terminal INPUT 2 terminals INPUT 1 terminals Antenna input terminal AUDIO OUTPUT terminal Regarding the headphone jack • Use headphones with a stereo mini plug (Ø 3.5 mm). • Be sure to unplug headphones from the jack when they are not in use. • The speakers do not output volume when headphones are plugged in.
Part names Remote control unit 6 e (Mute) Mute the sound. (See page 15.) 1 16 7 VOLk/VOLl Set the volume. (See page 15.) 8 GUIDE DTV mode: Display the programme list. (See page 32.) 9 EPG DTV: To display EPG (Electronic Programme Guide) screen. (See page 30 to 31.) 2 10 a/b/c/d (Cursor) Select a desired item on the setting screen. (See pages 17 and 29.) ENTER Execute a command. 3 17 11 EXIT 4 18 12 DEMO 5 6 7 19 20 21 8 9 Turn off the On-Screen Display.
Watching TV Turning on the power Press POWER on the TV. • POWER indicator (Green): The TV is on. (After a few seconds, an image appears with sound.) • After turning the power “ON” by pressing POWER on the TV, you can turn the power ON/OFF by pressing POWER on the remote control. Simple button operations for changing channels You can change channels in several ways. Using CHr/s on the remote control unit • Press CHr to increase the channel number. • Press CHs to decrease the channel number.
Watching TV Using Flashback (A) on the remote control unit When receiving a monaural signal Each time you press MPX, the mode switches between NICAM MONO and MONO. Monaural mode PAL NICAM Press A to switch the currently tuned channel to the previously tuned channel. Press A again to switch back to the currently tuned channel. BBC2 99 BBC2 99 B/G MONO MONO In the TV mode of A2 TV broadcasts When receiving a stereo signal Each time you press MPX, the mode switches between STEREO and MONO.
Watching TV Simple button operation for changing volume/sound Sleep timer Allows you to set a time when the TV automatically switches to standby. 1 Changing the volume You can change the volume on the TV or on the remote control unit. • To increase the volume, press VOLk. • To decrease the volume, press VOLl. Press SLEEP. • Remaining time displays when sleep timer has been set. Sleep Timer: Remain 2 hr. 00 min. 2 Each time you press SLEEP, the remaining time switches as shown below. 0 hr. 30 min.
Watching TV ANALOG/DTV/RADIO buttons Use the following buttons on the remote control to operate the menu. When you watch the TV for the first time When the TV powers on for the first time after purchase, perform the auto installation. Analogue TV You can run the auto installation to set channels automatically. 1 To watch the analogue TV, select “Auto Installation” from Setup menu. (See page 19.) 2 After setting the channels, you can select a channel using CH r/s or 0 – 9 on the remote control unit.
Basic adjustment settings Menu operation buttons On-Screen Display Use the following buttons on the remote control to operate the menu. (Example) MENU [Option ... Colour System] Option DTV Menu DNR Input Select Output Volume Select Audio Only Game Play Time 1 Colour System HDMI Setup 2 Fine Sync. 3 1 Item displayed in yellow • This indicates the item currently selected. • Press ENTER to go to the adjustment screen for this item.
Basic adjustment settings Menu items (TV/DTV/AV) List of menu items to help you with operations Picture AV Mode ...................................................................... Page 23 OPC .............................................................................. Page 23 Backlight ..................................................................... Page 24 Contrast....................................................................... Page 24 Brightness .........................................
Basic adjustment settings (Analogue) Auto installation Programme setup You can run auto installation again, even after setting up the preset channels. You can run the auto search procedure again at any time by accessing the Setup menu and Programme Setup. Channels can be tuned automatically or manually. Auto search You can also automatically search by performing the procedure below. This is the same function as programme auto search in auto installation. 1 Press MENU and the MENU screen displays.
Basic adjustment settings (Analogue) Manual setting for each channel You can set some channel items manually. They are Search, Fine (TV frequency), Colour System, Sound System, and Skip. Fine tuning 1 Press a/b/c/d to select the channel you want to edit, and then press ENTER. • The selected channel information displays. 1 Press MENU and the MENU screen displays. 2 Press a/b to select “Fine”, and then press ENTER. 2 Press c/d to select “Setup”.
Basic adjustment settings (Analogue) Manual setting for each channel (continued) Sound system (Broadcasting system) 1 Press a/b/c/d to select the channel you want to edit, and then press ENTER. Sort Channel positions can be sorted freely. 1 Press MENU and the MENU screen displays. 2 Press c/d to select “Setup”. 3 Press a/b to select “Programme Setup”, and then press ENTER. If you already set the password, enter it here. • The selected channel information displays.
Basic adjustment settings (Analogue) Label Channels can be labelled freely. 1 Press MENU and the MENU screen displays. 2 Press c/d to select “Setup”. 3 Press a/b to select “Programme Setup”, and then press ENTER. If you already set the password, enter it here. Erase Programme The individual programme can be erased. 1 Press MENU and the MENU screen displays. 2 Press c/d to select “Setup”. 3 Press a/b to select “Programme Setup”, and then press ENTER.
Basic adjustment settings (Analogue/Digital) AV MODE selection Selected item The AV MODE function enables you to select appropriate settings for audio and video to account for the system environment which can vary due to factors like room brightness, type of programme watched or the type of image input from external equipment. STANDARD Using AV MODE on the remote control unit 1 Press AV MODE. 2 Press AV MODE again before the mode displayed on the screen disappears.
Basic adjustment settings (Analogue/Digital) Adjustments items Using OPC on the menu screen 1 Press MENU and the MENU screen displays. 2 Press c/d to select “Picture”. MENU [Picture] Picture 3 Press a/b to select “OPC”, and then press ENTER. 4 Press a/b to select the desired item, and then press ENTER.
Basic adjustment settings (Analogue/Digital) Film Mode Advanced Advanced setting enables you to set the picture adjustment in more detail. There are six options you can choose from. Colour temperature Automatically detects a film-based source (originally encoded at 24/25 frames/second, depending on the vertical frequency), analyses it then recreates each still film frame or high-definition picture quality. 1 Repeat steps 1 to 3 in Colour temperature.
Basic adjustment settings (Analogue/Digital) 3D-Y/C Audio adjustment Provides high quality images with minimal dot crawl and cross colour noise. 1 Press MENU and the MENU screen displays. 2 Press c/d to select “Picture”. 3 Press a/b to select “Advanced”, and then press ENTER. 4 You can adjust the sound quality to your preference with the following settings. 1 2 Press MENU and the MENU screen displays. Press c/d to select “Audio”.
Basic adjustment settings (Analogue/Digital) Surround Power Control When you set to On, you can enjoy surround sound, the same as if you were in a movie theatre. Selected item No Signal Off When set to “Enable”, the power will automatically shut down if no signal inputs for 15 minutes. Description On Makes it possible to enjoy natural, realistic surround sound. Off Outputs the normal sound. Using Surround on the menu screen You can produce Surround effects from the “Audio” setting.
Basic adjustment settings (Analogue/Digital) Power Management When set, the power will automatically shut down if no signal is input for a certain time. 1 2 No Operation Off When set to “Enable”, the power will automatically shut down if there is no operation for 3 hours. Press MENU and the MENU screen displays. 1 Press c/d to select “Power Control”. 2 • Power control menu displays. Press MENU and the MENU screen displays. Press c/d to select “Power Control”. • Power control menu displays.
Basic adjustment settings (Digital) DTV input mode menu items List of DTV menu items to help you with operations Programme Programme List .................................................................................................. Page 33 Edit Channel Favourite & Lock .............................................. Page 33 Parental Rate ................................................... Page 33 Setup Installation Auto Search .....................................................
Basic adjustment settings (Digital) EPG What is an EPG? An “EPG (Electronic Programme Guide)” is a programme schedule, which is displayed on the TV screen. The EPG is broadcasted together with DTV. The TV screen shows the EPG when the viewer presses EPG on the remote control, provided that the TV is receiving the digital broadcasting signal. The EPG enables you to search for a programme, do timer recording or view the programme schedule in detail.
Basic adjustment settings (Digital) 5 Search for next day programme 1 Press Y. 2 Press c/d to select the desired time span, and then press ENTER.
Basic adjustment settings (Digital) Programme Guide You can check the schedule of DTV events and view detailed information about current or future events. NOTE • While the I-Plate is still on the screen, you can press INFO on the remote control again to call up the extended programme information of the current TV channel. • Press INFO again and you call up the extended information on the next programme.
Basic adjustment settings (Digital) Programme List Selected item You can select the desired programme from the programme list. 1 Press MENU and the MENU screen displays. 2 Press c/d to select “Option”. 3 Press a/b to select “DTV menu”, and then press ENTER. 4 Press a/b to select “Programme”, and then press ENTER. 5 Press a/b to select “Programme List”, and then press ENTER. Programme List Description FAV You can easily select your favourite channel from the Favourite Programme List.
Basic adjustment settings (Digital) Installation The first time the receiver is powered on, “Programme list is empty” will display on the screen. Under the main menu, select “Installation” and enter into the submenu. Auto Search You can automatically search for and download TV channels. 1 2 Manual Adjust You can set some channel items manually. 1 Repeat steps 1 to 5 in Auto Search. 2 Press a/b to select “Manual Adjust”, and then press ENTER. 3 Press 0l9 orc/d to select a channel number.
Basic adjustment settings (Digital) Quick Search If you live in the cities or regions listed in the “Quick Search” menu, you can scan all DTV channel signals. Video Setup This function allows you to select an output format. Press MENU and the MENU screen displays. 1 Press MENU and the MENU screen displays. 1 2 Press c/d to select “Option”. 2 3 Press a/b to select “DTV menu”, and then press ENTER. 3 Press a/b to select “DTV menu”, and then press ENTER.
Basic adjustment settings (Digital) Digital Output This function allows you to select your favourite audio output system. NOTE • The DIGITAL AUDIO OUTPUT terminal outputs only DTV audio. • When you are watching a programme on Analogue TV or images from external equipment, audio from the DTV channels still outputs from the DIGITAL AUDIO OUTPUT terminal. • The DIGITAL AUDIO OUTPUT terminal usually outputs the same audio from the speakers.
Basic adjustment settings (Digital) Time Setup Information This function allows you to select your local time zone. 1 Press MENU and the MENU screen displays. 2 Press c/d to select “Option”. 3 You can check the current version of the hardware and software on the screen. 1 Press MENU and the MENU screen displays. 2 Press c/d to select “Option”. Press a/b to select “DTV menu”, and then press ENTER. 3 Press a/b to select “DTV menu”, and then press ENTER.
Useful adjustment settings Password setting for child lock (for TV/DTV input mode) Allows you to use a password to protect certain settings from being accidentally changed. Setting a channel 1 Repeat steps 1 to 4 in Setting a password. 2 Press a/b to select “Channel Setting”, and then press ENTER. 3 Press a/b to select “Yes”, and then press ENTER. Change Password Channel Setting Yes Reset No Setting a password Register a 4-digit password number to use the Child Lock function.
Useful adjustment settings Input Skip Input Label This setting allows you to skip the HDMI or PC input on the Input Selection operation. You can assign each input source a label you like. 1 Press MENU and the MENU screen displays. 2 Press c/d to select “Setup”. 3 Press a/b to select “Input Skip”, and then press ENTER. 1 Press TV/VIDEO to select the desired input source. 2 Press MENU and the MENU screen displays.
Useful adjustment settings Wide Screen Signalling (WSS) Image position For adjusting a picture’s horizontal and vertical position. WSS allows a television to switch automatically among the different screen formats. 1 Press MENU and the MENU screen displays. 1 Press MENU and the MENU screen displays. 2 Press c/d to select “Setup”. 2 Press c/d to select “Setup”. 3 Press a/b to select “Position”, and then press ENTER. 3 Press a/b to select “WSS”, and then press ENTER.
Useful adjustment settings Picture aspect ratio Standby Mode The WSS signal has 4:3 auto-switching that allows you to select between Panorama and Normal. Standby Mode may be set to either start the TV quickly from standby or conserve energy while on standby. 1 Press MENU and the MENU screen displays. 1 Press MENU and the MENU screen displays. 2 Press c/d to select “Setup”. 2 Press c/d to select “Setup”. 3 Press a/b to select “4:3 Mode”, and then press ENTER.
Useful adjustment settings Reset If complex adjustments are made and the settings cannot be restored to normal, you can reset the settings to the factory preset values. 1 2 Press MENU and the MENU screen displays. Press c/d to select “Setup”. 3 Press a/b to select “Reset”, and then press ENTER. 4 Press a/b to select “Yes”, and then press ENTER. • After the reset has completed, the power shuts off and then comes back on. The screen will have returned to its original settings. 42 D53X_en_g.
Useful adjustment settings WIDE mode (for TV/AV input mode) Manual Selection 1 2 Press WIDE. • The WIDE MODE menu displays. • The menu lists the wide mode options selectable for the type of video signal currently received. Press WIDE or a/b while the WIDE MODE menu displays on the screen. • As you toggle down the options, each is immediately reflected on the TV.
Useful adjustment settings WIDE mode (for PC input mode) You can select the screen size. NOTE • Connect the PC before making adjustments. (See page 58.) • Selectable screen size may vary with input signal type. 1 Press WIDE. • The WIDE MODE menu displays. WIDE MODE Normal Full 2 Press WIDE or a/b to select a desired item on the menu. a Screen size images. Input Signal 1024g768 1360g768 Normal Full Keeps the original aspect An image fully fills the ratio in a full screen display. screen.
Useful adjustment settings Language setting for on-screen display You can also select a language from setup menu. Select from among 4 languages: English, Simplified Chinese, Traditional Chinese and Arabic. 1 Press MENU and the MENU screen displays. 2 Press c/d to select “Setup”. 3 Press a/b to select “Language”, and then press ENTER. 4 Press a/b to select the desired language listed on the screen, and then press ENTER.
Useful adjustment settings DNR (Digital Noise Reduction) Produces a clearer video image. 1 Press MENU and the MENU screen displays. 2 Press c/d to select “Option”. 3 Press a/b to select “DNR”, and then press ENTER. 4 Press a/b to select the desired level, and then press ENTER. Off High Input Select Selecting input source Can use for selecting the input source. Using TV/VIDEO on the remote control unit or on the TV TV/VIDEO allows you to choose from the available input sources.
Useful adjustment settings Output Volume Select Allows you to select what controls the audio output. 1 Press MENU and the MENU screen displays. 2 Press c/d to select “Option”. 3 Press a/b to select “Output Volume Select”, and then press ENTER. 4 Press a/b to select “Fixed” or “Variable”, and then press ENTER. Audio Only When listening to music from a music programme, you can set the display off and enjoy audio only. 1 Press MENU and the MENU screen displays. 2 Press c/d to select “Option”.
Useful adjustment settings Colour system setting Game Play Time This function displays the elapsed game time so you do not lose track of the time. To display the elapsed time, select “GAME” for the input mode of the terminal connected to the game console before starting the game. 1 Press MENU and the MENU screen displays. 2 Press c/d to select “Option”. 3 Press a/b to select “Game Play Time”, and then press ENTER. 4 Press a/b to select “On”, and then press ENTER.
Useful adjustment settings HDMI Setup PC Setup HDMI (High-Definition Multimedia Interface) terminal selection. 1 To watch an HDMI equipment image, select “INPUT3” or “INPUT4” using TV/VIDEO on the remote control unit or on the TV. 2 Press MENU and the MENU screen displays. 3 Press c/d to select “Option”. Input Signal (PC input mode only) • Some input signals may have to be registered manually to display properly.
Useful adjustment settings Adjusting the PC image automatically This function enables the screen to be automatically adjusted to its best possible condition when the analogue terminals of the TV and PC are connected with a commercially available RGB cable, etc. Adjusting the PC image manually Ordinarily you can easily adjust the picture as necessary to change image position using Auto Sync. In some cases, however, manual adjustment is needed to optimise the image.
Useful features Dual screen functions Allows you to display two pictures on the screen at one time. Dual screen You can display two pictures except when inputting from the RS-232C or PC INPUT terminal. 1 Press P&P. 2 Press SELECT to set either screen to be active. • Dual screen displays and a selected input source image displays. • “z” displays on the active screen, which has sound output. 3 Press TV/VIDEO to select another input source on the active screen. • A selected image displays.
Useful features Teletext function What is Teletext? Teletext broadcasts pages of information and entertainment to specially equipped television sets. Your TV receives Teletext signals broadcast by a TV network, and decodes them into graphical format for viewing. News, weather reports, sports information, stock exchange prices and programme previews are among the many services available. TELETEXT Teletext mode Teletext is turned on/off with m on the remote control unit.
Useful features Displaying Subtitle You can display several subtitles as they are transmitted. 1 2 Press [ to display the subtitle. • Subtitle is updated by information sent by the broadcasting station. • To stop updating subtitle automatically, press 3. Displaying Subpages You can display several subpages as they are transmitted. 1 2 Press [ to exit the subtitle screen. Press m to display Teletext. Press 1 to display the subpage as shown below.
Useful features Teletext language setting If Teletext information does not display correctly, perform the setting procedure below. Select from among 4 kinds of language tables: West Europe, East Europe, Greek/Turkish, Cyrillic. Each table is compatible with the Teletext languages listed below. 1 Freezing images You can freeze a motion picture on the Display. Press MENU and the MENU screen displays. 2 Press c/d to select “Setup”. 3 Press a/b to select “Text Language”, and then press ENTER.
Using external equipment You can connect many types of external equipment to your TV, like a VCR, DVD player, HDTV tuner, game console and camcorder. To view external source images, select the input source from TV/VIDEO on the remote control unit or TV/VIDEO on the TV. Displaying an external equipment image Explanation here is for the setting when connecting DVD to INPUT1 terminal.
Using external equipment Connecting a DVD player You can use the INPUT 1, INPUT 2, INPUT 3 (HDMI) or INPUT 4 (HDMI) terminals when connecting to a DVD player and other audiovisual equipment. NOTE • When using a DVI-HDMI conversion adaptor, input the Audio Signal from the AUDIO terminal of INPUT 3. To watch an image from this input terminal, you need to select the input source (see page 55) and the input signal type (see page 46).
Using external equipment Connecting a game console or camcorder A game console, camcorder and some other audiovisual equipment are conveniently connected using the INPUT 1 or INPUT 2 terminals. To watch an image from this input terminal, you need to select the input source (see page 55) and the input signal type (see page 46).
Using external equipment Viewing an image from a PC Connecting a PC Use the INPUT 5 terminal to connect a PC. NOTE • The PC INPUT terminals are DDC1/2B-compatible. • Refer to page 60 for a list of PC signals compatible with the TV. RGB cable (commercially available) ANALOG RGB Ø 3.5 mm stereo minijack cable (commercially available) AUDIO (L/R) PC Signal names for 15-pin mini D-sub connector Pin No. 5 4 10 15 13 1 6 7 8 9 14 2 3 12 11 Signal name R G B Not connected CSYNC Pin No.
Appendix Troubleshooting Problem Possible Solution • No power. • Check if you pressed POWER on the remote control unit. (See page 13.) If the indicator on the TV lights up red, press POWER. • Is the AC cord disconnected? (See page 7.) • Has the power been turned on? (See page 13.) • Unit cannot be operated. • External influences such as lightning, static electricity, etc., may cause improper operation.
Appendix RS-232C port specifications PC Control of the TV • When a program is set, the TV can be controlled from the PC using the RS-232C terminal. The input signal (PC/video) can be selected, the volume can be adjusted and various other adjustments and settings can be made, enabling automatic programmed playing. • Attach an RS-232C cable cross-type (commercially available) to the supplied Din/D-sub RS-232C for the connections.
Appendix Response code format Normal response O Problem response (communication error or incorrect command) K E R R Return code (0DH) Return code (0DH) Commands • Commands not indicated here are not guaranteed to operate.
Appendix Specifications Model Item LCD panel LC-32D53X LC-37D53X 32o (80 cm) Advanced Super View & BLACK TFT LCD 37o (94 cm) Advanced Super View & BLACK TFT LCD Number of dots 3,147,264 dots (1366 g 768 g 3 dots) Video Colour System PAL/SECAM/NTSC 3.58/NTSC 4.43/PAL 60 TV Function PAL: B/G, D/K, I SECAM: B/G, D/K, K/K1 NTSC: M TV-Standard Receiving Channel Digital DVB-T VHF/UHF 44.25—863.
Dimensional drawings Unit: mm LC-32D53X, LC-37D53X NOTE • Figures within parentheses are for LC-37D53X. 506 (542) 797 (920) 84 (100) 116 (116) 343 (377) 395.1 (464) 533 (600) 250 (292) 200 (200) 200 (200) 85 (85) 57.5 (57) 590.5 (657) 700.4 (823) 63 D53X_en_k.
CLEARING THE PASSWORD If you forget the password, clear the password using the following procedure. 1 Press MENU and the MENU screen displays. 2 Press c/d to select “Setup”. 3 Press a/b to select “Child Lock”, and then press ENTER. 4 The password input screen displays. 5 If you enter “3001” using 0 – 9, the “Child Lock” setting menu will be displayed. 6 Enter the 4-digit number as a password using 0 – 9. (See page 38.) The new password is now set. The Password is .
Cover2_D53X.
Printed on post-consumer recycled paper. Cover_D53X.