
Installation manual

4 W100T Twin Alternating Series Softeners
General Warnings (continued)
• This glass filled Noryl
1
(or equivalent) fully automatic control
valve is designed as the primary control center to direct and
regulate all cycles of a water softener or filter.
• The control valve is compatible with a variety of regenerants
and resin cleaners. The control valve is capable of routing the
flow of water in the necessary paths to regenerate or backwash
water treatment systems. The injector regulates the flow of
brine or other regenerants. The control valve regulates the flow
rates for backwashing, rinsing, and the replenishing of treated
water into a regenerant tank, when applicable.
• Control valve installation is made easy because the distributor
tube can be cut ½” above to ½” below the top of tank thread.
The distributor tube is held in place by an o-ring seal and
the control valve also has a bayonet lock feature for upper
distributor baskets.
• The power adapter comes with a 15 foot power cord and is
designed for use with the control valve. The power adapter
is for dry location use only. The control valve remembers all
settings until the battery power is depleted if the power goes
out.
• After the battery power is depleted, the only item that needs to
be reset is the time of day; other values are permanently stored
in the nonvolatile memory. The control valve battery is not
rechargeable but is replaceable.
• No user serviceable parts are on the PC board, the motor or
the power adapter. The means of disconnection from the main
power supply is by unplugging the power adapter from the
wall.
How To Use This Manual
This installation manual is designed to guide the installer through
the process of installing and starting up water conditioning systems
featuring the ProSense controller.
This manual is a reference and will not include every system
installation situation. The person installing this equipment should
have:
• Training on the control valve.
• Knowledge of water conditioning and how to determine proper
control settings.
• Adequate plumbing skills.
Pre-Installation Considerations
A. Water Pressure
A minimum of 25 pounds of water pressure is required for
regeneration valve to operate effectively.
B. Electrical Facilities
A continuous 115 volt, 60 Hertz current supply is required. Make
certain the current supply is always hot and cannot be turned off with
another switch.
C. Existing Plumbing
Condition of existing plumbing should be free from lime and iron
buildup. Piping that is built up heavily with lime and/or iron should
be replaced. If piping is clogged with iron, a separate iron filter unit
should be installed ahead of the water softener.
D. Location Of Softener And Drain
The softener should be located close to a drain.
E. Bypass Valves
Always provide for the installation of a bypass valve.
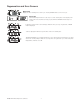
F. Valve to Tank Installation Instructions
1. Spin the valve onto the tank, ensuring the threads are not cross-
threaded.
The main control valve and tank adaptor have right-hand threads, or
clockwise, to install
2. Rotate the valve freely without using force until it comes to a stop
(this position is considered zero).
3. Rotate the valve clockwise from zero, between ¼ turn and ½
turn to fully tighten. No tools are needed. Hand tight is enough.
Overtightening may cause valve or tank damage.
If lubricant is required, a silicone compound is strongly
recommended. Dow Corning
®
Silicone Compound (available from
Watts), is recommended for best possible results. Dow Corning
®
7
Release Compound is used in the manufacture of this control valve.
The use of other types of lubricants may attack the control’s plastic
or rubber components. Petroleum-based lubricants can cause
swelling in rubber parts, including O-rings and seals.
1
Noryl is a trademark of Sabic.
NOTICE
NOTICE