
Installation Manual
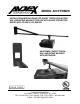


INSTALLATION INSTRUCTIONS
SHORT THROW PROJECTOR WALL
MOUNTING BRACKET AN-STWM20
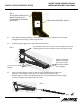
PAGE 5
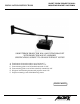
FIG. 3
WALL MOUNTING PLATE
MOUNT ONTO WALL
USING HEX HEAD BOLTS
PROVIDED
CABLE MANAGEMENT ACCESS
2.2 Note that the mounting plate has a rectangular hole intended to facilitate wire and cable
management if the wiring is fed through the wall.
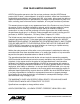
2.3 Attach the upper support bar to the wall mounting bracket.
FIG. 4
Place the holes in the bar over the 2 screws attached to the wall
mounting plate and secure with the 2 nylon cap nuts provided.
Install 1/4-20x5/16”
button head socket
cap screw on both
sides of the bracket.
Do not tighten
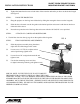
2.4 Press on the stop button in order to slide the long inner slide tube into the outer
slide tube. The stop has two positions, one nearer the wall and one at the
furthest extension. The 1/4-20 side button head screws must be backed out far enough
in order to slide the inner tube into the outer tube.
FIG. 5
1/4-20X1/4” BUTTON HEAD
SCREWS