INSTRUKCJA OBSŁUGI MODELE PG-C45X XG-C50X PROJEKTOR LCD
Wprowadzenie WA NE Prosimy o zapisanie numeru seryjnego (Serial No.) posiadanego przez Państwa projektora. Będzie to przydatne na wypadek jego ewentualnej kradzie y lub zagubienia. Numer ten znajduje się na tylnej ciance projektora. Przed wyrzuceniem opakowania od projektora nale y się upewnić, czy wszystkie elementy wyposa enia, wyszczególnione w punkcie „Dostarczone wyposa enie” na stronie 14, zostały wypakowane.
OSTRZE ENIE: Wentylator projektora pracuje jeszcze przez około 90 sekund od wyłączenia projektora. W czasie normalnej eksploatacji nale y wyłączać projektor przy pomocy przycisku POWER na pilocie lub projektorze. Przed odłączeniem kabla zasilającego od sieci nale y się upewnić, e wentylator się zatrzymał. PODCZAS NORMALNEJ EKSPLOATACJI NIE WOLNO WYŁ CZAĆ PROJEKTORA POPRZEZ WYJMOWANIE WTYCZKI Z GNIAZDKA ELEKTRYCZNEGO, PONIEWA DOPROWADZI TO DO PRZEDWCZESNEGO ZU YCIA ARÓWKI.
Najwa niejsze właściwości projektora 1. Wysoka jasność obrazu z kompaktowego projektora • • arówka o mocy 250 W zasilana napi ciem zmiennym zapewnia niezwykł zgodność kolorów i du jasność. Funkcja oszcz dzania energii zmniejsza poziom emisji szumów i wydłu a czas ycia arówki. 2. Prosta i wygodna obsługa • • Przyjazny interfejs u ytkownika i łatwo dost pne gniazda przył czeniowe bardzo upraszczaj podł czenie.
Spis treści Wa ne informacje Najwa niejsze właściwości projektora............3 Spis treści ..........................................................4 WA NE INFORMACJE DOTYCZ CE BEZPIECZE STWA ...........................................6 Nazwy cz ści ...................................................10 Projektor (widok z przodu i z góry).................10 Projektor (widok z boku) ................................11 Pilot zdalnego sterowania (widok z przodu)...12 Pilot zdalnego sterowania (widok z góry)....
Wybór trybu oszcz dzania energii ................69 Ustawienie trybu oszczędzania energii..........69 Wyłączenie gniazd wyj ciowych monitora i RS-232C ......................................................69 Funkcja automatycznie wyłączająca projektor70 Kontrola pozostałego czasu ycia arówki (w procentach) ................................................70 Projekcja obrazu obróconego i lustrzanego 71 Blokada przycisków na pulpicie sterowniczym ..................................................
WA NE INFORMACJE DOTYCZ CE BEZPIECZE STWA OSTRZE ENIE: Przed przyst pieniem do pracy nale y zapoznać si uwa nie z poni szymi informacjami. Energia elektryczna znalazła bardzo wiele zastosowa . Opisywany projektor został zaprojektowany i skonstruowany w taki sposób, eby zapewnić bezpiecze stwo osobom, które go obsługuj i przebywaj w jego pobli u. Nale y jednak pami tać, e NIEPRAWIDŁOWA OBSŁUGA ZWI KSZA RYZYKO PORA ENIA PR DEM I WYST PIENIA PO ARU.
18. Kiedy wezwać serwis W następujących przypadkach prosimy o odłączenie projektora z sieci i skontaktowanie się z serwisem: a.Je li kabel sieciowy lub wtyczka zostały uszkodzone. b.Je li jakikolwiek płyn przedostał się do wnętrza projektora. c. Je li projektor został poddany działaniu wody lub deszczu. d.Je eli projektor nie działa prawidłowo podczas normalnej obsługi. Prosimy o regulację tylko tych funkcji, które opisane zostały w niniejszej instrukcji.
WA NE INFORMACJE DOTYCZ CE BEZPIECZE STWA, C.D. Przystępując do instalacji projektora nale y zapoznać się z poni szymi wskazówkami: Ostrze enia dotycz ce wymiany zespołu arówki Je li arówka pęknie, we wnętrzu projektora mogą się znajdować odłamki szkła. W takim przypadku nale y porozumieć się z serwisem. Opis wymiany arówki znajduje się na stronie 85. Uwagi dotycz ce ustawienia projektora Z projektora nie nale y korzystać w pomieszczeniach wilgotnych, zakurzonych lub zadymionych.
WA NE INFORMACJE DOTYCZ CE BEZPIECZE STWA, C.D. Nie wolno blokować kratek wentylacyjnych. Wszelkie ciany i przeszkody powinny się znajdować co najmniej w odległo ci 20 cm od kratek wentylacyjnych. Nie wolno wsuwać adnych przedmiotów do otworów wentylacyjnych. Je li wentylator zostanie zablokowany, obwód zabezpieczający automatycznie wyłączy projektor. Nie oznacza to jednak uszkodzenia.
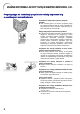
Nazwy cz ści W polach podane są numery stron, na których mo na znale ć więcej informacji na dany temat. Projektor (widok z przodu i z góry) Przyciski ON/OFF Słu ą do włączania i wyłączania zasilania. Wska nik POWER wieci na czerwono, gdy projektor znajduje się w trybie gotowo ci. Po włączeniu zasilania zaczyna wiecić na zielono. Wska nik LAMP W trakcie normalnej eksploatacji wieci na zielono. Gdy wieci na czerwono, nale y wymienić arówkę. Wska nik TEMP. W trakcie normalnej pracy wieci na zielono.
Nazwy cz ści, c.d. Projektor (widok z boku) Gniazdo USB Umo liwia podłączenie komputera przy pomocy kabla USB. Gniazdo AUDIO INPUT 1, 2 Słu y do podłączenia dowolnego ródła d więku powiązanego z wej ciami INPUT 1 i 2. Gniazdo RS-232C Umo liwia sterowanie projektorem przy pomocy komputera. Gniazdo WIRED REMOTE do podł czenia pilota Gniazdo AUDIO OUTPUT Wspólne wyj cie d więku dla gniazd INPUT 1, 2, 3 i 4.
Nazwy cz ści, c.d. Pilot zdalnego sterowania (widok z przodu) Przycisk KEYSTONE Przycisk umo liwiający korekcję efektu trapezowego i cyfrowego przesunięcia obrazu. Przycisk ENTER Słu y do ustawiania wybranych elementów w menu. Przycisk UNDO Słu y do anulowania operacji lub przywracania ustawień standardowych. Przyciski ENLARGE Umo liwiają powiększenie lub pomniejszenie fragmentów obrazu. Przycisk GAMMA Umo liwia poprawę jasno ci niewyra nego obrazu wy wietlanego w jasnym pomieszczeniu.
Obsługa pilota zdalnego sterowania Zasięg pilota Pilot mo e być u ywany do sterowania projektorem w zasi gu pokazanym na ilustracji obok. Odbiornik Wskazówka • Sygnał pilota mo e być odbijany od ekranu. Jednak efektywny zasięg w takiej sytuacji będzie zale ał od rodzaju materiału, z jakiego wykonany został ekran. Podczas korzystania z pilota: • Pilota nie wolno nara ać na wstrząsy, wilgoć lub wysoką temperaturę. • W pomieszczeniach o wietlanych lampą jarzeniową pilot mo e działać nieprawidłowo.
Wyposa enie Dostarczone wyposa enie Pilot zdalnego sterowania RRMCGA029WJSA Dwie baterie typu R-06 („AA”) Kabel zasilający (1,8 m): Wersja dla Ameryki Północnej QACCDA007WJPZ Wersja dla Europy, oprócz Wielkiej Brytanii QACCV4002CEZZ Wersja dla Wielkiej Brytanii, Hong Kongu i Singapuru QACCB5024CENA Wersja dla Australii, Nowej Zelandii i Oceanii QACCL3022CEZZ Wskazówka • W zale no ci od kraju, w którym został kupiony, projektor jest dostarczany w zestawie z jednym z pokazanych po- wy ej kabli zasilaj
Podł czenie i ustawienia 15
Podł czenie projektora do innych urz dze Przed przystąpieniem do pracy Wskazówka • Przed przystąpieniem do pracy nale y wyłączyć zarówno zasilanie projektora jak i wszystkich podłączanych urządzeń. • Przed dokonaniem podłączeń nale y się zapoznać z instrukcjami obsługi wszystkich podłączanych urządzeń. Podłączając komputer nale y pamiętać, eby był on ostatnim włączanym urządzeniem. Opisywany projektor mo na podłączyć do: Komputera poprzez: Kabel RGB i komputerowy kabel audio (patrz strona 18).
Podł czenie projektora do innych urz dze , c.d. Podłączanie kabla zasilającego Dostarczone wyposa enie Kabel zasilający Podł cz dostarczony w zestawie kabel zasilaj cy do gniazda AC z tyłu projektora.
Podł czenie projektora do innych urz dze , c.d. Podł czenie projektora do komputera Podłączenie komputera poprzez kabel RGB 1 Kabel RGB Dostarczone wyposa enie Komputerowy kabel audio Podł cz projektor do komputera poprzez dostarczony w zestawie kabel RGB. • Zabezpiecz wtyczki wkrętami. Notebook Do gniazda wyj ciowego RGB 2 W celu doprowadzenia sygnału d wi kowego podł cz projektor do komputera przy pomocy komputerowego kabla audio zako czonego wtyczkami minijack o średnicy 3,5 mm.
Podł czenie projektora do innych urz dze , c.d. Funkcja „Plug & Play” (działa z gniazdem 15-zł czowym) Opisywany projektor jest zgodny ze standardami VESA DDC 1 i DDC 2B. Przy podł czeniu projektora do komputera kompatybilnego ze standardem VESA DDC, wymogi dotycz ce niezb dnych ustawie zostan przekazane automatycznie. Zanim u yjesz funkcji „Plug and Play”, pami taj, by wł czyć najpierw projektor, a nast pnie poł czony z nim komputer.
Podł czenie projektora do innych urz dze , c.d. Podł czenie projektora do urz dze wideo Podłączenie projektora do ródeł sygnału wideo poprzez kable s-wideo lub wideo i audio Magnetowid lub inne ródło sygnału Do gniazda wyj ciowego sygnału s-wideo Do gniazda wyj ciowego sygnału wideo Do gniazda wyj ciowego sygnału audio Przy pomocy kabli s-wideo lub wideo i audio mo na podł czyć do gniazd INPUT 3, INPUT 4 oraz AUDIO (L/R) w projektorze magnetowid, laserowy odtwarzacz płyt lub inne urz dzenie audio-wideo.
Podł czenie projektora do innych urz dze , c.d. Podłączenie projektora do ródeł sygnału wideo o składowych rozdzielonych Dokonuj c podł czenia do gniazda INPUT 1 lub 2 nale y u yć kabla zako czonego 3 wtyczkami RCA i 15-zł czow wtyczk D-sub. ródłami sygnału wideo o składowych rozdzielonych s m.in. odtwarzacze DVD oraz dekodery DTV*.
Podł czenie projektora do innych urz dze , c.d. Podł czenie do wzmacniacza Podłączenie projektora do wzmacniacza lub innego urządzenia audio Do wej cia sygnału audio Przy pomocy kabla audio zako czonego wtyczkami ø 3,5 mm minijack stereo i cinch mo na poł czyć wyjście AUDIO OUTPUT w projektorze z wejściami we wzmacniaczu lub innym urz dzeniu audio. Podł cz projektor do wzmacniacza przy pomocy kabla audio zako czonego wtyczkami ø 3,5 mm minijack stereo i cinch.
Podł czenie projektora do innych urz dze , c.d. Sterowanie projektorem przy pomocy komputera Podłączenie projektora do komputera przy pomocy przejścia DIN D-sub/RS-232C oraz kabla RS-232C Jeśli gniazdo RS-232C w projektorze zostanie poł czone przy pomocy przejścia DIN D-sub/ RS-232C oraz kabla RS-232C (typu cross, sprzedawanego oddzielnie) z analogicznym gniazdem w komputerze, mo na b dzie u ywać komputera do sterowania i kontroli stanu projektora. Szczegóły na ten temat mo na znale ć na stronie 89.
Podł czenie projektora do innych urz dze , c.d. Podł czenie monitora Równoczesne wyświetlanie obrazu z projektora i na ekranie monitora Obrazy z komputera mog być wyświetlane równocześnie z projektora oraz na ekranie monitora podł czonego przy pomocy dodatkowego kabla RGB. 1 Podł cz projektor do komputera i monitora poprzez kable RGB (jeden w zestawie, drugi sprzedawany oddzielnie).
Podł czenie projektora do innych urz dze , c.d. Funkcja ułatwiaj ca przeprowadzanie prezentacji Pilot zdalnego sterowania wyposa ony jest w przyciski działające w identyczny sposób co klawisze [Page Up] i [Page Down] na klawiaturze komputera. Mogą one między innymi słu yć do wy wietlania kolejnych slajdów prezentacji przygotowanej w programie Power Point™. Korzystanie z przycisków 1 Dostarczone wyposa enie Kabel USB Podł cz projektor do komputera poprzez dostarczony w zestawie kabel USB.
Podł czenie projektora do innych urz dze , c.d. Podł czenie pilota poprzez kabel Podłączenie Jeśli ze wzgl du na ustawienie projektora (np. projekcja tylna) pilot nie mo e być u ywany bezprzewodowo, nale y go podł czyć poprzez kabel zako czony wtyczkami ø 3,5 mm (dost pny powszechnie w sprzeda y, równie u autoryzowanych przedstawicieli firmy SHARP, numer cz ści QCNW-4870CEZZ). Wtyczki nale y podł czyć do gniazd WIRED R/C JACK w górnej cz ści pilota oraz WIRED REMOTE w projektorze.
Ustawienie Regulacja nó ek K t pochylenia projektora mo na regulować przy pomocy nó ek o zmiennej długości. Jest to szczególnie przydatne, gdy projektor jest ustawiony na nierównej powierzchni lub ekran jest pochylony. Posługuj c si nó kami mo na równie unieść obraz, jeśli ekran znajduje si powy ej projektora. Przycisk HEIGHT ADJUST Nó ka 1 Naciśnij przycisk HEIGHT ADJUST. 2 Unieś projektor na dan wysokość i zwolnij przycisk HEIGHT ADJUST.
Ustawienie, c.d. Regulacja obiektywu Regulacj ostrości i wielkości obrazu przeprowadza si przy pomocy pierścienia i pokr tła umieszczonych na projektorze. 1 Ostrość mo na wyregulować obracaj c pierście regulacyjny. 2 Wielkość obrazu ustawia si poło enie pokr tła.
Ustawienie, c.d. Ustawienie ekranu W celu uzyskania obrazu o najwy szej jakości nale y ustawić projektor prostopadle do powierzchni ekranu. • Wskazówka rodek obiektywu powinien się znajdować na wysoko ci rodka ekranu. Je li pozioma o przechodząca przez rodek obiektywu nie będzie prostopadła do powierzchni ekranu, obraz będzie niewyra ny. • Ekran nale y ustawiać w ten sposób, by nie padało na niego intensywne wiatło, poniewa mogłoby to utrudnić lub uniemo liwić obserwację wy wietlanych obrazów.
Ustawienie, c.d. Rozmiar ekranu a odległość projektora od ekranu Linia bazowa: Pozioma o przechodząca przez rodek obiektywu. Ekran rodek obiektywu : odległo ć projektora od ekranu Obiektyw standardowy Proporcje odległości 1:1,77 do 2,25 Tryb NORMAL (4:3) Rozmiar ekranu (obrazu) w calach Przekątna (X) Szeroko ć Wysoko ć Odległo ć projektora od ekranu (L) Maks. (L1) Min.
Ustawienie, c.d. Obiektyw standardowy Proporcje odległości 1:1,18 do 1,48 Tryb NORMAL (4:3) Rozmiar ekranu (obrazu) w calach Przekątna (X) Szeroko ć 300" (762 cm) 240" (609,6 cm) Wysoko ć Odległo ć projektora od ekranu (L) Maks. (L1) Min.
Ustawienie, c.d. Wyświetlanie obrazu odwróconego i w odbiciu lustrzanym Projekcja tylna Ustaw przezroczysty ekran pomiędzy widownią a projektorem. Przy pomocy odpowiedniego ustawienia w menu wybierz tryb projekcji „Rear” w menu „PRJ Mode” (patrz strona 71). Gdy wybrane jest ustawienie standardowe. T Menu ekranowe Obraz zostanie odwrócony. Projekcja z wykorzystaniem lustra Umie ć zwykłe płaskie lustro naprzeciwko obiektywu.
Podstawy obsługi 33
Wyświetlanie obrazu Czynności podstawowe Przed wykonaniem opisanych poni ej czynności nale y podł czyć do projektora wszystkie urz dzenia zewn trzne. d Wska niki na pulpicie sterowniczym projektora Wska nik POWER Wska nik LAMP Informacja • Zgodnie z ustawieniem fabrycznym, menu ekranowe wy wietlane jest w języku angielskim. Opis wyboru języka menu znajduje się na stronie 30. 1 Podł cz kabel zasilaj cy do gniazdka elektrycznego w ścianie.
Wyświetlanie obrazu, c.d. 3 Naciśnij przycisk INPUT 1, 2, 3 lub 4 na pilocie, eby wybrać odpowiednie ródło sygnału. • Naci nij przycisk INPUT na pulpicie sterowniczym projektora, a następnie naci nij ten przycisk ponownie odpowiednią liczbę razy, eby wybrać odpowiednie ródło sygnału. •••••••••••••••••••••••••••••• Wskazówka d Przykładowa informacja ekranowa Tryb INPUT 1 Sygnał RGB Sygnał o składowych rozdzielonych • Je li projektor nie wykryje sygnału, na ekranie pojawi się komunikat „NO SIGNAL”.
Wyświetlanie obrazu, c.d. 5 Naciśnij przycisk AV, wył czyć d wi k. eby tymczasowo •••••••••••••••••••••••••••••• Wskazówka • Ponowne naci nięcie przycisku MUTE spowoduje po- Przycisk OFF Przycisk ON nowne włączenie d więku. 4 eby wył czyć zasilanie, naciśnij przycisk OFF, a gdy pojawi si prośba o potwierdzenie, naciśnij przycisk OFF ponownie.
Wyświetlanie obrazu, c.d. 3 4 Przy pomocy przycisku d lub c wybierz dany j zyk, a nast pnie naciśnij przycisk ENTER. Naciśnij przycisk MENU. • Od tego momentu wszystkie komunikaty i ele- menty menu ekranowego w wybranym języku.
Korekcja efektu trapezowego Korekcja efektu trapezowego Opisana poni ej funkcja jest przydatna, gdy kraw dzie obrazu nie s prostopadłe (obraz ma kształt trapezu). Przycisk KEYSTONE Przycisk ENTER Przyciski ef d c Przycisk UNDO •••••••••••••••••••••••••••••• Wskazówka • Funkcja ta umo liwia zminimalizowanie deformacji obrazu powstającej, gdy projektor nie jest ustawiony prostopadle do ekranu. • Istnieje mo liwo ć korekcji deformacji wynikającej z odchylenia projektora maksymalnie o 35 stopni.
Korekcja efektu trapezowego, c.d. Opisywana funkcja, w celu ułatwienia obserwacji, umo liwia przesunięcie w górę lub w dół całego obrazu o proporcjach 16:9 pochodzącego z odtwarzacza DVD lub dekodera DTV*. Cyfrowe przesuwanie obrazu * DTV jest roboczym terminem okre lającym nowy standard telewizji cyfrowej w Stanach Zjednoczonych. eby przesunąć obraz do góry, naci nij przycisk c. eby przywrócić pierwotne poło enie obrazu, naci nij przycisk UNDO.
Struktura menu ekranowego Poni ej pokazane s poszczególne ustawienia dost pne w menu ekranowym. Tryby INPUT 1 i 2 Menu główne Menu poboczne Wskazówka Menu główne Menu poboczne • Powy ej podane zostały jedynie przykładowe warto ci rozdzielczo ci oraz częstotliwo ci pionowej i poziomej. • Ustawienia „Color”, „Tint” i „Sharp” w menu „Picture” są dostępne, gdy projektor pracuje w trybie „Component”. • Niektórych ustawień nie mo na zmienić nawet przy pomocy opcji „All Reset” w menu „Options (2)”.
Struktura menu ekranowego, c.d.
Korzystanie z menu ekranowego Opisywany projektor wyposa ony jest w dwa zestawy menu ekranowego, które umo liwiaj regulacj obrazu i dokonywanie ustawie ró nych funkcji projektora. Menu mo e być obsługiwane bezpośrednio z projektora lub z pilota za pomoc pokazanych poni ej przycisków.
Korzystanie z menu ekranowego, c.d. Przy pomocy przycisku e lub f wybierz menu, w którym chcesz dokonać regulacji. •••••••••••••••••••••••••••••• 2 Wskazówka • Szczegółowa struktura menu jest pokazana na stro- nach 40 i 41. 3 Przy pomocy przycisku d lub c wybierz element, który chcesz wyregulować. •••••••••••••••••••••••••••••• • Wskazówka eby wy wietlić tylko regulowany element, naci nij przycisk ENTER po wybraniu tego elementu. Wy wietlony zostanie tylko pasek menu i regulowany element.
Korzystanie z menu ekranowego, c.d. Podstawy obsługi menu (ustawienia) 1 Przycisk ENTER Przyciski ef d c Naciśnij przycisk MENU. •••••••••••••••••••••••••••••• Przycisk MENU Wskazówka • Wy wietlone zostanie menu „Picture” dla odpowiednie• Je li wybrane będzie go ródła sygnału. ródło INPUT 1 lub INPUT 2, wy wietlone zostanie menu pokazane na rysunku po prawej stronie u dołu. Przy pomocy przycisku e lub f wybierz menu, w którym chcesz dokonać regulacji.
Korzystanie z menu ekranowego, c.d. 4 Naciśnij przycisk f. • Kursor zostanie przeniesiony do menu poboczne- go. 5 Przy pomocy przycisku d lub c wybierz dane ustawienie dost pne w menu pobocznym. 6 Naciśnij przycisk ENTER. Menu poboczne • Ustawienie zostanie zatwierdzone. •••••••••••••••••••••••••••••• Wskazówka • W niektórych przypadkach mo e się pojawić pro ba o potwierdzenie. Dokonując ustawienia naci nij przycisk e lub f, eby wybrać „Yes” lub „OK”, a następnie naci nij przycisk ENTER.
Regulacja obrazu Do regulacji obrazu słu wymienione poni ej ustawienia.
Regulacja obrazu, c.d. Tryb PROGRESSIVE Ta funkcja umo liwia wł czenie jednego z trybów PROGRESSIVE. W trybach tych obraz jest uaktualniany w sposób bardzie płynny. W menu „Picture” wybierz „Progressive Mode”. → Opis obsługi menu znajduje si na stronach od 42 do 45. •••••••••••••••••••••••••••••• • • • Wskazówka Tryb 2D Ten tryb nadaje się najlepiej do wy wietlania szybko poruszających się obrazów, np. relacji sportowych lub filmów akcji. W trybie tym obraz jest optymalizowany klatka po klatce.
< Regulacja obrazu z komputera Ustawienia w menu „Fine Sync” umo liwiaj likwidacj zakłóce mrugaj cych punktów) pojawiaj cych si na obrazie z komputera. Wybrany parametr Clock (np. pionowych pasków lub Opis Reguluje pionowe szumy. Phase Reguluje poziome szumy (podobne do trackingu w magnetowidzie). H-Pos Centruje obraz w poziomie. V-Pos Centruje obraz w pionie. Gdy funkcja „Auto Sync” jest wyłączona Gdy funkcja „Auto Sync” jest wył czona, na obrazie z komputera mog si pojawiać zakłócenia (np.
Regulacja obrazu z komputera, c.d. Przywoływanie zapamiętanych ustawień Po zapami taniu ustawie kie przywoływanie. mo liwe jest ich szyb- W menu „Fine Sync” wybierz „Select Setting”. → Opis obsługi menu znajduje si na stronach od 42 do 45. •••••••••••••••••••••••••••••• Wskazówka • Je li pod wybraną pozycją nie zapisano adnych usta- wień, rozdzielczo ć i częstotliwo ć nie zostaną wy wietlone.
Regulacja obrazu z komputera, c.d. Dostrojenie automatyczne Ta funkcja umo liwia automatyczne dostrojenie projektora do sygnału z komputera. W menu „Fine Sync” wybierz „Auto Sync”. → Opis obsługi menu znajduje si na stronach od 42 do 45. •••••••••••••••••••••••••••••• Wskazówka Gdy wybrane jest ustawienie „ High Speed”: Normal” lub „ • Dostrojenie będzie przeprowadzane automatycznie po włączeniu projektora oraz zmianie ródła sygnału, gdy projektor będzie podłączony do komputera.
U yteczne funkcje 51
Ustawienie proporcji obrazu Ta funkcja umo liwia zmian trybu wyświetlania i dostosowanie go do indywidualnych potrzeb poprawiaj c jakość wyświetlanego obrazu. W zale ności od rodzaju sygnału wejściowego mo na wybrać „NORMAL”, „FULL”, „DOT BY DOT”, „BORDER”, „STRETCH” lub „SMART STRETCH”. Zmiana proporcji obrazu dla ró nych sygnałów wejściowych Naciśnij przycisk RESIZE. • Ka de naci nięcie przycisku RESIZE będzie powodo- wało zmianę trybu wy wietlania w kolejno ci pokazanej na stronach 52 i 53.
Ustawienie proporcji obrazu, c.d. Sygnał wideo Obraz o proporcjach 4:3, koperta i ci nięty • Obraz o proporcjach 16:9 Gdy wprowadzane są sygnały 720P lub 1080I, ustalony jest tryb „STRETCH”. * W tych trybach mo e być u ywana funkcja cyfrowego przesuwania obrazu. Obraz wyjściowy Sygnał wejściowy NORMAL Obraz wy wietlany jest na pełnym ekranie. FULL rodkowa czę ć obrazu jest wy wietlana w proporcjach 4:3 dzięki rozciągnięciu jej w poziomie 1,3 raza.
Zatrzymanie obrazu Ta funkcja umo liwia natychmiastowe zatrzymanie ruchomego obrazu. Jest to szczególnie u yteczne, jeśli chcesz wyświetlić zatrzymany obraz z magnetowidu lub komputera, np. eby go dokładniej omówić. Wyświetlanie nieruchomego obrazu 1 Naciśnij przycisk FREEZE. • Obraz zostanie zatrzymany. Przycisk FREEZE d Informacja ekranowa 2 54 Ponownie naciśnij przycisk FREEZE, eby powrócić do wyświetlania ruchomego obrazu z bie cego ródła.
Powi kszanie wybranego fragmentu obrazu Ta funkcja umo liwia powi kszenie określonego fragmentu obrazu. Jest to u yteczne, gdy chcesz wyświetlić element obrazu składaj cy si z wielu drobnych szczegółów. Wyświetlanie powiększonego fragmentu obrazu 1 Naciśnij przycisk . • Obraz zostanie powiększony dwukrotnie (x2). • Naci nięcie przycisku lub będzie powodo- Przycisk ENLARGE wało powiększenie lub zmniejszenie wy wietlanego obrazu.
Funkcja gamma Gamma jest funkcj poprawiaj c jakość wyświetlanego obrazu poprzez rozjaśnianie ciemnych fragmentów obrazu bez zmiany jasności fragmentów jasnych. W trakcie wyświetlania długich ciemnych scen, np. filmów i koncertów lub podczas projekcji w jasnych pomieszczeniach, opisywana funkcja ułatwia ogl danie i stwarza wra enie gł bi obrazu. Wybrane ustawienie Opis STANDARD Standardowy obraz, bez korekcji gamma. PRESENTATION Rozja nia ciemne fragmenty obrazu w zaawansowanych prezentacjach.
Wyświetlanie obrazów z dwóch ródeł Ta funkcja umo liwia jednoczesne wyświetlenie obrazów pochodz cych z dwóch ródeł. Mo na na obraz pochodz cy ze ródła INPUT 1 lub INPUT 2 nało yć obraz ze ródła INPUT 3 lub 4. Wyświetlanie wewnętrznego obrazu 1 2 3 Naciśnij przycisk PinP. Naciśnij przycisk INPUT 2 lub 3 na pilocie, eby wyświetlić wewn trzny obraz w postaci ruchomej ramki. Przy pomocy przycisków e, f, d i c określ poło enie ramki na ekranie.
Zaczernianie ekranu Ta funkcja umo liwia zaczernienie wyświetlanego obrazu. Zaczernianie wyświetlanego obrazu 1 Naciśnij przycisk BALCK SCREEN. • Obraz zostanie zaczerniony i widoczny będzie Przycisk BLACK SCREEN napis „BLACK SCREEN”. 2 eby wył czyć zaczernienie, naciśnij ponownie przycisk BLACK SCREEN.
Wyświetlanie informacji o czasie pozostałym do ko ca przerwy Ustawienie i wyświetlanie czasu pozostałego do końca przerwy 1 2 Naciśnij przycisk BREAK TIMER. Ustawiony na 5 minut zegar zacznie odliczać czas pozostały do ko ca przerwy. Gdy na ekranie widoczny b dzie symbol „ ”, przyciskiem e, f, d lub c ustaw dany czas. • Przerwa mo e trwać od 1 do 60 minut. • Zegar rozpocznie odliczanie natychmiast po zwol- nieniu przycisku e, f, d lub c. 3 Naciśnij przycisk UNDO, zegar.
System zarz dzania kolorami (C.M.S.) Ta funkcja umo liwia indywidualne ustawienia charakterystyki sześciu kolorów (R: czerwonego, Y: ółtego, G: zielonego, C: cyan, B: niebieskiego i M: magenta). Ustawienie trybu odtwarzania kolorów W menu „C.M.S.” wybierz „Color Selected”. → Opis obsługi menu znajduje si na stronach od 42 do 45. •••••••••••••••••••••••••••••• Wskazówka • Dodatkowe informacje na temat ustawienia sRGB mo na znale ć na stronie „http://www.srgb.com/”.
System zarz dzania kolorami (C.M.S.), c.d. Ustawienie jasności koloru docelowego W menu „C.M.S.” wybierz „Lightness”. → Opis obsługi menu znajduje si na stronach od 42 do 45. Ustawienie nasycenia koloru docelowego W menu „C.M.S.” wybierz „Chroma”. → Opis obsługi menu znajduje si na stronach od 42 do 45. Ustawienie odcienia koloru docelowego W menu „C.M.S.” wybierz „Hue”. → Opis obsługi menu znajduje si nach od 42 do 45.
System zarz dzania kolorami (C.M.S.), c.d. Przywrócenie ustawień fabrycznych W menu „C.M.S.” wybierz „Reset (This Color)” lub „Reset (All Colors)”. → Opis obsługi menu znajduje si na stronach od 42 do 45. Wybrany element Kontrola dokonanych ustawień W menu „C.M.S.” wybierz „View Settings”. → Opis obsługi menu znajduje si na stronach od 42 do 45. 62 Opis Reset (This Color) Przywracane są parametry „Lightness”, „Chroma” i „Hue” wybranego koloru.
Ustawienie wyjścia sygnału d wi kowego Ta funkcja umo liwia ustawienie wyjścia sygnału d wi kowego. Wybrane ustawienie Opis FAO (Fixed audio output) Poziom gło no ci nie zmienia się w zale no ci od ustawienia poziomu gło no ci w projektorze. VAO (Variable audio output) Poziom gło no ci zmienia się w zale no ci od ustawienia poziomu gło no ci w projektorze. Ustawienie wyjścia sygnału d więkowego W menu „Options (1)” wybierz „Audio Out”. → Opis obsługi menu znajduje si na stronach od 42 do 45.
Automatyczne wyszukiwanie ródeł sygnału Ta funkcja automatycznie wyszukuje i wybiera ródło sygnału bezpośrednio po wł czeniu zasilania lub naciśni ciu przycisku INPUT. U ywanie funkcji W menu „Options (1)” wybierz „Auto Search”. → Opis obsługi menu znajduje si na stronach od 42 do 45. •••••••••••••••••••••••••••••• • • Wskazówka ON: Po włączeniu zasilania lub naci nięciu przycisku INPUT na pulpicie sterowniczym projektor automatycznie przełączy się na aktualnie odbierany sygnał.
Redukcja szumów na obrazie System cyfrowej redukcji szumów (DNR) minimalizuje szumy i dr enia punktów poprawiaj c jakość obrazu. Włączenie funkcji W menu „Options (1)” wybierz „Power Save”. → Opis obsługi menu znajduje si na stronach od 42 do 45. •••••••••••••••••••••••••••••• Wskazówka • Nale y dobrać poziom („Level”) zapewniający najlepszą jako ć obrazu. Funkcję DNR nale y wyłączyć w następujących przypadkach: • Gdy obraz jest rozmyty.
Ustawienie systemu wideo Fabrycznie projektor jest ustawiony na automatyczne rozpoznawanie odbieranego systemu wideo. Ustawienie to mo e być jednak zmienione, jeśli dobrany przez projektor system jest niezgodny z emitowanym przez u ywane urz dzenie wideo. Ustawienie systemu wideo W menu „Options (1)” wybierz „Video System”. → Opis obsługi menu znajduje si na stronach od 42 do 45.
Zapisywanie obrazów • Opisywany projektor mo e zapisywać nieruchomy obraz RGB, a nast pnie odtwarzać go jako obraz pocz tkowy lub obraz tła. • Zapisywać mo na obrazy RGB. Zapisanie obrazu W menu „Options (1)” wybierz „Image Capture”. → Opis obsługi menu znajduje si na stronach od 42 do 45. 1 Przyciskiem d lub c wybierz „ Save Image”, a nast pnie naciśnij przycisk ENTER. • Wy wietlany aktualnie obraz zostanie zapisany w pamięci projektora. Mo e to chwilę potrwać. 2 Przyciskiem e lub f wybierz „Yes”.
Ustawienie obrazu tła Ta funkcja umo liwia wybór obrazu, wyświetlanego, gdy aden sygnał nie dociera do projektora. Wybrane ustawienie Opis Sharp Standardowy obraz z logo firmy SHARP Custom*1 Obraz zaprogramowany przez U ytkownika (np. logo firmy) Blue Niebieski obraz None Czarny obraz*2 *1 To ustawienie umo liwia wy wietlanie obrazu zapisanego w pamięci projektora zgodnie z opisem z poprzedniej strony. *2 Je li sygnał wej ciowy jest zakłócany, na czarnym obrazie równie widoczne będą zakłócenia.
Wybór trybu oszcz dzania energii Tryb oszcz dzania energii oraz funkcja automatycznie wył czaj ca projektor pozwalaj zmniejszyć ilość energii zu ywanej przez projektor. Ustawienie trybu oszczędzania energii W menu „Options (1)” w „Economy mode” wybierz „Power Save”. → Opis obsługi menu znajduje si na stronach od 42 do 45. •••••••••••••••••••••••••••••• Wskazówka • Przy ustawieniu „ON” obni one jest zu ycie energii i poziom szumów wentylatora jasno ć jest zmniejszona o 80%.
Wybór trybu oszcz dzania energii, c.d. Funkcja automatycznie wyłączająca projektor Jeśli ta funkcja b dzie wł czona (ustawienie „ON”), projektor zostanie automatycznie wył czony, w przypadku gdy przez ponad 15 minut nie b dzie docierał do niego aden sygnał. Ustawienie „OFF” spowoduje, e funkcja zostanie wył czona. W menu „Options (1)” w „Economy mode” wybierz „Mntr.out/RS-232C”. → Opis obsługi menu znajduje si na stronach od 42 do 45.
Projekcja obrazu obróconego i lustrzanego Opisywany projektor wyposa ony jest w funkcje projekcji obrazu lustrzanego i obróconego. Umo liwia to instalacj projektora na ró ne sposoby. Wybrane ustawienie Opis Front Ceiling + Front Normalny obraz Obraz obrócony („do góry nogami”) Rear Obraz lustrzany Ceiling + Rear Obraz lustrzany i obrócony Ustawienie trybu projekcji W menu „Options (2)” wybierz „PRJ Mode”. → Opis obsługi menu znajduje si na stronach od 42 do 45.
Blokada przycisków na pulpicie sterowniczym, c.d. Wyłączenie blokady Po wybraniu ustawienia „Normal” dost pne b d wszystkie przyciski na pulpicie sterowniczym projektora. W menu „Options (2)” wybierz „Keylock Level” a nast pnie „ Normal”. → Opis obsługi menu znajduje si na stronach od 42 do 45. •••••••••••••••••••••••••••••• Wskazówka • Je li projektor został zabezpieczony hasłem, po wybra- niu opcji „Keylock Level” pojawi się okno do wprowadzania hasła.
Zabezpieczenie wa nych ustawie hasłem Istnieje mo liwość zabezpieczenia przy pomocy hasła niektórych ustawie projektora w menu „Options (2)”. Dzi ki zabezpieczeniu hasłem bardziej efektywna jest równie blokada przycisków. Wprowadzanie hasła W menu „Options (2)” wybierz „Password”. → Opis obsługi menu znajduje si na stronach od 42 do 45. 1 Przyciskiem d lub c wybierz fr i naciśnij przycisk f. 2 Wprowad 3 kolejne cyfry i naciśnij przycisk ENTER.
Zabezpieczenie wa nych ustawie hasłem, c.d. Zmiana hasła W menu „Options (2)” wybierz „Password”. → Opis obsługi menu znajduje si na stronach od 42 do 45. Przy pomocy przycisków d, c i f wprowad aktualne hasło w polu „Old Password”, a nast pnie naciśnij przycisk ENTER. pomocy przycisków d, c i f wpro2 Przy wad nowe hasło, a nast pnie naciśnij przycisk ENTER. ponownie 4-cyfrowe hasło 3 Wprowad w polu „Reconfirm”, a nast pnie naciśnij przycisk ENTER.
Ustawienie zabezpieczenia przed kradzie Jeśli projektor zostanie zabezpieczony przed kradzie , obraz pochodz cy z podł czonego ródła sygnału nie zostanie wyświetlony, dopóki U ytkownik nie wprowadzi odpowiedniego kodu. W przypadku kradzie y zabezpieczony projektor stanie si bezu yteczny. Wprowadzenie kodu • Zabezpieczenie przed kradzie ą będzie mo liwe dopie- ro po uprzednim zapisaniu hasła w pamięci projektora (patrz strona 73).
Ustawienie zabezpieczenia przed kradzie , c.d. Jeśli ustawione b dzie zabezpieczenie przed kradzie , po wł czeniu zasilania na ekranie pojawi si okienko do wprowadzenia kodu. eby mo na było korzystać z projektora, nale y wprowadzić prawidłowy kod. • W zale no ci od tego, w jaki sposób został zapisany kod, nale y go teraz wprowadzić naciskając przyciski na pulpicie sterowniczym projektora lub pilocie zdalnego sterowania. Informacja • Po wprowadzeniu kodu nale y go zapisać w bezpiecz- nym miejscu.
Przywrócenie ustawie standardowych Opisana poni ej funkcja umo liwia przywrócenie ustawieniom projektora wartości standardowych. Przywrócenie ustawień standardowych W menu „Options (2)” wybierz „All Reset”. → Opis obsługi menu znajduje si na stronach od 42 do 45. •••••••••••••••••••••••••••••• Wskazówka • Je li projektor został zabezpieczony hasłem, po wybra- niu opcji „All Reset” pojawi się okno do wprowadzania hasła. Funkcja „All Reset” nie zmienia następujących ustawień projektora: • C.M.S.
Kontrola ustawie Ta funkcja słu y do wyświetlania w jednym momencie informacji o wszystkich ustawieniach projektora. Wyświetlenie wykazu wszystkich ustawień projektora Wybierz menu „Status” i naciśnij przycisk ENTER. → Opis obsługi menu znajduje si na stronach od 42 do 45.
Dodatek 79
Konserwacja projektora Czyszczenie projektora Przed przystąpieniem do czyszczenia projektora nale y odłączyć kabel zasilający od gniazdka elektrycznego w cianie. Zarówno obudowa jak i pulpit sterowniczy są wykonane z plastiku. Do ich czyszczenia nie wolno u ywać benzyny ani rozpuszczalnika, poniewa mogłoby to spowodować ich uszkodzenie. Obudowę nale y chronić przed działaniem wszelkich lotnych substancji, takich jak np. rodki owadobójcze.
Wymiana filtra powietrza • W celu zapewnienia optymalnych warunków pracy projektor wyposa ony jest w filtry powietrza. • Filtry powietrza powinny być czyszczone po ka - dych 100 godzinach pracy projektora. Filtry nale y czyścić cz ściej, je eli projektor jest u ywany w pomieszczeniach zakurzonych lub zadymionych. • Jeśli filtr musi zostać wymieniony, nale y zakupić nowy wkład (PFILDA005WJZZ) u autoryzowanego przedstawiciela firmy SHARP.
Wymiana filtra powietrza, c.d. 4 Wyczyść filtr powietrza. • Oczy ć filtr i pokrywę z kurzu przy pomocy odku- rzacza z wąską ssawką. 5 Załó filtr. 6 Wsu pokryw filtra w kierunku wskazywanym przez strzałk . • Umie ć go pod wypustkami w pokrywie. •••••••••••••••••••••••••••••• Wskazówka • Upewnij się, e pokrywa jest prawidłowo zamocowana. • Je li kurz zgromadził się równie W przeciwnym razie zasilanie się nie włączy. na filtrze stałym, oczy ć go przy pomocy odkurzacza z wąską ssawką.
Wska niki ostrzegawcze Wska niki umieszczone na obudowie projektora informuj o problemach w jego wn trzu. Jeśli wyst pi jakiś problem, jeden ze wska ników ostrzegawczych zacznie świecić na czerwono i projektor wył czy si . Po wył czeniu zasilania nale y post pować według poni szych wskazówek. Wska nik LAMP Wska nik POWER Je li łączny czas pracy arówki przekroczy 2.000 godzin przy włączonym lub 1.
Wska niki ostrzegawcze, c.d. Informacja • Je li wska nik LAMP zaczyna wiecić i projektor się wyłącza, nale y postępować według wskazówek zamieszczonych w powy szej tabeli, a następnie po odczekaniu 5 minut a projektor ostygnie mo na podłączyć kabel zasilający do sieci i włączyć zasilanie. • Je li zasilanie było wyłączone i zaraz potem ponownie włączone, wska nik LAMP mo e wiecić, a projektora nie będzie mo na uruchomić. W takim przypadku nale y odłączyć i włączyć kabel zasilający.
Informacje dotycz ce arówki arówka Wymiana arówki jest zalecana, gdy wska nik stopnia czasu ycia arówki pokazuje 6% lub mniej, albo w sytuacji, gdy zauwa alne b dzie znaczne obni enie jakości obrazu i kolorów. Czas pracy arówki mo e być kontrolowany w menu ekranowym. Patrz strona 70. (Warunki, w których pracuje projektor, mog mieć znacz cy wpływ na ywotność arówki.) W sprawie wymiany arówki nale y si porozumieć z autoryzowanym przedstawicielem firmy SHARP.
Informacje dotycz ce arówki, c.d. Opis wymiany arówki • • • • Informacja Zespół arówki nale y trzymać wyłącznie za uchwyt. Nie wolno dotykać szklanej powierzchni arówki lub wnętrza projektora. eby uniknąć skaleczeń lub cię szych obra eń nale y dokładnie przestrzegać informacji zawartych w niniejszym opisie. Nale y wykręcać tylko wkręty wskazane w niniejszym opisie (Mo na wykręcać tylko srebrne wkręty.). Dodatkowe informacje mo na znale ć w instrukcji dołączonej do nowego zespołu arówki.
Informacje dotycz ce arówki, c.d. 5 Wyjmij zespół arówki. • Wykręć wkręty zabezpieczające zespół. Trzymaj zespół za uchwyt i wysuń go z projektora. Wkr t 6 Zainstaluj nowy zespół arówki. 7 Zainstaluj osłon zespołu arówki. • Doci nij zespół i zabezpiecz go wkrętami. • Wsuń osłonę w kierunku wskazywanym przez strzałkę i zabezpiecz ją przy pomocy wkrętu. Wkr t Informacja • Je li zespół arówki nie zostanie prawidłowo zainstalowany, nie będzie mo na włączyć projektora.
Opis gniazd INPUT 1 RGB i OUTPUT (INPUT 1, 2): gniazdo 15-złączowe mini D-sub eńskie Wejście RGB 1. Wej cie wideo (czerwony) 2. Wej cie wideo (zielony/synchronizacja) 3. Wej cie wideo (niebieski) 4. Zarezerwowany 5. Zło ony sygnał synchronizacji 6. Masa (czerwony) 7. Masa (zielony/synchronizacja) 8. Masa (niebieski) 9. Nie podłączony 10. Masa 11. Masa 12. Dane dwukierunkowe 13. Synchronizacja pozioma 14. Synchronizacja pionowa 15. Zegar danych Wejście sygnału o składowych rozdzielonych 1. PR 2. Y 3. PB 4.
Port RS-232C – parametry i lista rozkazów Sterowanie z komputera PC Do sterowania projektorem mo e być u ywany komputer PC połączony z nim poprzez kabel RS-232C (typ null modem cross, sprzedawany oddzielnie). Opis podłączenia kabla znajduje się na stronie 23. Warunki transmisji Port RS-232C w komputerze nale y skonfigurować według poni szych parametrów: Format danych: zgodny ze standardem RS-232C Prędko ć: 9.
Port RS-232C – parametry i lista rozkazów, c.d.
Port RS-232C – parametry i lista rozkazów, c.d. Polecenie Rozkaz Parametry Odpowied Polecenie Rozkaz Parametry Odpowied Wskazówka • Je li w kolumnie parametrów widoczne jest podkre lenie (_), nale y w tym miejscu wprowadzić spację. Je li widoczna • • jest gwiazdka (*), nale y wprowadzić liczbę z zakresu podanego w nawiasach w kolumnie poleceń. Ustawienie FINE SYNC mo e być modyfikowane tylko podczas wy wietlania obrazu w trybie RGB. *2 Polecenie SERIAL NO.
Dane techniczne gniazda do podł czenia pilota Parametry gniazda • 3,5 mm minijack stereo • Złącze zewnętrzne: + 5 V (1 A) • Złącze wewnętrzne: masa Funkcje i kody transmisji Element Kod systemowy Kod danych sterujący Kod zewnętrzny Element Kod systemowy Kod danych sterujący Kod zewnętrzny Kod funkcji steruj cej • Kody systemowe od C1 do C5 są stałe i mają warto ć „10110”. • Kody C14 i C15 są odwróconymi bitami potwierdzającymi, przy czym „10” oznacza „przód”, a „01” oznacza „tył”.
Lista obsługiwanych sygnałów komputerowych • Obsługiwane częstotliwo ci: częstotliwo ć pozioma: 15 – 126 kHz; częstotliwo ć pionowa: 43 – 200 Hz; zegar punkto- Sygnał z komputera • Projektor jest kompatybilny ze standardami, których sygnał synchronizacji jest przekazywany z sygnałem zieleni lub wy: 12 – 230 MHz • Projektor jest kompatybilny ze standardami SXGA i UXGA dzięki inteligentnej kompresji i zaawansowanej inteligentnej w postaci sygnału zło onego. kompresji.
Rozwi zywanie problemów Problem Przyczyna lub mo liwe rozwi zanie • Kabel zasilający nie jest podłączony do gniazdka w cianie. • Upewnij się, e zasilanie podłączonych urządzeń zewnętrznych jest włączone. 17 • Kable zostały nieprawidłowo podłączone do gniazd z boku projektora. 35 • Zewnętrzne wyj cie sygnału w podłączanym notebooku nie zostało włączone. 13 • Kable zostały nieprawidłowo podłączone do gniazd z boku projektora. 87 • Wybrane jest nieodpowiednie ródło sygnału. Brak d więku i obrazu.
Rozwi zywanie problemów, c.d. Problem Funkcja nakładania obrazów nie działa. Przyczyna lub mo liwe rozwi zanie • Sygnał doprowadzony do wej cia INPUT 1 ma rozdzielczo ć większą ni • Do wej cia INPUT 1 został doprowadzony sygnał Component 480I, 480P, SXGA. Obraz w trybie INPUT 1 RGB jest ró owy. Obraz jest zbyt ciemny. Obraz jest zbyt jasny. 57 540P, 580I, 580P, 720P, 1035I lub 1080I. • Do wej cia INPUT 1 został doprowadzony sygnał RGB z przeplotem.
Autoryzowane serwisy SHARP W przypadku wyst pienia problemów podczas korzystania z opisywanego projektora nale y spróbować rozwi zać je na podstawie informacji w tabelach na stronach 94 i 95. Jeśli problemu nie udało si rozwi zać, prosimy o kontakt z autoryzowanym serwisem firmy SHARP. Poni ej zamieszczona jest lista przedstawicieli firmy SHARP zagranic , do których mo na si zwrócić o pomoc w przypadku problemów z projektorem podczas pobytu poza granicami Polski.
Dane techniczne Rodzaj urządzenia Model Systemy Wideo Sposób wy wietlania Panel LCD Standardowy obiektyw arówka Wej ciowy sygnał o składowych rozdzielonych (INPUT 1/2) Rozdzielczo ć pozioma Wej ciowy sygnał RGB (INPUT ½) Wej ciowy sygnał wideo (INPUT 3) Wej ciowy sygnał S-wideo (INPUT 4) Zegar punktowy Częstotliwo ć pionowa Częstotliwo ć pozioma Wej cie audio Wyj cie audio Gło nik Napięcie zasilające Prąd wej ciowy Częstotliwo ć zasilania Moc maksymalna Pobór mocy Temperatura otoczenia podczas pracy Temper
Wymiary Widok z tyłu Widok z góry Widok z boku Widok z boku Widok z przodu Widok z dołu Wszystkie wymiary w calach (milimetrach) 98
Przegl d najwa niejszych poj ć Auto sync Funkcja optymalizująca wy wietlanie obrazu, poprzez automatyczne dokonanie pewnych ustawień. Bezprzewodowa mysz Funkcja pozwalająca wykorzystywać pilot projektora jako myszki. Cyfrowa korekcja obrazu Funkcja, która cyfrowo poprawia zniekształcony obraz i przywraca mu proporcje 4:3 zmienione w wyniku ustawienia projektora pod du ym kątem.
Skorowidz Automatyczne dostrajanie ................................................. 50 Automatyczne wyłączenie zasilania .................................. 70 Automatyczne wyszukiwanie ródeł sygnału..................... 64 Baterie ............................................................................... 13 Blokada klawiszy ............................................................... 71 Cyfrowe przesunięcie obrazu ............................................ 39 Dostarczone wyposa enie..............
PG-C45X / XG-C50X ® SHARP ELECTRONICS GESSELSCHAFT M.B.H. Sp. z o.o.