
Operating instructions


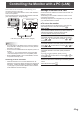

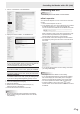

Table Of Contents
- IMPORTANT INFORMATION
- DEAR SHARP CUSTOMER
- SAFETY PRECAUTIONS
- TIPS AND SAFETY INSTRUCTIONS
- MOUNTING PRECAUTIONS
- Supplied Components
- System Requirements
- Part Names
- Connecting Peripheral Equipment
- Connecting the Power Cord
- Binding Cables
- Preparing the Remote Control Unit
- Removing the Handles
- Mounting a web camera
- Turning Power On/Off
- Touch Panel / Touch Pen Preparations
- Touch action
- Basic Operation
- Using the launcher (WHITEBOARD mode)
- Menu Items
- Initialization (Reset)/Functional Restriction Setting (FUNCTION)
- Controlling the Monitor with a PC (LAN)
- Troubleshooting
- Specifications
- Appendix: System Settings
- Mounting Precautions (For SHARP dealers and service engineers)

48
E
■ INFORMATION
Information about this monitor appears.
■ CONTROL
You can control the operations corresponding to the buttons
(
POWER
INPUT
SIZE
) on the remote control unit. (See page 25.)
TIPS
• Instandbymodeandwhiteboardstandbymode,theonly
operation that can be performed is Power ON.
• WhenMONITORPOWERissettoOFF,themonitorenters
standby mode.
• Saveanydatayouneedinadvance.Thepowerwillturnoff
even if there is unsaved data. (The data will be lost.)
■ ADJUSTMENT
You can adjust these settings which are also available on the
monitor’s menu.
• SCREEN(Seepage33.)
• PICTURE(Seepages34to35.)
• AUDIO(Seepage36.)
• SETUP(Seepages36to37.)
• MONITOR(Seepage38.)
• SCHEDULE(Seepage42.)
• PIP/PbyP(Seepage39.)
• OTHERS(Seepage40.)
• FUNCTION(Seepage44.)
TIPS
• AfterchangingDISPLAYCOLORPATTERNtoOFFin
PICTURE menu, click [Refresh] to correctly retrieve the
status of the monitor.
Controlling the Monitor with a PC (LAN)