
Installation manual

6
E
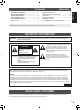
Connections
Caution
• Besuretoturnoffthemainpowerswitchanddisconnecttheplugfromthepoweroutletbeforeconnecting/disconnecting
cables.Also,readthemanualoftheequipmenttobeconnected.
• Becarefulnottoconfusetheinputterminalwiththeoutputterminalwhenconnectingcables.Accidentallyreversingcables
connectedtotheinputandoutputterminalsmaycausemalfunctionsandtheotherproblems.
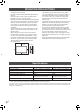
TIPS
• SettheaudioinputterminaltobeusedineachinputmodeinAUDIOSELECTontheSETUPmenu.Thefactorysettingsare
shownbelow.
Input mode Audio input terminal (Factory setting)
D-SUB1 Audio1inputterminal
D-SUB2 Audio2inputterminal
DisplayPort DisplayPortinputterminal
HDMI1 HDMI1inputterminal
HDMI2 HDMI2inputterminal
HDMI3 HDMI3inputterminal
• Touseatouchpanel,thetouchpanelmustbeconnectedtothecomputer,andTouchPanelSettingsToolandPenSoftware
mustbeinstalledonthecomputerfromtheprovidedCD-ROM.
Toinstallthesoftware,seethemanualforeach.
• Touseatouchpanelwithacomputerconnectedtothebottom,connecttotheUSB1port.
Touseatouchpanelwithacomputerconnectedtotheside,connecttotheUSB2port.
(Factorysetting.CanbechangedinTOUCHINPUTSELECTintheSETUPmenu.)
• ThetermsHDMIandHDMIHigh-DenitionMultimediaInterface,andtheHDMILogoaretrademarksorregisteredtrademarks
ofHDMILicensingLLCintheUnitedStatesandothercountries.
• DisplayPortisaregisteredtrademarkofVideoElectronicsStandardsAssociation.
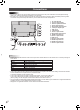
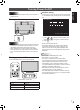
1
For power outlet
2
345678 91110 12
13
14
15
16
17
1. AC input terminal
2. Power cord (Supplied)
3. External speaker terminals
4. Audio output terminal
5. DisplayPort output terminal
6. Touch pen adapter port
7. USB 1 port
8. LAN terminal
9. D-sub 1 input terminal
10. DisplayPort input terminal
11. HDMI 1 input terminal
12. Audio 1 input terminal
13. USB 2 port
14. D-sub 2 input terminal
15. HDMI 2 input terminal
16. HDMI 3 input terminal
17. Audio 2 input terminal