
User Manual
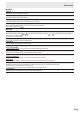
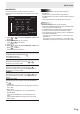

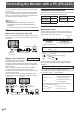
Table Of Contents
- IMPORTANT INFORMATION
- DEAR SHARP CUSTOMER
- SAFETY PRECAUTIONS
- TIPS AND SAFETY INSTRUCTIONS
- MOUNTING PRECAUTIONS
- Supplied Components
- Part Names
- Connecting Peripheral Equipment
- Connecting the Power Cord
- Binding Cables
- Preparing the Remote Control Unit
- Turning Power On/Off
- Basic Operation
- Menu Items
- Initialization (Reset)/Functional Restriction Setting (FUNCTION)
- Controlling the Monitor with a PC (RS-232C)
- Controlling the Monitor with a PC (LAN)
- Troubleshooting
- Specifications
- Mounting Precautions (For SHARP dealers and service engineers)

29
E
You can return the settings to their factory-preset values and
restrict operations.
1. Hold
SIZE
down until “F” appears in the upper left
corner of the screen.
2. While “F” appears, press
, , , in that
order.
▲▲▲
▲ ▲ ▲
OFF
ON
ON
FUNCTION
ALL RESET
ADJUSTMENT LOCK
OSD DISPLAY
LED
OK…[ENTER] BACK…[RETURN]
3. Select and set the items.
ALL RESET
Resets the settings to the factory default settings.
(The settings in COMMUNICATION SETTING are
retained.)
Press
ENTER
, select ALL RESET, and then press
ENTER
.
After initialization, turn the main power switch off and
then back on.
ADJUSTMENT LOCK
You can disable operations on the monitor and the
remote control unit that use buttons.
OFF ...Enables operation.
ON .....Disables all operations other than turning power
on/off and FUNCTION.
OSD DISPLAY
Shows/hides the menu, modes and messages.
The FUNCTION screen cannot be hidden.
ON ................. Shows menus, modes, and messages.
OFF ............... Hides menus, modes and messages.
LED
Species whether to light the power LED.
4. Press
RETURN
to return to the normal screen.
TIPS
• Even if LED is set to OFF, the power LED lights when a
temperature alert occurs.
Initialization (Reset)/Functional Restriction Setting (FUNCTION)