
Operation Manual, Cloud Connect Guide
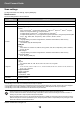


Table Of Contents

11
Cloud Connect Guide
CONFIGURING CLOUD CONNECT AND
E-MAIL CONNECT SETTINGS
This section explains the settings that must be configured before using the Cloud Connect function and E-mail Connect function.
ENABLE CLOUD CONNECT AND E-MAIL CONNECT
Enable the Cloud Connect or Email Connect that you want to use.
(1)
In "Settings (administrator)", select [System Settings] → [Sharp OSA Settings] → [External Service
Connect].
"External Service Connect" page appears.
(2) Select the connector that you want to use, and tap [Enable] key.
Selected connector is shown on the home screen.
Additionally, the Cloud Connect and E-mail Connect functions enabled in system settings [Sharp OSA Settings] → [Standard
Application Settings] and [Embedded Application Settings] are stored.
CONNECT CLOUD CONNECT AND E-MAIL CONNECT
TO THE NETWORK
Set the settings for connecting to the cloud service and the initial value of the connector.
(1) In "Settings (administrator)", select [System Settings]
→
[Sharp OSA Settings]
→
[Embedded
Application Settings].
"Embedded Application Settings" page appears to show the installed connector.
(2) Tap the connector that you want to configure.
"Embedded Application information" page appears.
(3) Tap the [Detail] button.
The detailed setting screen appears.
Set the required items and tap [Submit].
Embedded Application Settings
Google Drive
File Name
Enter File Name.
Include Date in File Name
Specify whether or not to add a save date after the file name.
OneDrive
File Name
Enter File Name.
Include Date in File Name
Specify whether or not to add a save date after the file name.
Models with the application communication function as standard and that have a Application Communication Module
installed will have SharePoint Online, OneDrive, and Google Drive items displayed.
Using [Export/Import] is possible to save the settings of the current embedded application and import its settings.