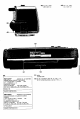
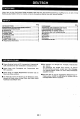
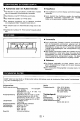
1. Commutateur anti battement 2. Prise de casque 3. Commande de volume 4. Commande de tonalités . Prise de microphone extérieur 6. Sélecteur de fonction 7. Sélecteur de gamme d'ondes . Commande d'accord . Compartiment de cassette 10. Touche d’arrêt/ éjection: W/ & 11. Touche d'avance rapide: 4« 12. Touche de rebobinage: »» 13. Touche de facture: 4 14. Touche d'enregistrement: ® 15, Antenne télescopique FM 18. Ligament de piles 17.
1 Amener Interrupteur FUMIGATION sur TAPE. 2 Appuyer sur |2 touche stoppeuse et charger une cassette dans [e compartiment de cassette. 3 Appuyer sur la touche PLAT. 4 gour avancer rapidement 1a bande, appuyer sur la touche sectoriser, puis sur la touche F FWD. Pour rebobiner, appuyer sur |a touche stoppeuse, puis sur la touche REW. ® Pour changer de doms pendant le fonctionnement de cassette, appuyer sur la touche stoppeuse.
I @ Enregistrement a parfit d'un microphone extérieur T Sa saurer droitiser un micromachine mui Fuie figes de 35 min de diamètre et ayant ure impédance de 600 ohms; si c@ rasta pas le cas, utiliser un adaptateur approprié. 2 Branche a fiche de microphone sur a prise EXT MIC. 3 Amont s commutatrice FUMIGATION sur TAPE. A ectoprocte enregistrement, tol que adscrit dans "Entomologiste ment & partir de Ja radia incorporée” voir gaps 4), @ L'enregistrement effectué par un microphone extérieur hast pas en stéréo.
INTRODUZIONE Congratulazioni per F'ottimo acquisto di questa prodotto SHERPA che, sigillo convinti, vi procurerà molti piaceri musicali per giannini venire, Per sfruttane al meglio Site le caratteristiche, vi raccomandiamo di leggere attentatore il presente manuale. Vi setters ad ottenere sempre it meglio dall'apparecchio, . SOMMARIO Pagina PRECAUZIONI -NOME DEl comandi alimentazione- # Alimentazioni c.
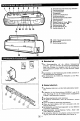
NOME DEI COMANDA! I12 1314 15 \ 2 Inserire & batterci UM/SUN.1 o R 20 nello scomparo, facendo dn attenzione alle indicazioni delle polarità stampigliaste sul pannello posteriore. 3 Rimontare il coperchio dello scomparto delle pile. ® 5o dalla distorsione dovesse inserirsi nelle registrazione, sostituire le pile. ® Sostituire sempre tutte Je pile contemporaneamente. ® Se non si usa riapparecchio per molta tempo, estrarre fe pile. @ L'uso del cavo di carente scollega somigliantemente ie pile.
RIPRODUZIONE T posizionar Interruttore FICTION su TAPE, 2 Premere il taste STOPPATORE e caricare la cassetta nell'alloggiamento. 3 Premere il taso PLAY, 4 per tor avanzare il nastro, premer il tasto STOPPATORE & poi quello F FWD. Por riavvolgere il nastro, premere il fasi STOPPATORE ¢ poi quello REW. @ Prima di cambiare modo mentre il nastro & in moto, premere il tasto STOPPATORE.
SO DEI COMPONENTI! ESTERNA! W Registrazione da un microfono esterno 1 Accestirai che il microfono abbia una spina di 3,5 mim di diametro 8 un'imperizia di 800 ohi; in casi contrario, usare un adattatore appropriato. 2 Collegare ta spina del microfono alta presa EXT MCI, 3 Tortore interruttore FICTION sulla posizione TAPE, 4 Registrare con la procedura indicata nella seziona “Registrazione dalla radio incorporate” (2 pagine 4). ® Le registrazioni effettuate con il microfono esterna non sono stereofoniche.
ENGLISH INTRODUCTION Thank you for purchasing this SHARP Product. We hope it will give you many years of trouble free enjoyment. But for the best performance, read this Manual carefully. 1t will guide you in operas PRECAUTIONS -+ NAME OF CONTROLS POWER SOURCE -+ ® AC power # Battery power RADIO OPERATION SOUND CONTROL # Volume ® Tone CASSETTE OPERATION # General information PRECAUTIONS ng your SHARP product.
NAME OF CONTROLS Beat Cancel Switch 2. Headphones Socket 3. Value Central 4. Tone Control 8. External Microphone Racket . Function Switch 7. Band Selector Switch 8. Tuning Control 9. Cassette Compartment 10. Stop/Eject Button: M/ & 1. Fast Forward Button: 44 2. Rewind Button: bp 13. Play Button: 4 1. Record Burton: 15. FM Telescopic Rod Ag rial 186. Battery Compartment 17. AC Power Input Socket = AC power -5t the AC vintage selector to the required voltages for your area.
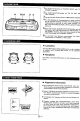
RADIO OPERATION 1 Set the FUNCTION switch ta RADIOCARBON or FM STEREO), 2 Set the BAND SELECTOR switch Use the TUNING control ta tune in the desired station. 4 For P broadcasts, raise and extend the telescopic rod aerial, then adjust the position and length for the best reception. For W, raise the aerial vertically to its full height. For move end rotter the unit for the bast sound.
PLAYBACK RECORDING FROM THE BUILT-IN R ® When recording important selections, be sure to make a preliminary test to ensure that the desired malted is being properly retarded. @ The ALC {Automatic Record Level Central) sir cult automatically controls the Elvis of the input signal used for recording. ARSING RECORDED TAPES 1 Load the tape to be erased into the cassette compartment, 2 Set the FUNCTION switch to TAPE, 10 1 Set the FUNCTION switch lo TAPE, 2 press.
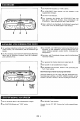
[Using External Units ® Recording from an external microphone 7 Be sure that the microphone has a 3.5 mm diameter plug s fitted, and is of 600 tums impedance; if not, use the appropriate adsorption. 2 Connect the microphone plug o the EXT MIC socket. 3 Set the FUNCTION switch to TAPE, & Record 3 outlined in the “Recording from the built-in radii” section. (See page 4.} # Recording from an external microphone is ot in stereo. # Place the microphone about 10-15 om away from the source.