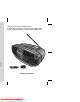
Thank you for purchasing this SHARP product. To obtain the best performance from this product, please read this manual carefully. It will guide you in operating your SHARP product. SHARP CORPORATION Downloaded From Disc-Player.
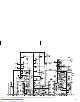
• Wiring diagram of this model is subject to change for improvement without prior notice. Downloaded From Disc-Player.
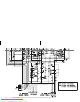
Downloaded From Disc-Player.com Sharp Manuals • Wiring diagram of this model is subject to change for improvement without prior notice.
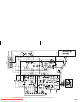
Downloaded From Disc-Player.com Sharp Manuals • Wiring diagram of this model is subject to change for improvement without prior notice.
• Wiring diagram of this model is subject to change for improvement without prior notice. Downloaded From Disc-Player.
Downloaded From Disc-Player.com Sharp Manuals • Wiring diagram of this model is subject to change for improvement without prior notice.
• Wiring diagram of this model is subject to change for improvement without prior notice. Downloaded From Disc-Player.
• Wiring diagram of this model is subject to change for improvement without prior notice. Downloaded From Disc-Player.
Downloaded From Disc-Player.com Sharp Manuals • Wiring diagram of this model is subject to change for improvement without prior notice.
QT-MP5W Special notes WARNINGS: General Information When the ON/STAND-BY button is set at STAND-BY position, mains voltage is still present inside the unit. This unit contains no user serviceable parts. Never remove covers unless qualified to do so. This unit contains dangerous voltages, always remove mains plug from the socket before any service operation and when not in use for a long period. To prevent fire or shock hazard, do not expose this appliance to dripping or splashing.
Supply of this product does not convey a license nor imply any right to distribute content created with this product in revenue-generating broadcast systems (terrestrial, satellite, cable and/or other distribution channels), revenue-generating streaming applications (via Internet, intranets and/or other networks), other revenue-generating content distribution systems (pay-audio or audio-on-demand applications and the like) or on revenue-generating physical media (compact discs, digital versatile discs, semi
QT-MP5W Precautions General General Information Use the unit on a firm, level surface free from vibration. Keep the unit away from direct sunlight, strong magnetic fields, excessive dust, humidity and electronic/electrical equipment (home computers, facsimiles, etc.) which generate electrical noise. Do not place anything on top of the unit. Do not expose the unit to moisture, to temperatures higher than 60˚C (140˚F) or to extremely low temperatures.
Controls and indicators 2 3 4 5 6 7 8 9 10 11 12 13 14 15 16 Front panel Reference page 1. Random Button . . . . . . . . . . . . . . . . . . . . . . . . . . . . . . . . . . 10 2. Memory/Display Button . . . . . . . . . . . . . . . . . . . . . . . . . 11, 12 3. On/Stand-by Button . . . . . . . . . . . . . . . . . . . . . . . . . . . . . . . . 7 4. Stand-by Indicator . . . . . . . . . . . . . . . . . . . . . . . . . . . . . . . . . 7 5. CD Stop Button . . . . . . . . . . . . . . . . . . . . . . . . . .
QT-MP5W Controls and indicators (continued) Back panel General Information Reference page 1. Battery Compartment . . . . . . . . . . . . . . . . . . . . . . . . . . . . . . . 6 2. Beat Cancel Selector . . . . . . . . . . . . . . . . . . . . . . . . . . . . . . 14 3. AC Input Socket . . . . . . . . . . . . . . . . . . . . . . . . . . . . . . . . . . . 6 4. Headphone Socket . . . . . . . . . . . . . . . . . . . . . . . . . . . . . . . . 19 5. Reset Switch . . . . . . . . . . . . . . . . . . . . . . . . . .
Operation with AC power Operation with batteries QT-MP5W AC 110-127/220-240 V, 50/60 Hz 2 3 4 1 5 7 To AC INPUT To a wall socket 1 2 Connect the AC power lead to the AC power input socket, then connect the AC power lead plug to the wall socket. Notes: If the unit will not be used for a long period of time, remove the AC power lead from the wall socket. Connection of the AC power lead to the unit disconnects the batteries. Never use a power lead other than the one supplied.
QT-MP5W General control Volume control Press the VOLUME (+ or –) button to increase or decrease the volume. 0 ..... 30 MAXIMUM Equaliser Basic Operation When the EQUALIZER button is pressed, the current mode setting will be displayed. To change to a different mode, press the EQUALIZER button repeatedly until the desired sound mode appears. FLAT (Not displayed) No equalisation. To turn the power on Press the ON/STAND-BY button to turn the power on.
Listening to a CD or MP3/WMA disc MP3: MP3 is a form of compression. It is an acronym which stands for MPEG Audio Layer 3. MP3 is a type of audio code which is processed by significant compression from the original audio source with very little loss in sound quality. This system supports MPEG 1 Layer 3, MPEG 2 Layer 3, and VBR files. During VBR file playback, time counter in the FL display may differ from its actual playback time. Bitrate which is supported by MP3 is 32 ~ 320 kbps.
QT-MP5W Listening to a CD or MP3/WMA disc (continued) Various disc functions Function Play Main unit Operation Press in the stop mode. To change the display (MP3 discs only) Whilst in the playback mode, press the MEMORY/DISP button. ID3 will on. Folder number, folder name, track number, track name will scroll through the display as follows: /II CD or MP3/WMA disc Playback Folder number Stop Press in the playback mode. Pause Press in the playback mode.
Advanced CD or MP3/WMA disc playback 1 Whilst a disc is stop or playing, press the REPEAT button to Repeat 1. 2 Each time the button is pressed, the repeat play mode changes in the following order. The repeat play mode changes as follows on CD. REPEAT 1 REPEAT NORMAL REPEAT ALL 1 CD CD CD The repeat play mode changes as follows on MP3/WMA disc.
QT-MP5W Advanced CD or MP3/WMA disc playback (continued) Programmed play You can choose up to 32 selections for playback in the order you like. 1 Whilst in the stop mode, press the MEMORY/DISP button to enter the programming save mode. MEMORY/DISP CD or MP3/WMA disc Playback MEMORY TRACK 2 Select a track by pressing the or button. Selected track number 3 Press the MEMORY/DISP button to save the track number.
QT-MP5W Programmed play (Folder mode) 1 4 Press the MEMORY/DISP button to save the track number. Whilst in the stop mode, press the MEMORY/DISP button to enter the programming save mode. MEMORY 2 Press the TUNING/FOLDER ( desired folder. or ) button to select the MEMORY FOLDER 3 Press the tracks. or MEMORY FOLDER button to select the desired 5 Repeat steps 2 - 5 for other folder/tracks. Up to 32 tracks can be programmed. 6 Press the CD / button to start playback.
QT-MP5W MP3/WMA folder mode (only for MP3/WMA files) CD or MP3/WMA disc Playback To playback MP3/WMA (Windows Media Audio) file There are many music sites on the internet that you can download MP3/WMA (Windows Media Audio) music files. Follow the instructions from the website on how to download the music files. You can then playback these downloaded music files by burning them to a CD-R/RW disc. Your downloaded song/files are for personal use only.
Listening to the radio QT-MP5W Tuning 1 2 Press the ON/STAND-BY button to turn the power on. 3 Press the TUNING ( or ) button to tune in to the desired station. Manual tuning: Press the TUNING button as many times as required to tune in to the desired station. Auto tuning: When the TUNING button is pressed for more than 0.5 seconds, scanning will start automatically and the tuner will stop at the first receivable broadcast station.
QT-MP5W Listening to the radio (continued) Aerial adjustment: 4 FM AM Within 10 seconds, press the MEMORY/DISP button to store that station in memory. MEMORY SH AR P MHz If the “MEMORY” and preset number indicators disappear before the station is memorised, repeat the operation from step 2. Beat cancel switch: If a whistling noise occurs when recording from an FM or AM station, set the BEAT CANCEL switch to 1 or 2, whichever gives the best reception.
Setting the FM/AM interval QT-MP5W To change the FM/AM tuning interval: 1 During Standby mode, press ON/STAND-BY and FOLDER UP ( ) buttons for 2 seconds. or kHz 2 kHz The display will appear and the new setting is activated. Radio Caution: When the unit is left for a few hours after the span has been switched and the AC power lead disconnected, the FM span will be automatically returned to 50 kHz (AM span to 9 kHz). If this happens, set the span again.
QT-MP5W Listening to a cassette tape Cassette Tape Before playback: For playback, use normal or low-noise tapes for the best sound. (Metal or CrO tapes are not recommended.) Do not use C-120 tapes or poor-quality tapes, as they may cause malfunctions. Before loading a tape into the cassette compartment, tighten the slack with a pen or a pencil. Tape Playback TAPE RECORD PLAY REWIND F.FWD STOP/EJECT PAUSE 1 2 3 Press the ON/STAND-BY button to turn the power on.
Recording to a cassette tape QT-MP5W Before recording: When recording important selections, make a preliminary test to ensure that the desired material is properly recorded. SHARP is not liable for damage or loss of your recording arising from malfunction of this unit. The volume and sound controls can be adjusted with no effect on the recorded signal (Variable Sound Monitor). For recording, use only normal tapes. Do not use metal or CrO tapes. Side A Tab for side B Tab for side A PLAY REWIND F.
QT-MP5W Recording to a cassette tape (continued) Recording from CD Headphone 1 2 Set the FUNCTION switch to CD. 3 4 Press the RECORD Load a blank cassette into the cassette compartment with the side to be recorded on facing up. button, the recording will begin. When press the STOP/EJECT / button during recording, display will appear, but CD still spinning. Tape Recording TRACK 5 To stop the CD spinning press the STOP button.
Troubleshooting chart General Symptom When a button is pressed, the unit does not respond. No sound is heard. Possible cause Set the unit to the power standby mode and then turn it back on. Is the volume level set to “0”? Are the headphones connected? CD player Symptom Playback does not start. Playback stops in the middle or is not performed properly. Playback sounds are skipped, or stopped in the middle of a track. Symptom Cannot record. Cannot record tracks with proper sound quality.
QT-MP5W Troubleshooting chart (continued) Cleaning the cabinet Before transporting the unit Remove CD from the unit. Make sure there is no CD in the disc compartment. Then, set the unit to the power stand-by mode. Carrying the unit with disc left inside can damage the unit. References Care of compact discs Compact discs are fairly resistant to damage, however mistracking can occur due to an accumulation of dirt on the disc surface.
Specifications General Power source AC 110 - 127/220 - 240 V, 50/60 Hz DC12V [“D” size (UM/SUM-1, R20 or HP-2) battery x 8] Power consumption Power on: 15 W Output power MPO: 5.4 W (2.7 W + 2.7 W) (AC OPERATION, 10% T.H.D) RMS: 4 W (2 W + 2 W) (DC OPERATION, 10% T.H.D) Speaker type 2 way speaker system 10 cm (4") - 8 ohms x 2 - Speaker 4 cm (1 - 3/5") - 8 ohms x 2 - Tweeter Dimensions Width: 410 mm (16-1/4") Height: 165 mm (6-1/2") Depth: 240 mm (9-1/2") Weight 3.4 kg (7.5 lbs.
SHARP CORPORATION 92L01TMP500010 06K R KI 1 03/12/17 QT-MP5_BACK.fm Downloaded From Disc-Player.