R-24AT R-22AT COMMERCIAL MICROWAVE OVEN OPERATION MANUAL Original Instruction This operation manual contains important information which you should read carefully before using your microwave oven. IMPORTANT:There may be a serious risk to health if this operation manual is not followed or if the oven is modified so that it operates with the door open.
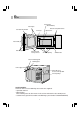
O VEN Ceramic floor (Not removable) Door hinges Holes for safety door latches Oven door with window Oven light Splash cover Door handle Door safety latches Door seals and sealing surfaces Air intake opening Air intake filter Screw for mounting plate Mounting plate Power supply cord Removable cover to access oven light buIb Air vent openings ACCESSORIES: Check to make sure the following accessories are supplied: • Operation manual • Menu Sticker Enter cooking times or dish menus in this sticker
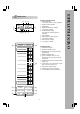
ONTROL PANEL DISPLAY AND INDICATORS 1 Heating indicator: This indicator shows heating in progress 2 Memory number indicator 3 TIME display 4 EXPRESS DEFROST indicator 5 Check mode indicator 6 POWER LEVEL display: Percentage of microwave power is indicated 7 Filter indicator 8 Double quantity mode indicator 9 3rd sequence indicator 0 2nd sequence indicator A 1st sequence indicator 3 45 DEF NUMBER 2 1 CHECK POWER 6 ON 1 3 DOUBLE 2 FILTER % A098 7 B DOUBLE QUANTITY EXPRESS DEFROST C OPERATING PA
C ONTENTS Oven Features with Control Panel .......................................................................... Contents ................................................................................................................. Important Safety Instructions ................................................................................... Installation ............................................................................................................... 1-2 3 4 5 Before Operation ...
I MPORTANT SAFETY INSTRUCTIONS IMPORTANT: PLEASE READ CAREFULLY AND KEEP FOR FUTURE REFERENCE. This appliance is intended to be used by expert or trained user in shops, in light industry and on farms, or for commercial use by lay persons. This oven is designed to be used on a countertop only. It is not designed to be built into a kitchen unit. Do not place the oven in a cabinet. The electrical outlet must be readily accessible so that the unit can be unplugged easily in an emergency.
I NSTALLATION 8-10) Turn the removed mounting plate B over and then using the removed screw (c) and (d), attach the mounting plate B, as shown in the figure A. ! WARNING: Inspect the Oven: Check the oven carefully for damage before and regularly after installation. • Make sure the door closes properly, that it is not misaligned or warped. • Check the hinges and door safety latches are not broken or loose. • Ensure the door seal and sealing surfaces are not damaged.
B EFORE OPERATION • • • When you first connect the microwave oven to an electrical socket, the digital display will show . You can input the pads only when the door is closed. Oven lamp and fan motor work for 1minute whenever the door is opened or after cooking. • • The programme or check mode is cancelled when any pads are not pressed for more than 3 minutes. will appear on the display after the time reaches zero. It will disappear when the oven door is opened or the STOP/CLEAR pad is pressed.
MEMORY PROGRAMME ENTRY You can change memory programmes for 20 memory banks. One, two or three sequences can be programmed. See cooking sequence chart on top of page 11 for time maximums. MEMORIZING TIME AND POWER LEVEL * Example : If you want to set 4 minutes at 60% as the 1st sequence and 2 minutes at 30% as the 2nd sequence for 1 serving in the memory 1. Step 1 Press pad Action Select set mode. Display X2 SET NUMBER within 2 sec. 2 Select memory number. 3 Press MANUAL/REPEAT pad.
CHANGING THE TIMING REQUIRED BY THE MAGNIFICATION FACTOR FOR DOUBLE QUANTITY The magnification factor for double quantity is preset 1.8 times the single quantity cooking time, but you can alter this constant to suit your needs if the food needs more or less cooking time. * Example: If you want to change the magnification factor to 1.67 in memory 1. Step Action Press pad Select set mode. 1 Display X2 SET NUMBER within 2 sec. Press DOUBLE QUANTITY pad.
MEMORY CHECK You can check the information programmed into the memory. CHECKING TIME AND POWER LEVEL * Example: If you want to know the information that you have programmed into memory 1, this memory has been programmed for 4 minutes at 60% as the 1st sequence and 2 minutes at 30% as the 2nd sequence. Step Action 1 Select check mode. 2 Select memory number. Press pad CHECK 1 1 Display CHECK NUMBER POWER NUMBER % 1 POWER NUMBER % 2 Repeat 3 Cancel check mode.
MANUAL COOKING Your oven can be programmed for up to 3 cooking sequences and has 11 preset microwave power levels. COOKING TIME Cooking Sequence Microwave power level that can be used. Cooking time that can be used. 1 Stage only 0-100% Max. 30 minutes 0-40% all stages Max. 30 minutes any stage Max. 60 minutes for two stages Max. 90 minutes for three stages 50-100% Max.
MULTIPLE SEQUENCE COOKING * Example: To cook for 5 minutes at 70% and then continue to cook for 20 minutes at 30%. Step 1 Select manual cooking. Step 2 Enter desired cooking time. (5 min.) MANUAL / REPEAT Step 4 Step 5 Enter desired power level. (70%) Press MANUAL/ REPEAT pad. 7 Step 7 Press POWER LEVEL pad. DISPLAY 0 0 Step 6 Enter desired cooking time for the 2nd stage. (20 min.) MANUAL / REPEAT Step 8 Enter desired power level.
OTHER CONVENIENT FEATURES COUNTER CHECK Set counter to "0" before using oven for the first time. See page 13. With this feature you can check how many times the oven was used. * Example: Suppose you want to know the total operated times and the number operated by each memory/ function. If the oven was operated 8268 times and memory 1 was used 513 times and memory 12 was used 228 times, and manual cooking was used 3339 times, and Express Defrost was used 856 times.
COUNTER CLEAR Each number of times can be cleared. * Suppose you want to clear the times of memory 1. Step 1 Display Press pad Action Select check mode. CHECK X2 CHECK (Total times used) 2 Press NUMBER pad 1 . 1 NUMBER CHECK (Times memory 1 was used) 3 Press SET pad. SET NUMBER 4 Cancel check mode. CHECK CHECK Note: 1. To clear times of manual cooking, press MANUAL/REPEAT pad at Step 2 instead of NUMBER pad.
C OOKING ADVICE WARNING - Always attend the oven when in use. Carefully follow the SHARP Operation Manual at all times. If you exceed recommended cooking times and/or use power levels that are too high, food may overheat, burn, and in extreme circumstances, catch fire and damage the oven. • The microwave power level will default to 100% unless you press the POWER LEVEL button for the desired setting. Take care when heating foods with high sugar or fat content, e.
! Face & Hands: Always use oven gloves to remove food or cookware from the oven. Stand back when opening the oven door to allow heat or steam to disperse. When removing covers (such as cling-film), opening roasting bags or popcorn packaging, direct steam away from face and hands. Check the temperature of food and drink and stir (before serving). Take special care when serving food to babies, children or the elderly.
ADVICE FOR DEFROSTING Meat joints Place in a flan dish, turn over at least 4-5 times during defrosting, shield any warm areas with small, flat pieces of foil. After defrosting, wrap in foil and allow meat to stand for 1-2 hours, until thoroughly defrosted. Poultry Place in a flan dish, turn over at least 3-4 times during defrosting, shield any warm areas with small, pieces of foil. After defrosting, wrap in foil and allow poultry to stand for 1-2 hours, until thoroughly defrosted.
ADVICE FOR REHEATING ! WARNINGS: Oil & Fat: Never heat oil or fat for deep frying as this may lead to overheating and fire. Stand back when opening the oven door to allow heat or steam to disperse. When removing covers (such as cling-film), opening roasting bags or popcorn packaging, direct steam away from face and hands. Never heat liquids in narrow-necked containers, as this could result in the contents erupting from the container and may cause burns.
D EFROSTING CHART MANUAL DEFROSTING DEFROSTING FOOD TIME R-24AT Beef, Lamb & Pork Joints (uncooked) R-22AT 8 mins 13-14 mins /450g (1lb) MICROWAVE POWER LEVEL METHOD LOW (10%) 1. Place on a large plate. 2. Turn over 4-5 times during defrosting. NOTE: If necessary, small pieces of aluminium foil can be used to shield small areas of meat which may become warm during defrosting. 3. After defrosting, wrap in foil and leave to stand for 1-2 hours or until thoroughly defrosted.
D EFROSTING CHART FOOD DEFROSTING TIME R-24AT R-22AT MICROWAVE POWER LEVEL METHOD Bread Sliced 2-3 mins 3-4 mins /800g (13/4lb) loaf MEDIUM LOW (30%) 1. Arrange and separate slices on the turntable. 2. Turn over, separate and re-arrange twice during defrosting. Remove defrosted slices each time. 3. After defrosting, cover with foil for 5-10 minutes or until thoroughly defrosted. Bread Buns 1-2 mins 2-3 mins for 6 buns LOW (10%) 1. Place on turntable. 2.
C OOKING CHART FOOD COOKING TIME R-24AT Beef: Medium (Topside, Silverside) Chilled (50C) MICROWAVE POWERLEVEL METHOD R-22AT 7-8 mins 9-10 mins /450g (1lb) MEDIUM HIGH (70%) Lamb, medium 7-8 mins 9-10 mins /450g (1lb) (fillet, shoulder, leg) Chilled (50C) MEDIUM HIGH (70%) As above. 7-8 mins 12-13 mins /450g (1lb) MEDIUM HIGH (70%) As above. Pork (loin, leg) Chilled (50C) 1. Place fat side down in a flan dish. 2. Turn over halfway through cooking and remove juice. 3.
C OOKING CHART FOOD COOKING TIME R-24AT R-22AT MICROWAVE POWERLEVEL METHOD 1. Place in a single layer in a large flan dish, cover with microwave cling film and pierce in 4-5 places. 2. Leave to stand for 2-3 minutes before serving.
C OOKING CHART FOOD COOKING TIME Peas Fresh: 200C Frozen: -180C R-24AT R-22AT Fresh: 1-2 mins 2-3 mins for 225g (8oz) Frozen: 2-3 mins 3-4 mins for 225g (8oz) New potatoes Room 200C MICROWAVE POWERLEVEL METHOD HIGH (100%) 1. Place in a dish, add 30ml (2tbsp) water. 2. Cover with microwave cling film and pierce in 4-5 places. 3. Stir halfway through cooking. 4. Leave to stand for 1-2 minutes before serving. 4 mins 6-7 mins for 450g (1lb) HIGH (100%) 1.
R EHEATING CHART FOOD TEMP QUANTITY METHOD REHEATING TIME ON HIGH (100%) R-24AT R-22AT BREAKFAST Porridge Chilled 125g (5oz) Place in a bowl, uncovered 35 sec 1 min Scrambled Egg Chilled 125g (5oz) Place on a plate, uncovered 30 sec 50 sec Scrambled Egg with bacon or sausage Chilled 175g (6oz) As above 50 sec 1 min 20 sec Bacon Chilled 4 rashers As above 25 sec 45 sec Sausages - thick Sausages-thin Chilled Chilled 4 8 As above As above 35 sec 35 sec 55 sec 55 sec Smoked H
R EHEATING CHART FOOD TEMP METHOD QUANTITY REHEATING TIME ON HIGH (100%) R-24AT R-22AT Place on a plate, cover with cling film 1 min 15 sec 2 mins 15 sec PREPARED DISHES Bangers & Mash Chilled 325g (12oz) Duck à l’orange Chilled 540g (1lb 4oz) As above 3 mins 15 sec 4 mins Spaghetti Bolognese Chilled 300g (11oz) As above 1 min 15 sec 2 mins 15 sec Chicken in a sauce Chilled 300g (11oz) As above 2 mins 30 sec 3 mins 15 sec Beef Stroganoff & Rice Chilled 375g (13oz) As above 2
R EHEATING CHART FOOD TEMP QUANTITY METHOD REHEATING TIME ON HIGH (100%) R-24AT R-22AT SAVOURY BREAD AND PASTRY Cornish Pastie(s) (175g)(6oz) each Chilled 1 2 Place on a plate, uncovered As above 35 sec 1 min 10 sec 55 sec 1 min 50 sec Sausage Roll(s) 75g (3oz) each Chilled 1 2 Place on a plate, uncovered As above 15 sec 25 sec 30 sec 40 sec CANNED FOODS Baked Beans Room 450g (1lb) Place in a bowl, cover with cling film, 1 min 30 sec stir halfway through cooking Sausage & Beans Room
R EHEATING CHART FOOD TEMP QUANTITY METHOD REHEATING TIME ON HIGH (100%) R-24AT R-22AT FRESH VEGETABLES Jacket Potatoes Chilled 250g (9oz) Place on the turntable, uncovered 1 min 1 min 45 sec New Potatoes Chilled 225g (8oz) Place on a plate, uncovered 1 min 1 min 45 sec Brussels Sprouts Chilled 225g (8oz) Place on a plate, uncovered 30 sec 40 sec 1 min 1 min 30 sec 1 min 30 sec 2 mins MEAT PORTIONS Chicken Portions Leg Breast Chilled Chilled 1 (300g)(11oz) 1 (400g)(14oz) Place o
R EHEATING CHART FOOD TEMP QUANTITY METHOD REHEATING TIME ON HIGH (100%) R-24AT R-22AT SWEET PORTIONS Fruit Crumble Chilled 175g (6oz) Place in a bowl, uncovered 35 sec 45 sec Fruit Crumble with custard Chilled 275g (10oz) Place in a bowl, uncovered 1 min 1 min 30 sec Fruit Pie Chilled 175g (6oz) Place in a bowl, uncovered 35 sec 45 sec Fruit Pie with Custard Chilled 275g (10oz) Place in a bowl, uncovered 50 sec 1 min Sponge Pudding Chilled 125g (5oz) Place in a bowl, uncove
C LEANING & MAINTENANCE WARNING • Do not allow grease or dirt to build up on the door seals and adjacent parts as this may prevent the door from closing correctly and may cause a leakage of microwaves. To clean use a mild detergent solution on a soft damp cloth. • • • • DO NOT OPERATE the oven without the splash cover in place.
T ROUBLESHOOTING If you answer "NO" to any question first check that the oven is plugged in properly and the fuse has not blown, if there is no fault with either, check against the troubleshooting chart below. If you think the oven is not working properly there are some simple checks which you can carry out yourself before you call for an engineer. This will help prevent unnecessary service calls if the fault is something simple.
T O REPLACE THE MAINS PLUG The wires in the mains cable are colour coded as shown opposite: As the colours of the cores in the mains lead of your oven may not correspond with the coloured marking identifying the terminals in your plug, connect the wires as shown: Make sure the terminal screws are tight and the cable is held securely by the cable grip where it enters the plug. Like most appliances in your home, your oven must be connected to a single phase 230-240 Volt, 50Hz alternating current supply.
SPECIFICATIONS: AC Line voltage ........................... Single phase 230-240V, 50Hz * This Product fulfils the requirement of the European AC Power required ...................... R-24AT : 2.9kW standard EN55011. In conformity with this standard, .................................................... R-22AT : 2.4kW this product is classified as group 2 class B Output power .............................. R-24AT : 1900W (IEC 60705) equipment. Group 2 means that the equipment ................................