® GRILL MICROWAVE OVEN OPERATION MANUAL AND COOKING GUIDES MODEL R-750D CONTENTS Pages Important Safety Instructions 1 Installation Instructions 3 Oven Diagram 4 Operation of Touch Control Panel 4 Control Panel Display 4 Touch Control Panel Layout 5 Before Operating 6 Getting Started 6 Stop/Clear 6 To Cancel Programme During Cooking 6 Heating without Food 6 Clock Setting 7 Manual Operations 8 Microwave Cooking Techniques 8 Microwave Time Cooking 9 Sequence Cooking 10 Insta
A32229 R750D Eng. Heb. O/M IMPORTANT SAFETY INSTRUCTIONS Warning To avoid the danger of fire To avoid the possibility of injury 1. Do not operate the oven if it is damaged or malfunctioning. Check the following before use. (1) The door (not warped) (2) The hinges and safety door latches (not broken or loose) (3) The door seals and sealing surfaces (4) The oven cavity (not dented) (5) The power supply cord or plug 2. Do not try to adjust or repair the oven by yourself because of hazard.
To avoid the possibility of explosion and sudden boiling Other warnings 1. Never modify the oven in any way. 2. Do not move the oven while it is in operation. 3. This oven is for home food preparation only. It is not suitable for commercial or laboratory use. 4. This appliance is not intended for use by young children or infirm persons without supervision. 1. Never use sealed containers. Remove seals and lids before use.
INSTALLATION INSTRUCTIONS 1. Remove all packing materials from the oven cavity, (do not remove the waveguide cover, item 10 on page 4), and the feature sticker from the outside of the door, if there is one. Check the unit for any damage such as a misaligned door, damaged door seals around the door or dents inside the oven cavity or on the door. If there is any damage, please do not operate the oven until it has been checked by a SERVICE CENTRE APPROVED BY SHARP and repaired, if necessary. 2.
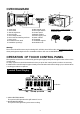
OVEN DIAGRAM 3 2 1 9 D C H 4 8 B F G E 10.Waveguide cover 11.Door open button 12.Control panel 13.Digital readout 14.Power supply cord 15.Outer cabinet 16.Turntable 17.Turntable support 18.Ventilation slit Metal racks——High and low The racks are for Grill, Grill Mix and Auto Grill. A 5 79 0 5 6 1. Oven lamp 2. Grill heater 3. See through door 4. Door hinges 5. Door safety latches 6. Door seals and sealing surfaces 7.Oven cavity 8.Turntable motor shaft 9.
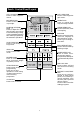
Touch Control Panel Layout AUTO COOK PAD Press to select 4 popular menus. AUTO GRILL PAD Press to select 4 popular grill menus. RICE MENU PAD Press to cook rice, congee or porridge. REHEAT PAD Press to reheat dish, soup, beverage or bread. MORE( ), LESS( ) PADS Press to adjust the doneness of food in one minute increments during cooking or to increase/decrease the time whilst programming the automatic operations. STEAM MENU PAD Press to steam fish, meat or dumpling.
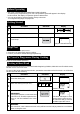
Before Operating * This oven is preset with the OPERATION GUIDE in English. To assist you in programming your oven, the operation guide will appear in the display. In this manual, the display of operation guide is abbreviated. * You can get operation guide in English, Malay or Russian. To change the language, see page E-30. Getting Started Step Procedure 1 Plug the oven into a power point. 2 Close the oven door. Pad Order Display as above Press the STOP/CLEAR pad so that the oven beeps.
Clock Setting * To enter the present time of day 11:34 (AM or PM). Step Procedure Pad Order Display Press the CLOCK pad once. 1 The dots (:) will flash on and off. 2 Enter the correct time of day by pressing the numbers in sequence. 1 1 3 4 Press the CLOCK pad again. 3 This is a 12-hour clock. If you attempt to enter an incorrect clock time (Ex. 13:45), will appear in the display. Press the STOP/CLEAR pad and re-enter the time of day (Ex. 1:45).
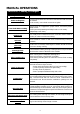
MANUAL OPERATIONS Microwave Cooking Techniques Arrange food carefully Place thickest areas toward outside of dish. Watch cooking time Cook for the shortest amount of time indicated and add more time as needed. Food severely overcooked can smoke or ignite. Cover foods before cooking Check recipe for suggestions: paper towels, microwave plastic wrap or a lid. Covers prevent spattering and help foods to cook evenly.
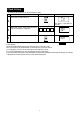
Microwave Time Cooking This is a manual cooking feature, first enter the cooking time then the power level. You can programme up to 99 minutes, 99 seconds. There are five different power levels.
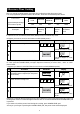
Sequence Cooking Your oven can be programmed for up to 4 automatic cooking sequences, switching from one variable power setting to another automatically. Note that POWER LEVEL must be entered first when programming sequence cooking. * Suppose you want to cook for 10 minutes on 50% (MEDIUM power) followed by 5 minutes on 100% (HIGH power). Step Procedure 1 Select desired power level by pressing the POWER LEVEL pad (for 50% press three times). Enter desired cooking time.
Slow Cook The SLOW COOK setting is designed for foods which cook longer time. For example, stewing, braising, boiling soup or Chinese desserts of liquid type. The SLOW COOK setting provides two choices: SLOW COOK HIGH or SLOW COOK LOW. The maximum cooking time is 2 hours for each choice when cook manually. To select SLOW COOK HIGH, press the SLOW COOK pad once. To select SLOW COOK LOW, press the SLOW COOK pad twice. * Suppose you want to cook stew chicken on SLOW COOK HIGH for 1 hour 30 min.
Grill Cooking The grill heater has one power setting and cannot be adjusted. Use appropriate time for steaks, chops, chicken pieces or other grilled food to achieve opimum results of cooking. Recommended Utensils: High rack Low rack Aluminium foil container Heat resistant cookware * Suppose you want to cook 1.0 kg of steak for 20 minutes on Grill. Step Procedure Pad Order Display Press the GRILL pad. 1 Enter desired cooking time. 2 0 0 0 2 COOK COOK will flash on and off.
Grill Mix Cooking Your Grill Microwave Oven has two programmed settings that make it easy to cook with grill heater and microwave automatically. The GRILL MIX-HIGH is programmed with 50% microwave power, while the GRILL MIX-LOW is programmed with 10% microwave power. To select GRILL MIX-HIGH, press the GRILL MIX pad once. To select GRILL MIX-LOW, press the GRILL MIX pad twice.
GRILL RECIPES Beef Steak with Vegetable Sauce [ Ingredients ] 510g beef, about 1 cm thick 1/2 onion, sliced 1 tomato, sliced 2 cloves garlic, chopped 1 tbsp. oil [ Seasonings ] 1 tbsp. light soy sauce 1 tbsp. dark soy sauce 1 tbsp. chopped ginger 1 tsp. sugar 1 tsp. wine 1/2 tsp. salt 2 tbsp. oil 1/2 tsp. garlic powder 1 tsp. pepper [ Gravy ] 2 tbsp. tomato sauce 2 tsp. sugar 1/2 tsp. salt 1 tsp. vinegar 5 tbsp. water 2 tsp. cornflour blended with 1 tbsp. water [ Method ] (Beef Steak) 1.
AUTOMATIC OPERATIONS Notes for Automatic Operations 1. will be displayed if: More or less than the quantity or weight of foods suggested in each MENU GUIDE is programmed when the INSTANT COOK/START pad is pressed. To clear, press the STOP/CLEAR pad and reprogramme. 2. When using the automatic features, carefully follow the details provided in each MENU GUIDE to achieve the best result. If the details are not followed carefully, the food may be overcooked or undercooked or may be displayed. 3.
Auto Grill 1. Grilled Chicken 2. Shipudim 3. Grill Fish 4. Grilled Steak/Chops AUTO GRILL will automatically compute the cooking mode and cooking time for the 4 listed menus. (Follow the details provided in Auto Grill Menu Guide on next page.) * Suppose you want to cook 1.0 kg of Grill Chicken (Round off to nearest 0.1 kg): Step 1 Procedure Pad Order Display Press the AUTO GRILL pad until the desired menu number is displayed (for Grill Chicken press once). HELP KG AUTO x1 KG flashes on and off.
Auto Grill Menu Guide Menu No. Menu Grill Chicken Initial Temperature 8 - 12˚C Weight (KG) 1.0 - 1.6kg AG-1 • • • • Wash chicken, trim away fat and pat dry. Season as desired for at least 30 mins. Place on the low rack, uncovered. When oven stops, cover thinner part or end of legs with foil. (Discard excess oil on the turntable where necessary.) Turn it over and continue to cook. (Note: Make sure the foil does not touch each other and the oven wall.) • After cooking, stand for 5-10 mins.
Auto Cook 1. Fresh Vegetable 2. Frozen Vegetable 3. Jacket Potato 4. Noodles AUTO COOK will automatically compute the power level and cooking time. AUTO COOK has 4 menus. To select a menu, press the AUTO COOK pad until the menu of your choice is displayed. (Follow the details provided in Auto Cook Menu Guide on next page.) * Suppose you want to cook 2 pieces of Jacket Potato. Step Procedure Pad Order Display Press AUTO COOK pad 3 times to cook Jacket Potato.
Auto Cook Menu Guide Menu No. AC-1 Initial Temperature Fresh Vegetables 20-25˚C Room Broccoli (florets) temperature Lettuce (shreds) Asparagus (strips) Chinese Pak Choi (whole or halves) Chinese Celery Cabbage (Shreds) Spinach (halves) Onions (shreds) Mange-tout (whole) Corn-on-the-cob (whole or halves) Green Pepper (strips) Menu Quantity (KG or PCS) 0.1 - 1.0 kg Procedure • Wash vegetables, then remove excess water. • Cut & trim the vegetables info florets, shreds or strips.
Reheat 1. Dish REHEAT will automatically compute the power level and 2. Soup cooking time.Press to select 4 popular reheat menus. 3. Beverage (Follow the details provided in Reheat Menu Guide as 4. Bread below.) * Suppose you want to reheat 2 cups of Soup: — Step Procedure 1 Press the REHEAT pad until the desired menu number is displayed (for soup press twice). Pad Order Display HELP x2 PCS AUTO PCS will flash on and off. Press the number pad to enter quantity.
Rice Menu 1. Rice 2. Congee 3. Porridge RICE MENU will automatically compute the power level and cooking time. Press to select 3 popular rice menus. (Follow the details provided in Rice Menu Menu Guide on next page.) * Suppose you want to cook 2 serves of Rice: — Step 1 Procedure Pad Order Press the RICE MENU pad until the desired menu number is displayed (for rice press once). Display COVER x1 HELP PCS AUTO PCS and COVER will flash on and off. Press number pad to enter serves.
Rice Menu Menu Guide Menu No. Quantity Menu Rice R-1 1-2 serves Serving (s) 1 serve (1-2 persons) 2 serves (3-5 persons) Congee Rice 50g 80g Water 750ml 1350ml • • • • • • • • Wash rice until water runs clear. Place rice and water into a deep casserole (about 2 ) and soak for 30 mins (stir rice a few times during soaking). Stir and cook with cover. After cooking, stir lightly and stand for 5 mins with a cover. Wash rice until water runs clear.
Steam Menu 1. Fish 2. Meat 3. Dumpling STEAM MENU will automatically compute the power level and cooking time. Press to select 3 popular steam menus. (Follow the details provided in Steam Menu Guide on next page.) * Suppose you want to cook 350g (3 serves) of Fish: — Step 1 Pad Order Procedure Press the STEAM MENU pad until the desired menu number is displayed (for fish press once). Display COVER x1 HELP PCS AUTO PCS and COVER will flash on and off. Press the number pad to enter quantity.
Steam Menu Menu Guide Menu No. Menu Fish S-1 Initial Temperature 8-12°C eg: Sea Bream Red Snapper Carp Pomfret Golden Thread Black Mullet Flatfish Garoupa etc. Meat S-2 eg: Beef patty Spare rib cubes Chicken pieces etc.
STEAM MENU RECIPES (Meat) Beef Patty [ Ingredients ] 330 g Ground beef 50 g Preserved Vegitables 1 Salted Egg Yolk [ Seasonings ] 1 tsp. Salt 1 tsp. Sugar 2 tsp. Cornstarch 2 tsp. Oil Soya sauce 1 1/2 tsp. [ Method ] 1. Marinate the ground beef and preserved vegetables with seasonings and mix well. Press into patty shape. 2. Cut the salted Egg Yolk into dices and place on the patty for decoration. 3. Cover with microwave wrap and press STEAM MENU pad twice to Meat.
Easy Defrost The Easy Defrost feature allows you to defrost meats by entering weight. * Suppose you want to defrost 1.0 kg of Chicken Pieces. (Round off to nearest 0.1 kg) Step Procedure Pad Order Display Press the EASY DEFROST pad . DEFROST HELP 1 KG AUTO KG flashes on and off. Press number pads to enter weight. DEFROST HELP 1 0 KG 2 AUTO KG stops flashing and remains on display. COOK will flash on and off. Press the INSTANT COOK/START pad.
Easy Defrost Menu Guide MENU WEIGHT (KG) PROCEDURE Steaks Chops 0.1 - 2.0 kg • Shield thin end of chops or steaks with foil. • Position the food with thinner parts in the centre in a single layer on the defrost rack. If pieces are stuck together, try to separate as soon as possible. • When oven has stopped, remove defrosted pieces, turn over and shield the warm portions. • Press start to continue defrosting. • After defrost time, stand covered with aluminium foil for 5-30 minutes. Minced Meat 0.
OTHER CONVENIENT FEATURES Help Feature (INFO) (1) Auto Start 1. Auto start 2. Child Lock 3. Demonstration Mode 4. Language 5. Help The HELP feature has 5 different programs. The Auto Start feature allows you to set your oven to start automatically. Auto Start can be used for manual cooking, Slow Cook or Rice Menu. * Suppose you want to start cooking a casserole for 20 minutes on 50% (MEDIUM power) at 4:30 in the afternoon. (Check that the correct time of day is displayed.
(2) Child Lock If the oven is accidentally started with no food or liquid in the cavity, the life of the oven can be reduced. To prevent accidents like this, your oven has a "Child Lock" feature that you can set when the oven is not in use. * To set the Child Lock. After step 1 from Auto Start. Step Procedure Pad Order Press the number 2 pad. Display 2 2 Press the INSTANT COOK/START pad. 3 The time of day will appear in the display.
(3) Demonstration Mode This feature is mainly for use by retail outlets, and also allows you to practice key operations. * To demonstrate. After step 1 from Auto Start. Step Procedure Pad Order Press the number 3 pad. Display 3 2 Press the INSTANT COOK/START pad. 3 Then will appear repeatedly. Cooking operations can now be demonstrated with no power in the oven. * Suppose you demonstrate Instant Cook. Step Procedure Pad Order Display Press the INSTANT COOK/START pad.
Multi CookSetting Less/More To adjust the cooking time to your individual preference -use the "more" or "less" feature to either add (more) or reduce (less) cooking time. The LESS/MORE pads can be used to adjust the cooking time of the following features:– Auto Grill – Reheat – Rice Menu – Steam Menu – Auto Cook – Easy Defrost To adjust cooking time, press the LESS ( ) or MORE ( ) pad at the beginning of the procedure. * Suppose you want to defrost 1.0 kg Roast Lamb for a longer time.
CARE AND CLEANING CLEAN THE OVEN AT REGULAR INTERVALS IMPORTANT: Disconnect the power supply cord before cleaning. And if possible leave the door open to inactivate the oven during cleaning. Before cleaning, make sure the oven door, outer cabinet, oven cavity, air vent openings, turntable, turntable support and racks are not hot. Exterior: The outside may be cleaned with mild soap and warm water; wipe with a soft cloth. Avoid the use of harsh abrasive cleaners.
SERVICE CALL CHECK Check the following before calling service: No 1. Does the display light? Yes 2. When the door is opened, is the oven lamp switched on? Yes No 3. Place one cup of water (approx. 250 ml) in a glass measure in the oven and close the door securely. Programme the oven for one minute on 100% (HIGH). At this moment: No A. Does the oven lamp light? Yes B. Does the cooling fan work? Yes No (Put your hand over the rear ventilation openings.) No C.