R-1900M INTELLIGENT THINKING Model COMMERCIAL MICROWAVE OVEN OPERATION MANUAL OPERATION MANUAL This operation manual contains important information which you should read carefully before using your microwave oven. IMPORTANT:There may be a serious risk to health if this operation manual is not followed or if the oven is modified so that it operates with the door open. R-1900M [EN].
C ONTENTS Contents Important Safety Instructions Installation Troubleshooting Oven & Control Panel Before Operation How to Operate the Oven Memory Operation Memory Cooking Cooking Double/Triple Quantity with Memory Express Defrost with Memory Manual Operation Time Cooking Single Stage Cooking Multi Stage Cooking Repeat Cooking Express Defrost 1 2 2 4 6 7 7 7 7 Programme & Customise Custom Setting Saving Memories Other Convenient Features Demonstration Mode Monitor Cleaning & Maintenance Cooking Advice Sui
I MPORTANT SAFETY INSTRUCTIONS IMPORTANT: PLEASE READ CAREFULLY AND KEEP FOR FUTURE REFERENCE. • The oven is for food preparation only. Never operate when empty. • Do not leave or store anything inside the oven when not in use. • Never attempt to use the oven with the door open. It is important not to tamper with the door safety latches. This may result in exposure to microwave energy. • Never operate the oven with any object caught in the door sealing surfaces, this again may cause microwave leakage.
I NSTALLATION 1. Remove all packing materials. Remove the protective film (blue film) from the outer case cabinet (if covered). 2. Place oven on a secure, level surface, strong enough to take the oven weight, plus the heaviest item likely to be cooked in the oven. 3. Ensure there is a minimum free space above the oven of 25 cm. 4. Do not place the oven where heat, moisture or high humidity are generated, (for example, near or above a conventional oven) or near combustible materials (for example, curtains).
T ROUBLESHOOTING If you think the oven is not working properly there are some simple checks which you can carry out yourself before you call for an engineer. This will help prevent unnecessary service calls if the fault is something simple. Simply answer “YES” or “NO” to the following questions: If you answer “NO” to any question first check that the oven is plugged in properly and the fuse has not blown, if there is no fault with either, check against the troubleshooting chart below. WARNING: 1.
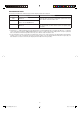
MAINTENANCE MODE Should any of maintenance indicators appear in the display, follow the instruction: CC Mode Reason Action required CC1 CC2 Operation time of magnetrons exceeds 1,250 hours. CC4 Operation time of the control unit, relays, switches exceeds 200,000 times. Call for service to replace the parts promptly. Failure to replace parts that have exceeded recommended operation time may cause failure of the microwave oven. CC3 Operation time of exhaust motor exceeds 3,000 hours.
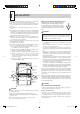
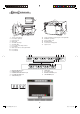
O C VEN & ONTROL PANEL 13 1 9 8 1 2 11 17 4 10 7 1. 2. 3. 4. 5. 6. 7. 8. 9. 10. 11. 3 14 5 12 16 15 6 Touch control panels Door latch openings Ceramic shelf Oven light Air intake openings Air intake filter Door seals and sealing surfaces Door hinges Oven door with see-through window Door latches Door handle 1 12. 13. 14. 15. 16. 17. 2 7 1. 2. 3. 4. 5. MANUAL/REPEAT pad POWER LEVEL pad DOUBLE/TRIPLE QUANTITY pad CUSTOM SETTING pad STOP/CLEAR pad ON DEF. NO.
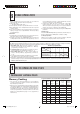
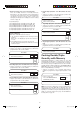
B EFORE OPERATION * Before operating your new oven, make sure you read and understand this operation manual completely. 1) Plug in the oven. * The digital display will show “ . “ 2) Control panels can only be operated when the door is closed. 3) Oven light will go on for 1 minute whenever the door is opened or after cooking. 4) Your oven has 3 ways to select memory numbers. See Custom Setting 1 on page 11 to set Input Method. The factory setting is Dual Digit Input .
* Memory Cooking can be set in 6 operating ways. There are multiple methods of selecting memories depending on the input method selected and whether or not Auto Start is turned on or off. To avoid mistakenly selecting the incorrect memory, please confirm your settings by checking Custom Setting (see Custom Setting 1 and 2 on page 11). 4. Repeat Digit Input/Auto Start ON (without the Start pad) * Suppose you want to cook with memory 12, which was programmed for 10 seconds at 100%.
Express Defrost with Memory Procedure 2 Press the START pad to continue defrosting. * Suppose you want to cook with memory 0, which was programmed for 10 minutes Express Defrost sequence, Single Digit Input/Auto Start ON. NOTES: 1. Even though CHECK lights up in the display, your oven continues defrosting and does not stop to check. 2. Press the START pad at step 2 to continue defrosting as once the door is closed, cooking data will be canceled if the START pad is not pressed within 3 minutes. 3.
Express Defrost Procedure 4 Press the POWER LEVEL pad. Enter power level for 2nd stage. Use EXPRESS DEFROST to defrost meat and poultry. Calculate total defrost time using chart below. Express Defrost can be programmed for a maximum of 90 minutes. 5 * Suppose you want to defrost one pound of lamb chops for 3 minutes and 30 seconds. 5 Press the MANUAL/REPEAT pad. Enter cooking time for 3rd stage. Procedure 3 0 0 1 Place food in oven. Press the EXPRESS DEFROST pad. 6 Press the START pad.
PROGRAMME & CUSTOMISE 2. Selecting Auto Start Operation Your oven has 2 ways to start memory cooking. CU21 : Auto Start OFF = Factory Setting CU22 : Auto Start ON Custom Setting You can check your oven settings and customise your oven by changing Custom Setting settings. The CUSTOM SETTING pad has 11 operations. 1. Selecting Memory Input Method 2. Selecting Auto Start Operation 3. Programme Lock Setting 4. Audible Signal Sound Volume Setting 5. Cooking Completion Signal Setting 6. Memory Check 7.
* Suppose you want to set Programme Lock ON. 4. Audible Signal Sound Volume Setting The volume of the audible signal can be adjusted to High, Medium, or Mute. CU41 : High = Factory Setting CU42 : Medium CU43 : Mute Procedure 3 x2 1 Press the Custom Setting pad twice within 2 seconds. 2 2 Enter 3, 2 for Programme Lock ON.
Procedure 0 1 To check more than one counter Press each pad as indicated below, after the previous usage is displayed. Display NO. CHECK 2 Enter memory number. (After entering the memory number, the memory setting of each content is shown for 1.5 seconds at 0.3 second intervals until the STOP/ CLEAR pad is pressed.) NO. CHECK After about 1 sec. CHECK Total each memory usage Input memory number. Total manual cooking usage Press the MANUAL/REPEAT pad.
Use Custom Setting Function for Air Intake Filter Counter to change the Air Intake Filter cycle from 001-999. The factory setting is 100 hours. When 100 hours is exceeded, the FILTER indicator in the display will start to flash on and off as a reminder to clean the air filter, even if in the middle of cooking. Furthermore “FILt“ flashes on and off in stead of displaying “ . “ during standby and at the same time FILTER indicator flashes on and off.
Air Filter Cycle Air Filter Cycle can be changed from the factory setting of 100 hours to 001-999 hours 10. Multiplication Factor for Double/Triple Quantity The multiplication factors of the double and triple quantities for memory cooking are preset to 1.80 and 2.60. You can check or change the multiplication factors. * Suppose you want to set the cycle to 250 hours. Procedure x2 * Suppose you want to know the multiplication factor for double quantity with memory 1, and change it to 2.
* Suppose you want to change the Express Defrost set factory settings to the following: NOTES: 1. Only Dual Digit Input method can be used when inputting memory numbers in Multiplication Factor for Double/Triple Quantity. 2. The multiplication factors can be set from 0.01 to 9.99 for double quantity and triple quantity. 3. When you want to know the multiplication factor for triple quantity, press the DOUBLE/TRIPLE QUANTITY twice at step 1 after pressing the CUSTOM SETTING pad twice. 4.
Procedure 5 Press the MANUAL/ REPEAT pad and enter desired multiplication for A2 at Stage 2. (Ex: Enter 1, 5 for 0.15.) Saving Memories Display * Memory 0 - 9 are programmed as factory settings. See the table of Programmed Memories on page 7. * Memories must be programmed before memory cooking can be used. DEF. 1 Memory banks Dual Digit: Memory 0-99 Single Digit: Memory 0-9 Repeat Digit Input: Memory 0-29 Max. cooking stages: 4 stages DEF. 5 DEF.
NOTES: 1. Press the SET MEMORY pad twice within 2 seconds. 2. If the cooking time is over the maximum time, the display will show error code EE9. To clear the error code, press the STOP/CLEAR pad and re-programme. See Maximum Cooking Time on page 21. 3. It is not necessary to press the POWER LEVEL pad for 100% in Single Stage. * Suppose you want to set 4 minutes at 60% with memory 1 and 2 minutes at 30% with memory 2. Procedure X2 NO.
Procedure Display Procedure 3 Display 6 12 Enter power level for memory 2. 6 Enter power level for 1st stage. NO. 7 Press the MANUAL/REPEAT pad. 13 Press the SET MEMORY pad to save memory 2. 2 0 0 8 Enter cooking time for 2nd stage. 14 Press the STOP/CLEAR pad to exit. NOTES: 1. Press the SET MEMORY pad twice within 2 seconds. 2. If the programmed cooking time is over the maximum time, the display will show error code EE9. To clear the error code, press the STOP/CLEAR pad and re-programme.
* Suppose you want to set the Total Cooking Time of Express Defrost to 30 minutes with memory 2 using Single Digit Input. Setting Total Cooking Time of Express Defrost * Suppose you want to set the total cooking time of Express Defrost to 30 minutes with memory 2 using Dual Digit Input. Procedure Procedure Display Display X2 NO. X2 1 Press the SET MEMORY pad twice within 2 seconds. NO. 1 Press the SET MEMORY pad twice within 2 seconds. 0 2 2 2 Enter memory number. NOTES: 1.
Maximum Cooking Time 1. 100%~60% power level : The Total Cooking Time of all cooking stages is maximum 60 minutes. 2. 50%~10% power level : The Total Cooking Time of all cooking stages is maximum 120 minutes. 3. Multi Stage Cooking : The Maximum Cooking Time is limited by the following calculation. Each stage has 100~60% power level or 50~10% power level.
C LEANING & MAINTENANCE • Keep the ceramic floor clean at all times. If you leave grease or fat in the cavity, it may overheat, smoke or even catch fire when next using the oven. • Never use spray cleaners, oven keys or abrasive scourers as these damage the surface of the oven. • Do not remove the ceramic floor from the oven. • Do not use commercial oven cleaners, abrasive or harsh cleaners or scouring pads on any part of your microwave oven.
SPLASH COVER (Frame + Cover) OVEN INTERIOR At least once a week, remove the splash cover and wash both sides of it in a mild detergent solution. A build up of grease may overheat and begin to smoke and may burn the splash cover. The splash cover is located in the top of the oven and may easily be removed. Remember to unplug the power cord. Clean the microwave oven cavity, at the end of each day with a damp soft cloth for hygienic reasons.
C OOKING ADVICE WARNING: Always attend the oven when in use. Carefully follow the SHARP Operation Manual at all times. If you exceed recommended cooking times and/or use power levels that are too high, food may overheat, burn, and in extreme circumstances, catch fire and damage the oven. • The microwave power level will default to 100% unless you press the POWER LEVEL button for the desired setting. Take care when heating foods with high sugar or fat content, e.
COOKWARE SUITABLE FOR MICROWAVING Kitchen paper. YES Always attend the oven closely. Only use to absorb fat and moisture when warming food. Pay special attention as overheating may cause a fire in your oven. Browning dishes & self-heating packages. YES Always place on an up-turned plate on the turntable to prevent heat stress. Follow manufacturer’s instructions. Be careful as these become very hot.
FOOD HANDLING & PREPARATION Stir, turn & stand For even cooking stir, turn or rearrange food during cooking. Where recommended, leave food to stand after cooking or defrosting. Initial temperature The initial temperature of food affects the amount of cooking time needed, for example, chilled food requires more cooking than food at room temperature. The temperature of the container is not a true indication of the temperature of the food or drink.
ADVICE FOR DEFROSTING Meat joints Place in a flan dish, turn over at least 4-5 times during defrosting, shield any warm areas with small, flat pieces of foil. After defrosting, wrap in foil and allow meat to stand for 1-2 hours, until thoroughly defrosted. Poultry Place in a flan dish, turn over at least 3-4 times during defrosting, shield any warm areas with small, pieces of foil. After defrosting, wrap in foil and allow poultry to stand for 1-2 hours, until thoroughly defrosted.
ADVICE FOR REHEATING Oil & Fat: Never heat oil or fat for deep frying as this may lead to overheating and fire. Stand back when opening the oven door to allow heat or steam to disperse. When removing covers (such as cling-film), opening roasting bags or popcorn packaging, direct steam away from face and hands. WARNING: Never heat liquids in narrow-necked containers, as this could result in the contents erupting from the container and may cause burns.
D EFROSTING CHART MANUAL DEFROSTING DEFROSTING TIME MICROWAVE POWER LEVEL Beef, Lamb & Pork Joints (uncooked) 8 mins /450g (1lb) LOW (10%) Whole Poultry (uncooked) 6-7 mins /450g (1lb) LOW (10%) Minced Beef (uncooked) 2-4 mins /450g (1lb) MEDIUM LOW (30%) 1. Place on a plate or in a flan dish. 2. Turn over 2-3 times during defrosting, removing defrosted mince each time. 3. After defrosting, cover any frozen mince remaining with aluminium foil for 15-20 minutes or until thoroughly defrosted.
D EFROSTING CHART DEFROSTING TIME MICROWAVE POWER LEVEL Bread Buns 1-2 mins for 6 buns LOW (10%) 1. Place on turntable. 2. Turn over & re-arrange halfway through defrosting. 3. After defrosting, cover with foil and leave to stand for 10-15 minutes or until thoroughly defrosted. Rice (cooked) 31/2 mins /450g (1lb) MEDIUM LOW (30%) 1. Place in a large bowl. 2. Break up during defrosting, removing defrosted rice each time. 3.
C OOKING CHART COOKING TIME MICROWAVE POWER LEVEL Beef: Medium (Topside, Silverside) Chilled (5°C) 7-8 mins /450g (1lb) MEDIUM HIGH (70%) Lamb, medium (fillet, shoulder, leg) Chilled (5°C) 7-8 mins /450g (1lb) MEDIUM HIGH (70%) As above. Pork (loin, leg) Chilled (5°C) 7-8 mins /450g (1lb) MEDIUM HIGH (70%) As above. Poultry (whole) (max.3.5kg (8lb) Chilled (5°C) 5-6 mins /450g (1lb) MEDIUM HIGH (70%) 1. Place breast side down in a flan dish. 2.
C OOKING CHART COOKING TIME MICROWAVE POWER LEVEL Rice/Pasta Room (20°C) 6-7 mins for 200g (70oz) MEDIUM HIGH (70%) Jacket Potatoes Room (20°C) 4-5 mins for 2 potatoes HIGH (100%) 1. Pierce each potato in several places. 2. Stand for 3-4 minutes before serving. HIGH (100%) 1. 2. 3. 4. Place in a dish, add 60ml (4tbsp) water. Cover with microwave cling film pierce in 4-5 places. Turn over halfway through cooking. Stand for 1-2 minutes before serving. HIGH (100%) 1. 2. 3. 4.
C OOKING CHART FOOD Tomatoes (fresh) Room (20°C) Scrambled Egg Chilled (5°C) COOKING TIME MICROWAVE POWER LEVEL 1 min for 225g (8oz) MEDIUM HIGH (70%) 1. Slice or quarter as desired. NOTE: If you wish to leave whole, pierce in several places. 2. Place in a dish or on a plate, cover with microwave cling film and pierce in 4-5 places. 3. Leave to stand for 1-2 minutes before serving. 2 mins HIGH (100%) 1.
R EHEATING CHART FOOD REHEATING TIME ON HIGH (100%) TEMP QUANTITY METHOD Porridge Chilled 125g (5oz) Place in a bowl, uncovered 35 sec Scrambled Egg Chilled 125g (5oz) Place on a plate, uncovered 30 sec Scrambled Egg with bacon or sausage Chilled 175g (6oz) As above 50 sec Bacon Chilled 4 rashers As above 25 sec Sausages - thick Sausages-thin Chilled Chilled 4 8 As above As above 35 sec 35 sec Smoked Haddock Chilled 175g (6oz) As above 45 sec Mushrooms Chilled 100g (4oz)
R EHEATING CHART FOOD TEMP QUANTITY METHOD REHEATING TIME ON HIGH (100%) PREPARED DISHES Duck à l’orange Chilled 540g (1lb 4oz) As above 3 mins 15 sec Spaghetti Bolognese Chilled 300g (11oz) As above 1 min 15 sec Chicken in a sauce Chilled 300g (11oz) As above 2 mins 30 sec Beef Stroganoff & Rice Chilled 375g (13oz) As above 2 mins 30 sec BBQ Ribs Chilled 375g (13oz) As above 2 mins Rice/Pasta Chilled 225g (8oz) As above 45 sec SAVOURY BREAD AND PASTRY Dinner Roll(s) Chil
R EHEATING CHART FOOD TEMP QUANTITY METHOD REHEATING TIME ON HIGH (100%) CANNED FOODS Baked Beans Room 450g (1lb) Place in a bowl, cover with cling film, stir halfway through cooking 1 min 30 sec Sausage & Beans Room 450g (1lb) As above 2 mins 10 sec Soup - thick/thin Room 425g (15oz) As above 1 min 50 sec Hot Dogs Room 425g (15oz) Place in a bowl, cover with cling film 1 min 45 sec Peas Room 550g (1lb 4oz) Place in a bowl, cover with cling film, stir halfway through cooking 2 m
R EHEATING CHART FOOD TEMP QUANTITY METHOD REHEATING TIME ON HIGH (100%) MEAT PORTIONS Chicken Portions Leg Breast Chilled Chilled 1 (300g) (11oz) 1 (400g) (14oz) Place on a plate, cover with cling film Place on a plate, cover with cling film 1 min 1 min 30 sec Lamb Chops Chilled 3 (225g) (8oz) Place on a plate, cover with cling film 1 min 30 sec Pork Chop Chilled 1 (125g) (5oz) Place on a plate, cover with cling film 50 sec Sliced Meat with Gravy Chilled 1 (225g) (8oz) Place on a pla
CAUTION 1. Do not operate the oven empty. Either food or water should always be in the oven during operation to absorb microwave energy. 2. Limit use of metal to those specific examples given in this booklet. Generally, metal should not be used in the microwave oven during operation. 3. Do not heat eggs in the shell. Pressure will build up inside the shell and it will explode. Do not reheat cooked eggs unless they are scrambled or chopped. Puncture the yolk before heating eggs. 4.
T O REPLACE THE MAINS PLUG The wires in the mains cable are colour coded as shown opposite: green and yellow stripes = EARTH blue = NEUTRAL brown = LIVE • The green and yellow wire to the plug terminal marked E or or coloured green or coloured green and yellow. • The blue wire to the plug terminal maked N or coloured black or coloured blue. • The brown wire to the plug terminal marked L or coloured red or coloured brown.
S PECIFICATIONS AC Line voltage Single phase 230-240V, 50Hz AC Power required 2.8kW Output power 1900W (IEC 60705) Microwave frequency Outside dimensions 2450MHz* (Group 2 / Class B) 445(W) x 346(H) x 573(D) mm (Single) 445(W) x 692(H) x 573(D) mm (Two ovens stacked) Cavity dimensions 356(W) x 177(H) x 326(D) mm Oven capacity 0.7 cu.ft (21 litres) Cooking uniformity Rotary antenna system Weight Approx. 33.5kg * This Product fulfils the requirement of the European standard EN55011.
A. Information on Disposal for Users (private households) Attention: Your product is marked with this symbol. It means that used electrical and electronic products should not be mixed with general household waste. There is a separate collection system for these products. 1.