
Operating instructions


Great Plains Manufacturing, Inc. Table of Contents Index Adjustments 27
2013-03-25 Table of Contents Index 403-362M
Meter Sample Calibration
18. Weigh any container(s) required to hold the sample
on the scale.
Refer to Figure 14
19. Place a tarp under the fertilizer meter. Support the
corners or edges so that no material can spill.
Refer to Figure 15
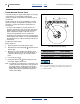
20. Open the meter calibration door. The calibration door
is the rear door, furthest from the DRIVING gear.
Material Loss Risk:
Do not open the (forward) door under the DRIVING gear.
This is the clean-out door. Opening this door drains the
hopper. Once the clean-out door is open it is difficult to stop
seed flow until the hopper is empty.
21. Wipe all material off the flanges around the meter
door.
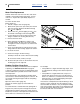
Machine Damage Risk:
Do NOT turn the crank clockwise, or the gearbox may be
damaged. Turn the crank only counter-clockwise (as seen from
planter left, facing planter right).
Refer to Figure 16
22. Turn the crank counter-clockwise until material is
consistently appearing in the collection containers.
Stop cranking.
23. Empty the tarp and return it to the collection position.
24. Turn the crank for the number of revolutions
necessary to simulate the area to sample, as shown
in chart on page 25.
25. Weigh the collected sample. Subtract the weight of
any container required at the scale.
26. Calculate the material rate per the instructions and
examples on page 28.
27. If the results differ from your target by more than a
few percent, adjust the gearbox setting per the
instructions on page 27.
Then measure another sample starting at step 23.
Meter Sample Close-Out
28. Pin the gearbox adjuster in position
29. Remove the calibration crank.
Figure 14
Meter Sample Collection
31105
Figure 15
Calibration Door Handles
31101
Figure 16
Calibration Crank (Meter)
31000
3
3