M I C R O W AV E O V E N OPERATION MANUAL MODEL R-426H Followed by letter indicating color K=black, W=white, Q=bisque S=stainless steel CONTENTS • For Customer Assistance ................. Inside Front Cover • Precautions to Avoid Possible Exposure to Excessive Microwave Energy ....................................... Inside Front Cover • Consumer Limited Warranty ............................ 1 • Product Information Card ................................. 1 • Important Safety Instructions ..................
F O R C U S T O M E R A S S I S TA N C E To aid in reporting this microwave oven in case of loss or theft, please record below the model number and serial number located on the unit. We also suggest you record all the information listed and retain for future reference.
CONSUMER LIMITED WARRANTY SHARP ELECTRONICS CORPORATION warrants to the first consumer purchaser that this Sharp brand product (the “Product”), when shipped in its original container, will be free from defective workmanship and materials, and agrees that it will, at its option, either repair the defect or replace the defective Product or part thereof with a new or remanufactured equivalent at no charge to the purchaser for parts or labor for the period(s) set forth below.
I M P O R TA N T S A F E T Y I N S T R U C T I O N S When using electrical appliances basic safety precautions should be followed, including the following: WARNING - To reduce the risk of burns, electric shock, fire, injury to persons or exposure to excessive microwave energy: 1. READ ALL INSTRUCTIONS BEFORE USING THE APPLIANCE. combustible materials are placed inside the oven to facilitate cooking. b. Remove wire twist-ties from paper or plastic bags before placing bag in oven. c.
U N PA C K I N G A N D I N S TA L L AT I O N I N S T R U C T I O N S Unpacking and Examining Your Oven on the sides, top and at the rear of the oven for air circulation. Do not place or install the oven in any area where heat and steam are generated; for example, next to or above a conventional gas or electric range or above a conventional wall oven. Heat and steam may damage the electronics or the mechanical parts of the oven. Remove: 1.
I N F O R M AT I O N Y O U N E E D T O K N O W ABOUT YOUR OVEN This Operation Manual is valuable: read it carefully and always save it for reference. for the exterior of the oven to be warm to the touch when cooking or reheating. A good microwave cookbook is a valuable asset. Check it for microwave cooking principles, techniques, hints and recipes. See pages 19 and 20 for ordering the Ultimate Accessory, the Sharp Carousel Microwave Cookbook. Condensation is a normal part of microwave cooking.
INFORMATION YOU NEED TO KNOW ABOUT UTENSILS AND COVERINGS The following coverings are ideal: It is not necessary to buy all new cookware. Many pieces already in your kitchen can be used successfully in your new microwave oven. Make sure the utensil does not touch the interior walls during cooking. • Paper towels are good for covering foods for reheating and absorbing fat while cooking bacon. • Wax paper can be used for cooking and reheating.
INFORMATION YOU NEED TO KNOW ABOUT MICROWAVE COOKING • Arrange food carefully. Place thickest areas towards outside of dish. • Rearrange foods such as meatballs halfway through cooking both from top to bottom and from the center of the dish to the outside. • Watch cooking time. Cook for the shortest amount of time indicated and add more as needed. Food severely overcooked can smoke or ignite. • Add standing time. Remove food from oven and stir, if possible.
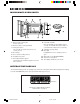
PART NAMES MICROWAVE OVEN PARTS 1 One touch door open button Push to open door. 8 Removable turntable Place the turntable on the turntable support securely. The turntable will rotate clockwise or counterclockwise. Only remove for cleaning. 2 Oven door with see-through window 3 Safety door latches 9 Ventilation openings (Rear) The oven will not operate unless the door is securely closed. 10 Oven light 4 Door hinges It will light when oven is operating or door is open.
PART NAMES CONTROL PANEL R-426H 17 9 16 9 9 14 15 10 10-11 13 14-15 On Door 9 16 Number next to the control panel illustration indicates page on which there are feature descriptions and usage information. 8 1.
B E F O R E O P E R AT I N G M A N U A L O P E R AT I O N • Before operating your new microwave oven make sure you read and understand this operation manual completely. TIME COOKING Your oven can be programmed for 99 minutes 99 seconds (99.99). Always enter the seconds after the minutes, even if they are both zeros. • Suppose you want to cook for 5 minutes at 100%. • Before the oven can be used, follow these procedures: 1. Plug in the oven. Close the door.
S P E C I A L F E AT U R E S SENSOR COOK Sharp's Sensor is a semi-conductor device that detects the vapor (moisture and humidity) emitted from the food as it heats. The sensor adjusts the cooking times and power level for various foods and quantities. 8. Check food temperature after cooking. If additional time is needed, continue to cook manually. Using Sensor Settings: 9. Each food has a cooking hint. Touch the CUSTOM HELP pad when the HELP indicator is lighted in the display. 1.
SPECIAL FEATURES SENSOR COOK CHART (continued) FOOD AMOUNT PROCEDURE FRESH VEGETABLES: Soft Broccoli .25 - 2.0 lb Brussels sprouts .25 - 2.0 lb Cabbage .25 - 2.0 lb Caulif. (flowerets) .25 - 2.0 lb Cauliflower (whole) 1 med. Spinach .25 - 1.0 lb Zucchini .25 - 2.0 lb Baked apples 2 - 4 med. Wash and place in casserole. Add no water if vegetables have just been washed. Cover with lid for tender vegetables. Use plastic wrap for tender-crisp vegetables.
SPECIAL FEATURES SENSOR COOK RECIPES Glazed Apple Slices 1/4 3 2 1/2 1/4 1/2 Makes 6 to 8 servings cup brown sugar tablespoons margarine or butter tablespoons apricot preserves teaspoon ground nutmeg teaspoon salt cup sugar 3/4 cup orange juice 1 tablespoon cornstarch 4 baking apples (about 1 1/2 pounds), peeled and sliced into 8 pieces each 3 tablespoons chopped green pistachios 1 Combine brown sugar, margarine and apricot preserves in a small bowl.
SPECIAL FEATURES REHEAT NOTE: Reheat allows you to heat many of your favorite foods. 1. To increase quantity, touch chosen pad until number in display is same as desired quantity to heat. Ex: touch BEVERAGE three times for 1.5 cups. More or less food than the quantity listed in the chart should be heated following the guidelines in any microwave cookbook. • Suppose you want to heat 2 fresh rolls or muffins. PROCEDURE FRESH ROLLS/ MUFFINS D I S P L AY x2 2 PCS COOK LBS HELP Select desired setting.
SPECIAL FEATURES DEFROST MANUAL DEFROST Defrost automatically defrosts all the foods shown in the DEFROST CHART on page 15. If the food that you wish to defrost is not listed on the DEFROST CHART or is above or below the limits in the “Amount” column on the DEFROST CHART (see page 15), you need to defrost manually. Round the weight to the nearest half pound. (Ex: if the steak’s actual weight is 2.2 lb round to 2.0 lb If the steak’s weight is 2.4 lb round to 2.5 lb.
SPECIAL FEATURES DEFROST CHART FOOD AMOUNT PROCEDURE GROUND MEAT .5 - 2.0 lb Remove any thawed pieces after each stage. Let stand, covered, for 5 to 10 minutes. STEAKS/ CHOPS .5 - 3.0 lb After each stage, rearrange and if there are warm or thawed portions, shield with small flat pieces of aluminum foil. Remove any meat or fish that is nearly defrosted. Let stand, covered, for 10 to 20 minutes. BONELESS POULTRY .5 - 2.
O T H E R C O N V E N I E N T F E AT U R E S TIMER DEMONSTRATION MODE • Suppose you want to time a 3 minute long distance phone call. To demonstrate, touch TIMER/CLOCK, the number 0, close the door, then touch START/MINUTE PLUS and hold for 3 seconds. DEMO ON will appear in the display. Cooking operations and specific special features can now be demonstrated with no power in the oven. For example, touch MINUTE PLUS and the display will show 1:00 and count down quickly to END .
OTHER CONVENIENT FEATURES CUSTOM HELP NOTE: Custom Help provides 4 features that make using your oven easy because specific instructions are provided in the interactive display. 1. Auto Start can be used for manual cooking if clock is set. 2. If the oven door is opened after programming Auto Start, it is necessary to touch the START/ MINUTE PLUS pad for Auto Start time to appear in the readout so that the oven will automatically begin programmed cooking at the chosen Auto Start time. 1.
CLEANING AND CARE Disconnect the power cord before cleaning or leave the door open to inactivate the oven during cleaning. Exterior-painted Clean the outside painted surfaces with mild soap and water. Rinse and polish dry with a soft cloth. Do not use any type of household or abrasive cleaner. Exterior-stainless steel Clean the stainless steel surfaces with mild soap and water. Rinse and polish dry with a soft cloth.
SERVICE CALL CHECK Please check the following before calling for service: Place one cup of water in a glass measuring cup in the oven and close the door securely. Operate the oven for one minute at HIGH 100%. A Does the oven light come on? YES _______ NO _______ B Does the cooling fan work? (Put your hand over the rear ventilating openings.) YES _______ NO _______ C Does the turntable rotate? (It is normal for the turntable to turn in either direction.
S P E C I F I C AT I O N S R-426H AC Line Voltage: Single phase 120V, 60Hz, AC only AC Power Required: 1700 watts, 14.3 amps. Output Power:* 1200 watts Frequency: 2450 MHz Outside Dimensions: 21 21/32"(W) x 12 3/8"(H) x 18 7/16"(D) Cavity Dimensions: 15 23/32"(W) x 9 21/32"(H) x 17 7/8"(D) Oven Capacity:** 1.6 Cu. Ft. Cooking Uniformity: Turntable system, diameter 14 1/8" Weight: Approx.
GUIA AUTO-TOUCH Para mayor informacion y precauciones de seguridad, consulte el Manual de Operaciones PARA FIJAR LA HORA OPERACIÓN MANUAL Si en la pantalla se lee ENJOY YOUR OVEN PRESS CLEAR AND PRESS CLOCK toque primero STOP/ CLEAR. TIMER 1 Toque el botón que dice TIMER/ 2 CLOCK CLOCK y número 2 . 2 Ajuste el reloj en la hora correcta 1 2 3 0 oprimiendo los botones numéricos en el orden respectivo. (Ej: 12:30) TIMER 3 Toque nuevamente el botón que CLOCK dice TIMER/CLOCK.
AUTO-TOUCH GUIDE For more complete information and safety precautions, refer to your Operation Manual. SET CLOCK MANUAL OPERATION If ENJOY YOUR OVEN PRESS CLEAR AND PRESS CLOCK is in the display, first touch STOP/CLEAR. High Power Cooking TIMER CLOCK 1 Touch TIMER/CLOCK pad and number 2. 2 Enter correct time of the day by touching numbers in sequence. (Ex: 12:30) 2 1 2 3 0 3 Touch TIMER/CLOCK pad again. Close the door and touch START/ MINUTE PLUS pad .