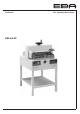
Guillotines EBA 480 EP GB Operating Instructions
• Sicherheitshinweise • Safety precautions • • Consignes de sécurité • Veiligheidsvoorschriften • • Misure di Sicurezza • Normas de Seguridad • • Säkerhetsföreskrifter • Turvallisuusohjeita • Sikkerhetsforskriftene • • Środki bezpieczeństwa • Ìåðû ïðåäîñòîðîæíîñòè • EBA 480 EP D GB F NL I E S FIN N PL Bitte lesen Sie vor Inbetriebnahme der Maschine unbedingt diese Betriebsanleitung und beachten Sie die Sicherheitshinweise. Die Betriebsanleitung muss jederzeit verfügbar sein.
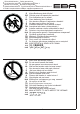
• Sicherheitshinweise • Safety precautions • • Consignes de sécurité • Veiligheidsvoorschriften • • Misure di Sicurezza • Normas de Seguridad • • Säkerhetsföreskrifter • Turvallisuusohjeita • Sikkerhetsforskriftene • • Środki bezpieczeństwa • Ìåðû ïðåäîñòîðîæíîñòè • D GB F NL I E S FIN N PL RUS H TR DK CZ P GR Keine Bedienung durch Kinder! Children must not operate the machine! Pas d‘utilisation par un enfant! Geen bediening door kinderen! Non lasciare utilizzare il tagliacarte a bambini! No dejar que la
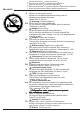
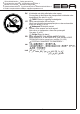
• Sicherheitshinweise • Safety precautions • • Consignes de sécurité • Veiligheidsvoorschriften • • Misure di Sicurezza • Normas de Seguridad • • Säkerhetsföreskrifter • Turvallisuusohjeita • Sikkerhetsforskriftene • • Środki bezpieczeństwa • Ìåðû ïðåäîñòîðîæíîñòè • EBA 480 EP D Messer nie lose liegen lassen! Messer nur mit Messerwechselvorrichtung oder im Messertransportkasten befördern! (siehe Seite 31 und 33).
• Sicherheitshinweise • Safety precautions • • Consignes de sécurité • Veiligheidsvoorschriften • • Misure di Sicurezza • Normas de Seguridad • • Säkerhetsföreskrifter • Turvallisuusohjeita • Sikkerhetsforskriftene • • Środki bezpieczeństwa • Ìåðû ïðåäîñòîðîæíîñòè • DK Knivbladet må aldrig efterlades uden opsyn. Forsøg ikke at afmontere eller transportere knivbladet uden beskyttelse! (Se side 31 og 33) FARE! Risiko for legemlig beskadigelse. CZ Nikdy nenechávejte nůž bez krytu.
• Sicherheitshinweise • Safety precautions • • Consignes de sécurité • Veiligheidsvoorschriften • • Misure di Sicurezza • Normas de Seguridad • • Säkerhetsföreskrifter • Turvallisuusohjeita • Sikkerhetsforskriftene • • Środki bezpieczeństwa • Ìåðû ïðåäîñòîðîæíîñòè • EBA 480 EP D GB F Keine harten und splitternden Materialien schneiden! Do not cut hard materials or materials which may splinter! La coupe de matériaux trop durs ou risquant des projections est interdite ! NL Snij geen harde materialen of mat
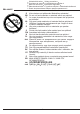
• Safety precautions • The machine is designed for cutting stacks of paper to a specified size.
• Safety precautions • EBA 480 EP All components which could endanger the operator are covered by a guard! A P 480E A A B 480E P Do not operate the machine without the following safety devices: • Front safety guard (A) • rear screwed safety guard (B) • and panel (C).
• Safety precautions • 480E The dangerous cutting movement is safeguarded by a movable guard (A) and a safety two-handed control system! (B) P B A 480E P A Before working with the machine and after every blade replacement the automatic cut-off function of safety guard (A),(correct if distance between cover and table is < 20 mm) main switch (B) and control panel (C) must be checked. C B ≤20mm ≤0.
• Safety precautions • EBA 480 EP Protect mains cable against heat, oil and sharp edges! Connect the power cord to a single phase socket.
• Safety precautions • When not in use for a longer period switch off. (Main switch to "0"). Danger! Blade must always be covered by the pressing bar.
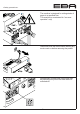
• Installation • EBA 480 EP Remove the stand from the wooden pallet. 4 strong people are required to lift the machine from the pallet and place it on the stand. Secure with 4 screws (A). Put the shelf (B) on the stand. (Parts and tools are in the tool set (C).
• Installation • Attach the enclosed hand-wheel for clamping. Parts and tools are in the tool set (C). C 0E 48 P Plug into socket.
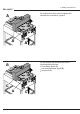
• Operation • EBA 480 EP A P 480E It is forbidden to operate the machine if the operating and safety instructions have not been understood. Please check the safety devices are functioning and complete before use. • All covers have to be mounted (A). • The release for cutting is allowed only if the cover is closed and the two-hand safety device is operated at the same time (B) • If the front cover closes by itself the gas spring (X) needs replacing. We recommend you keep a record of your test results.
• Operation • Position the main switch to "I" (A). Insert the key for the control system and move it to the right (B). Open the safety guard (C). The machine is now ready for use. Press button (D). Machine will automatically go to the start position. D P 480E S B C A 480E P B The measurement is set either with the handwheel (A) or by programming (B) the cutting measurements. Measurement is shown on the display in inches or cm (B).
• Operation • EBA 480 EP AB If display (C) shows " " the clamp must be completely opened. Turn the hand-wheel for clamping (A) completely to the left until the backgauge (B) is activated. A B P 480E C A Optical cutting line (A) that indicates the exact position of the cut. Blade cuts on the front edge (B) of the light beam. (Only use when no exact cut is required).
• Operation • B A P 480E C Position the paper on the backgauge (A) and side lays left or right (B). To move paper stacks, please use the paper knock-up block (C) provided. (Run backgauge to the front for turning the paper stack). B 480E P Clamping is released by the hand-wheel. Before every cut lower the clamp by turning the hand-wheel to the right and tighten with a light twist. The cut is activated by pressing the two buttons exactly at the same time.
• Operation • EBA 480 EP Close the safety guard P 480E 480E Cutting activation: Press both buttons of the two-handed control system activation (A) simultaneously and them pressed until the paper is completely cut. P A P 480E To interrupt or stop cutting: To interrupt or stop cutting release both buttons (A) of the two-hand control.
• Operation • Operating elements P A - Front safety guard B - Safety two-handed control system for cutting 480E switch C - Overload (blade drive/backgauge drive) D - Backgauge control (EP) E - Paper clamp F - Main switch for backgauge G - Hand-wheel setting cm inch H - Key switch I - Backgauge J - Side lay left and right K - Display cutting size (EP, cm or inch) L - Select program step up M - Select program step down N - Stop and delete input O - Start P - Memory multiple cut Q - Keypad R - Changeove
• Operation • EBA 480 EP Start machine • Main switch F to position "I", insert the key for the control panel and turn it to the right. Open the front safety guard • Press button backgauge moves to the rear and searches for the reference position, wait until 45 cm or 17,72 inches is shown in the display H P 480E A O S I D. Warning! Before storing or cutting a measurement please check if the correct measurement scale (cm or inch) see above is stored.
• Operation • Eject function If button is pressed instead of button after inserting the measurement, the backgauge will advance forwards to measurement 9 cm/0,36 inch (standard setting of the machine) so that paper can be removed. Finally the backgauge moves to the last setting. S O, rM Adjust the eject-dimension • Press , press , Press press e on display. • Insert the desired dimension. • Store dimension.
• Operation • EBA 480 EP Programming This control system enables you to store 9 programs with 9 programmable steps. One step represents one measurement. After entering the program numbers you are able to change between several program steps with the button and . First figure on display = program number. Second figure = program step. Dimensions below 9 cm can only be approached with the button held pressed. "u" on the display the entered dimension is too low.
• Operation • Eject function program • Set the measurement push g button and r simultaneously. e appears shortly on the display. The backgauge will advance and eject the paper and finally return to the position shown on the display. Programming of multiple cut dimension • Press P appears on the display. • ... Enter program number 1 ... 9. First figure on display = program number. Second figure = program step. Enter the cut size on the display . • Store the dimension. • ... Enter multiple cut size.
• Operation • EBA 480 EP Working with programs P appears on the display • Press • ... Enter program number 1 ... 9 With the button and you are able to change between several program steps. With the backgauge moves to the indicated dimension. With the backgauge stops. p 1 9 r h S s General LED "S" blinks the basic position will appear. LED "S" is off the actual dimension appears. In the program mode the ejection of paper is not possible. The ejection of paper has to be programmed.
• Blade and cutting stick replacement • If the cutting quality decreases: • Check the cutting depth (see page 33). • Check the cutting stick (see page 29). • Replace or grind the blade (see page 25 - 33). The blade cannot be ground if the blade height is less than 83 mm/3,29 inches. A new blade must be used. The blade may only be ground by a qualified supplier or from the manufacturer Krug & Priester, D-72336 Balingen. Danger! Risk of injury! The blade is extremely sharp.
• Blade and cutting stick replacement • EBA 480 EP Turn the blade depth adjustment screw to the left until it stops. (Screwdriver found in tool set (A). P 480E Close the safety guard (1.). Lower the blade by pressing both cutting buttons (2.). Keep one button pressed and turn off the main switch (3.).
• Blade and cutting stick replacement • The 3 eccentrics are now exposed and should be turned counter clockwise to position "0" with the special wrench and attachable extension pipe (A) (in the tool set). The slot must correspond to position "0" (B). Unscrew the blade screws (C) on the right hand side. P 480E C A B P 480E Remove the special wrench and turn on the main switch until the blade returns to the home position.
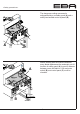
• Blade and cutting stick replacement • EBA 480 EP A Position the main switch to "0" (1.) Remove the 2 blade screws on the elongated holes (2.). Then put the blade changing tool (A) into place and fasten it to the blade (3.). 3. 2. 1. 1. 0E 48 Remove 2 blade screws (1.) Loosen the grips (2.) of the blade changing tool (A) lightly and allow the blade to be taken downwards out of the machine (3.). Place the blade into the blade carrier (B) and screw it into place (4). P 3. B 4. A 2.
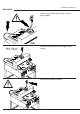
• Blade and cutting stick replacement • EP 480 A Take out the cutting stick with a small screwdriver. If needed the cutting stick can be turned or exchanged. (The cutting stick can be used eight times). 1. 2. Replacing the cutting stick (not the blade) • Turn the blade adjusting screw (A) to the left 3. A until it stops.(Otherwise the first cut will be too deep). • Remove the cutting stick according to top picture.
• Blade and cutting stick replacement • EBA 480 EP Take the exchange blade carefully out of the blade box and screw it to the blade changing tool (A) • Make sure there is a space ot 11 mm or 0.43 inches! (B). • Blade must be covered! (C). Danger! Risk of injury! A 11 mm 0.43 inch B B C C 1. A Place the blade to be exchanged with the blade changing tool (A) mounted (1.), into the blade carrier and push it up to the top and screw it into place with the grips (2.). 2.
• Blade and cutting stick replacement • Lightly tighten 2 of the 5 blade screws with washers (1.). Remove the blade changing tool (2.). Lightly tighten the remaining blade screws with washers (3.). Lightly screw in the right blade screw with the washer (A) when the blade is lowered. EP 480 A 2. 1. 3. Remove all tools and distribute paper along the entire cutting length (1.). Turn main switch to position "I" (2.). P 480E 1. 2.
• Blade and cutting stick replacement • EBA 480 EP 1. 3. Close the safety guard (1.) Lower the blade by pressing both cutting buttons (2.). Keep one button pressed and turn off the main switch (3.). 2. 480E P Open the safety guard (4.). With the special wrench (B) the 3 eccentrics should be screwed down (5.)until the paper is cut along the entire length of the blade (The blade must remain parallel, not too deep into cutting stick). 4. A 5. P 480E A 2.
• Blade and cutting stick replacement • Paper cutting test. If the last sheet or several sheets are not completely cut, gradually turn the knob for blade depth adjustment (A) ¼ turn to the right until the paper is cut along the entire length. Do not set too low as blade will become blunt sooner. Danger! Blade must always be covered by the pressing bar (see picture below at the left).
• Maintenance and cleaning • EBA 480 EP Maintenance work may only be performed by trained staff. Danger! Disconnect the mains before starting any service work or before removing the cover. 480E D P Grease the backgauge (A) control weekly with a grease gun. Advance the backgauge as far as possible to the front. (Use non-resinous oil or grease). Grease the remaining parts twice a year (see picture). The main switch must be on "0" (B). Remove lower panel (C). Tools in tool set. • Remove any paper.
• Maintenance and cleaning • Safety test The safety regulations are according to the regulations of the country where the cutting machine is operated. The manufacturer recommends a safety check is made every 5 years by an authorised service team.
• Possible malfuntions • EBA 480 EP Machine does not function! Is the machine plugged in? P 480E Main switch to position "I"? (A) Control system activated? (B) (Turn key to the right) Release a cut see page 18.
• Possible malfuntions • Cut cannot be made. • If cover is open: close it. • If cover is closed: open and re-close it. (Security check).
• Possible malfuntions • EBA 480 EP 480E P A, B Machine turns off: • Machine overloaded. Safety button (A) ejects. (Allow 1 minute cooling time and reset the safety button (A). Machine blocked. • • Blade is blunt. Eliminate the cause, and push the safety button (A). • Backgauge blocked Safety button (B) ejects. Eliminate the cause, and push the safety button (B).
• Possible malfuntions • A Does not cut through the last sheet: 480 EP • Turn or turn around the cutting stick (A), readjust the blade by means of the blade adjusting knob (B) (see page 33). Poor cutting quality or blade stays in the paper stack. • Change the blade (C) (see pages 25 - 33).
• Possible malfuntions • EBA 480 EP Motor runs but blade does not move downwards. • Security brake has been activated! Inform the Service Team! • www.eba.de "Service" service@krug-priester.
• Possible malfuntions • Cut cannot be made. • Measurement has not been reached correctly. • LED "S" X does not turn off. Push the button again. Check the security cover (see page 37). S • Measurement below 9 cm button until the Hold the measurement is achieved. S O cm inch • Backgauge I AB does not move and " " is shown on the display. Open the clamp Turn the hand wheel to the left as far as possible. E.
• Accessories • EBA 480 EP Recommended accessories: Blade • Nr. 9000 021 Cutting stick (6 pieces) • Nr. 9000 022 Blade changing tool 1 • Nr. 9000 511 Paper knock-up block 1 • Nr.
• Technical data • A 480E P Technical data: • Power supply: 230V/50Hz/1~,115V/60Hz/1~ • Cutting length: 475 mm • Cutting height: 80 mm • Table depth: 458 mm • Sound level EN 13023: < 70 dB (A) • Minimum space requirement (width x depth x height) 755 mm x 970 mm x 1360 mm • Weight: 194 kg The exact technical specifications can be found on the technical specifications sticker (A) on the machine. A wiring diagram is found in the electrical switch box.
• Technical data • EBA 480 EP This machine is approved by independent safety laboratories and is in compliance with the EC-regulations 98/37/EG, 2006/95/EG and 2004/108/EG. Sound level information: The sound level is < 70 db (A) as defined by EN 13023. Subject to alteration without notice.
D GB F NL I E RUS EG-KONFORMITÄTSERKLÄRUNG EC-declaration of conformity Déclaration de conformité CE EG-verklaring van overeenstemming Dichiarazione CE di conformità Declaración CE de conformidad Ñåðòèôèêàò Ñîîòâåòñòâèÿ ÅÑ - Hiermit erklären wir, daß die Bauart von - Herewith we declare that - Par la présente, nous déclarons que - Hiermede verklaren wij, dat de in de handel gebrachte machine - Si dichiara che il modello della - Por la presente, declaramos que la - ÄÀÍÍÛÌ ÏÎÄÒÂÅÐÆÄÀÅÌ, ×ÒÎ 480 EP - folgen
EBA 480 EP Remarks: - 46 -
Remarks: - 47 -
EBA • Made in Germany Document Shredders • EBA Krug & Priester • 72336 Balingen • Germany • www.eba.