F O R C U S T O M E R A S S I S TA N C E To aid in reporting this microwave oven in case of loss or theft, please record below the model number and serial number located on the unit. We also suggest you record all the information listed and retain for future reference.
C O N T E N T S O F O P E R AT I O N M A N U A L & C O O K I N G G U I D E For Customer Assistance .... Inside Front Cover From the Pantry Recipes .......................... 22-23 Precautions to Avoid Possible Defrost Center........................................... 23 Exposure to Excessive Super Defrost Chart .................................. 23 Microwave Energy ............ Inside Front Cover Compu Defrost Chart ................................ 24 Contents ....................................
CONSUMER LIMITED WARRANTY SHARP ELECTRONICS CORPORATION warrants to the first consumer purchaser that this Sharp brand product (the “Product”), when shipped in its original container, will be free from defective workmanship and materials, and agrees that it will, at its option, either repair the defect or replace the defective Product or part thereof with a new or remanufactured equivalent at no charge to the purchaser for parts or labor for the period(s) set forth below.
I M P O R TA N T S A F E T Y I N S T R U C T I O N S When using electrical appliances basic safety precautions should be followed, including the following: WARNING - To reduce the risk of burns, electric shock, fire, injury to persons or exposure to excessive microwave energy: 1. READ ALL INSTRUCTIONS BEFORE USING THE APPLIANCE. example, near a kitchen sink, in a wet basement or near a swimming pool, and the like. 2. Read and follow the specific “PRECAU- 13. Do not immerse cord or plug in water.
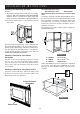
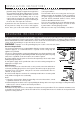
I N S TA L L AT I O N I N S T R U C T I O N S Unpacking and Examining Your Oven The applicable wall oven is: General Electric (27") ZET837SYSS Do not build-in above any other gas or electric wall oven. See Sketch 1 for proper location when building in above the specified wall oven. Carefully follow both the wall oven installation instructions and Sharp’s Built-in Kit instructions. Be sure that the clearance of the floor between the wall oven and the microwave oven is minimum of 2 inches.
UI NN SP TA ACLKLI ANTGI O AN N IDN IS NT SR TU AC LT LI OA NT SI O N I N S T R U C T I O N S 2. The floor of the opening should be constructed of plywood strong enough to support the weight of the oven and floor load (about 100 pounds). The floor should be level for proper operation of the oven. Be sure to check the local building code as it may require that the opening be enclosed with sides, ceiling and rear partition. The proper functioning of the oven does not require the enclosure.
I N F O R M AT I O N Y O U N E E D T O K N O W ABOUT YOUR OVEN This Operation Manual is valuable: read it carefully and always save it for reference. for the exterior of the oven to be warm to the touch when cooking or reheating. A good microwave cookbook is a valuable asset. Check it for microwave cooking principles, techniques, hints and recipes. See pages 30 and 31 for ordering the Ultimate Accessory, the SHARP CAROUSEL MICROWAVE COOKBOOK. Condensation is a normal part of microwave cooking.
INFORMATION YOU NEED TO KNOW ABOUT UTENSILS AND COVERINGS The following coverings are ideal: It is not necessary to buy all new cookware. Many pieces already in your kitchen can be used successfully in your new microwave oven. Make sure the utensil does not touch the interior walls during cooking. • Paper towels are good for covering foods for reheating and absorbing fat while cooking bacon. • Wax paper can be used for cooking and reheating.
INFORMATION YOU NEED TO KNOW ABOUT MICROWAVE COOKING • Arrange food carefully. Place thickest areas towards outside of dish. • Rearrange foods such as meatballs halfway through cooking both from top to bottom and from the center of the dish to the outside. • Watch cooking time. Cook for the shortest amount of time indicated and add more as needed. Food severely overcooked can smoke or ignite. • Add standing time. Remove food from oven and stir, if possible.
PART NAMES MICROWAVE OVEN PARTS 1 One touch door open button Push to open door. 8 Removable turntable Place the turntable on the turntable support securely. The turntable will rotate clockwise or counterclockwise. Only remove for cleaning. 2 Oven door with see-through window 3 Safety door latches 9 Ventilation openings (Rear) The oven will not operate unless the door is securely closed. 10 Oven light 4 Door hinges It will light when oven is operating or door is open.
PART NAMES CONTROL PANEL R-530ES 13-17 27 18-25 26 28 11 28 12, 26 27 11 Number next to the control panel illustration indicates pages on which there are feature descriptions and usage information.
B E F O R E O P E R AT I N G • Before operating your new microwave oven make sure you read and understand this operation manual completely. • Before the oven can be used, follow these procedures: 1. Plug in the oven. Close the door. The oven display will show SHARP SIMPLY THE BEST PRESS CLEAR AND PRESS CLOCK. 2. Touch the Stop/Clear pad. : will appear. 3. Set clock. TO SET THE CLOCK STOP/CLEAR • Suppose you want to enter the correct time of day 12:30 (A.M. or P.M.). Touch the Stop/Clear pad to: 1.
M A N U A L O P E R AT I O N TIME COOKING TO SET POWER LEVEL Your oven can be programmed for 99 minutes and 99 seconds (99.99). Always enter the seconds after the minutes, even if they are both zeros. • Suppose you want to cook for 5 minutes at 100%. There are eleven preset power levels. Using lower power levels increases the cooking time which is recommended for foods such as cheese, milk and long slow cooking of meats. Consult cookbook or recipes for specific recommendations.
SENSOR COOKING Sharp's Sensor is a semi-conductor device that detects the vapor (moisture and humidity) emitted from the food as it heats. The sensor adjusts the cooking times and power level for various foods and quantities. Covering Foods: Using Sensor Settings: 1. Casserole lid. 1. After oven is plugged in, wait 2 minutes before using Sensor Cooking. 2. Plastic wrap: Use plastic wrap recommended for microwave cooking.
SENSOR COOKING SENSOR COOKING CHART FOOD AMOUNT Popcorn 1 package 1.5 - 3.5 oz bag Sensor reheat Fresh vegetables: Soft Broccoli Brussels sprouts Cabbage Cauliflower (flowerets) Cauliflower (whole) Spinach Zucchini Baked apples Fresh vegetables: Hard Carrots, sliced Corn on the cob Green beans Winter squash: diced halves Rice PROCEDURE Use only popcorn packaged for microwave oven use. Try several brands to decide which you like the best. Do not try to pop unpopped kernels.
SENSOR COOKING SENSOR COOKING CHART (CONTINUED) FOOD AMOUNT PROCEDURE Poultry: Boneless .5 - 2.0 lb Use boneless breast of chicken or turkey. Cover with vented plastic wrap. Touch Poultry, number 1 and Start/Touch On pads. When oven stops, rearrange. Re-cover and touch Start/ Touch On pad. After cooking, let stand, covered, 3 to 5 minutes. Poultry should be 160°F. .5 - 3.0 lb Arrange pieces with meatiest portions toward outside of glass dish or microwave safe rack. Cover with vented plastic wrap.
SENSOR COOKING SENSOR COOKING RECIPES (CONTINUED) Shrimp Pasta Sauce 1 2 1 1/2 1/2 Makes 4 servings pound of shrimp, peeled and deveined cups canned tomato puree tablespoon tomato paste cup thinly sliced fresh basil leaves teaspoon oregano 1 1 cup thinly sliced scallions (about 2 bunches) clove of garlic, minced salt and pepper to taste Parmesan cheese 1 Place shrimp in 2-quart, covered casserole. 2 Microwave using Fish/Seafood. Drain and set aside.
SENSOR COOKING SENSOR COOKING RECIPES (CONTINUED) Mexican Seasoned Potatoes 4 1 /4 1 1 /2 1 /2 Makes 6 to 8 servings 1 /4 medium baking potatoes (8 ounces each) cup olive oil tablespoon instant minced onion teaspoon chili powder teaspoon oregano leaves 1 /2 teaspoon ground cumin teaspoon salt 1 Cut each potato lengthwise into 4 equal wedges. Place potato wedges into 10-inch square casserole. Toss potatoes with oil to coat well. 2 In small bowl, combine remaining ingredients. Sprinkle over potatoes.
LET'S COOK Your oven has 6 convenience pads to assist with meal preparation. There are some foods in the Breakfast, Lunch, 15 Minute Recipes and From the Pantry that use the sensor. See the sensor cooking information on page 13. For foods not using the sensor, follow the directions in the Interactive Display to enter quantity. BREAKFAST AND LUNCH Breakfast and Lunch are for cooking and heating popular foods that take a short amount of time. NOTE: 1. Heat rolls/muffins setting has 2 choices.
LET'S COOK BREAKFAST CHART (CONTINUED) FOOD 3. HOT CEREAL PROCEDURE AMOUNT 1 - 6 servings Use individual packets or bulk cereal in your favorite variety: oatmeal, oat bran, cream of wheat, farina or wheatena. Follow package directions for the correct amount of water or milk. To prevent boil overs, it is very important to choose a large container because microwave cooking of cereal causes high boiling. If the oven stops, stir and touch Start/Touch On.
LET'S COOK 15 MINUTE RECIPES AND FROM THE PANTRY 15 Minute Recipes and From the Pantry each offer five simple-to-prepare but great tasting meals. Follow the specific directions on the Recipe Card and in the Interactive Display. 3 • Suppose you want to use 15 Minute Recipes to cook Saucy Chicken. 4 PROCEDURE 1 15 Minute Recipes Touch 15 Minute Recipes pad. 2 1 D I S P L AY When the oven stops, the display will show the instruction number on the Recipe Card.
LET'S COOK 3. FIESTA CHILI 8 ounces chunky salsa 1 11-ounce can of Mexican corn, drained 1 15-ounce can chili with beans 1 to 3 teaspoons chili powder Stir together well. Re-cover. Touch Start/Touch On. 1. Place in a 3 quart casserole: 1 1/4 pounds ground turkey 1/2 cup diced onions 1/2 cup diced red pepper Break up turkey and stir in onions and red pepper. Cover. Touch 15 Minute Recipes, number 3 to select FIESTA CHILI and then touch Start/Touch On. 2. At pause, drain and add to the casserole: 3.
LET'S COOK FROM THE PANTRY (RECIPES SERVE 6) 1. BEEF WRAPS 1 10-ounce package frozen chopped spinach, thawed and drained 1 1/2 cups salsa 1-3 teaspoons chili powder Stir together well. Re-cover. Touch Start/Touch On. 1. Place in a 2-quart casserole: 1 pound ground beef Break apart and cover. Touch From the Pantry, number 1 to select BEEF WRAPS and then touch Start/Touch On. 3. At end, stir well and place in 8 warmed corn tortillas. Top with 1 cup shredded Cheddar cheese. 2.
LET'S COOK 5. GARDEN MEDLEY 2. At pause, stir well and add: 1 16-ounce package frozen stir fry mixed vegetables 2 cups thinly sliced summer squash Re-cover. Touch Start/Touch On. 1. Place in a 2 1/2-quart casserole: 1 pound peeled baking potatoes, cut into eighths and thinly sliced 1 14 1/2-ounce can diced tomatoes 2 teaspoons minced garlic 1 teaspoon thyme leaves Cover with a lid. Touch From the Pantry, number 5 to select GARDEN MEDLEY and then touch Start/ Touch On. 3.
LET'S COOK DEFROST CENTER (CONTINUED) COMPU DEFROST • Suppose you want to defrost a 2.0 pound steak, using CompuDefrost. PROCEDURE 1 Touch Start/Touch On pad. The oven will stop so the food can be checked. The display will show: SEE LABEL SELECT FOOD NUMBER STEAKS CHOPS OR FISH Select desired Defrost ENTER WEIGHT Center setting by touching the desired number pad. (Ex: Touch the number pad 5 to select steak.) IN POUNDS Touch Defrost Center pad.
LET'S COOK BEVERAGE CENTER Beverage Center enables you to reheat coffee or tea to a more suitable drinking temperature or to make instant coffee or tea. • Suppose you want to reheat 2 cups of coffee. PROCEDURE 1 2 3 SEE LABEL Touch Beverage Center pad. SELECT FOOD 1. Beverage Center can be programmed with More or Less Time Adjustment. Touch the Power Level pad once or twice after selecting the amount. See page 26. NUMBER 2.
O T H E R C O N V E N I E N T F E AT U R E S KEEP WARM PLUS MULTIPLE SEQUENCE COOKING Keep Warm Plus allows you to keep food warm up to 30 minutes. Your oven can be programmed for up to 4 automatic cooking sequences, switching from one power level setting to another automatically. To use, simply touch the Keep Warm Plus pad and enter the appropriate time (up to 30 minutes). You can also program Keep Warm Plus with manual cooking to keep food warm continuously after cooking.
OTHER CONVENIENT FEATURES CUSTOM HELP 4. If you wish to know the time of day, simply touch the Clock pad. As long as your finger is touching the Clock pad, the time of day will be displayed. Custom Help provides 4 features which make using your oven easy because specific instructions are provided in the interactive display. 4. LANGUAGE / WEIGHT SELECTION 1. CHILD LOCK The oven comes set for English and U.S. Customary Unit-pounds. To change, touch CUSTOM HELP and the number 4 pads.
OTHER CONVENIENT FEATURES TIMER/CLOCK DEMONSTRATION MODE To demonstrate, touch Timer/Clock, the number 0 and then touch Start/Touch On pad and hold for 3 seconds. . .DEMO ON DURING DEMO NO OVEN POWER will appear in the display. Cooking operations and specific special features can now be demonstrated with no power in the oven. For example, touch Minute Plus pad and the display will show. 1.00 and count down quickly to END .. . • Suppose you want to time a 3-minute long distance phone call.
CLEANING AND CARE Disconnect the power cord before cleaning or leave the door open to inactivate the oven during cleaning. Exterior Waveguide Cover The outside surface is painted. Clean the outside with mild soap and water; rinse and dry with a soft cloth. Do not use any type of household or abrasive cleaner. The waveguide cover is made from mica so requires special care. Keep the waveguide cover clean to assure good oven performance.
S P E C I F I C AT I O N S R-530ES AC Line Voltage: Single phase 120V, 60Hz, AC only AC Power Required: 1650 watts, 13.8 amps. Output Power: Microwave 1200 watts* (IEC Test Procedure) Frequency: 2450 MHz Outside Dimensions: 24"(W) x 13 3/8"(H) x 19 1/8"(D) Cavity Dimensions: 17 3/8"(W) x 10 1/2"(H) x 18 5/8"(D) Oven Capacity: 2.0 Cu. Ft. Cooking Uniformity: Turntable system Weight: Approx.
SERVICE CALL CHECK Please check the following before calling for service: Place one cup of water in a glass measuring cup in the oven and close the door securely. Operate the oven for one minute at HIGH 100%. A Does the oven light come on? YES _______ NO _______ B Does the cooling fan work? (Put your hand over the rear ventilating openings.) YES _______ NO _______ C Does the turntable rotate? (It is normal for the turntable to turn in either direction.
REHEATING CHART STARTING TEMPERATURE MICROWAVE TIME PROCEDURE Plate of Food 1 serving of meat, 2 servings of vegetables Room temp. Refrigerated MED.-HIGH (70%) 1 - 2 min. 2 - 3 min. Meaty portions and bulky vegetables to outside. Cover with wax paper. Meat (Chicken pieces, chops, hamburgers, meat loaf slices) 1 serving 2 servings MED.-HIGH (70%) 1 - 2 min. 2 - 3 min. Cover loosely with wax paper. Refrigerated Refrigerated Room temp. Refrigerated MEDIUM (50%) 1 - 1 1/2 min. per serving 1 - 2 min.
VEGETABLE COOKING CHART MICROWAVE TIME AT HIGH (100%) STANDING TIME, COVERED VEGETABLE AMOUNT COOKING PROCEDURE Artichokes Fresh 2 medium Trim and rinse. 2-qt casserole. 2 tbsp water. Cover with plastic wrap. 4 - 6 min. 5 min. 1 lb 2-qt casserole. 2 tbsp water. Cover. Rearrange after 3 min. 3 - 6 min. 2 min. 1 lb 1 1/2-in pieces, 2-qt casserole. 1/4 cup water. Cover. Stir twice. 8 - 10 min. 2 min. 10 - 16 min. 3 min. Wash. 2-qt casserole. Add no water. Cover. Rearrange after 3 min.
VEGETABLE COOKING CHART (continued) VEGETABLE Peas, Green Fresh Potatoes Boiled Spinach Fresh Squash Fresh, Acorn Fresh, Sliced Zucchini Sweet Potatoes Baked Tomatoes Fresh Canned Vegetables AMOUNT 2 cups 4 medium 1 lb 1 whole 2 cups COOKING PROCEDURE MICROWAVE TIME AT HIGH (100%) STANDING TIME, COVERED 3 - 5 min. 3 min. Peel and quarter potatoes. 2-qt casserole. Cover. Stir after 5 min. 8 - 10 min. 3 min. Wash and trim. Add no water. 3-qt casserole. Cover. Stir after 3 min. 4 - 6 min. 2 min.
GUÍA AUTO-TOUCH Si desea leer información más completa y precauciones de seguridad para el manejo del horno, consulte el manual de operaciones. PARA FIJAR LA HORA OPERACIÓN MANUAL Si el indicador dice SHARP SIMPLY THE BEST PRESS CLEAR AND PRESS CLOCK, toque primero el botón Stop/Clear. 1 Toque el botón Timer/Clock y botón 2. 2 Marque la hora correcta en el reloj tocando los botones numéericos en el orden respectivo.
GUÍA AUTO-TOUCH BREAKFAST (DESAYUNO) 15 MINUTE RECIPES 1 Toque el botón Breakfast. 2 Seleccione la comida deseada. (Ej: toque el botón número 3 para cereales calientes.) 3 Toque el botón número 2 para dos raciones. 4 Toque el botón Start/Touch On. (RECETAS RAPIDAS EN 15 MINUTOS) ALIMENTO Breakfast 1 Toque el botón 15 Minute Recipes. 2 Seleccione la comida deseada. (Ej: toque el botón numero 2 para Cerdo a la hawaiana.) 3 Toque el botón Start/Touch On. 3 2 Start Touch On 1-9 huevos 2. TOINO 3.
AUTO-TOUCH GUIDE 15 MINUTE RECIPES BREAKFAST 1 Touch Breakfast pad. Breakfast 1 Touch 15 Minute Recipes pad. 15 Minute Recipes 3 2 Select desired food. (Ex: touch number pad 2 for Hawaiian Pork.) 2 2 3 Touch Start/Touch On pad. 2 Select desired food. (Ex: touch the number 3 pad for hot cereal.) 3 Touch number 2 pad for 2 servings. R E C I P E S (All are for 6 servings) Start Touch On 4 Touch Start/Touch On pad. FOOD 1. SAUCY CHICKEN 2. HAWAIIAN PORK AMOUNT 1. SCRAMBLED EGGS 1 - 9 eggs 3.
AUTO-TOUCH GUIDE For more complete information and safety precautions, refer to your Operation Manual. SET CLOCK MANUAL OPERATION If SHARP SIMPLY THE BEST PRESS CLEAR AND PRESS CLOCK is in the display, first touch Stop/Clear. High Power Cooking 1 Touch Timer/Clock pad and number 2. 2 Enter correct time of the day by touching numbers in sequence. (Ex: 12:30) Timer Clock 2 1 2 3 0 Timer Clock 3 Touch Timer/Clock pad again. 1 3 0 2 Touch Start/Touch On pad.