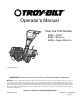
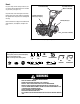
Operator’s Manual Rear-tine Tiller Models 630C—Tuffy® 634F—Bronco 634A—Super Bronco TM TM Model 634A Shown IMPORTANT: Read safety rules and instructions carefully before operating equipment. Warning: This unit is equipped with an internal combustion engine and should not be used on or near any unimproved forest-covered, brushcovered or grass-covered land unless the engine’s exhaust system is equipped with a spark arrester meeting applicable local or state laws (if any).
TABLE OF CONTENTS Content Customer Support Safety Assembly Features and Controls Operation Page 2 3 6 10 12 Content Maintenance Off-season Storage Troubleshooting Parts List Warranty Page 17 21 22 23 Back Cover FINDING MODEL NUMBER This Operator’s Manual is an important part of your new lawn tractor. It will help you assemble, prepare and maintain the unit for best performance. Please read and understand what it says.
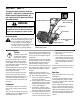
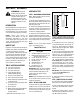
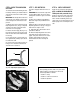
SECTION 1: SAFETY This machine meets voluntary safety standard B71.8 – 1996, which is sponsored by the Outdoor Power Equipment Institute, Inc., and is published by the American National Standards Institute. Forward Clutch Bail Reverse Clutch Control (Models 634F⁄634A) WARNING Depth Regulator The engine exhaust from this product contains chemicals known to the State of California to cause cancer, birth defects or other reproduc- Tine Hood Flap Safety Alert Symbol This is a safety alert symbol.
. Exercise caution to avoid slipping or falling. 5. If the unit should start to vibrate abnormally, stop the engine, disconnect the spark plug wire and prevent it from touching the spark plug, and check immediately for the cause. Vibration is generally a warning of trouble. 6. Stop the engine, disconnect the spark plug wire and prevent it from touching the spark plug, whenever you leave the operating position, before unclogging the tines, or when making any repairs, adjustments or inspections. 7.
Decals Keep the decals clean and legible at all times. Contact your local service dealer or the factory for replacements if any decals are damaged or missing. Reverse Clutch Control Operating Instruction (Models 634F/634A) Forward Clutch Bail For your safety and the safety of others, various safety and operational decals are located on your unit (see Figure 1-2).
SECTION 2: ASSEMBLY WARNING: To prevent personal injury or property damage, do not start the engine until all assembly steps are complete and you have read and understand the safety and operating instructions in this manual. INTRODUCTION Carefully follow these assembly steps to correctly prepare your tiller for use. It is recommended that you read this Section in its entirety before beginning assembly. NOTE: Various tiller models are presented in this Manual.
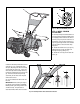
K M O N L Fig. 2-3: Wheel in FREEWHEEL position G I H A STEP 4: INSTALL FORWARD CLUTCH CABLE 1. Carefully unwrap the forward clutch cable (cable without an attached knob) from its shipping position and slide the thin cable wire (T, Fig. 2-4) into the slot in the cable bracket. Push the cable connector (U, Fig. 2-4) up through the hole in the bracket until the groove in the connector snaps into place. F G E C F 2. Thread the #10-24 hex nut (Z, Fig.
6 4 5 4. Check for correct tension on the forward drive belt by taking two measurements of the cable spring, as follows: b. Squeeze the Forward Clutch Bail against the handlebar (see Fig. 2-7) and re-measure the spring length. The belt tension is correct if this second measurement is between 1/16" to 3/16" longer than the first measurement. If so, turn the hex nut (Z, Fig. 2-7) tightly against the cable adjuster (X) while preventing the cable adjuster from turning. c.
STEP 6: CHECK TRANSMISSION OIL LEVEL The transmission was filled with gear oil at the factory. However, you should check the gear oil level at this time to make certain it is correct. IMPORTANT: Do not operate the tiller if the gear oil level is low. Doing so will result in severe damage to the transmission components. 1. With the tiller on level ground, pull the Depth Regulator Lever (FF, Fig. 2-10) back and then all the way up until the lowest notch in the lever is engaged. 2.
SECTION 3: FEATURES AND CONTROLS WARNING: Before operating your machine, carefully read and understand all safety, controls and operating instructions in this Manual, the separate Engine Owner’s Manual, and on the decals on the machine. Failure to follow these instructions can result in serious personal injury.
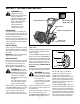
A D B C WARNING: Use extreme caution when reversing or pulling the machine towards you. Look behind to avoid obstacles. Never attempt to till in reverse. Failure to follow this warning could result in personal injury or property damage. To operate the Reverse Clutch Control: 1. Put wheels in WHEEL DRIVE position (see “WARNING” statement at the left). Figure 3-3: FREEWHEEL position. WARNING: Before starting engine, be sure that both wheels are in WHEEL DRIVE position.
SECTION 4: OPERATION WARNING: Before operating your machine, carefully read and understand all safety (Section 1), controls (Section 3) and operating instructions (Section 4) in this Manual, the separate Engine Owner’s Manual, and on the decals on the machine. Failure to follow these instructions can result in serious personal injury.
Stopping the Engine and Tiller 1. To stop the wheels and tines, release the Forward Clutch Bail (all models) or the Reverse Clutch Control (Models 634F and 634A) — whichever control is in use. 2. To stop the engine, put the ignition switch and/or the throttle control lever in the “OFF” or “STOP” position. OPERATING THE TILLER The following operating instructions provide guidelines to using your tiller effectively and safely.
TILLING TIPS & TECHNIQUES Tilling Depths • Avoid pushing down on the handlebars in an attempt to force the tiller to dig deeper. Doing so takes the weight off the powered wheels, causing them to lose traction. Without the wheels helping to hold the tiller back, the tines will attempt to propel the tiller – often causing the tiller to skip rapidly across the ground.
TILLING TIPS & TECHNIQUES (CON’T) Power Composting Power composting simply means tilling under and burying in the soil all manner of organic matter such as crop residues, leaves, grass clippings and cover crops. This material will decompose during the non-growing season and add important natural nutrients to the soil. The first place to begin is with crop residues such as leftover vines, stalks, stems and roots. Power compost these crop residues as soon as they finish bearing.
TILLING TIPS & TECHNIQUES (CON’T) Terrace Gardening (continued) • To create a terrace, start at the top of the slope and work down. Go back and forth across the first row as shown in Fig. 4-10. • Each succeeding lower terrace is started by walking below the terrace you’re preparing. For added stability of the tiller, always keep the uphill wheel in the soft, newly tilled soil. Do not till the last 12" or more of the downhill outside edge of each terrace.
SECTION 5: MAINTENANCE WARNING: Before inspecting, cleaning or servicing the machine, shut off engine, wait for all moving parts to come to a complete stop, disconnect spark plug wire and move wire away from spark plug. Remove ignition key on electric start models. Failure to follow these instructions can result in serious personal injury or property damage.
WARNING: Before inspecting, cleaning or servicing the machine, shut off engine, wait for all moving parts to come to a complete stop, disconnect spark plug wire and move wire away from spark plug. Failure to follow these instructions can result in serious personal injury or property damage. 4. The gear oil level is correct if the gear oil is approximately halfway up the side of the main drive shaft. 5. If the gear oil level is low, add gear oil as described next.
WARNING: Before inspecting, cleaning or servicing the machine, shut off engine, wait for all moving parts to come to a complete stop, disconnect spark plug wire and move wire away from spark plug. Failure to follow these instructions can result in serious personal injury or property damage. b Unthread the hex nut (C, Figure 5-4) halfway up the adjustment screw (D). c. Unhook the top of the spring from the Forward Clutch Bail. d.
WARNING: Before inspecting, cleaning or servicing the machine, shut off engine, wait for all moving parts to come to a complete stop, disconnect spark plug wire and move wire away from spark plug. Failure to follow these instructions can result in serious personal injury or property damage. FORWARD CLUTCH BAIL ADJUSTMENT If the Forward Clutch Bail does not function properly, first check that the forward drive belt is adjusted properly (see Checking and Adjusting Forward Drive Belt Tension).
WARNING: Before inspecting, cleaning or servicing the machine, shut off engine, wait for all moving parts to come to a complete stop, disconnect spark plug wire and move wire away from spark plug. Failure to follow these instructions can result in serious personal injury or property damage. 3. Clean around the oil dipstick or oil fill tube (whichever applies) to prevent dirt from falling into the crankcase. 4.
WARNING: Before inspecting, cleaning or servicing the machine, shut off engine, wait for all moving parts to come to a complete stop, disconnect spark plug wire and move wire away from spark plug. Failure to follow these instructions can result in serious personal injury or property damage. TROUBLESHOOTING PROBLEM Engine does not start POSSIBLE CAUSE CORRECTION 1. Spark plug wire disconnected. 1. Reconnect wire. 2. Engine Throttle Control Lever incorrectly set. 2. Put lever in START position. 3.
TROY-BILT TILLER LIFETIME LIMITED WARRANTY WHAT PRODUCT IS COVERED All Troy-Bilt branded rear tine walk-behind tillers with gear drive transmissions. This warranty begins on the date of purchase and is warranted by Troy-Bilt LLC for the life of the tiller, to the original purchaser only.