HP Photosmart R930 series Digital Camera User Guide 6.
Legal and notice information © Copyright 2007 Hewlett-Packard Development Company, L.P. The information contained herein is subject to change without notice. The only warranties for HP products and services are set forth in the express warranty statements accompanying such products and services. Nothing herein should be construed as constituting an additional warranty. HP shall not be liable for technical or editorial errors or omissions contained herein. Windows® is a U.S.
Contents 1 Getting started Camera top, side, and back .......................................................................................................4 Camera front and bottom............................................................................................................5 Before taking pictures.................................................................................................................5 Install the battery...............................................................
Reviewing images and video clips Using Playback.........................................................................................................................24 Reviewing videos................................................................................................................25 Deleting images..................................................................................................................25 Viewing thumbnails.........................................................
Contents Safety precautions for using batteries......................................................................................54 Power indicators.......................................................................................................................55 Number of shots per battery charge.........................................................................................55 Recharging the Lithium Ion battery..............................................................................
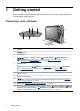
1 Getting started Use this section to get familiar with the camera controls, set up your digital camera for use, and begin taking pictures. Camera top, side, and back 3 4 5 6 1 2 7 11 8 10 1 Speaker. 2 4 9 button 3 Power light. 4 selector—Switches between Picture Capture, Video Record, and Playback (see “Taking pictures” on page 12, “Recording video clips” on page 12, and “Reviewing images and video clips” on page 24). 5 Shutter button.
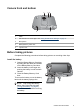
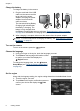
Camera front and bottom 1 5 2 3 4 1 Flash. 2 Self-Timer/Focus Assist light—See “Using the Self-Timer settings” on page 21. 3 Microphone. 4 Battery/Memory Card door. 5 Tripod mount. Before taking pictures Complete the following procedures before taking pictures or recording video clips. Install the battery 1. Open the Battery/Memory Card door by sliding the door latch as indicated on the Battery/Memory Card door. 2.
Chapter 1 Charge the battery To charge the battery in the camera: 1. Plug the small end of the USB cable into the camera and the large end into the power adapter, then plug the power adapter into an electrical outlet, as shown. The camera's blinking Battery Charging light indicates that the battery is charging. The battery is fully charged when the Battery Charging light turns on solid (see “Recharging the Lithium Ion battery” on page 55 for information on charging times). 2.
Set the date and time Accurately setting the date and time will help you locate images once you have transferred them to your computer, and will ensure that images are accurately marked if you use the date and time imprint feature. See Date & Time Imprint under “Using the Picture Capture and Video Record menus” on page 18. 1. Touch or to adjust the month, date, and year. 2. Touch Next to confirm your settings and display the Time screen. 3. Touch or to adjust the time. 4.
Chapter 1 For information about supported memory cards, see Storage under “Specifications” on page 57. Install the software The HP Photosmart Software provides features for transferring images and video clips to your computer, as well as features for modifying stored images (remove red eyes, rotate, crop, resize, and more). To install the HP Photosmart Software, your computer must meet the system requirements as stated on the camera packaging.
To use the Touch Screen: • • Touch a rounded-corner touch button (as shown) or menu item on the Touch Screen. For example, touching exits the current screen or menu. Whenever you are framing an image or video clip, you can turn off the Touch Screen overlay to view the display more clearly. Press to turn off the touch buttons. Press again to turn on the touch buttons. NOTE: Overlay items on the Touch Screen vary based on the task you are performing.
Chapter 1 TIP: To switch between Playback, slide 10 Getting started Picture Capture, Video Record, and to the desired option.
2 Taking pictures and recording video clips You can take pictures when you are in Picture Capture and you can record video when you are in Video Record. Slide to to take pictures or to to record video clips. The Image Display resembles the following: 1 Touch Screen buttons Menu • • When in Picture Capture, displays When in Video Record, displays Picture Capture Menu. Video Record Menu. ( only) Displays the Shooting Mode menu.
Chapter 2 For the icons you may see displayed on additional buttons, see the entries for camera features in “Using the Picture Capture and Video Record menus” on page 18. Taking pictures You can take a picture when the camera is set to Picture Capture. to . 1. Slide 2. Frame the subject for your picture in the Image Display. 3. Press the Shutter button halfway down to measure and lock the focus and exposure.
TIP: If you follow the suggestions for focus and exposure and your image does not appear to be in proper focus or exposure when viewed in Playback, see the topics on blurry, dark, light, or grainy images in “Troubleshooting” on page 44. Optimizing focus When the camera cannot auto focus, the focus brackets turn red. This indicates the picture may be out of focus because the subject is out of the focus range or the scene has low contrast.
Chapter 2 3. Hold the Shutter button halfway down and reframe. 4. Press the Shutter button all the way down to take the picture. Optimizing exposure When you are taking a picture and press the Shutter button halfway down, the camera also measures the light level to set the proper exposure. If the camera determines the scene will require a very long exposure, a shaking hand icon ( ) appears.
Digital zoom In digital zoom, the Image Display shows a yellow frame around the scene and the image quality setting (MP value). As you zoom in, the scene enlarges within the yellow frame to indicate the area of the scene the camera will capture, and the MP value decreases to indicate the resolution at which the scene will be captured. When capturing images using digital zoom, make sure that the MP value shown in the Image Display is appropriate for the size at which you want to print the captured image.
3 Setting options for taking pictures and recording video clips Your camera's default settings work well for most shooting situations. For some situations, however, the features described in this chapter can improve the pictures you take and the video clips you record.
Using the shooting modes Shooting modes are predefined settings for everyday situations. They are optimized for particular types of scenes or shooting situations. To select a shooting mode: 1. While in Picture Capture, touch the icon corresponding to the current shooting by default). mode ( 2. Touch or to display the shooting mode you want, touch the shooting mode, then touch OK. To exit the Shooting Mode menu without changing the shooting mode, touch .
Chapter 3 software” on page 8), you can also stitch panoramas automatically as you transfer them to your computer. 1. While in Picture Capture, touch the icon corresponding to the current shooting by default). Touch or to display the / Panorama shooting mode ( Panorama (left to right) or Panorama (right to left), modes. Touch either touch OK, then touch to return to Picture Capture. 2. Press the Shutter button to take the first picture in the panoramic sequence. 3.
Video Quality ( only)—Sets resolution and compression for video clips. The setting remains in effect until it is changed, even when you turn off the camera. • • • Best (Default)—For outdoor action video clips or printing individual video frames up to 10.2 by 15.2 cm (4 by 6 in). Better —For indoor video clips or printing individual video frames up to 7.6 by 12.7 cm (3 by 5 in). Good —For capturing longer video clips or e-mailing shorter clips. Shooting Mode ( only)—For selecting a shooting mode.
Chapter 3 (continued) Exposure Compensation—Overrides the camera’s automatic exposure setting. For more information, see “Exposure Compensation” on page 22. • • To make the images you are about to capture brighter, touch + to increase the value. Touch OK when done. To make the images you are about to capture darker, touch − to decrease the value. Touch OK when done.
Using the Self-Timer settings The Self-Timer allows you to take one or two pictures or one video clip after a 10second delay. 1. While in the Picture Capture or Video Record Menu, touch Self-Timer. 2. In the Self-Timer menu, touch On (for one shot) or On-2 Shots ( only), touch OK, then touch to return to Picture Capture or Video Record. For more details on selecting options in the Picture Capture and Video Record menus, see “Using the Picture Capture and Video Record menus” on page 18. 3.
Chapter 3 way, you take a clearer picture because the camera reduces the effects of movement. Steady Photo with or without the flash. Steady Photo is useful in You can use situations like these: • • • In dim lighting conditions When the subject of the scene is beyond the flash distance When you are taking pictures indoors and do not want to use the flash TIP: For other situations when the picture may be blurry, see the suggestions under “My image is blurry.” on page 47.
Higher ISO numbers allow faster shutter speeds, and can be used when taking pictures in dark areas without a flash, or when taking pictures of fast moving objects. Higher ISO speeds produce pictures with more grain (or noise) and, therefore, can be of lower quality.
4 Reviewing images and video clips You can review and manipulate images and video clips in Playback as described here. For information about enhancing images, see “Using the Playback Menu” on page 26 and “Using the Design Gallery Menu” on page 30. Using Playback 1. Slide to . 2. Touch or to scroll through your images (see “Reviewing videos” on page 25 for information about reviewing videos). TIP: If your image is obscured by the Touch Screen overlay, press to turn off the overlay.
(continued) Indicates this image is marked for buying prints online; touch to display Buy Prints Online menu (see “Buying prints online” on page 39). the Indicates this image is tagged as a Favorite; touch to display the menu (see “Tagging images” on page 27). 10 Indicates this image is tagged with any tag other than Favorite; touch to Tag menu (see “Tagging images” on page 27). display the Displays the 2 Tag Delete menu (see “Deleting images” on page 25).
Chapter 4 • Entire Panoramic Sequence—If the current image is part of a panoramic sequence, deletes all images in the panoramic sequence. • All Images (in Memory/on Card)—Deletes all stored images and video clips. • Format (Memory/Card)—Deletes all stored files, then formats the internal memory or memory card. 3. Touch any option to select the option, or touch to exit without deleting and return to Playback. Viewing thumbnails 1.
Design Gallery...—Allows you to enhance images by editing, cropping, adding borders, and more (see “Using the Design Gallery Menu” on page 30). Photosmart Express...—Allows you to mark images for printing, sharing, and ordering prints online (see “Using HP Photosmart Express” on page 38). Tag—Allows you to tag images (see “Tagging images” on page 27). View Slideshow—Allows you to create and view slideshows of your images and videos (see “Viewing slideshows” on page 27).
Chapter 4 4. When you have finished tagging images, touch Done to exit the Tag menu. 5. Touch or to scroll to the next image you wish to tag, then repeat Steps 2 through 4. 6. When you have finished tagging images, touch Done, then touch to return to the Playback Menu. NOTE: You can select a tag to be applied to all images you take (see Tag under “Taking pictures and recording video clips” on page 11).
Managing tags in Windows The HP Photosmart Software that came with your camera includes a feature that allows you to define custom tags on your computer, then transfer the tags to your camera. To define tags: 1. Connect your camera to your computer (see “Connecting to the computer” on page 35). 2. When the HP Photosmart Transfer dialog displays, click Cancel. 3. From the HP Solution Center, select Settings, then select HP Photosmart Tag Setup. 4.
5 Using the Design Gallery Menu You can use the Design Gallery features to enhance your captured images. Playback, touch or to scroll to an image. 1. While in 2. Touch Menu, touch Design Gallery, then touch the Design Gallery option you want to use and follow any on-camera instructions. repeatedly to return to Playback. 3. Touch TIP: To more clearly view the effect of Design Gallery options on the displayed image, press to hide the Touch Screen overlay. Press again to display the Touch Screen overlay.
Rotating images You can rotate a displayed image clockwise or counter-clockwise in 90–degree increments. 1. While in the Design Gallery Menu, touch Rotate. to rotate the image clockwise; touch to rotate the image counter2. Touch clockwise. to return to the 3. Touch Save to save the image in its new orientation. Touch Design Gallery Menu without saving the changes.
Chapter 5 Enhance Photos allows you to correct common problems or improve the image. Design Gallery Menu, touch Enhance Photos. 1. While in the 2. Touch an enhancement, then touch Next. • Slimming—Compresses centered subjects for a slimmer look. • Pet-Eye Fix—Allows you to correct glowing-eye problems in images of animals. • Press and to zoom in and out on the area to be corrected. • Touch the eye to be corrected (a yellow selection box appears around the area).
Add Borders allows you to add one or more predefined borders to the displayed image. To add a border: 1. Touch Add Borders. 2. Touch an option to select a border type. • Soft Edge—Applies a soft, vignetted frame to the image. • Inset Border—Image extends beyond the inset frame. • Torn Edge—Creates random tears for an uneven border effect. • Burned Edge—Creates a border with darkened areas that appear burned. • Spatter—Creates an edge that appears to dissolve into the paper, like spray.
6 Transferring and printing images Regularly transferring images to your computer and deleting them from the memory card will reduce the time it takes to turn on your camera, to review images, and to transfer images. You can transfer pictures and video clips with or without the HP Photosmart Software that came with your camera. However, the HP Photosmart Software has several features for transferring and managing your images and also guides you through the transfer process.
3. Connect the camera and computer using the USB cable that came with your camera. 4. Turn on the camera. When the Image Display indicates that the camera is connected to the computer, follow the instructions on the computer screen. For more information, see the Help feature in the HP Photosmart Software. NOTE: If the camera does not successfully connect to the computer, see “My camera stalls when establishing a connection to the computer.” on page 49.
Chapter 6 NOTE: On Macintosh computers, if you set the camera to Disk Drive and no image transfer software starts automatically, look on the desktop for a disk drive icon labeled with your HP camera model number and copy the images manually. For more information about how to copy files, visit Mac help. Using a memory card reader You can put your camera’s optional memory card into a (separately purchased) memory card reader.
one of the following: • If you want to print the pictures you marked for printing (see “Marking images for printing” on page 39), touch Yes. In the Printer Settings menu, touch or to specify printer settings, then touch OK. NOTE: After the printer prints the marked images, the Image Display on the camera shows an image. You can then select individual images to print by following the remaining steps in this procedure. • If you want to select individual images to print, touch No. 4.
7 Using HP Photosmart Express With HP Photosmart Express, you can select pictures in your camera to print automatically (see “Marking images for printing” on page 39), to buy prints online (see “Buying prints online” on page 39), or to send to custom destinations (see “Sharing images” on page 40) the next time you connect the camera to your computer or printer. You must have the HP Photosmart Software installed on your computer to use some features in the Photosmart Express Menu.
Marking images for printing Marked images are automatically printed when you connect the camera to a PictBridgecertified printer or a computer with the HP Photosmart Software installed. You can mark individual images, all images, or tagged images (see “Tagging images” on page 27). 1. While in the Photosmart Express Menu, touch Print. 2. To mark individual images for printing: a.
Chapter 7 4. When you are done marking images for which you want to buy prints, touch repeatedly until you return to Playback. 5. To buy prints of the images you selected, see “Transferring images with HP Photosmart Software” on page 34. Sharing images You can customize the Share menu to include e-mail addresses, group distribution lists, or other online services. You can then select images to send to these destinations.
5. Follow the instructions on the computer screen to create, delete, and reorder share destinations. 6. When you are done, turn off the camera and disconnect the camera from the computer. Turn on the camera, access the Photosmart Express Menu, then touch Share to verify that the new destinations are now in the camera.
8 Using the Camera Setup Menu The Camera Setup Menu allows you to set preferences for the camera’s behavior. The Camera Setup Menu is available from the Picture Capture, Video Record, and Playback menus. 1. While in the Picture Capture, Video Record, or Playback menu, touch or to display Camera Setup..., then touch Camera Setup.... 2. Touch or to display the option you want, then touch the option to display the menu option’s menu. 3.
Setting Remembered Settings Using Remembered Settings, you can specify which options in the Picture Capture and Video Record menus reset to their default setting and which retain their setting when you turn off the camera. 1. While in the Camera Setup Menu, touch or to display Remembered Remembered Settings to display its menu. Settings, then touch 2. Touch or to display an option. Options with check marks will retain their setting even when you turn off the camera.
9 Troubleshooting Use this section to find information on: • • • • Resetting the camera (see “Resetting the camera” on page 44). Aligning the Touch Screen (see “Aligning the Touch Screen” on page 44). Caring for the Touch Screen (see “Caring for the Touch Screen” on page 44). Possible problems and solutions (see “Problems and solutions” on page 45). Resetting the camera If your camera does not respond when you press buttons, reset the camera. 1. Turn off the camera. 2. Remove the memory card.
Problems and solutions Use this information to find solutions to common issues you may have using your camera. NOTE: Known issues are often fixed with new releases of firmware. To optimize your digital photography experience, periodically check the Hewlett-Packard Technical Support website (www.hp.com/support) for updates to your camera's firmware, software, and drivers.
Chapter 9 It takes the camera a long time to turn on. • Your camera may be slower to turn on if you have a high capacity (4GB or larger) memory card inserted. • Having a large number of files (over 300) stored on a memory card affects the time it takes for the camera to turn on. Transfer stored files to your computer, then format the memory card. • Power-on time in Playback is slow if you have a large number of tagged images on your memory card.
My image is blurry. • Use Focus Lock (see “Using Focus Lock” on page 13). • In dim lighting conditions, turn on Steady Photo (see Steady Photo under “Using the Picture Capture and Video Record menus” on page 18). • In average or bright lighting conditions when photographing fast-moving subjects, turn Steady Photo (see Steady Photo under “Using the Picture Capture and off Video Record menus” on page 18), set the flash to Auto Flash and set the shooting mode to Action.
Chapter 9 • • You may have zoomed in too far using digital zoom (see “Digital zoom” on page 15). If the camera is warm, the effect will diminish as the camera cools. For best image quality, avoid storing the camera in very hot locations. Images are missing on my camera. Remove the memory card and see if the images are stored in internal memory. If so, transfer the images to the memory card (see Move Images to Card under “Using the Playback Menu” on page 26).
The camera responds sluggishly when trying to review images. Playback is slow if you have a large number of tagged images • Power-on time in on your memory card. Transfer the images to your computer (see “Transferring and printing images” on page 34) and review them there. • See “Storage” on page 58 and “Memory capacity” on page 58 for tips about memory cards. Video recording terminates abruptly. The video is saved successfully, but it is shorter than expected.
Chapter 9 I cannot transfer images from the camera to my computer. • Either install the HP Photosmart Software (see “Install the software” on page 8), or see “Transferring images without HP Photosmart Software” on page 35. • Configure your camera preferences so the HP Photosmart software starts automatically when you connect your camera to your Macintosh. Open the HP Photosmart Camera settings in System Preferences to make changes, or to view the camera software help.
Camera error messages Should you receive one of the following error messages when using your camera, you can look up details about the message by visiting www.hp.com/support and searching on the specific code.
10 Product support Use this section to find support information for your digital camera, including links to helpful websites and an overview of the support process. Helpful websites To optimize your digital photography experience, periodically check the websites listed below for updates to your camera's software, drivers, and firmware. Camera tips, product registration, newsletter subscriptions, driver and software updates, purchase HP supplies and accessories www.hp.com Customers with disabilities www.
5. Extending or upgrading your warranty. If you would like to extend or upgrade your camera's warranty, please contact the store where you bought the camera or check the HP Care Pack offers at www.hp.com/support. 6. If you already purchased an HP Care Pack Service, please check the support conditions on your contract.
A Managing batteries Your camera uses a rechargeable HP Photosmart R07 Lithium Ion battery (L1812A/L1812B). Top points about batteries Always insert the battery in the camera correctly (see “Install the battery” on page 5). If the battery is inserted improperly, the compartment door may close but the camera will not operate. • New rechargeable Lithium Ion batteries are shipped partially charged. Fully charge them before first use.
• • Immediately discontinue use of the battery if, while using, charging, or storing the battery, the battery emits an unusual smell, feels excessively hot (note that it is normal for the battery to feel warm), changes color or shape, or appears abnormal in any other way. In the event the battery leaks and the fluid gets into one’s eye, do not rub the eye. Rinse well with water and immediately seek medical care. If left untreated, the battery fluid could cause damage to the eye.
Appendix A The following table shows the average recharge time for a fully discharged battery, based on recharge location. Charge location Average charge time Signals In camera connected to AC power via the power adapter 2–3 hours Charging: Camera's battery charging light blinks and the animated battery icon is displayed.
B Specifications Resolution Pictures: • 8.15MP (3298 by 2472) effective pixel count • 8.28MP (3336 by 2484) total pixel count Video clips: • • VGA • 640 by 480 total pixel count • Best—24 frames/sec • Better—12 frames/sec QVGA • 320 by 240 total pixel count • Good—24 frames/sec Sensor Diagonal 7.183 mm (1/2.5 in, 4:3 format) CCD Color depth 36 bit (12 bits by 3 colors). 36 bit images are transformed into an optimized 24 bit image and stored in the JPEG format.
Appendix B (continued) Storage • • • • • 32MB internal flash memory, not all of which is available for storing images and video clips (see “Memory capacity” on page 58). Slot for memory card. This camera supports standard, high speed, and high capacity Secure Digital (SD) memory cards, 32MB to 8GB. This camera supports storing a maximum of 1999 images on a memory card.
Video quality To locate the approximate seconds of video that can be stored in internal memory when the camera is set to different Video Quality settings (see Video Quality under “Using the Picture Capture and Video Record menus” on page 18), go to www.hp.com/support, select your language and region, enter your camera model number in the Search: Product field, click Product Information, then click Specifications.
Index A Action mode 17 Adaptive Lighting 19, 22 adding borders 32 AE Metering 20 aligning the Touch Screen 44 Alignment, Touch Screen 42 apply artistic effects 31 artistic effects 31 assistance 52 Auto mode 17 B battery charge 6 conserving 54 door 5 install 5 shots per 55 top points about use 54 Beach mode 17 blinking lights on camera 4 borders 32 Burst setting 19, 21 C camera dimensions 58 parts 4, 5 reset 44 specifications 57 turn on/off 6 weight 58 Camera Setup Menu 42 Camera Sounds 42 caring for the T
Index O on/off 6 online destinations 40 print buying 39 optical zoom 14 P Panorama mode 17, 29 parts of camera 4, 5 Photosmart Express Menu buying prints online 39 marking images for printing 39 sharing images 40 Picture Capture Menu 18 pictures 12, 21 Playback 24 Playback Menu 26 Portrait mode 17 power indicators 55 light 4 usage 58 preview Panorama 29 print images 36, 38 prints, buy online 39 problems and solutions 45 product support 52 R record video clips 12 red-eye removal 16, 30 Region 6 remaining
Regulatory / Geltende Richtlinien / Informations règlementaires Geräuschemission LpA < 70 dB Am Arbeitsplatz Normaler Betrieb nach DIN 45635 T. 19 FCC statement The United States Federal Communications Commission (in 47 CFR 15.105) has specified that the following notice be brought to the attention of users of this product. This equipment has been tested and found to comply with the limits for a Class B digital device, pursuant to Part 15 of the FCC Rules.