OPERATION MANUAL R-270 MICROWAVE OVEN 800W (lEC 60705) R-269 [cover-28],indd A 7^3/08 11:02:53 AM
!H OPERATION MANUAL This operation manual contains important information which you should read carefully before using your microwave oven. IMPORTANT:There may be a serious risk to health if this operation manual is not followed or If the oven is modified so that it operates with the door open. If you require any advice or assistance regarding your Sharp product, please visit our website: http://www.sharp.co.
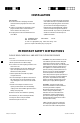
CONTENTS Oven and Accessories......................................................................................................................................................................2 Control Panel....................................................................................................................................................................................3 Safety: Installation....................................................................................................
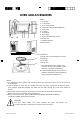
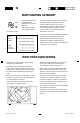
OVEN AND ACCESSORIES OVEN: 1. Oven lamp 2. Control panel 3. Door opening button 4. Waveguide cover (DO NOT REMOVE) 5. Oven cavity 6. Coupling 7. Door latches 8. Door hinges 9. Door seals and sealing surfaces 10. Power cord I ¡.Ventilation openings 12.Outer cabinet 1 j: uc/“iu. ♦ ° ° . i\ \ Li-l 12. ACCESSORIES: Check to make sure the following accessories are provided: 13 13. Turntable 5^ 14 14.
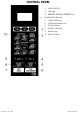
CONTROL PANEL 1 1. DIGITAL DISPLAY 2. TIME keys 3. WEIGHT COOK & DEFROST key 4* LESS/MORE TIME keys 5. POWER LEVEL key 6. START/AUTO MINUTE key 7. STOP/CLEAR key 8. KITCHEN TIMER key 9. WEIGHT keys 10.
INSTALLATION A 5. WARNING: Inspect the Oven: Check the oven carefully for damage before and regularly after installation. Make sure the door closes properly, that it is not misaligned or warped. Check the hinges and door safety latches are not broken or loose. Ensure the door seal and sealing surfaces are not damaged. If the door or door seals are damaged, the oven must not be operated until it has been repaired by a competent person. Inspect the oven interior and door for dents.
INSTALLATION IMPORTANT! ♦ The fuse from the cut-off plug should be removed and the plug disposed of in a safe manner. ♦ Under no circumstances should the cut-off plug be inserted into a socket outlet as a serious electric shock may occur. ♦ The plug must not be used without the fuse cover fitted. If you have any doubt about your microwave oven obtain the help of a qualified electrician.
!H MAFF HEATING CATEGORY eoow E Microwave output power in Watts (based on international (IEC 60705) standard). Letter representing the oven heating category. Microwave Symbol.
MICROWAVE POWER LEVELS ♦ Your oven has 10power levels, as shown. P re s s th e Power Level H IG H M E D IU M H IG H POWER LEVEL k e y LOW (D e fro s t) ♦ To change the power level for cooking, enter the required time and then press XI P lO O X2 P90 X3 P80 X4 P70 X5 P60 X6 P50 X7 P40 X8 P30 M E D IU M M E D IU M L O W (D e fro s t) Percentage X9 P20 XI 0 PI 0 the POWER LEVEL key until the display indicates the desired level.
HOW то OPERATE YOUR OVEN Opening the door: To open the oven door, push the door opening button. Starting the oven: START ALITO ШШЕ Prepare and place food in a suitable container onto the turntable or place directly onto the turntable. Close the door and press the START/AUTO MINUTE key. Stopping the oven: STOP If you want to stop the oven during cooking press the STOP/ CLEAR key once or open the oven door. If you want to cancel the cooking programme, press the STOP/CLEAR key twice.
HOW TO OPERATE YOUR OVEN MANUAL DEFROSTING ♦ Enter the defrosting time and use microwave power levels PIO or P30 to defrost (refer to page 7). ♦ ♦ Stir or turn the food, where possible, 2-3 times during defrosting. After defrosting, cover the food in foil and leave to stand until thoroughly defrosted. Example: To defrost for 10 minutes on P 30 microwave power. I. input the power level by pressing the POWER LEVEL key 8 times. ■ ■ Enter the defrosting time by pressing the 10 MIN. key once.
AUTO WEIGHT COOK / DEFROST_____________________ AUTO WEIGHT COOK J DEFROST enables you to cook or defrost pre-proqrammed meals listed. Follow the example below for details on how to operate these functions. AUTO WEIGHT COOK allows you to cook 3 popular menus. When cooking beef, press the AUTO WEIGHT COOK key x 11 C001 | will appear on the display. When cooking lamb, press the AUTO WEIGHT COOK key x2 [ C002 | will appear on the display.
AUTO WEIGHT COOK CHART WEIGHT RANGE: ♦ Food weight should be rounded up or down to the nearest 0.1 kg,for example, 0,65kg to 0.7kg or 0.34kg to 0.3kg. ♦ You are restricted to enter a weight within the range (see the following charts). NOTES: ♦ When action is required (example, to turn food over), the oven stops, the audible signals sound, the remaining cooking time and an indicator will flash on the display.To continue cooking, press the START/AUTO MINUTE key.
SPEED DEFROST This function quickly defrosts food while enabling you to choose a suitable defrost period, depending on the food type. Follow the example below for details on how to operate this function. Example: To defrost the food for 10 minutes. Select the menu required by 2. pressing the SPEED DEFROST key once. Enter the cooking time by pressing the 10 MIN key once. SPEED DEFROST 3. Press the START/ AUTO MINUTE key start cooking.
AUTO COOK CHART SELECTING MENU: You can select the Menu directly on the Key Sheet by pressing the relevant key. Auto cook menus: Food Jacket Potato (each 230g) Note 1. For beverage and potatoes, parameters on display are not weight but number of servings. 2.
CONVENIENT FUNCTIONS I.SEQUENCE COOKING: This function enables continued and uninterrupted operation for 2 different stages. Example: To cook for: 5 minutes on PI 00 power (Stage I) 16 minutes on P30 power (Stage 2) STAGE I I. Input the power level by pressing the POWER LEVEL key once. ■ ■ 2. Enter the cooking time by pressing the I MIN key 5 times. POWER H LEVEL ■ x5 xl o^nn r lU u c-nn ^•uu STAGE 2 3. Input the power level by pressing the POWER LEVEL keys times. ■ ■ 5.
CONVENIENT FUNCTIONS 3, LESS (▼) and MORE (A)TIME: The LESS (▼) TIME and MORE (A) TIME keys enable you to: ♦ Decrease or increase cooking/defrosting time whilst the oven is in use (manual cooking only). TO USE LESS AND MORE WITH MANUAL COOKING Press the LESS (T) or MORE (A) TIME key to decrease or increase the cooking or defrosting time in multiples of I minute whilst the oven is in use.The overall cooking time can be increased to a maximum of 99 minutes.
CONVENIENT FUNCTIONS 4.KITCHENTIMER: Use the KITCHEN TIMER as a minute timer or to monitor the standing time for cooked / defrosted food. Example: To set the timer for 5 minutes. I. Press the KITCHEN TIMER key once. 3. Press the START/ AUTO MINUTE key once to start. 2. Enter the desired time by pressing the I MIN key 5 times. START AUTOMiNUlE x1 Xl x5 The display will count down.When the display reaches zero, the audible signal will sound.
MICROWAVE COOKING ADVICE Man/ of the following techniques are similar to those used in conventional cooking. Microwaves cook food faster than conventional cooking. It is therefore essential that certain techniques are followed to ensure good results. COOKING ADVICE NOTES: Always attend the oven when in use. Liquids and foods must not be heated in sealed containers or jars/containers with lids on,as pressure will build up inside and may cause the container/jar to explode.
!H MICROWAVE COOKING ADVICE Food Characteristics Composition Foods high in fat or sugar (e.g. Christmas pudding, mince pies) require less heating time. Care should be taken as overheating can lead to fire. Bones in food conduct heat, making the food cook more quickly. Care must be taken so that the food is cooked evenly. Density Food density will affect the amount of cooking time needed. Light, porous foods, such as cakes or bread, cook more quickly than heavy, dense foods, such as roasts and casseroles.
!H SUITABLE COOKWARE To cook/defrost food in a microwave oven, the microwave energy must be able to pass through the container to penetrate the food.Therefore it is important to choose suitable cookware. Cookware Aluminium foil Foil Containers Browning dishes Microwave Safe ✓ /X Comments Small pieces of aluminium foil can be used to shield food from overheating. Keep foil at least 2cm from the oven walls, as arcing may occur. Foil containers are not recommended unless specified by the manufacturer, e.g.
DEFROSTING ADVICE Defrosting food using your microwave oven is the quickest method of all. It is a simple proccess but the following instructions are essential to ensure the food is thoroughly defrosted. Rearrange Foods that are placed towards the outside of the dish will defrost quicker than foods in the centre, it is therefore essential that the food is rearranged up to 4 times during defrosting. Move closely packed pieces from the outside to the centre and rearrange over-lapping areas.
REHEATING ADVICE For the reheating of foods, follow the advice and guidelines below to ensure food is thoroughly reheated before serving. Plated meals Remove any poultry or meat portions, reheat these separately, see below. Place smaller items of food to the centre of the plate, larger and thicker foods to the edge. Cover with vented microwave clingfilm and reheat on MEDIUM, stir/ rearrange halfway through reheating. NOTE: Ensure the food is thoroughly reheated before serving.
CLEANING & MAINTENANCE OVEN INTERIOR ♦ It is important to clean the interior of your microwave oven after each use. Do not allow grease or dirt to build up on the door seals or areas around the door.This may prevent the door from closing correctly and may cause a leakage of microwaves (follow the cleaning instructions opposite). ♦ To dean the oven interior, use a mild detergent solution, such as washing-up liquid, with warm water on a soft cloth.
TROUBLESHOOTING If you think the oven is not working properly there are some simple checks you can carry out yourself before calling an engineer.This will help prevent unnecessary service calls if the fault is something simple. Follow this simple check below: Place half a cup of water on the turntable and close the door. Select HIGH and programme the oven to cook for I minute. 1. Does the oven lamp come on when it is cooking? 2. Does the turntable rotate? 3.
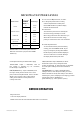
Ш то REPLACE THE MAINS PLUG The wires in the mains cable are colour coded as shown: Green andyellow stripes = EARTH Blue = NEUTRAL Brown = LIVE Make sure the terminal screws are tight and the cable is held securely by the cable grip where it enters the plug. Like most appliances in your home, your oven must be connected to a single phase 230-240V, 50Hz alternating current supply.
GUARANTEE Sharp Electronics (UK) Ltd. (“Sharp”) guarantees that for a period of 12 months from the date of purchase the enclosed product will be free from defects in materials and workmanship. Sharp agrees to provide for the repair or, at its option, the replacement of a defective product. Sharp reserves the right to replace defective parts, or the product, with new or refurbished items, items that are replaced become the property of Sharp.
SPECIFICATIONS AC Line Voltage.................................................................................. Single phase 230-240V, 50Hz Power Consumption: Microwave..................................................................................... 1200W Input Current: Microwave..................................................................................... 5.2 A Output Power: Microwave.....................................................................................
SJjfu Sharp Electronics (U.K.) Ltd London, U. K. U.K.: 0845 888 8112 (office hours) Ireland: 01 676 0648 (office hours) Webslte: http://www.sharp.co.uk/support R-269 [29-42].