PN-86HC1 PN-75HC1 PN-65HC1 LCD MONITOR OPERATION MANUAL
Information on the Disposal of this Equipment and its Batteries IF YOU WISH TO DISPOSE OF THIS EQUIPMENT OR ITS BATTERIES, DO NOT USE THE ORDINARY WASTE BIN, AND DO NOT PUT THEM INTO A FIREPLACE! Used electrical and electronic equipment and batteries should always be collected and treated SEPARATELY in accordance with local law. Separate collection promotes an environment-friendly treatment, recycling of materials, and minimizing final disposal of waste.
IMPORTANT INFORMATION WARNING: TO REDUCE THE RISK OF FIRE OR ELECTRIC SHOCK, DO NOT EXPOSE THIS PRODUCT TO RAIN OR MOISTURE. CAUTION RISK OF ELECTRIC SHOCK DO NOT OPEN CAUTION: TO REDUCE THE RISK OF ELECTRIC SHOCK, DO NOT REMOVE COVER. NO USER-SERVICEABLE PARTS INSIDE. REFER SERVICING TO QUALIFIED SERVICE PERSONNEL.
DEAR SHARP CUSTOMER Thank you for your purchase of a SHARP LCD product. To ensure safety and many years of trouble-free operation of your product, please read the Safety Precautions carefully before using this product. SAFETY PRECAUTIONS Electricity is used to perform many useful functions, but it can also cause personal injuries and property damage if improperly handled. This product has been engineered and manufactured with the highest priority on safety.
SAFETY PRECAUTIONS (Continued) 19. Batteries — Incorrect use of batteries may cause the batteries to burst or ignite. A leaky battery may corrode the equipment, dirty your hands or spoil your clothing. In order to avoid these problems, make sure to observe the precautions below: • Use the specified batteries only. • Install the batteries with due attention to the plus (+) and minus (-) sides of the batteries according to the instructions in the compartment. • Do not mix old and new batteries.
TIPS AND SAFETY INSTRUCTIONS - The TFT color LCD panel used in this monitor is made with the application of high precision technology. However, there may be minute points on the screen where pixels never light or are permanently lit. Also, if the screen is viewed from an acute angle there may be uneven colors or brightness. Please note that these are not malfunctions but common phenomena of LCDs and will not affect the performance of the monitor.
MOUNTING PRECAUTIONS • This product is for indoor use. • A mounting bracket compliant with VESA specifications is required. • Since the monitor is heavy, consult your dealer before installing, removing or moving the monitor. • Mounting the monitor on the wall requires special expertise and the work must be performed by an authorized SHARP dealer. You should never attempt to perform any of this work yourself.
Contents IMPORTANT INFORMATION.............................................3 DEAR SHARP CUSTOMER...............................................4 SAFETY PRECAUTIONS...................................................4 TIPS AND SAFETY INSTRUCTIONS................................6 MOUNTING PRECAUTIONS.............................................7 Supplied Components......................................................9 System Requirements......................................................9 Part Names.......
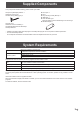
Supplied Components If any component should be missing, please contact your dealer. Liquid Crystal Display Monitor: 1 Remote control unit: 1 Cable clamp (affixing type): 3 Power cord Remote control unit battery: 2 CD-ROM (Utility Disk for Windows): 1 Setup Manual: 1 Touch pen: 2 Tray: 1 Tray mounting screws (M3x15): 5 USB cable: 1 Cover SHARP logo: 1 Place this sticker onto the SHARP logo to cover the logo.
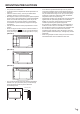
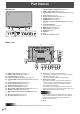
Part Names nFront view 1. USB port (USB 2.0 compliant) (See page 12.) 2. HDMI 1 input terminal (See page 12.) 3. TOUCH PANEL terminal 1 (for touch panel) (See page 12.) 4. Power LED (See page 16.) 5. Remote control sensor (See page 15.) 6. POWER button (See page 16.) 7. FREEZE button (See page 21.) 8. VOLUME +/- (Volume adjustment) buttons (See page 21.) 9. Touch On/Off button Toggle the touch panel on and off. 10. MENU button (See page 22.) 11. INPUT button (See page 22.) 12. Brightness sensor 13.
Part Names nRemote control unit 1 1. Signal transmitter 2. Operation buttons (See page 21.
Connecting Peripheral Equipment 4 5 6 1 1 7 2 3 Caution • Be sure to turn off the main power switch and disconnect the plug from the power outlet before connecting/ disconnecting cables. Also, read the manual of the equipment to be connected. • Be careful not to confuse the input terminal with the output terminal when connecting cables. Accidentally reversing cables connected to the input and output terminals may cause malfunctions and other problems.
Connecting Peripheral Equipment 6. LAN terminal • When Power Save Mode is Off, you can use “Wake on LAN (Magic Packet)” to turn on the power via LAN. 7. TOUCH PANEL terminal 2 (for touch panel) • To use the touch panel with a computer, connect the touch panel to the computer with a USB cable. • To use this terminal, connect your computer to the video input terminal on the rear of the monitor. 8.
Connecting the Power Cord Caution • Use only the power cord supplied with the monitor. 1. Turn off the main power switch. 2. Plug the power cord (supplied) into the AC input terminal. 3. Plug the power cord (supplied) into the power outlet. 2 AC input terminal Power cord (Supplied) 1 Main power switch 3 For power outlet Binding Cables The supplied cable clamps can be used to clamp the power cord and cables connected to the back of the monitor.
Preparing the Remote Control Unit Installing the batteries Remote control operation range 1. Place your finger on the part marked with the ▲, and then pull the cover off. The operation range of the remote control unit is approx. 16.4 feet (5 m) at an angle of approx 10° from the center to the top/ bottom/right/left of the remote control sensor. 2. See the instructions in the compartment and put in the batteries (R03 or LR03 (“AAA” size) x 2) with their plus (+) and minus (-) sides oriented correctly. 3.
Turning Power On/Off Caution • Turn on the monitor first before turning on the computer or playback device. • When switching the main power switch or the POWER button off and back on, always wait for at least 5 seconds. A short interval may result in a malfunction. Turning power on/off Press the POWER button to turn the power ON/OFF. You can also turn the power ON/OFF by pressing the MONITOR ON button/MONITOR OFF button on the remote control unit.
Touch action Touch action Touch actions that can be used with this monitor differ according to operating system and application. The functions of touch actions are also different. For details, check operating system Help and the application’s support documentation. Operating system Windows 8.
Touch action Drag-and-drop Same action as drag-and-drop with a mouse. Touch the screen with your finger/touch pen and move without lifting. When you have finished the movement, lift your finger/ touch pen. nFinger actions Zoom Use in a screen that is capable of enlargement/reduction. Touch the screen with two fingers and move your fingers closer together to reduce the view, or apart to enlarge the view. Flicks Flick your finger/touch pen in the direction of the function you want to use.
Touch action Rotate Use this action in a screen that is capable of image rotation. Touch the center point of the rotation with one finger. While holding that finger still, move another finger in the desired direction of rotation. Move another finger in the desired direction of rotation With one finger touching TIPS • The screen may not respond correctly in the following cases: - Touch gesture is too quick. - The distance between the two points is too short. - The two points intersect.
Basic Operation About the home screen of APPLICATION mode This appears when the input mode is changed to APPLICATION. (3) (2) (2) (1) (1) Start File Explorer. (See page 24.) Start E-board. (See page 25.) Display the list of applications. Start File Explorer. (See page 24.) Display the menu of system-related settings. (See page 31.) Start E-board. (See page 25.) Start EShareServer. (See page 30.) (2) Touch to display the settings menu. Go back to the previous screen.
Basic Operation Using the remote control unit 1 11 12 13 5. VOLUME +/- (Volume adjustment) Press + or - to adjust the volume. 6. INFORMATION In video input mode (other than APPLICATION), use this to display the input terminal and the signal. 7. FUNCTION Use this to display the Function menu. (See page 37.) 2 8. ENTER Confirms the setting. 3 14 4 5 6 15 16 17 9. FREEZE Freezes the video shown on the monitor. To cancel, press any button other than the POWER button, MUTE button or VOLUME button.
Basic Operation 17. INPUT (Input mode selection) The menu is displayed. Press the or button to select the input mode, and press the ENTER button to enter.
Basic Operation nSwitching the screen size Even when the screen size is changed, the display may remain the same depending on the input signal. 16:9 Displays the image with an aspect ratio of 16:9 so it fills the entire screen. Use with 16:9 signals such as 3840 × 2160, 1920 × 1080 or 1280 × 720. 4:3 Displays the image with an aspect ratio of 4:3. Use with 4:3 signals such as 640 × 480, 800 × 600, or 1024 × 768. When showing such as 16:9 video, the width of the image will be shrunk.
File Explorer Touch in the home screen of APPLICATION mode to start. Select the data media. Go back to the previous display. Change the display method. You can sort, create a new folder, copy/paste a selected file, remove a USB flash drive, exit an application, and perform other actions. TIPS • A list of files that can be opened on this monitor is displayed. (See page 28.) The zip file can be opend on E-board. • Text files can display the following character codes.
E-board / Note You can use E-board/Note to draw in the same way as on a whiteboard. • T he drawn lines and the images pasted on the board are handled in the software as an “object”. • You can write/draw letters and lines on the image displayed on this monitor. • In these applications, the data of one screen is referred to as a “sheet”. Caution • When the power is turned off, any data is lost. • Please insert a USB flash drive in the rear USB port when you save data.
E-board / Note nDrawing 1. Select the sheet to be drawn on. You can open a saved board, and load a background. (See page 25.) Tool Function Add a new sheet behind the currently displayed sheet. Display the previous sheet. Shows the current sheet number and the total number of sheets. Touch to show a list (thumbnails) of the sheets on the right side of the screen. You can touch a thumbnail to go to that sheet. To delete that sheet, touch . Display the next sheet. 2. Draw.
E-board / Note Note Touch or on the side of the screen, and touch in the menu that displays to start. The board is shown as transparent. Video input from the HDMI terminals/expansion slot cannot be saved. Only 1 sheet. • T he drawn lines and the images pasted on the board are handled in the software as an “object”. • You can write/draw letters and lines on the image displayed on this monitor. Used for drawing. (See below.) nDrawing 1. Draw. Select such as drawing tool to draw.
Playing the Files You can play photo, music, and video files. Extension nSupported formats The types of files that can be played are as follows. The operation of formats not indicated in the table is not guaranteed. *.mpg (*.mpeg) Max. resolution Sample rate MPEG-1,2,2.5 L3 32/44.1/48kHz 320kbps MPEG-1,2 L2 16kHz - 48kHz 385kbps LPCM 8kHz - 48kHz 1.5Mbps *.mp4 AAC, HEAAC 8kHz - 48kHz *.png MPEG-1,2,2.5 L3 32/44.1/48kHz 320kbps MPEG-1,2 L2 Music files 16kHz - 48kHz Sample rate 32/44.
Playing the Files Playing files Operations during play nPlaying files When playback starts, you can display the operation bar in the bottom of the screen. If the operation bar does not appear, touch the screen to display it. You can perform the actions below while the operation bar is displayed. 1. Start File Explorer (see page 24) and display the file to be played. 2. Touch the file to be played. The selected file starts playing.
Wireless Display • You can display the image of another device on the same network on this monitor. Connect the monitor (with a wireless adapter connected) and the device to the access point of the network or wireless router. You can write/draw letters and lines on the image displayed on this monitor using Note. • This monitor cannot be used in other than the country or region where you purchased it. The channels and frequencies that can be used for wireless LAN vary by country and region.
Menu Items Displaying the menu screen Video and audio adjustment and settings of various functions are enabled. This section describes how to use the menu items. See page 32 for details of each menu items. Caution • Do not turn the main power switch off while the menu items are being displayed. Doing so may initialize the settings. nHow to display the menu Display a video menu 1. Change to a video input mode (other than APPLICATION). 2. Press the MENU button. The menu will be displayed.
Menu Items Video menu Change to a video input mode (other than APPLICATION), and press the MENU button to display the menu. nPicture Picture Mode Video settings can be changed to match the scene. STD (Standard)/ Vivid/High Illuminance Contrast Adjusts the difference between the bright and dark portions of the image. You can set this when the Picture Mode is STD. Black Level Adjusts the entire brightness of the video signals. You can set this when the Picture Mode is STD. Hue Adjust the hue control.
Menu Items nSound Sound Mode Sound settings can be changed to match the scene. Standard/Music/Movie/Sports/User Bass Adjusts the volume of bass-level sound. You can set this when the Sound Mode is User. Treble Adjusts the volume of treble-level sound. You can set this when the Sound Mode is User. Balance Adjusts the balance of the audio sound between right and left. SPDIF Set to On to output PCM format on the digital audio output (optical) terminal.
Menu Items Power Save Mode When Off is selected, Standby state is Networked standby mode. Wake on LAN is enabled. Note, however, that more power will be consumed in standby state. When On is selected, Standby state is Standby mode. Wake on LAN is disabled. Note, however, that the startup time from standby state becomes longer. Off If No Operation Determines whether or not to set the monitor to go into standby state when there is no operation by the remote control unit, touch or RS-232C control.
Menu Items System menu Touch or on the side of the screen, and touch on the monitor or the remote control to display the menu. . In the APPLICATION mode, you can also press the MENU button nNetwork Ethernet Set whether or not to use LAN terminal. Set the IP address, subnet mask, and other settings. Get IP address automatically If your LAN has a DHCP server and you wish to obtain an address automatically, select this setting.
Menu Items Adjustments for computer screen display nAutomatic adjustment When you use the D-SUB to display a computer screen for the first time, or when you change the setting of the computer, use the automatic screen adjustment. 1. Switch the input to D-SUB and display the adjustment pattern. (See the description below.) 2. Press the MENU button and select “PC Setting” in “Picture”. 3. Touch “Auto Adjust”.
Functional Restriction Setting (Function) You can restrict operations. 1. Press the FUNCTION button, and then press the MENU button within 10 seconds. Function RC Lock OFF Monitor Lock OFF 2. Select and set the items. RC Lock You can disable the remote control buttons. OFF ��������������� Enables operation. ON 1 �������������� Disables all remote control operations.
Controlling the Monitor with a computer (RS-232C) You can control this monitor from a computer via RS-232C (COM port) on the computer. Computer connection Connect with RS-232 straight cable between the computer’s COM port (RS-232C connector) and the RS-232C input terminal on the monitor. The terminal on the monitor is a female-type connector.
Controlling the Monitor with a computer (RS-232C) nResponse code format When a command has been executed correctly O K Return code (0DH, 0AH) A response is returned after a command is executed. When a command has not been executed E R R Return code (0DH, 0AH) nCommunication interval • After OK or ERR is returned, you must send the following commands. To set a timeout for the command response, specify 10 seconds or longer.
Controlling the Monitor with a computer (RS-232C) RS-232C command table How to read the command table Command: Command field (See page 38.) Direction: W When the “Parameter” is set in the parameter field (see page 38), the command functions as described under “Control/Response Contents”. R The returned value indicated under “Reply” can be obtained by setting “????” or “ ?” in the parameter field. (See page 38.) Parameter: Parameter field (See page 38.
Controlling the Monitor with a computer (RS-232C) Others Function INFORMATION Model Serial no. Command Direction INF1 R Parameter Reply Control/Response contents Value SRNO R ALL RESET RSET W 0 Value ALL RESET BACKLIGHT OFF BOMD W 0 Turn backlight off 1 R Turn backlight on 0 Backlight off 1 Backlight on Check the resolution PXCK R - Returns current resolution in the form of hhh, vvv.
Troubleshooting If you are experiencing any problem with your display, before calling for service, please review the following troubleshooting tips. There is no picture or sound. • The power LED is off. - Is power supplied to this monitor? - Is the power cord disconnected? (See page 14.) - Is the main power switch off? (See page 16.) • The power LED lights red. - This monitor is in standby state. Turn on the power. (See page 16.) Remote control does not work.
Troubleshooting The monitor makes a cracking sound. • You may occasionally hear a cracking sound from the monitor. This happens when the cabinet slightly expands and contracts according to change in temperature. This does not affect the monitor’s performance. After the Power LED illuminates in red and blue alternately, the monitor automatically turns off, and the Power LED illuminates in red. • When the internal temperature of the monitor rises excessively, the monitor automatically will turn off.
Specifications nProduct Specifications Model LCD component Max. resolution Max. colors Pixel pitch Brightness (typical) Contrast ratio (typical) Viewing angle PN-86HC1 PN-75HC1 86" Class 75" Class [85-9/16 inch (217.4 cm) [74-1/2 inch (189.3 cm) diagonal] TFT LCD diagonal] TFT LCD (pixels) 3840 x 2160 Approx. 1.07 billion colors 0.4935 mm (H) × 0.4935 mm (V) 0.4296 mm (H) × 0.
Specifications nDimensional Drawings Note that the values shown are approximate values. [PN-86HC1] Unit: inch [mm] Screw holes for mounting brackets 13-3/4 [350] 7-3/4 8 [197.5] [202.5] 11/16 [18] 1-5/8 [41] 11/16 [18] 13-3/4 [350] 22-13/16 [579.
Specifications nCompatible signal timing (PC) VESA Vsync Frequency 31.5kHz 60Hz 25.175MHz Yes Yes 37.9kHz 72Hz 31.5MHz Yes Yes 37.5kHz 75Hz 31.5MHz Yes Yes 35.1kHz 56Hz 36.0MHz - Yes 37.9kHz 60Hz 40.0MHz Yes Yes 48.1kHz 72Hz 50.0MHz Yes Yes 46.9kHz 75Hz 49.5MHz Yes Yes 848 × 480 31.0kHz 60Hz 33.75MHz - Yes *2 1024 × 768 48.4kHz 60Hz 65.0MHz Yes Yes 56.5kHz 70Hz 75.0MHz Yes Yes 60.0kHz 75Hz 78.75MHz Yes Yes 47.8kHz 60Hz 79.5MHz - Yes *2 60.
Specifications nCompatible signal timing (AV) Screen resolution 4096 × 2160p 3840 × 2160p 1920 × 1080p 1920 × 1080i 1280 × 720p 720 × 576p 720 × 480p 640 × 480p(VGA) 720(1440) × 576i 720(1440) × 480i Frequency 24Hz 25Hz 30Hz 50Hz *2 59.94Hz 60Hz 24Hz 25Hz 30Hz 50Hz *2 59.94Hz 60Hz 24Hz 50Hz *2 59.94Hz 60Hz 50Hz *2 59.94Hz 60Hz 50Hz *2 59.94Hz 60Hz 50Hz *2 59.94Hz 60Hz 59.94Hz 60Hz 50Hz *2 59.
Specifications nChannels that can be used in wireless LAN Standard EUROPEAN COUNTRIES HONG KONG IEEE802.11b/g/n IEEE802.11ac/a/n OMAN Frequency band (center frequency) 1-13ch 2412-2472MHz 36/40/44/48/52/56/60/64ch 5180-5320MHz 100/104/108/112/116/120/124/128/132/136/140ch 5500-5700MHz Channel PHILIPPINES SAUDI ARABIA SINGAPORE SOUTH AFRICA SRI LANKA THAILAND TURKEY UNITED ARAB EMIRATES VIETNAM INDIA KUWAIT NEPAL MOROCCO AUSTRALIA NEW ZEALAND IEEE802.11b/g/n IEEE802.11ac/a/n IEEE802.11b/g/n IEEE802.
Intellectual Property Rights and Other Matters n Information on the software license for this product Software composition The software included in this product is comprised of various software components whose individual copyrights are held by SHARP or by third parties.
Mounting Precautions (For SHARP dealers and service engineers) • When installing, removing or moving the monitor, ensure that this is carried out by at least 4 people. • Be sure to use a wall-mount bracket designed or designated for mounting the monitor. • This monitor is designed to be installed on a concrete wall or pillar. Reinforced work might be necessary for some materials such as plaster / thin plastic board / wood before starting installation.
Mounting Precautions (For SHARP dealers and service engineers) nAttaching the Tray Secure the tray using 5 tray mounting screws (M3x15) (supplied).
PN-86HC1-75HC1-65HC1 M EN20J(1)