MODEL SD-2060 ELECTROSTATIC COPYING MACHINE OPERATION MANUAL • GETTING STARTED • MAKING COPIES • SUPPLIES • COPIER TROUBLE? • GENERAL INFORMATION • OPTIONAL EQUIPMENT Page 2 10 48 53 67 70
I CONTENTS Page GETTING STARTED ● ● ● ● ● ● INTRODUCTION ............................. USING THIS MANUAL ........................ INSTALLATION REQUIREMENTS ............... CAUTIONS ................................. PART LOCATIONS AND FUNCTIONS ............. Exterior .................................... Interior ..................................... Operation Panel .............................. POWER ON AND OFF ......................... INFORMATION FUNCTION ....................
I INTRODUCTION GETTING STARTED Introduction/Using this manual The SD-2060 has been designed to give high copy quality, productivity and reliability. Amongst its many useful features and functions are the RADF, dual page copying, margin shift, covers and inserts placement, and an internal auditor. The machine can also be equipped with an optional sorter or staple sorter to provide finished copy sets ready for distribution. The SD-2060 was also designed with ease of use in mind.
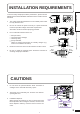
I INSTALLATION REQUIREMENTS The copier should be installed near an accessible power outlet for easy disconnection. 2. Be sure to connect the power cord only to a power outlet that meets the specified voltage and current requirements. Also make certain the outlet is properly grounded. 3. Do not install the machine where it is: ● ● ● ● ● 4. 5. damp or humid, exposed to direct sunlight, extremely dusty, poorly ventilated, subject to extreme temperature or humidity changes (e.g.
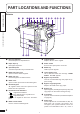
I PART LOCATIONS AND FUNCTIONS GETTING STARTED Exterior q w e rt y u io !0 !1 !2 !3 !4 !5 !6 Part locations and functions @0 @1 q Exit tray (optional) Finished copies are deposited here. !0 Original guides Adjust to the size of the original. w Paper clip tray Place paper clips here. !1 Power switch Press to turn copier power on and off. e Operation panel Contains all operation keys and indicators. !2 RADF tray Holds up to 50 originals.
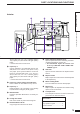
I PART LOCATIONS AND FUNCTIONS Interior @3 GETTING STARTED @2 @4 Part locations and functions @5 @6 @7 @8 @9 #0 I 11"R, 8-1/2" x 14", 11" x 17", or A4 size paper.) Tray capacity is 1,000 sheets of 80 g/m2 (20 lb.) paper. * Can be selected in certain areas. !9 Paper tray 3 Can be adjusted to accommodate A4, B4, A3, A4R, 8-1/2" x 11" or 8-1/2" x 14" (8-1/2" x 13"*) size paper.
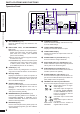
I PART LOCATIONS AND FUNCTIONS Operation Panel q SORTER w e r ORIGINAL TO COPY AUTO IMAGE GETTING STARTED 1 1 2 ( ORIGINALS) EVEN NUMBER SORT GROUP Part locations and functions !3 !4 REDUCTION ENLARGEMENT 100% ODD NUMBER 1 1 100% ZOOM EXPOSURE PRE-COUNT ORIGINAL LIGHT !5 A4 AUTO SELECT COPY RATIO 2 2 2 STAPLE SORT READY TO COPY 1 1 AUTO MANUAL PHOTO !6 EXPOSURE 1. A4 AUTO 2. B4 DARK 2 3 1 !7 !8 3. A3 !9 @0 q AUTO IMAGE key (p.
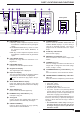
I PART LOCATIONS AND FUNCTIONS t y i o u !0 COPIES SELECTED !1 !2 COPIES MADE SCROLL DISPLAY SPECIAL MODES MARGIN SHIFT DUAL PAGE COPY ERASE COVERS INSERTS CHANGE TRANSPARENCY INSERTS PROGRAM P 1 3 2 CLEAR ALL CA 4 5 6 7 8 9 START GETTING STARTED INFORMATION Inch system 81/2 x11 AUTO SELECT 1. 8 1/2 x11 INTERRUPT TRAY SELECT CLEAR/STOP 0/ @3 @4 @5 3. 11x17 C/ @6 @7 @8 !7 COPY RATIO display Displays the copy ratios for reductions or enlargements.
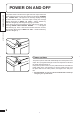
I POWER ON AND OFF GETTING STARTED Power on and off The power switch is located on the right side of the copier. When the power switch is turned to the “ON” position, the message “WARMING UP, PLEASE WAIT.” will appear in the message display. Warming up takes about 5 minutes. Once the copier is ready, the message display will change to “READY TO COPY.”, and the START key indicator will light up, indicating that copying is possible.
I INFORMATION FUNCTION SCROLL DISPLAY Press the INFORMATION(✱) key in the standby mode. ● The following message will appear. Information function 1 GETTING STARTED The information feature provides a quick reference guide to the use of the various features and functions of this copier. The information mode can be entered when the copier is in the standby condition.
I AUDIT ACCOUNTS If this copier has been programmed in the audit account mode, it will not function until an assigned 5-digit account number has been entered. ★ KEY OPERATOR See page 6 of the KEY OPERATOR’S GUIDE for setting the auditing mode. The initial status of the message display will be ENTER YOUR ACCOUNT NUMBER. ––––– MAKING COPIES 1 2 3 4 5 6 7 8 AUDIT CLEAR Enter your account number using the 10-key pad.
I USING THE RADF The RADF (Reversing Automatic Document Feeder) will handle A5 to A3 (8-1/2" x 5-1/2" to 11" x 17") size originals. ● Before loading originals into the RADF tray, be sure to remove any staples or paper clips from them. The RADF can handle a maximum of 50 originals. ● Badly damaged originals may misfeed in the RADF. It is recommended that these be copied from the document glass and the copies be used as original documents.
I USING THE RADF ORIGINAL TO COPY 2 1 1 1 2 1 ( ORIGINALS ) EVEN NUMBER COPIES SELECTED MAKING COPIES 3 Use the 10-key pad to enter the desired number of copies. 2 1 1 2 1 is selected on the ORIGINAL TO Ensure that W1 / W COPY section of the operation panel. PRE-COUNT ORIGINAL COPIES MADE ● The number will be shown on the COPIES SELECTED display. ● Use the CLEAR/STOP key to cancel an entry if a mistake has been made.
I USING THE RADF 1 2 1 EVEN NUMBER ( ORIGINALS ) EVEN NUMBER ODD NUMBER ODD NUMBER 2 2 1 2 2 2 1 PRE-COUNT ORIGINAL STAPLE SORT If the number of originals is known, use the ORIGINAL TO COPY key to select EVEN NUMBER or ODD NUMBER on the ORIGINAL TO COPY section of the operation panel, then proceed to step 3. If the number of originals is not known, select PRE-COUNT ORIGINAL for an automatic count by the RADF and press the START key. ● The following message will appear.
I USING THE RADF 1 2 3 4 5 6 3 Enter the desired number of copies. 4 Press the START key. ● START 7 If the specified number of copies is more than 50, the COPIES SELECTED display will display 50 after starting copying. If an optional sorter is installed, the display will change to 20 after copying starts. (in sort mode) 8 0/ AUDIT CLEAR ● To cancel a copy run during duplex copying, press the CLEAR ALL key. Incomplete copies will be output from the duplex tray.
I COPYING FROM THE DOCUMENT GLASS Use the document glass for copying single originals, bound documents, and other originals that cannot be set on the RADF. ● 2-sided to 2-sided or 2-sided to 1-sided cannot be selected when copying from the document glass. These operations, however, can be performed by manually turning over the originals. 1-sided copies of 1-sided originals 4 Use the TRAY SELECT key to select the desired paper tray. 5 Use the 10-key pad to enter the desired number of copies.
I COPYING FROM THE DOCUMENT GLASS 2-sided copies from 1-sided originals For an odd number of originals: MAKING COPIES 1 2 EVEN NUMBER Copying from the document glass ( ORIGINALS ) EVEN NUMBER ODD NUMBER 2 STAPLE SORT 1 1 3 Copy the remainder of the originals in reverse order. ODD NUMBER 2 2 2 1 1 PRE-COUNT ORIGINAL For an even number of originals: 2 EVEN NUMBER ( ORIGINALS ) EVEN NUMBER ODD NUMBER 2 STAPLE SORT 16 2 Use the ORIGINAL TO COPY key to select EVEN NUMBER.
I REDUCTION/ENLARGEMENT/ZOOM Reduction and enlargement ratios can be selected either automatically with the AUTO IMAGE key or manually with the REDUCTION key, ENLARGEMENT key, or ZOOM keys. The zoom function enables precise copy ratio selection from 50% to 200% in 1% increments. ★ KEY OPERATOR A total of four extra presets, two each for reduction and enlargement, can be added. See page 15 of the KEY OPERATOR’S GUIDE. Automatic selection ● 2. B4 1 TRAY SELECT 3.
I REDUCTION/ENLARGEMENT/ZOOM Manual selection MAKING COPIES 1 Set the original(s) in the RADF tray or on the document glass. 2 Use the REDUCTION, ENLARGEMENT and ZOOM keys to set the desired copy ratio. ● AUTO IMAGE Reduction/Enlargement/Zoom ENLARGEMENT REDUCTION 100% ● ● ZOOM A4 h 3 Use the TRAY SELECT key to select the paper tray with the desired paper size. 4 Enter the desired number of copies. 5 Press the START key. 1. A4 2 3 2. B4 1 TRAY SELECT 3.
I SPECIAL PAPERS (manual feed) The bypass tray is used to copy onto transparency film, labels, tracing paper, and other special purpose papers. It is also used to feed cover stock and insert stock. Up to 100 sheets of standard copy paper can be set on the bypass tray. 2 Unfold the bypass tray extension. 3 Set the bypass tray guides to the width of the copy paper. 4 Insert the copy paper all the way into the bypass tray.
I EXPOSURE ADJUSTMENTS This copier has three selectable exposure modes –– AUTOMATIC, MANUAL, and PHOTO mode. Automatic 100% This is the standard initial setting for this copier. In this mode, the characteristics of an original being copied are “read” by the exposure system, and exposure adjustments are made automatically. This optimizes contrast of the copied images by reducing the effect of coloured or shaded background areas.
I DUAL PAGE COPYING The DUAL PAGE COPY feature produces individual copies of two documents placed side by side on the document glass. It is especially useful when copying books and other bound documents and can be used with the MARGIN SHIFT feature. ● DUAL PAGE COPY ERASE COVERS INSERTS I MARGIN SHIFT Press the DUAL PAGE COPY key. ● The message “DUAL PAGE COPY” will be displayed. ● To leave a binding margin on the copy, press the MARGIN SHIFT key. See page 23.
I ERASE This copier has an edge erase function and a centre erase function. ● Edge erase can be used to eliminate shadow lines around the edges of copies caused when thick paper or a book is used as an original. ● Centre erase can be used to eliminate the shadow produced by the bindings of bound documents. ★ KEY OPERATOR The width for edge erase and centre erase can be changed. See page 16 of the KEY OPERATOR’S GUIDE. The initial setting of the erase mode can also be changed.
I MARGIN SHIFT The MARGIN SHIFT feature automatically shifts the text or image to the right both on one-sided copies and on the front of two-sided copies. The images are shifted to the left on the second side of twosided copies. ● The standard shift setting is 9 mm (1/4"), but can be changed to 0 mm, 3 mm, 6 mm, 12 mm, or 15 mm (0", 1/8", 3/8", 1/2", or 5/8") as desired.
I MARGIN SHIFT Margin shift adjustment MARGIN SHIFT DUAL PAGE COPY ERASE COVERS INSERTS MAKING COPIES TRANSPARENCY INSERTS CHANGE 1 Press the MARGIN SHIFT key. 2 Press the CHANGE key. ● The following message will appear. SIDE 1 SIDE 2 Margin shift ● 1 2 3 4 5 6 7 8 3 SIDE 2 AMOUNT PUSH 0 1 3mm 2 6mm 3 9mm 4 12mm 5 15mm 6 DIRECTION USE PUSH 1 I I 9mm 9mm SIDE 1 AMOUNT PUSH 0 1 3mm 2 6mm 3 9mm 4 12mm 5 15mm 6 SELECT MARGIN SHIFT AND DIRECTION BY 10–KEY PAD.
I COVERS The COVERS mode is used to place covers on the front, back, or both the front and back of multipage documents. ● Front cover sheets can be copied on, but only on the front side even in the 1-sided to 2-sided and 2-sided to 2-sided copy modes. The back side of the original designated as the cover will not be copied. ● Back cover sheets cannot be copied on, either on the front side or on the back side.
I COVERS 1 2 3 4 5 6 7 8 4 Press key 1 on the 10-key pad. The following message will appear. USE 10–KEY PAD TO SELECT COVER PLACEMENT. ● 9 CLEAR/STOP 0/ AUDIT CLEAR MAKING COPIES 1 FRONT : PUSH 1 C/ 5 3 2 5 7 8 FRONT+BACK : PUSH 3 Select cover placement by pressing key 1, 2, or 3 on the 10-key pad. ● 4 BACK : PUSH 2 6 If FRONT or FRONT+BACK is selected, the message “PRINT ON FRONT COVER? USE 10-KEY PAD TO SELECT. YES: PUSH 1 NO: PUSH 2” will appear.
I INSERTS The INSERTS mode is used to insert sheets as chapter dividers. ● 6 INSERTS ● 5 4 3 6 ● 2 5 1 4 ● 3 2 1 6 5 4 Insert sheets can be fed from tray 2, tray 3, or the bypass tray, but when the bypass tray is used for cover stock, insert sheets must be fed from tray 2 or tray 3. If the same paper stock is to be used for the cover stock and the insert sheets, the bypass tray may be used for both. Insert sheets must be the same size as the copy paper being used for copying the document.
I INSERTS To place insert sheets with printing in the 1-sided copy mode 8 MAKING COPIES 7 INSERTS WITH PRINTING 6 5 4 3 1 Make note of the numerical positions of the original pages which are to be copied onto insert sheets. In the example to the left, these are positions 3 and 6. 2 Place the originals face down in the RADF tray and press the COVERS/INSERTS key.
I INSERTS 2 3 4 5 6 5 Enter the number of originals using the 10-key pad and then press the PROGRAM key. If the number of originals is not known, press only the PROGRAM key. ● If only the PROGRAM key is pressed, the number of originals will be counted. When counting is completed, replace the originals in the RADF tray. ● The message “PRINT ON THE CHAPTER PAGES? USE 10KEY PAD TO SELECT. YES: PUSH 1 NO: PUSH 2” will appear.
I INSERTS MAKING COPIES 8 INFORMATION PROGRAM P 1 CLEAR ALL CA 4 Enter the remaining positions as in step 7 and then press the PROGRAM key again to end the sequence. ● Enter page numbers in ascending order. ● To correct an entry error, press the SCROLL DISPLAY key. ● The following message will appear. USE 10-KEY PAD TO INDICATE TRAY FOR INSERT PAPER.
I INSERTS To place insert sheets without printing in the 1-sided copy mode 6 4 3 2 1 Make note of the numerical positions of originals which are to follow blank insert sheets. In the example to the left, these are positions 3 and 5. 2 Place the originals face down in the RADF tray and press the COVERS/INSERTS key. 6 1 5 4 3 2 5 1 6 3 ● 2 4 1 If the 1 / 1 mode was previously selected, the following message will appear.
I INSERTS MAKING COPIES 1 2 3 4 5 6 5 Enter the number of originals using the 10-key pad and then press the PROGRAM key. If the number of originals is not known, press only the PROGRAM key. ● PROGRAM 7 8 P CLEAR ALL AUDIT 0 / CLEAR ● CA Inserts 2 3 4 5 6 7 8 9 6 CLEAR/STOP AUDIT CLEAR C/ The message “PRINT ON THE CHAPTER PAGES? USE 10KEY PAD TO SELECT. YES: PUSH 1 NO: PUSH 2” will appear. Press key 2 on the 10-key pad to select NO. ● The following message will appear.
I INSERTS PROGRAM P 1 CLEAR ALL CA 4 ● Enter page numbers in ascending order. ● To correct an entry error, press the SCROLL DISPLAY key. ● The following message will appear. MAKING COPIES 8 INFORMATION Enter the remaining positions as in step 7 and then press the PROGRAM key again to end the sequence. USE 10-KEY PAD TO INDICATE TRAY FOR INSERT PAPER.
I INSERTS To place insert sheets with printing in the 2-sided copy mode 12 10 1 2 Make note of the numerical positions of the original pages which are to be copied onto insert sheets. In the example to the left, these are positions 5 and 10 in the 1-sided to 2-sided mode, and positions 5 and 9 in the 2sided to 2-sided mode. 3 Place the originals face down in the RADF tray and press the COVERS/INSERTS key. 12 11 9 8 Separate the document into chapters and count the number of pages in each chapter.
I INSERTS 2 3 4 5 6 7 8 5 9 CLEAR/STOP 1 2 3 4 5 6 PLEASE INPUT THE NUMBER OF ORIGINALS THEN PRESS THE P KEY. -OR PRESS THE P KEY FOR AUTO-COUNT. 6 Enter the number of originals using the 10-key pad and then press the PROGRAM key. If the number of originals is not known, press only the PROGRAM key.
I INSERTS 1 2 3 4 5 6 7 8 8 PROGRAM Use the 10-key pad to designate the first original position to be copied onto an insert sheet and then press the PROGRAM key. In this example, press key 5 and then the PROGRAM key. ● P The entered number will be displayed on the bottom line of the message display. CLEAR ALL AUDIT 0 / CLEAR CA MAKING COPIES 9 INFORMATION PROGRAM P 1 CLEAR ALL CA Enter the remaining positions as in step 8 and then press the PROGRAM key again to end the sequence.
I INSERTS To place insert sheets without printing in the 2-sided copy mode 10 9 10 7 6 2 Make note of the numerical positions of the pages which are to follow blank insert sheets. In the example to the left, these are positions 5 and 9. 3 Place the originals face down in the RADF tray and press the COVERS/INSERTS key.
I INSERTS MAKING COPIES 1 2 3 4 5 6 6 Enter the number of originals using the 10-key pad and then press the PROGRAM key. If the number of originals is not known, press only the PROGRAM key. ● PROGRAM 7 0/ 8 P CLEAR ALL AUDIT CLEAR ● CA Inserts 2 3 4 5 6 7 8 9 CLEAR/STOP AUDIT CLEAR C/ The message “PRINT ON THE CHAPTER PAGES? USE 10KEY PAD TO SELECT. YES: PUSH 1 NO: PUSH 2” will appear. Press key 2 on the 10-key pad to select NO. ● The following message will appear.
I INSERTS PROGRAM P 1 CLEAR ALL CA ● Enter page numbers in ascending order. ● To correct an entry error, press the SCROLL DISPLAY key. ● The following message will appear. 4 USE MAKING COPIES 9 INFORMATION Enter the remaining positions as in step 8 and then press the PROGRAM key again to end the sequence. 10-KEY PAD TO INDICATE TRAY FOR INSERT PAPER.
I INSERTS To place covers and insert sheets MAKING COPIES 1 Make note of the numerical positions of the pages which are to be copied onto insert sheets, or to follow blank insert sheets, and place the originals face down in the RADF tray. 2 Press the COVERS/INSERTS key. ● Inserts ERASE USE 10–KEY PAD TO SELECT ORIGINAL TO COPY MODE. IT IS NOT POSSIBLE TO CHANGE MODE AFTER THIS FUNCTION IS SET.
I INSERTS 1 2 3 4 5 6 5 Enter the number of originals using the 10-key pad and then press the PROGRAM key. If the number of originals is not known, press only the PROGRAM key. ● PROGRAM 7 8 P CLEAR ALL AUDIT 0 / CLEAR CA 2 3 4 5 6 7 8 0/ FRONT : PUSH 1 C/ 6 3 4 5 6 7 8 9 7 Select cover placement by pressing key 1, 2, or 3 on the 10-key pad. ● If FRONT or FRONT+BACK is selected, the message “PRINT ON FRONT COVER? USE 10-KEY PAD TO SELECT.
I INSERTS Examples of positions to be designated for insert sheets in the COVERS/INSERTS mode MODE INSERTS OUTPUT 1-sided copy mode Front cover with printing Insert sheets with printing Front cover without printing Insert sheets with printing Front cover with printing Insert sheets without printing MAKING COPIES Front cover without printing Insert sheets without printing 4 5 6 7 4 5 6 7 2 3 4 5 2 3 4 5 5 7 2 1 3 3, 6 2 1 3 3, 6 1 3, 5 1 3, 5 1-sided to 2-sided copy mode F
I TRANSPARENCY FILM WITH INSERT SHEETS When copying onto transparency film, insert sheets can be placed following each transparent sheet. The insert sheets can be processed blank or can be copied with the same image as the transparent sheets. ● This mode can be selected only in the 1-sided to 1-sided and 2sided to 1-sided modes. ● Multiple copies cannot be selected in this mode. ● Transparency film must be fed from the bypass tray. ● Insert sheets must be the same size as the transparencies.
I TRANSPARENCY FILM WITH INSERT SHEETS MAKING COPIES 1 2 3 4 5 6 7 8 3 Press key 1 or key 2 on the 10-key pad. 4 Load transparency film into the bypass tray. 5 Use the TRAY SELECT key to select a paper tray with the same size paper as the transparencies. 9 CLEAR/STOP 0/ AUDIT CLEAR C/ Transparency film with insert sheets 1. A4 The copy paper must be the same size as the transparency film. 2. B4 2 3 1 3.
I JOB MEMORY Frequently used job programs can be stored in one of the nine storage registers. This is convenient for quick job recall without losing time manually reprogramming each aspect of the job.
I JOB MEMORY Deleting a stored job program 1 2 3 4 5 6 7 8 9 CLEAR/STOP 0/ AUDIT CLEAR MAKING COPIES 2 3 4 5 6 7 8 2 Press key 2 on the 10-key pad. ● The following message will appear. TO DELETE A PROGRAM FROM THE STORAGE REGISTER : PRESS 1 TO 9 KEY AND START KEY. C/ 1 1 Follow steps 1 and 2 in “Storing a job program.” (1. Press the PROGRAM key. 2. Press the 0 key.) 3 Enter the storage register number of the program to be deleted. 4 Press the START key.
I INTERRUPT INTERRUPT can be used to temporarily stop a long copy run so that a short job can be run. ● Duplex copying, sort, group, staple sort, covers/inserts, and transparency inserts cannot be selected during interrupt copying. Also job program recall cannot be selected. ● Reduction/enlargement/zoom, exposure adjustments, dual page copying, erase, and margin shift can be selected during interrupt copying.
I PAPER Types and sizes of copy paper Size Weight Capacity (80 g/m2 (20 lb.) paper) Paper Tray 1 A4 (8-1/2" x 11") 60 to 90 g/m2 (16 lbs. to 24 lbs.) 2,000 sheets Paper Tray 2 Paper Tray 3 A4 to A3, 8-1/2" x 11", 8-1/2" x 14"* (8-1/2" x 11" to 11" x 17", A4) 60 to 128 g/m2 (16 lbs. to 32 lbs.) 1,000 sheets Bypass Tray A5 to A3, 8-1/2" x 11" (8-1/2" x 13"**) (8-1/2" x 5-1/2" to 11" x 17", A4) 50 to 128 g/m2 (13 lbs. to 32 lbs.
I PAPER 4 5 Load it onto the feed table. ● Be sure to load paper appropriate for paper tray 1. See the table above. ● Do not exceed the maximum height line. Push the paper tray back into the copier. ● The release button lamp will blink as the feed table returns to the feed position and will light steadily when it is in position to feed.
I ADDING TONER The message “TONER SUPPLY IS LOW” will appear in the message display before the toner supply is completely empty. Copying can be continued until the message display changes to “ADD TONER”, indicating that the toner supply is empty. Toner can be added any time after the message “TONER SUPPLY IS LOW” appears. To add toner, stop the copier and proceed as below. For best copying results, be sure to use only SHARP products.
I USED TONER DISPOSAL When the toner collecting container is full, the “REPLACE USED TONER CONTAINER.” message will appear as a key operator assistance call, and the copier will stop and will not operate until a new container has been installed. Replace the used toner container following the instructions of your key operator. 1 @ Open the door located at the lower rear corner of the left side panel. ● Push once on the door to unlatch and open it.
I STORAGE OF SUPPLIES Standard SD-2060 supplies replaced by the user include copy paper, toner and staple cartridges for the optional staple sorter. For best copying results, be sure to use only SHARP products. The SD-2060 Copier/Duplicator has advanced process control technology which improves copy quality uniformity.
I MISFEED REMOVAL When a misfeed occurs, the copier will stop. The message “OPEN THE COPIER DOORS AND REMOVE PAPER AS INDICATED. PRESS ✱ KEY FOR RECOVERY INSTRUCTIONS.” will appear with a display of paper misfeed locations. Press the INFORMATION and SCROLL DISPLAY keys for more detailed information as necessary. If paper becomes accidentally torn during removal, be sure to remove all pieces. Be careful not to damage the photoconductive drum or the corona wires. First confirm the misfeed locations.
I MISFEED REMOVAL Location A 1 Open the exit roller cover and gently pull out the original. 2 Open the RADF cover. Remove any sheets in this area. Then close the RADF cover. Location B If the original is not easily removed, open the exit roller cover to pull out the original. COPIER Misfeed removal TROUBLE? Location C 3 Pull out the misfed original while pressing the RADF release button.
I MISFEED REMOVAL OPEN THE COPIER DOORS AND REMOVE PAPER AS INDICATED. PRESS ✱ KEY FOR RECOVERY INSTRUCTIONS. DT T2 T3 T1 Misfeed in the paper trays 1 When the release button lamp goes out, pull out the paper tray (T1, T2 or T3). ● Do not pull out the paper tray before the release button lamp goes out. 3 Push the paper tray back into the copier. 4 Open the right front door of the copier and then close it to cancel the misfeed display.
I MISFEED REMOVAL OPEN THE COPIER DOORS AND REMOVE PAPER AS INDICATED. PRESS ✱ KEY FOR RECOVERY INSTRUCTIONS. DT T2 T1 T3 Misfeed in the bypass tray Misfeed release button 2 Open the right front door of the copier and then close it. ● Confirm that the misfeed display is cleared. COPIER Misfeed removal TROUBLE? OPEN THE COPIER DOORS AND REMOVE PAPER AS INDICATED. PRESS ✱ KEY FOR RECOVERY INSTRUCTIONS. DT T2 T1 T3 Misfeed in the paper transport area 1 A @ 56 Downloaded from: http://www.
I MISFEED REMOVAL Photoconductive drum 2 Turn transport lever (E) in the direction of the arrow. 3 Turn roller rotating knob (D) in the direction of the arrow to remove misfed paper. ● If the misfed paper cannot be removed by turning knob (D) alone, turn knobs (D) and (C) together. CAUTION ● Roller rotating knobs (D) (C) Be careful not to damage the photoconductive drum or the corona wires.
I MISFEED REMOVAL 7 Open paper guide (B) and remove any misfed paper. 8 Push the paper transport back securely into the copier. 9 Turn transport lever (E) back in the direction of the arrow. (B) A @ 58 ● Confirm that the misfeed display is cleared. I COPIER Misfeed removal TROUBLE? 10 Close the front doors.
I MISFEED REMOVAL OPEN THE COPIER DOORS AND REMOVE PAPER AS INDICATED. PRESS ✱ KEY FOR RECOVERY INSTRUCTIONS. DT T2 T1 T3 A Misfeed in the fusing area 1 Open the front doors of the copier. 2 Turn transport lever (E) in the direction of the arrow. 3 Turn roller rotating knob (G) in the direction of the arrow while pulling this knob and remove any misfed paper from the fusing area. @ The fusing unit is hot! Be sure to touch only the green tab or the green roller rotating knob.
I MISFEED REMOVAL Roller rotating knob (G) Paper guide Roller rotating knob (G) @ 60 Turn roller rotating knob (G) in the direction of the arrow to remove any misfed paper. 6 Open the paper guide as shown and turn roller rotating knob (G) in the direction of the arrow to remove any misfed paper. 7 Push the fusing unit back securely into the copier. 8 Turn transport lever (E) back in the direction of the arrow. 9 Close the front doors. ● Confirm that the misfeed display is cleared.
I MISFEED REMOVAL OPEN THE COPIER DOORS AND REMOVE PAPER AS INDICATED. PRESS ✱ KEY FOR RECOVERY INSTRUCTIONS. DT T2 T3 1 Open the side door at the left side of the copier. 2 Lift up the paper guide and remove any misfed paper. ● If an optional sorter is installed, slide it away from the copier to allow access to the door. ● Close the side door after removing misfed paper. ● Push the sorter back into position.
I MISFEED REMOVAL 6 Open paper guide (J) after opening paper guide (I). 7 Slide paper guide (K) in the direction of the arrow. 8 Open paper guide (K) and remove any misfed paper. (J) (I) COPIER Misfeed removal TROUBLE? (K) (K) 62 ● Close paper guide (K) and then close paper guides (I) and (J) after removing misfed paper. I 5 Pull out the paper transport by holding transport lever (E).
I MISFEED REMOVAL 9 Remove any misfed paper on the duplex tray. Duplex tray 11 Turn transport lever (E) back in the direction of the arrow. 12 Close the front doors. I 10 Push the paper transport back securely into the copier after checking that paper guides (I) and (J) are closed. (J) (I) Confirm that the misfeed display is cleared. A @ 63 Downloaded from: http://www.usersmanualguide.
I MISFEED REMOVAL OPEN THE COPIER DOORS AND REMOVE PAPER AS INDICATED. PRESS ✱ KEY FOR RECOVERY INSTRUCTIONS. DT T1 T2 T3 Misfeed in the exit area 1 Remove any misfed paper gently while lifting up the exit area guide. ● Remove the exit tray if necessary. ● If an optional sorter is installed, slide it away from the copier. COPIER Misfeed removal TROUBLE? 2 If it is not possible to remove misfed paper in step 1, open the front doors and turn roller rotating knob (L) to remove the misfed paper.
I TROUBLESHOOTING ● Always check the message display whenever the copier stops or operation is not possible. The messages will give you easy-tofollow directions. If the messages do not give specific instructions, check the list below. Problem Solution ● Copier plugged in? Plug the copier into a grounded outlet. ● Power switch on? Turn the power switch on. ● Power up timer mode is set. Turn the power switch off, then on again. Copies are too dark or too light.
I TROUBLE SHOOTING Problem Paper misfeeds frequently. ● Non-standard paper used? Use standard paper. If using special papers, feed the paper through the bypass tray. ● Is paper properly installed? See pages 19 and 48. ● Pieces of paper inside copier? Remove all pieces of misfed paper. See page 53. ● Paper curled or damp? ● Document glass or RADF transport belt dirty? Store copy paper flat in the wrapper in a dry location. See page 52. Clean regularly. See next page.
I USER MAINTENANCE The document glass and RADF transport belt must be kept clean to avoid dirty areas from being copied onto the copies. Document glass and RADF transport belt Wipe the document glass and transport belt with a soft, clean cloth. ● If necessary, dampen the cloth with water. Do not use thinner, benzene, or similar volatile cleaning agents.
I SPECIFICATIONS COPIER Console Copy system Dry, electrostatic transfer system Originals Sheets, bound documents Original size Max. A3 (11" x 17") Copy sizes Max. A3 (11" x 17"), min. A5 (8-1/2" x 5-1/2") Copying speed (at 100% copy ratio) 60 copies/min. (A4, (8-1/2" x 11")) 45 copies/min. (A4R (8-1/2" x 11"R)) 40 copies/min. (B4 (8-1/2" x 14")) 35 copies/min. (A3 (11" x 17")) Continuous copy Max. 999 copies; number of copies selected display and copies made display First copy time Approx.
I SPECIFICATIONS Required power supply Local voltage ±10% Power consumption Max. 1.9 kW Overall dimensions 1627 (W) x 731 (D) mm (64-1/16" (W) x 28-25/32" (D)) Weight Approx. 239 kg (527 lbs.
I SYSTEM CONFIGURATION The options which are available for the SD-2060 are shown below. 20-bin sorter (SF-S16) Exit tray (Option) I 20-bin staple sorter (SF-S53) System configuration COPY CARD 001 OPTIONAL EQUIPMENT Counter commander (SF-EA13) Card counter (SF-EA11) NOTE: Operating instructions follow for the Sorters (SF-S16 and SFS53). For the Card Counter (SF-EA11) and the Counter Commander (SF-EA13), see their manual. 70 Downloaded from: http://www.usersmanualguide.
I 20-BIN SORTER (SF-S16) 20-BIN STAPLE SORTER (SF-S53) The SF-S16 20-Bin Sorter has two sorter modes for different copying jobs: one sorts by sets of originals and the second groups by original. The SF-S53 20-Bin Staple Sorter has, in addition to the above two modes, a STAPLE SORT mode. Sorted copies can be automatically stapled together. The maximum allowable number of copies varies with the selected mode.
I 20-BIN SORTER(SF-S16)/20-BIN STAPLE SORTER(SF-S53) SORT GROUP Using a sorter Press the SORT/GROUP key to select the desired mode. (The STAPLE SORT mode cannot be selected for the SF-S16.) To cancel the mode, press the SORT/GROUP key until the indicator goes off.
I 20-BIN SORTER(SF-S16)/20-BIN STAPLE SORTER(SF-S53) SORTER CAPACITIES SF-S16 SF-S53 Top bin 100 sheets in the NON-SORT mode Non-sort bin 250 sheets in the NON-SORT mode Sort bins Sort/Staple Sort Mode: Paper size Sort bins Up to 50 per bin in the SORT mode Up to 30 per bin in the GROUP mode Bin capacity (max.
I 20-BIN STAPLE SORTER(SF-S53) STAPLE SORT (SF-S53 only) The STAPLE SORT mode automatically staples copies of A4, A4R, B4, A3, 8-1/2" x 11", and 8-1/2" x 14" (8-1/2" x 11", 8-1/2" x 11"R, 81/2" x 14", 11" x 17", and A4) sizes. For other paper sizes, use the manual stapling mode. See page 76. Using the RADF 1 Stapling location Set the originals in the RADF tray face down with the stapling position in the upper right corner. ● STAPLE SORT 2 Press the STAPLE SORT key to select the STAPLE SORT mode.
I 20-BIN STAPLE SORTER(SF-S53) Using the Document Glass Stapling location 1 Set the original on the document glass with the corner to be stapled to the upper right. ● STAPLE SORT ● 2 3 4 5 6 START 0/ 8 Make sure that there is no paper in any sort bin before selecting the STAPLE SORT mode. 20-bin staple sorter(SF-S53) 1 7 2 Press the STAPLE SORT key to select the STAPLE SORT mode. 4 Press the START key. 5 When all copies are made and sorted, press the manual staple key.
I 20-BIN STAPLE SORTER(SF-S53) Manual stapling To use the stapling feature only, without using the STAPLE SORT mode, follow the procedure below. Copies 1 2 Align the edges of the copies to be stapled. Place the set of copies into the bin below the non-sort bin, making sure the edges are flush with the inner right corner, as shown in the figure. ● Make sure that there is no paper in the other sort bins. If there is, the manual staple key will not light up.
I 20-BIN STAPLE SORTER(SF-S53) Staple cartridge replacement The message “ADD STAPLES. FOLLOW INSTRUCTIONS INSIDE THE SORTER.” will appear when the staple cartridge is empty. Replace the staple cartridge as follows: Open the stapler cover. 2 Pull the empty staple cartridge up and out to remove it. 3 Remove the protective covering from a new staple cartridge and check to ensure the staples are all stacked within the cartridge. ● Do not remove the staple cartridge unless the message “ADD STAPLES.
I 20-BIN STAPLE SORTER(SF-S53) Staple jam removal “REMOVE STAPLER AND CHECK IT.” will be displayed as a key operator assistance call if staples become jammed in the stapler of optional staple sorter SF-S53. Remove the jammed staples following the instructions of your key operator. OPTIONAL EQUIPMENT 78 Green lever 2 Loosen the screw securing the stapler. 3 Pull out the stapler.
I 20-BIN STAPLE SORTER(SF-S53) Green release lever Green lever 5 Use the tool attached to the inside of the stapler cover to remove jammed staples as shown. 6 Return the green lever on the face of the stapler back down into place. Return the green release lever on top of the stapler unit to its upright position. ● If the levers are not returned to their original positions before the stapler is reinstalled, the stapler will jam again and may be damaged.
I 20-BIN SORTER(SF-S16) Misfeed removal The copier will stop when a misfeed occurs. The message “OPEN THE COPIER DOORS AND REMOVE PAPER AS INDICATED. PRESS ✱ KEY FOR RECOVERY INSTRUCTIONS.” will appear with a display of paper misfeed locations. Press the INFORMATION and SCROLL DISPLAY keys for more detailed information as necessary. SF-S16 20-Bin Sorter OPTIONAL EQUIPMENT 2 Close the top cover.
I 20-BIN STAPLE SORTER(SF-S53) SF-S53 20-Bin Staple Sorter 2 Open the paper guide. 3 Remove the misfed paper and return the paper guide to its original position. 4 While holding the sorter release lever, push the staple sorter toward the copier and latch it into place. I 1 While holding the sorter release lever, carefully pull the staple sorter away from the copier. ● If the message indicating a misfeed is still displayed, check the inside of the copier and remove any remaining misfed paper.
I 20-BIN SORTER(SF-S16)/20-BIN STAPLE SORTER(SF-S53) Specifications SF-S16 No. of bins 20 Bin capacity NON-SORT: SORT: GROUP: 100 sheets (top bin) 50 sheets 30 sheets Paper size Top bin: Max. A3 (11" x 17") Min. A5 (8-1/2" x 5-1/2") Sort bin: Max. A3 (11" x 17") Min. A4 (8-1/2" x 11") Power supply Drawn from the copier. Weight Approx. 30.2 kg (66.6 lbs.) Dimensions 512 (W) x 520 (D) x 883 (H) mm (20-11/64"(W) x 20-31/64"(D) x 34-49/64"(H)) I SF-S53 No.
SD-2060 SHARP CORPORATION PRINTED IN JAPAN