ENGLISH Please refer to pages i to iv and E-1 to E-72. FRANÇAIS 1-BIT DIGITAL RECEIVER WITH DVD AMPLITUNER NUMÉRIQUE 1-BIT AVEC DVD Se reporter aux pages i et iv F-1 à F-72. MODEL MODÈLE SD-HX600 OPERATION MANUAL MODE D’EMPLOI Thank you for purchasing this SHARP product. To obtain the best performance from this product, please read this manual carefully. It will guide you in operating your SHARP product. Nous vous remercions d'avoir porté votre choix sur ce produit SHARP.
SPECIAL NOTES (for Users in the U.S.A.) NOTE CAUTION: TO REDUCE THE RISK OF ELECTRIC SHOCK, DO NOT REMOVE COVER (OR BACK). NO USER-SERVICEABLE PARTS INSIDE. REFER SERVICING TO QUALIFIED SERVICE PERSONNEL. This equipment has been tested and found to comply with the limits for a Class B digital device, pursuant to Part 15 of the FCC Rules. These limits are designed to provide reasonable protection against harmful interference in a residential installation.
1 IMPORTANT SAFETY INSTRUCTIONS (for Users in the U.S.A.) 1 Read Instructions - All the safety and operating instructions should be read before the product is operated. 2 Retain Instructions - The safety and operating instructions should be retained for future reference. 3 Heed Warnings - All warnings on the product and in the operating instructions should be adhered to. 4 Follow Instructions - All operating and use instructions should be followed.
IMPORTANT SAFETY INSTRUCTIONS (for Users in the U.S.A.) (continued) 15 Outdoor Antenna Grounding - If an outside antenna or cable system 19 Object and Liquid Entry - Never push objects of any kind into this is connected to the product, be sure the antenna or cable system is grounded so as to provide some protection against voltage surges and built-up static charges.
SPECIAL NOTES REMARQUES SPÉCIALES "DTS" and "DTS Digital Surround" are registered trademarks of Digital Theater Systems, Inc. ENERGY STAR® Program Information "DTS" et "DTS Digital Surround" sont des marques déposées de Digital Theater Systems, Inc. Products that have earned the ENERGY STAR® are designed to protect the environment through superior energy efficiency. Manufactured under license from Dolby Laboratories. "Dolby", "Pro Logic" and the double-D symbol are trademarks of Dolby Laboratories.
ENGLISH SD-HX600 ENGLISH Contents ! General Information Page Accessories . . . . . . . . . . . . . . . . . . . . . . . . . . . . . . . . . . . . . . . . . . . . . . . . . . . . . . . 2 Precautions . . . . . . . . . . . . . . . . . . . . . . . . . . . . . . . . . . . . . . . . . . . . . . . . . . . . . . . 3 Controls and indicators . . . . . . . . . . . . . . . . . . . . . . . . . . . . . . . . . . . . . . . . . . 4 - 9 Description of discs . . . . . . . . . . . . . . . . . . . . . . . . . . . . . . . .
Accessories SD-HX600 ENGLISH Please confirm that the following accessories are included. (RRMCGA007AWSA) "AA" size battery (UM/SUM3, R6, HP-7 or similar) 2 (UBATU0001AWZZ) Cord holder 2 (LHLDZ1499AWSA) Copy Protection: This unit supports Macrovision copy protection. On DVD discs that include a copy protection code, if the contents of the DVD disc are copied using a VCR, the copy protection code prevents the videotape copy from playing normally.
SD-HX600 ENGLISH Precautions ! General " Ensure the unit is positioned in a well-ventilated area with at least the following amount of free space around the top: 6" (15 cm), sides: 4" (10 cm), and the back: 1-3/8" (3.5 cm). 4" (10 cm) " Do not remove the outer cover, as this may result in electric shock. Refer internal service to your local SHARP service facility. 4" (10 cm) 6" (15 cm) " This unit should only be used within the range of 41°F - 95°F (5°C - 35°C).
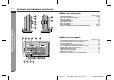
Controls and indicators SD-HX600 ENGLISH ! Main unit (front panel) E Reference page 5 6 7 8 9 10 11 12 13 20 14 15 16 17 18 19 21 22 S - Controls and indicators - 2 3 4 F General Information 1 1. Disc Door . . . . . . . . . . . . . . . . . . . . . . . . . . . . . . . . . . . . . . . . . . . . . . 21 2. Volume Control . . . . . . . . . . . . . . . . . . . . . . . . . . . . . . . . . . . . . . . . . 20 3. Remote Sensor . . . . . . . . . . . . . . . . . . . . . . . . . . . . . . . . . . .
SD-HX600 Controls and indicators (continued) ENGLISH ! Main unit (side panel) Reference page 1 2 6 7 3 4 8 - Controls and indicators - General Information 5 (Left side) 1 2 3 1. On/Stand-by Button . . . . . . . . . . . . . . . . . . . . . . . . . . . . . . . . . . .18, 69 2. Disc Door Open/Close Button . . . . . . . . . . . . . . . . . . . . . . . . . . . . . .21 3. Function Button . . . . . . . . . . . . . . . . . . . . . . . . . . . . . . . . . . . . . . . . .62 4. Tuner (Band) Button . . .
SD-HX600 ENGLISH ! Amplifier unit E Reference page 1. AC Power Cord . . . . . . . . . . . . . . . . . . . . . . . . . . . . . . . . . . . . . . . . . 18 2. System Connection Jacks (to main unit) . . . . . . . . . . . . . . . . . . . . 13 3. Subwoofer Pre Output Jack . . . . . . . . . . . . . . . . . . . . . . . . . . . . . . . 65 F (Connect a subwoofer with a built-in amplifier.) 4. Front Speaker Terminals . . . . . . . . . . . . . . . . . . . . . . . . . . . . . . . . . . 15 5.
SD-HX600 Controls and indicators (continued) ENGLISH ! AV selector Reference page 1 2 - Controls and indicators - General Information (Front) 3 4 5 6 7 8 9 10 11 12 13 1. Power Button. . . . . . . . . . . . . . . . . . . . . . . . . . . . . . . . . . . . . . . . . . . .18 2. Function Buttons (MAIN UNIT/VIDEO 1/VIDEO 2/VIDEO 3/TV) . . . . . . . . . . . . . . . .62, 64 3. Audio Output Jacks (to main unit) . . . . . . . . . . . . . . . . . . . . . . . . . .13 4. S-video Input Jack (to main unit) .
SD-HX600 ENGLISH 14 15 16 17 18 19 20 21 22 23 24 25 26 27 28 29 30 31 32 33 34 35 36 E Set the MODE 1/MODE 2 switch to MODE 1 and press the following buttons. Available operations change. Reference page 1. Remote Control Transmitter . . . . . . . . . . . . . . . . . . . . . . . . . . . . . . . 18 2. MODE 1/MODE 2 Switch . . . . . . . . . . . . . . . . . . . . . . . . . . . . . . . . . . . 9 3. TV Button . . . . . . . . . . . . . . . . . . . . . . . . . . . . . . . . . . . . . . . . . . . . . . 62 4.
SD-HX600 Controls and indicators (continued) ENGLISH ! Remote control Set the MODE 1/MODE 2 switch to MODE 2 and press the following buttons (indicated in blue). Available operations change. 1 - Controls and indicators - General Information Reference page 2 3 4 5 6 7 8 10 11 12 13 14 15 1. Timer/Sleep Button . . . . . . . . . . . . . . . . . . . . . . . . . . . . . . . . . . .19, 53 2. DVD Top Menu Button . . . . . . . . . . . . . . . . . . . . . . . . . . . . . . . . . . . .29 3.
Description of discs SD-HX600 ENGLISH ! Types of playable discs ! DVD-Video The unit can play back discs bearing any of the following marks: A popular type of DVD disc of the same size as a CD, mainly containing video images. Region number DVD discs are programmed with region numbers indicating countries in which they can be played. This system can play discs with region number "1" or "ALL".
SD-HX600 Description of discs (continued) ENGLISH ! DVD-R/DVD-RW playback ! Icons used on DVD discs " You can play DVD-R and DVD-RW discs recorded in the video mode. " Before playing DVD-R/DVD-RW discs with this unit, finalize them with the equipment used for recording. Check the icons of the DVD jacket before playing your discs. Display Format recorded on the DVD ! SACD (Super Audio CD) An SACD is a high-quality audio disc, capable of recording seven times as much data as a CD.
System installation SD-HX600 Front speaker (left) Center speaker Front speaker (right) Subwoofer Place the TV halfway between the front speakers. It is recommended that the center speaker be placed near the television. Place the surround speakers at a position just above the height of your ears. The subwoofer vibrates while reproducing bass. Place it on a stable, sturdy surface. " The subwoofer reproduces only lower frequency bass tones.
SD-HX600 System connections 1 ENGLISH Make sure to unplug the AC power cord before making this connection. Using the supplied cables, connect the main unit, amplifier unit, AV selector, and a TV.
SD-HX600 3 ! Connections 1 Connect the main unit and amplifier unit as follows. Arrow To disconnect: Pull the cable straight out pressing the plug. Notes: " You can enjoy higher quality images using the component video or S-video output. Use a commercially available cable. (see page 17). " Alternatively, connect the video output jack on the main unit to the TV's video input jack to view images. " Change the TV input in accordance with the connected jack.
SD-HX600 Speaker connection ENGLISH " Make sure to leave the AC power cord disconnected when connecting the speakers. " Use a speaker system which has 100 W or more rated power input and 4 - 8 ohm impedance. See page 12 for placing the speakers. To enjoy the high-quality sound of DVD-Audio or SACD discs, it is recommended to connect speakers with a wide frequency range.
Antenna connection ENGLISH ! Connecting speaker wires Supplied FM antenna: Make sure to leave the AC power cord disconnected when connecting the speakers. Connect the speaker wires to the speakers first, then to the unit. When using a speaker wire: Black Connect the AM loop antenna wire to the AM and GND terminals. Position the AM loop antenna for optimum reception. Place the AM loop antenna on a shelf, etc., or attach it to a stand or a wall with screws (not supplied).
SD-HX600 TV connection ENGLISH ! Positioning cables Unplug all equipment before making any connections. If your TV is equipped with an S-video input jack or component video input jacks, purchase an appropriate cable to enjoy higher quality images. When you use a TV supporting progressive scan, open the initial setting screen and set "PROGRESSIVE OUT" to "ON" in "TV MODE" (see page 46). Bundle up cables of the main unit and amplifier unit using each cord holder.
Remote control AC power connection ! Battery installation ! Connecting the AC power cord 1 Open the battery cover. 2 Insert the supplied batteries according to the direction indicated in the battery compartment. SD-HX600 ENGLISH After checking all the connections have been made correctly, plug the AC power cord of the amplifier unit and the AV selector into the AC outlet. F AC outlet (AC 120 V, 60 Hz) When inserting or removing the batteries, push them toward the battery terminals.
SD-HX600 Setting the clock ENGLISH By setting the unit to the correct time, you can use it not only as a clock but also for timer playback. 3 Press the or button to adjust the hour and then press the ENTER button. " Press the or button once to advance the time by 1 hour. Hold it down to advance continuously. " The 12-hour display will appear. " "AM" will change to "PM" automatically. Press the or button to adjust the minutes and then press the ENTER button.
General control SD-HX600 ENGLISH ! Volume control Main unit operation: When the VOLUME control is turned clockwise, the volume will increase. When it is turned counterclockwise, the volume will decrease. Remote control operation: 0 1 2 ..... 38 39 F 40 Press the VOL + button to increase the volume and the VOL - button for decreasing. ! Muting ! To change the display brightness (2 levels) Set the MODE 1/MODE 2 switch to MODE 1 and hold down the DISPLAY button for 3 seconds or more.
SD-HX600 Playing a disc ENGLISH ! Playback Main unit " Turn on the AV selector. " For a wide-screen TV, set the video output to (see page 45). " Turn on the TV, and switch the input to the "VIDEO 1", "VIDEO 2", etc. accordingly. Turn on the power and press the DVD button to set the input to "DVD". You can also use the - Playing a disc - DVD Operation 1 button on the main unit. 2 Press the OPEN/CLOSE button to open the disc door. 3 Insert a disc.
SD-HX600 ENGLISH Notes: Remote control Main unit To stop playback Operation When you press once, "RESUME" appears. Press again to enter the stop mode. While "RESUME" appears, press the button. Playback resumes from the point where it was stopped. (Resume play: See page 27.) To pause playback Not available Press during playback. In the pause mode, press the button. Playback resumes from the point where it was paused. How to place a disc: 1 Turn the playback side as shown on the right.
SD-HX600 Basic operation ENGLISH ! Fast forward/Fast reverse (search) You can search the desired point as you play the disc. 1 While a disc is playing, press the Example: When the - Basic operation - DVD Operation Press the or 1 (about 2 times) button. button is pressed 1/5 1 / 30 00 : 01 : 23 2 or C 1 DVD button repeatedly to select a search speed.
SD-HX600 ENGLISH ! To start playback from the desired point (direct play) Selecting a title of DVD: Press the DIRECT button. Selecting a chapter of DVD: Press the DIRECT button twice. Selecting a track on SACD/CD discs: Press the DIRECT button. TV screen To play by specifying time (time search): You can play back from the desired point by specifying the time. 1 2 -- /5 8 / 30 01 : 23 : 40 SACD (CD): Press the DIRECT button twice. " To correct the number, enter again.
SD-HX600 Useful operation ENGLISH 3 Use the or button to select a chapter (track) number, and press the ENTER button. " The number is saved in the confirmation area. DVD-VIDEO PROGRAM T : 1 T C C C C C C 1 2 3 4 5 6 Selection area 1: C 2: C 3: C 4: C 5: C 6: C : 1 1 Confirmation area " Repeat the operation to program another number. " To correct, press the button to move the cursor to the confirmation area, select the chapter (track) number with the or button, and press the CLEAR button.
SD-HX600 ! To play repeatedly (repeat play) You can play a chapter (track) or a title (group) repeatedly by specifying it during playback. During playback, set the MODE 1/MODE 2 switch to MODE 1 and press the button. TV screen Unit display C DVD 08 " On some discs, the repeat play function is disabled. " To repeat SACD/CD programmed play, perform repeat play during playback. " If you press the RANDOM button, the current SACD/CD repeat play is canceled and switched to random play.
SD-HX600 Useful operation (continued) ENGLISH ! Slow-motion play You can slow down the playback speed. 1 2 During playback, set the MODE 1/ MODE 2 switch to MODE 2 and press the SLOW button. Press the SLOW 3 - Useful operation - DVD Operation 1 (about DVD button repeatedly to select a playback speed. 1/2 times) Press the C 11 1/5 1 / 30 00 : 01 : 23 2 (about 1/8 times) 3 (about 1/16 times) button to return to normal playback.
SD-HX600 ENGLISH ! To zoom images (zoom) E You can magnify images during playback. 1 In the pause mode or during playback, set the MODE 1/MODE 2 switch to MODE 2 and press the ZOOM button. ZOOM : 1 F ZOOM indicator Pressing the button cycles through the zoom settings as follows: ZOOM: 1 ( 1.2) ZOOM: 2 ( 1.5) ZOOM: 3 ( 2.0) Off (The indicator goes out.). 1 2 When "ANGLE" appears on the unit display during playback, set the MODE 1/MODE 2 switch to MODE 2 and press the ANGLE button.
SD-HX600 Useful operation (continued) ENGLISH ! To select a subtitle or audio language from the disc menu 2 You can select the desired subtitle/audio language and sound system (5.1-ch Dolby Digital or DTS sound) on your DVD if it has a disc menu. 1 2 Example In the stop mode or during playback, set the MODE 1/MODE 2 switch to MODE 1 and press the MENU button. 1.Highlights 2.Start Movie Press the , , or button to select a subtitle/audio language and press the ENTER button.
Various settings During playback, you can change the audio language (audio output). 1 During playback, set the MODE 1/MODE 2 switch to MODE 2 and press the AUDIO button. 2 Press the AUDIO button repeatedly to select the audio language (audio output). 11 D 1 D 2 3 D 2 c h 3: Japanese (Dolby Digital 2 ch) Notes: " The audio language on some DVDs may not be changed. " For available audio languages (audio outputs), see the disc jacket.
SD-HX600 Various settings (continued) ENGLISH ! To change the display on the unit During playback, set the MODE 1/MODE 2 switch to MODE 1 and press the DISPLAY button. Each time you press, the display changes. DVD-Video: Title elapsed time Title/Chapter number Chapter elapsed time Group/Track number Group elapsed time Track elapsed time - Various settings - DVD Operation DVD-Audio: After approx.
SD-HX600 ENGLISH Each time you press, the display changes. SACD: Track elapsed time Track number Total elapsed time 1 During playback, set the MODE 1/MODE 2 switch to MODE 2 and press the DVD SET UP button. 2 Press the button. CD: Track elapsed time Total elapsed time Track playing time or 3 1 3 Elapsed playing time 4 Subtitle 4 2 8 01 2 1 1 2 3 5 Angle Audio language Gamma Super picture Press the , , ENTER button.
SD-HX600 Playing a DVD-Audio disc ENGLISH Some DVD-Audio discs contain still pictures, or grouped tracks called "bonus group". A 4-digit password may be required to play a bonus group. ! Switching still pictures on a DVD-Audio disc 1 2 Play a DVD-Audio disc (see page 21). During playback, set the MODE 1/MODE 2 switch to MODE 2 and press the PAGE UP or PAGE DOWN button. Each time you press, the image switches.
Playing an SACD disc E On hybrid discs (consisting of an SACD layer and a CD layer), you can select sound to play. 1 2 Insert an SACD disc and press the DVD button. In the stop mode, set the MODE 1/ MODE 2 switch to MODE 2 and press AUDIO button to select the desired layer. F TV screen MULTI It takes a few seconds to switch the audio output for reading the disc information.
SD-HX600 Playing an SACD disc (continued) ENGLISH ! To play in random order (random play) 1 While in the stop or playback mode, set the MODE 1/MODE 2 switch to MODE 1 and press the RANDOM button. 2 In the stop mode, press the button. All tracks play in random order. To cancel random play, press the RANDOM button. When you press the button, the current random play is canceled. - Playing an SACD disc - SACD and CD Operation The tracks on the disc can be played in random order automatically.
Playing an MP3 disc SD-HX600 ENGLISH You can play back a CD-R/CD-RW disc with tracks recorded in the MP3 format. 2 Select a folder using the , , ton. or E button and press ENTER but- " The track selection screen appears. " Move the cursor to a folder and press the first track. Select a track using the , , or button and press the ENTER button. MUSIC1 MP 3 1TRACK01 3TRACK03 Playback starts from the track.
SD-HX600 Listening to the radio ENGLISH Main unit 1 Turn on the power and press the TUNER (BAND) button to set the input to "FM (AM)". 2 Press the TUNER (BAND) button repeatedly to select the desired frequency band. STEREO FM stereo AM Press the TUNING ( or ) button to tune in to the desired station. Manual tuning: Press the TUNING button as many times as required to tune in to the desired station.
Listening to the memorized station SD-HX600 ENGLISH 1 ! For FM stations, stereo and mono modes are memorized. ! Store the stations in memory, in order, starting with preset channel 1. 2 F Within 5 seconds, press the TUNER PRESET ( or ) button to select the preset channel number. S Within 5 seconds, press the ENTER button to store that station in memory. ! When a new station is stored in memory, the station previously memorized will be erased.
SD-HX600 Listening to the memorized station (continued) ENGLISH " How to enter characters To recall a memorized station: ! Use the character input buttons (0 - 9). Press repeatedly to change the character. ! To move the cursor, press the or button. Character input button Available characters Character input button 0 SPACE - Press the TUNER PRESET ( select the desired station.
Enjoying surround sound (sound mode) SD-HX600 ENGLISH This product is equipped with Dolby Digital and DTS decoders. You can enjoy powerful and high-quality surround sound as if you were on the scene. Dolby Pro Logic reproduces 5.1 channel surround from 2 channel stereo sound. Dolby Pro Logic Dolby Digital Stereo-recorded discs and video tapes Dolby Pro Logic decodes 2 channel stereo sound from discs, videotapes, etc. to reproduce 5.1 channel surround sound.
SD-HX600 Enjoying surround sound (sound mode) (continued) ENGLISH " Audio signal/Speaker indicators Audio signal/Speaker indicators: Audio signal indicators light up for the corresponding audio source, and speaker indicators are illuminated according to signals sent to the speakers. (1) (2) (3)(4) (5) (6) Audio signal indicator Advanced Features - Enjoying surround sound (sound mode) - Speaker indicator (7) (8) (9) (10) (11) (12) (13) Example: When 2.
SD-HX600 ENGLISH You can enjoy spacious sound recorded in Dolby Digital or DTS. Also, Dolby Pro Logic allows you to enjoy spacious 2 channel stereo sound. " Listening to sounds in the multi channel mode (5.1 ch, etc.) DVD (Dolby Digital or DTS) E F While the disc is playing, press the MULTI-CH button. When you press once, the last used setting appears. To change it, press the button repeatedly within 3 seconds.
SD-HX600 Enjoying surround sound (sound mode) (continued) ENGLISH 2 channel stereo sound (CD, VCR, etc.) " Listening to 2 channel stereo sounds While the disc is playing, press the STEREO button. Example: DTS format While the disc is playing, press the MULTI-CH button. Example: 2-ch stereo sound Advanced Features - Enjoying surround sound (sound mode) - You can enjoy 2 channel stereo sound. Dolby Pro Logic converts 2 channel stereo sound of CDs, etc. to 5.1 channel.
Changing the initial setting of DVD SD-HX600 ENGLISH A new setting will be retained even if the unit is set to the stand-by mode. If you want to restore or change the setting, reset it. 3 Press the or button to select a setting item and press the ENTER button. For setting items, see the table on page 45. E OSD LANGUAGE SETUP ENGLISH E S PA Ñ O L SVENSKA FRANÇAIS NEDERLANDS I TA L I A N O F SELECT ENTER ENTER 4 Press the , , ENTER button.
SD-HX600 Changing the initial setting of DVD (continued) ENGLISH Setting TV MODE Selectable parameters (* indicates initial settings.) TV MODE Description Reference page Select according to the TV. P. 46 * PROGRESSIVE OUT ON OFF* If the TV supports progressive scan, select "ON" to enjoy high resolution images. If not, set to "OFF". P. 46 DVD-AUDIO AUDIO* VIDEO Some DVD-Audio discs contain both DVD-Audio and DVD-Video contents. Select either as default. P.
SD-HX600 ENGLISH 4 Setting When playing a wide image (16:9) disc, the left and right sides of the image are cut (pan scan) to display a natural-looking 4:3 size image. A wide image disc without pan scan is played back in letterbox . A 4:3 disc is played in 4:3. When playing a wide image (16:9) disc, black bands are inserted at the top and bottom and you can enjoy full wide images (16:9) on a 4:3 size TV.
SD-HX600 Changing the initial setting of DVD (continued) ENGLISH ! Disc language Indicator AUDIO ! Selecting a language for "DISC LANGUAGE", etc. Setting A language for audio can be set. Check the code of the language (See the language code list on page 70). Example: When you select HU (Hungarian) You can specify a language for dialogues and narration.
Changing the default settings of the amplifier SD-HX600 ENGLISH Change settings according to the connected speakers. E If you press during the operation, you can go back one step. Speaker size setting (See pages 48, 49.) Speaker delay setting (See page 49.) Speaker level setting (See page 50.) Test tone (See page 50.) Changing crossover frequency (See page 51.) F Example: CT CT FR FR FL SW SW SL SR SL 10 feet (3.
SD-HX600 Changing the default settings of the amplifier (continued) ENGLISH 4 Within 10 seconds, press the select their sizes. or button to To set sizes of other speakers, repeat the operation from step 3. 5 Press the RETURN button twice. Advanced Features - Changing the default settings of the amplifier - The setting is complete.
SD-HX600 ENGLISH ! Test tone If sounds from the speakers are uneven, you can equalize them by adjusting the speaker levels. You can check each speaker sound by a test tone. Readjust the volume set in "Speaker level setting". 1 Set the MODE 1/MODE 2 switch to MODE 2 and press the AMP SET UP button. 1 2 Set the MODE 1/MODE 2 switch to MODE 2 and press the AMP SET UP button. Within 10 seconds, press the or button to select "SP LEVEL", and press the ENTER button.
SD-HX600 Changing the default settings of the amplifier (continued) ENGLISH ! Changing crossover frequency Advanced Features - Changing the default settings of the amplifier - Change the level above which subwoofer frequencies are cut, to adjust the balance with the front speakers. When the speaker setting is "SMALL", low frequencies from the speaker are cut. It is recommended to set the level slightly above that of the lowest front speaker frequency (the lowest reproducible frequency).
Timer playback Setting the timer SD-HX600 ENGLISH The unit starts playback or turns on the radio at a specified time. This unit has 2 types of timer functions: "once timer" and "daily timer". E Once timer: Once timer playback works for one time only at a preset time. Use when... You want to listen to a radio program on the day. (After operation, the timer setting is canceled.) F Daily timer: Daily timer playback works at the same preset time every day. Use when...
SD-HX600 Setting the timer (continued) ENGLISH 1 Turn on the power, set the MODE 1/MODE 2 switch to MODE 2 and press the TIMER/SLEEP button. 2 Within 10 seconds, press the or button to select "TIMER ONCE" or "TIMER DAILY", and press the ENTER button. Once timer 7 Switch the input with the button. or button, and then press the ENTER " Available playback sources: DVD/CD and TUNER. " When you select "TUNER", select a station by pressing the then press the ENTER button.
Operations after setting the timer 1 SD-HX600 ENGLISH ! In the timer stand-by mode After setting the timer E Checking the timer setting: 1 2 3 Set the MODE 1/MODE 2 switch to MODE 2 and press the TIMER/SLEEP button. Within 10 seconds, press the or button to select "TIMER ONCE" or "TIMER DAILY", and press the ENTER button. Within 10 seconds, press the or button to select "ONCE CALL" or "DAILY CALL", and press the ENTER button.
SD-HX600 ENGLISH Sleep timer The unit turns off at a specified time when listening to a disc or the radio. To confirm the remaining sleep time: 1 2 While "SLEEP" appears, set the MODE 1/MODE 2 switch to MODE 2 and press the TIMER/SLEEP button. Within 10 seconds, press the or button to select "SLEEP". Remaining sleep time " The remaining sleep time is displayed for about 10 seconds. " You can change the remaining sleep time while it is displayed by pressing the ENTER button (steps 3 - 4).
Operating the connected TV You can operate Sharp TVs with the remote control. Change the remote control setting if operating other manufacturers' TV, or if you cannot operate a Sharp TV. SD-HX600 ENGLISH ! Changing the TV registration 1 While holding down the TV button, enter the manufacturer setting number (4 digits). 2 Release the TV button. E F The setting is registered and the TV can be operated with the remote control of this unit. Notes: 1 2 Press the TV I button to turn on the TV.
SD-HX600 Operating the connected TV (continued) - Operating the connected TV - Advanced Features ENGLISH TV manufacturer Setting number CURTIS MATHES 1005, 1009, 1011, 1012, 1013, 1014, 1015, 1016, 1020, 1021, 1036, 1038, 1044, 1048, 1050 DAEWOO 1007, 1011, 1017, 1019, 1021, 1036, 1041, 1042 DAYTRON 1007 DENON 1020 DUMONT 1006, 1007 DWIN 1044, 1046 ELECTRONBAND 1001 EMERSON 1007, 1010, 1011, 1021, 1029, 1030, 1031, 1032, 1037, 1041, 1042 ENVISION 1009 ETRON 1043 FISHER 1021 FORTRESS 1044 FUJITSU 1031 F
Storing volume, surround or amplifier settings SD-HX600 ENGLISH You can recall volume, surround or amplifier settings you stored (up to 4 settings) with a simple operation. Settings are stored in sound pattern buttons by default. 3 Within 5 seconds, press a SOUND PATTERN (A/B/C/D) button. Example: When you press the SOUND PATTERN A button. E To store in other buttons, repeat from step 1.
SD-HX600 ENGLISH Mounting the unit on the wall 2 3 ! Attaching the wall bracket 1 Remove the stand. Route all connection cables through the wall bracket. Attach the wall bracket. Main unit Main unit - Mounting the unit on the wall - Advanced Features Wall bracket Stand Screw Screw Amplifier unit Place the main unit and amplifier unit on a cushion or a soft cloth to avoid damage. Amplifier unit Wall bracket Stand Screw Screw " Fix them securely with the screw removed in step 1.
SD-HX600 ENGLISH Note: (*) VESA (Video Electronics Standards Association) is an organization to promote the standardization of digital imaging device for PCs. Types of fittings: Fittings must satisfy the following. " Compatible with the VESA standard. " Have a gap of 3.973" (100 mm) 3.973" (100 mm) between the screw holes on the section to be attached. " Sturdy and stable to prevent fall or breakage. 3.973" (100 mm) " Install brackets properly following the operation manual.
SD-HX600 Connecting other equipment ENGLISH Turn off all equipment before making this connection. " To connect external equipment, purchase a commercially available connection cable. " If using an audio cable, purchase one without resistance. If you use an audio cable with resistance, sound volume will decrease. VCR, DVD Recorder, etc. - Connecting other equipment - Advanced Features To optical digital audio output jack To component output jacks 4 Digital tuner, etc.
SD-HX600 ! Connection to DVD recorder, etc. You can listen to TV sound from the speakers by connecting the AV selector using a audio cable (not supplied). You can connect a DVD recorder, digital tuner, etc. to the AV selector with an optical digital cable, coaxial digital cable or audio cable to enjoy the sound through the speakers. If connecting the equipment with a video cable, S-video cable or component video cable, you can view images on a TV connected to the AV selector.
SD-HX600 Connecting other equipment (continued) ENGLISH Turn off all equipment before making this connection. " To connect external equipment, purchase a commercially available connection cable. " If using an audio cable, purchase one without resistance. If you use an audio cable with resistance, sound volume will decrease. " Before recording, select "auxiliary" for the equipment connected to the VIDEO 1 output jack.
SD-HX600 ENGLISH ! Recording between external equipment using the AV selector You can record images and sounds from the equipment connected to the VIDEO 2 or VIDEO 3 input jack to a DVD recorder or VCR connected to the VIDEO 1 output jack. The equipment should be connected to the AV selector with a video cable/S-video cable and audio cable. E F VCR, etc. VCR or DVD recorder AV selector S VIDEO 1 Advanced Features VIDEO 3 Procedure: 1 2 3 Turn on the AV selector and main unit.
SD-HX600 Connecting other equipment (continued) ENGLISH ! Headphones Turn off all equipment before making this connection. Headphones and the subwoofer audio cable are not supplied. Main unit Amplifier unit " Before plugging in or unplugging the headphones, reduce the volume. " Be sure your headphones have a 1/8" (3.5 mm) diameter plug and impedance between 16 and 50 ohms. The recommended impedance is 32 ohms. " While headphones are connected, sound is not produced from the speakers.
Maintenance SD-HX600 ! Cleaning the laser pickup lens Periodically wipe the cabinet with a soft cloth and a diluted soap solution, then with a dry cloth. Do not touch the laser pickup lens. If fingerprints or dust accumulate on the pick- Laser up, clean it gently with a dry cotton swab. pickup lens " Do not use chemicals for cleaning (gasoline, paint thinner, etc.). It may damage the cabinet finish. " Do not apply oil to the inside of the unit. It may cause malfunctions.
SD-HX600 Troubleshooting chart ENGLISH Many potential problems can be resolved by the owner without calling a service technician. If something is wrong with this product, check the following before calling your authorized SHARP dealer or service center. ! General References - Troubleshooting chart - The sounds from speakers are not well balanced. Noise is heard during playback. When a button is pressed, the unit does not respond. Interference or noise occurs on the TV image.
SD-HX600 The remote control does not operate properly. Possible cause " Is the battery polarity respected? " Are the batteries dead? " Is the distance or angle incorrect? " Are there any obstructions in front of the unit? " Is the remote control sensor exposed to strong light (inverter fluorescent light, direct sunlight, etc.
SD-HX600 Troubleshooting chart (continued) ENGLISH ! Condensation Sudden temperature changes, storage or operation in an extremely humid environment may cause condensation inside the cabinet (laser pickup, etc.) or on the transmitter on the remote control. Condensation can cause the unit to malfunction. If this happens, leave the power on with no disc in the unit until normal playback is possible (about 1 hour). Wipe off any condensation on the transmitter with a soft cloth before operating the unit.
Language code list for disc language SD-HX600 ENGLISH Code Language name MG Malagasy Code Language name SN Shona Abkhazian Afrikaans Amharic Arabic Assamese Aymara GA GD GL GN GU HA Irish Scots Gaelic Galician Guarani Gujarati Hausa MI MK ML MN MO MR Maori Macedonian Malayalam Mongolian Moldavian Marathi SO SQ SR SS ST SU Somali Albanian Serbian Siswati Sesotho Sundanese AZ Azerbaijani HI Hindi MS Malay SV Swedish BA BE Bashkir Byelorussian HR HU Croatian Hungarian MT MY Maltese Bur
SD-HX600 Specifications ENGLISH As part of our policy of continuous improvement, SHARP reserves the right to make design and specification changes for product improvement without prior notice. The performance specification figures indicated are nominal values of production units. There may be some deviations from these values in individual units.
SD-HX600 ENGLISH ! AV selector E Power source Power consumption Dimensions AC 120 V, 60 Hz 10 W Width: 17" (430 mm) Height: 3-1/8" (78 mm) Depth: 10-1/4" (260 mm) Weight 6.4 lbs. (2.
VALID IN U.S.A. ONLY CONSUMER LIMITED WARRANTY SHARP ELECTRONICS CORPORATION warrants to the first consumer purchaser that this Sharp brand product (the “Product”), when shipped in its original container, will be free from defective workmanship and materials, and agrees that it will, at its option, either repair the defect or replace the defective Product or part thereof with a new or remanufactured equivalent at no charge to the purchaser for parts or labor for the period(s) set forth below.