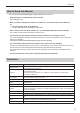
SHARP Digital Signage Software Pro Version 4.1 PN-SS05 OPERATION MANUAL Contents Introduction............................................ 2 Emergency Distribution...................... 23 Precautions on Use............................................2 Trademarks........................................................2 How to Read this Manual...................................3 Definitions...........................................................3 Break-in Program.......................................
Introduction Thank you for purchasing SHARP Digital Signage Software Pro. This software expands the functions provided by the SHARP Digital Signage Software Network Version (PN-SS05) with various enhancement such as management and distribution of programs. IMPORTANT: To aid reporting in case of loss or theft, please record the product’s model and serial numbers in the space provided. Model No.: Serial No.: U.S.A.
Introduction How to Read this Manual This manual describes SHARP Digital Signage Software Pro Version 4.1. • Keyboard keys are indicated with square brackets. E.g. [Shift], [Ctrl], etc. • Menus, windows, dialog boxes, buttons, and tabs, etc., are indicated with square brackets. E.g. 1. From the [Tools] menu, click [Options]. The [Pro Manager Options] dialog box will appear. • Items, check boxes, and option buttons, etc., are indicated with double inverted commas. E.g.
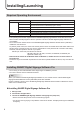
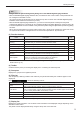
Installing/Launching Required Operating Environment Item CPU OS PC Memory Hard disk Interfaces Monitor SHARP Digital Signage Software Description 2 GHz or higher Pentium 4 processor Microsoft Windows XP, Windows Vista, Windows 7 (English version) Microsoft Windows Server 2003/2008 (English version) 512 MB or higher 40 MB or more free space (Additional space required for saving data) LAN port (TCP/IP communication must be functional) Full color display with resolution of at least 1280 x 1024 PN-SS02 (netw
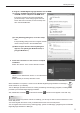
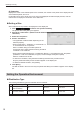
Installing/Launching If using the “SHARP Digital Signage Software Pro CD-ROM” (1) Load the “SHARP Digital Signage Software Pro CD-ROM” into the computer’s CD-ROM drive. If the setup program is launched automatically, proceed to step 4. If the setup program does not launch after a few moments, launch the setup.exe file in the CD-ROM folder. (2) In the [AutoPlay] dialog box, click “Run setup. exe”. If the [AutoPlay] dialog box does not appear, doubleclick the setup.exe file in the CD-ROM folder.
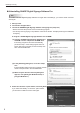
Installing/Launching zz Uninstalling SHARP Digital Signage Software Pro TIPS To install the SHARP Digital Signage Software Pro again after uninstalling it, you need to obtain a license code again. 1. Start your PC. 2. Close down all applications. 3. Launch the SHARP Digital Signage Software setup program (setup.exe). • Double-click the setup.exe file to launch the setup program. • If a security warning saying ‘The publisher could not be verified.’ is displayed during the installation, click [Run].
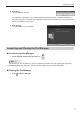
Installing/Launching 5. Click [Yes]. The uninstallation will start. If the Distribution Scheduler or the Client Scheduler has been launched, a message will appear. In this case, click [Yes]. The Distribution Scheduler and the Client Scheduler will be forcibly terminated and the uninstallation will continue. 6. Click [Finish]. The uninstallation is now complete. Launching and Closing the Pro Manager zz Launching the Pro Manager 1. On the desktop, double-click the short cut .
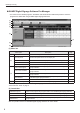
Installing/Launching zz SHARP Digital Signage Software Pro Manager * You need to have created programs, timetables and schedules and added the panels to which the programs are distributed using SHARP Digital Signage Software. (1) (2) (3) (4) (5) (7) (6) (8) (1) Menu bar Menu option File View Description Exit Exits the Pro Manager. Select all panels Selects all the panels shown on the display list. — Refresh Updates the content of the display list to reflect recent changes.
Installing/Launching TIPS Changes from the [Panel Management] dialog box of the SHARP Digital Signage Software • With the SHARP Digital Signage Software Pro, the maximum limit of the number of the panels that can be managed is increased to 1000. (The actual number of panels that can be managed is up to the number of the SHARP Digital Signage Software Viewer Versions licenses that you own.
Installing/Launching (8) Status bar Displays the name of the selected panel or the schedule, the number of the panels in the display list and of the selected panels, and so on. If information such as the cause of an error cannot be displayed all inside a display list item, click the relevant item to display the information in the Status bar. zz Setting a filter Sets conditions for the panels to be displayed on the display list. and then click [Create new filter]. 1.
Installing/Launching PUSH type distribution (static IP address) Distribution data is provided via FTP from the management PC. Each viewer PC must have a static IP address assigned. If a viewer PC resides inside a firewall, the firewall settings must be configured to allow distribution data to reach the viewer PC. PUSH type distribution (dynamic IP address) Distribution data is provided via FTP from the management PC.
Installing/Launching [Status monitoring] tab Sets the options for Status Monitoring / Control (p.29). (1) “Status of LCD monitor (PN series)” check box Check this box to retrieve the panel status from the viewer PC. (2) “Current program” check box Check this box to retrieve the current program information from the viewer PC. (3) “License information and file versions” check box Check this box to retrieve the license code and the file version of the SHARP Digital Signage Software Viewer Version.
Installing/Launching [HTTP Server] tab (1) “Start HTTP server when this PC boots up.” check box (1) Check this box to start the HTTP server from the management PC when using PUSH type distribution (dynamic IP address) or PULL type distribution. (2) (2) HTTP setting Sets the user name, the password and the port number. If connection from the viewer PC fails, contact your network administrator who maintains the firewall to confirm the setting details.
Installing/Launching zz Adding a panel (viewer PC) 1. Click [Add/Edit Panel] in the [Tools] menu. The [Panel Management] dialog box appears. 2. Click [Add New panel]. The [Add New Panel (Viewer PC)] dialog box appears. 3. Set the options. (1) Panel Name (Required) Choose a Name that will make it easy to identify the panel. (Names must be within 50 characters) (2) Group In the Group box, select a group to add the panel to. If you do not want to assign the panel to any particular group, select “(none)”.
Installing/Launching zz Registering a panel (viewer PC) for data request The panels used with PUSH type distribution (dynamic IP address) or PULL type distribution can be registered (accepted) based on the setting details sent from the viewer PC. The setting information of the viewer PC can be sent from the “FTP Server” tab in the setting dialog box of the SHARP Digital Signage Software Client Scheduler. (Read the operation manual for SHARP Digital Signage Software.) 1.
Distributing Distribution Schedule Assigns a schedule to a panel and reserves program distribution. Schedules are created using Schedule Editor of the SHARP Digital Signage Software. In the display list, panels and their assigned schedules are shown. For each day, the details of the timetable set for the day is displayed. (day view) By selecting an appropriate icon on the view toolbar, the timetable for a particular day can be displayed.
Distributing (1) View toolbar Specifies the dates (the start date and the end date) to be displayed on the display list in the day view. Click the icon to display a dialog box and click the start date (end date) in the dialog box. The maximum number of days to display is 62 days. Specifies the date to be displayed on the display list in the hour view. Click the icon to display a dialog box and click the date in the dialog box.
Distributing (4) Assigned Schedule Displays the details of the schedule assigned to a panel. Double-click the schedule list to edit schedules using the Schedule Editor of the SHARP Digital Signage Software. A schedule can be assigned if there is no already assigned schedule. Click the header to sort the schedules in the ascending or descending order of their names. Right-click to display a menu, which lets you perform various operations.
Distributing (3) Select the schedule data and click [Assign]. The schedule is now assigned. 4. Confirm the schedule (1) Select a panel to confirm the schedule. Click while holding down [Ctrl] or [Shift] to select multiple panels at the same time. (2) Click . The [Distribute Settings] dialog box appears. (3) Set the distribution date and time. • “Distribute Now” option button In the PUSH type distribution, select this option to distribute the schedule after the procedure (7) is completed.
Distributing Distribution Status (Delivery) This button lets you check the schedule distribution status. (1) (2) (3) (4) (5) (6) (1) Operation toolbar Stops uncompleted schedule distribution and cancels the confirmation. Select a panel to stop distribution and click this icon. Resends the schedule for which a distribution error has occurred. Select a panel to resend the schedule and click this icon. (2) Panel Name Displays the panel names.
Distributing Distribution Status (Panel) This button lets you check the schedules distributed to the panels. As in the case of Distribution Schedule, both the day view and the hour view are available. Day view (1) (3) Hour view (2) (4) (5) (1) (3) (2) (4) (6) (7) (1) View toolbar Refer to page 17 for more details. (2) Operation toolbar This button lets you retrieve the information of the schedules distributed to the panels. Select a panel to retrieve the information and click this icon.
Distributing (3) Panel Name Displays the panel names. Panels can be displayed selectively using the Group tree or the Filter bar. Click the header to sort the panels in the ascending or descending order of their names. (4) Retrieve Schedule Status Displays the names of retrieved schedules and the dates and times when their retrieval was complete. Right-click this to display a menu and retrieve the schedule from the menu.
Emergency Distribution Break-in Program This button lets you distribute break-in programs for emergency. It also lets you check the distribution status of such programs. It is also possible to send a stop command for programs to halt the break-in program in the middle. * Change the settings in Pro Manager Options so that the (p.11) button is shown. (1) (2) (3) (4) (5) (6) (1) Operation toolbar Assigns a break-in program (or a stop command for program) to a panel.
Emergency Distribution (3) Program data to be distributed Displays the names of the programs assigned to the panels. Double-click an assigned program to edit it using the Program Editor of the SHARP Digital Signage Software. A program or a stop command can be assigned if there is no already assigned program. Click the header to sort the panels in the ascending or descending order of the program names. Right-click on the schedule list to display a menu, which lets you perform various operations.
Emergency Distribution 4. Confirm distribution (1) Select a panel to confirm distribution. Click while holding down [Ctrl] or [Shift] to select multiple panels at the same time. (2) Click . The [Start time and duration of Break-in Program] dialog box appears. • When distributing only stop commands, a message will appear instead of this dialog box. Click [Yes] to confirm the distribution of stop commands. • When distributing both break-in programs and stop commands, the dialog box will appear.
Emergency Distribution (8) Click [OK]. The break-in program is now confirmed. Confirmed programs (or stop commands) are marked with the confirmed sign ( ). TIPS • In PULL type distribution, the distribution will start at the time of the first access from the viewer PC after the distribution is confirmed. • The following restrictions are applicable in the panel control: In the case of PN series and LB-1085, the input cannot be switched to “TV”.
Emergency Distribution (1) Operation toolbar Assigns an emergency scroll message (or a stop command for scroll message) to a panel. Select a panel to assign and click this icon. (p.28) Reverts to the state before a scroll message (or a stop command) was assigned. Select a panel to revert and click this icon. Stops uncompleted distribution of a scroll message (or a stop command) and cancels the confirmation. Select a panel to stop distribution and click this icon.
Emergency Distribution zz Distributing emergency scroll messages and stop commands for scroll message This button lets you distribute scroll message for emergency. To stop displaying a scroll message in the middle, send a stop command for scroll message. 1. Click the function button. If the Options. (p.11) function button is not shown, change the settings in Pro Manager 2. Select panels. • Use the group tree to show only the panels registered in a group on the list.
Management Status Monitoring / Control This button lets you retrieve and check the panel status. It also lets you control the power supply for the PC and the panel. TIPS The panel status monitoring function is available only for the SHARP LCD monitor (PN series).
Management (1) Operation toolbar Monitors the panels automatically. The information of the panels registered with the “Update automatically” option is retrieved at regular intervals and displayed. The interval for information retrieval can be changed in the Pro Manager Options settings. (p.11) Stops the automatic monitoring of the panels. Retrieves the panel status. Select a panel to retrieve the confirmation and click this icon. Displays the panel status as a list.
Management (7) Current Program Displays the name of the currently displayed program. Click the header to sort the panels in the ascending or descending order of the program names. When the check is cleared in the “Current program” check box in the Pro Manager Options, the program names will not be displayed. (p.11) (8) File Version, Software License Information Displays the version and the software license information of the SHARP Digital Signage Software Viewer Version installed in the viewer PC.
Management Panels can be displayed selectively using the Group tree or the Filter bar. Double-click the panel icons and the thumbnails to display a menu for status monitoring settings. Read “(3) Status Monitoring Options list” (p.30) for the details of the menu. Double-click a thumbnail to display it using an application specified in the Pro Manager Options settings. In PULL type distribution, the status will be retrieved at the time of the first access from the viewer PC.
Management TIPS • The retrieved system files are saved for up to 10 retrievals. After 10 retrievals, the older ones will be deleted when Pro Manager starts up. • To retrieve the Direct X information, the viewer PC must have the Direct X version 9.0 or newer installed. • File retrieval may take some time depending on the status of the viewer PC or on the file to retrieve.
Viewer Update This button lets you update the SHARP Digital Signage Software Viewer Version on the viewer PC and change settings of the viewer PC. * Change the settings in Pro Manager Options so that the button is shown. (p.11) TIPS This is not to guarantee any future software update. (1) (2) (3) (4) (5) (6) (1) Operation toolbar Assigns a system file (such as updaters or settings) to a panel (or the viewer PC that is connected to) for distribution. Select a panel to assign and click this icon. (p.
Viewer Update (4) Distribution Information Displays the confirmed dates and times of distribution. Click the header to sort the panels in the ascending or descending order of the dates and times. (5) Distribution Start Displays the dates and times the distribution is started. Click the header to sort the panels in the ascending or descending order of the dates and times. (6) Distribution Complete Displays the dates and times the distribution is completed.
Viewer Update zz Distributing preset programs/default programs This function lets you distribute preset programs and default programs. Prepare the program data to assign in the following method: (1) Export the program data. (2) Change the filename of the exported program. In the case of preset programs: change the filename to “preset program ID.prg”. A preset program ID is a number between 1 and 99999999. E.g.: 35.prg In the case of default programs: default.prg 1. Click the function button.
Viewer Update zz Distributing contents in advance This function lets you distribute contents to the viewer PC in advance. 1. Click the function button. If the Options. (p.11) function button is not shown, change the settings in Pro Manager 2. Select panels. • Use the group tree to show only the panels registered in a group on the list. • Specify a filter to show only the panels that satisfy the conditions on the list. (p.10) 3. Assign the contents to a panel. (1) Select a panel to assign the contents.
Viewer Update zz Distributing system settings files (for service persons) This function is to be used only by service persons. This is not to be used during normal operations. This allows changing the settings of viewer PCs from the management PC. 1. Click the function button. function button is not shown, change the settings in Pro Manager If the Options. (p.11) 2. Select panels. • Use the group tree to show only the panels registered in a group on the list.
Viewer Update zz Distributing panel attributes Distributes panel attributes (Panel Names, Group Names, Comments 1 to 3) to the viewer PCs. The panel attributes are used as judgment criteria for playing conditional contents on the viewer PC. 1. Click the function button. If the Options. (p.11) function button is not shown, change the settings in Pro Manager 2. Select panels. • Use the group tree to show only the panels registered in a group on the list.
Distribution Scheduler zz Launching the Distribution Scheduler Distribution Scheduler is a tool for managing communications with the viewer PC. Distribution Scheduler is automatically launched by “Startup” when Windows launches. When Distribution Scheduler launches, an icon ( ) is displayed (and resides permanently) in the Task Tray. Do not exit Distribution Scheduler unnecessarily. TIPS • The SHARP Digital Signage Software Server Scheduler is not used with the SHARP Digital Signage Software Pro.
V4.