MODEL SF-2052 ELECTROSTATIC COPYING MACHINE OPERATION MANUAL Page • GETTING STARTED 2 • MAKING COPIES 7 • SUPPLIES 48 • COPIER TROUBLE? 53 • GENERAL INFORMATION 66 • OPTIONAL EQUIPMENT 75 • KEY OPERATOR’S GUIDE 105
CONTENTS Page ● ● ● ● ● ● INTRODUCTION . . . . . . . . . . . . . . . . . . . . . . . . . . . . . . . . USING THIS MANUAL . . . . . . . . . . . . . . . . . . . . . . . . . . . . INSTALLATION REQUIREMENTS . . . . . . . . . . . . . . . . . . CAUTIONS . . . . . . . . . . . . . . . . . . . . . . . . . . . . . . . . . . . . . POWER ON AND OFF . . . . . . . . . . . . . . . . . . . . . . . . . . . . Power save modes . . . . . . . . . . . . . . . . . . . . . . . . . . . . . . . INFORMATION FUNCTION . . . . . . .
GETTING STARTED INTRODUCTION Introduction/Using this manual The SF-2052 has been designed to give high copy quality, productivity, and reliability. Amongst its many useful features and functions are the reversing automatic document feeder (RADF)*, dual page copying, erase, margin shift, covers and inserts placement, and an internal auditor. This copier can be equipped with an optional large capacity tray which holds 3,000 sheets of copy paper.
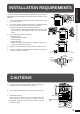
GETTING STARTED INSTALLATION REQUIREMENTS To ensure safety and proper machine performance, please note the following before initial installation and whenever the machine is to be relocated. The copier should be installed near an accessible power outlet for easy connection. 2. Be sure to connect the power cord only to a power outlet that meets the specified voltage and current requirements. Also make certain the outlet is properly grounded.
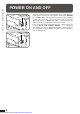
GETTING STARTED POWER ON AND OFF Power on Power on and off Power off 4 Downloaded from: http://www.usersmanualguide.com/ The power switch is located on the right side of the copier. When the power switch is turned to the “ON” position, the message “WARMING UP. PLEASE WAIT.” will appear in the message display. Warming up takes about 3 minutes. Once the copier is ready, the message display will change to “READY TO COPY.”, and the START key indicator will light up, indicating that copying is possible.
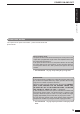
POWER ON AND OFF GETTING STARTED Power on and off Power save modes The copier has two power save modes – power off timer mode and preheat mode. Power off timer mode The power off timer mode will automatically turn off the power to the copier after a programmed length of time has elapsed from the time the power was first turned on. If the power off timer mode is set, the power will turn off even with the power switch in the “ON” position.
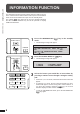
GETTING STARTED INFORMATION FUNCTION Information function The information function provides a quick reference guide to the use of the various features and functions of this copier. The information mode can be entered when the copier is in the standby mode. The symbol ( ) may appear at the end of a message indicating that the SCROLL DISPLAY key should be pressed to display additional information. 1 SCROLL DISPLAY Press the INFORMATION ( mode. ● ) key in the standby The following message will appear.
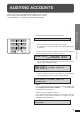
AUDITING ACCOUNTS If this copier has been programmed in the auditing mode, it will not function until an assigned 5-digit account number has been entered. ★ KEY OPERATOR See page 111 for setting the auditing mode. MAKING COPIES The initial status of the message display will be: 1 2 3 4 5 6 7 8 9 ENTER YOUR ACCOUNT NUMBER. ––––– ● Enter your account number using the 10-key pad. ● As each digit is entered, the dashes in the display will change to asterisks.
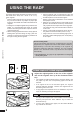
USING THE RADF MAKING COPIES The RADF (Reversing Automatic Document Feeder) will handle A5 to A3 (5-1/2" x 8-1/2" to 11" x 17") sized originals. ● Before loading originals into the document feeder tray, be sure to remove any staples or paper clips from them. The RADF can handle a maximum of 50 originals. ● Damaged or crumpled originals may misfeed in the RADF. It is recommended that these be copied from the document glass and the copies be used as original documents.
USING THE RADF 2 EVEN NUMBER Ensure that the 1-sided to 1-sided copying mode is selected in the ORIGINAL TO COPY section of the operation panel. ODD NUMBER ● ORIGINAL TO COPY SORTER 1 SORT 2 1 (ORIGINALS) STAPLE SORT 2 2 2 GROUP 1 1 PROGRAM 1 2 3 CLEAR ALL CA ● The number will be shown in the copy quantity display. ● Use the clear ( been made. START 4 5 6 7 8 9 ) key to cancel an entry if a mistake has AUDIT CLEAR 0/ C 3 START 4 6 9 Press the START key.
USING THE RADF ODD NUMBER 2 2 2 1 ORIGINAL TO COPY 1 1 2 2 1 (ORIGINALS) PRE-COUNT ORIGINALS EVEN NUMBER ODD NUMBER MAKING COPIES 2 2 1 2 If the number of originals is known, use the ORIGINAL TO COPY key to select EVEN NUMBER or ODD NUMBER in the ORIGINAL TO COPY section of the operation panel, then proceed to step 3. If the number of originals is not known, select PRE-COUNT ORIGINALS for an automatic count by the RADF and press the START key. ● 1 The following message will appear.
USING THE RADF 1 2 3 4 5 6 7 8 9 Enter the desired number of copies. 4 Press the START key. ● START C ● If the specified number of copies is more than 50, the copy quantity display will display 50 after copying starts. If an optional sorter is installed, the display will change to 20 after copying starts (in sort mode). To cancel a copy run during duplex copying, press the clear ( ) key. Incomplete copies will be output from the duplex tray.
COPYING FROM THE DOCUMENT GLASS Use the document glass for copying single originals, bound documents, and other originals that cannot be set in the RADF. ● Duplex copying will not work when a non-standard sized paper is used. ● 2-sided to 2-sided or 2-sided to 1-sided cannot be selected when copying from the document glass. These operations, however, can be performed by manually turning over the originals. ● Image void can occur at the leading edge (max. 3 mm (1/8")) and the trailing edge (max.
COPYING FROM THE DOCUMENT GLASS MAKING COPIES 2-sided copies from 1-sided originals For an odd number of originals: 2 2 2 1 1 ORIGINAL TO COPY 1 EVEN NUMBER ODD NUMBER 2 1 2 ODD NUMBER 2 1 PRE-COUNT ORIGINALS 3 Copy the remainder of the originals in reverse order. 2 1 2 2 Use the ORIGINAL TO COPY key to select EVEN NUMBER.
REDUCTION/ENLARGEMENT/ZOOM Reduction and enlargement ratios can be selected either automatically with the AUTO IMAGE key or manually with the REDUCTION key, ENLARGEMENT key, or ZOOM keys. The zoom function enables precise copy ratio selection from 50% to 200% in 1% increments. ★ KEY OPERATOR One extra preset copy ratio for reduction or enlargement can be added. See page 117. MAKING COPIES Automatic selection 1 Set the original(s) face up in the document feeder tray or face down on the document glass.
REDUCTION/ENLARGEMENT/ZOOM Manual selection Set the original(s) face up in the document feeder tray or face down on the document glass. 2 Use the REDUCTION, ENLARGEMENT and ZOOM keys to set the desired copy ratio. 100% A. Preset reduction ratios are: 86%, 81%, 70%, and 50% (95%, 77%, 64%, and 50%). ZOOM B. Preset enlargement ratios are: 115%, 122%, 141%, and 200% (121%, 129%, 141%, and 200%). EXPOSURE C. Zoom ratios: Any ratio from 50% to 200% can be set in 1% increments.
SPECIAL PAPERS (manual feed) The manual feed tray is used to copy onto transparency film, labels, tracing paper, and other special purpose papers. It is also used to feed cover stock and insert stock. Up to 100 sheets of standard copy paper can be set in the manual feed tray. ● Automatic duplex copying will not work when a non-standard sized paper is used.
EXPOSURE ADJUSTMENTS This copier has three exposure modes to choose from: AUTOMATIC, MANUAL, and PHOTO. AUTO P SELE EXPOSURE 1. A 2. A 3. A AUTO Automatic This is the standard initial setting for this copier. In this mode, the characteristics of an original being copied are “read” by the exposure system, and exposure adjustments are made automatically. This optimizes contrast of the copied images by reducing the effect of coloured or shaded background areas.
DUAL PAGE COPYING The DUAL PAGE COPY feature produces separate copies of two documents placed side by side on the document glass. It is especially useful when copying books and other bound documents and can be used with the MARGIN SHIFT feature and two-sided copying. MAKING COPIES 1 Place the originals on the document glass with the centre of the two pages aligned with the paper size ( 81/2).
ERASE Edge erase A A Centre erase AB AB This copier has an edge erase mode and a centre erase mode. ● Edge erase can be used to eliminate shadow lines around the edges of copies caused when thick paper or a book is used as an original. ● Centre erase can be used to eliminate the shadow produced by the bindings of bound documents. ★ KEY OPERATOR The width for edge erase and centre erase can be changed. See page 118. The initial setting of the erase feature can also be changed. See page 120.
ERASE MAKING COPIES 3 If you want to change the erase mode, press the SCROLL DISPLAY key. ● SCROLL DISPLAY The following message will appear. ERASE EDGE ERASE INFORMATION CENTRE ERASE PROGRAM Erase P USE 10-KEY PAD TO SELECT ERASE MODE.
MARGIN SHIFT Original Margin (Initial setting: copy image shifted to the right) NOTE: The front side and reverse side are referred to as “SIDE 1” and “SIDE 2” respectively in the message display. NCY COVERS/ INSERTS MARGIN SHIFT ERASE 1 Place the original face up in the document feeder tray or face down on the document glass. 2 Press the MARGIN SHIFT key. ● The following message will appear for several seconds.
MARGIN SHIFT MAKING COPIES 3 If you want to change the shift amount and/or shift direction, press the SCROLL DISPLAY key. ● SCROLL DISPLAY The following message will appear.
MARGIN SHIFT 2 3 4 5 6 7 8 9 5 Select the shift direction using the 10-key pad. 6 Ensure that the desired paper tray is selected. 7 Enter the desired number of copies. 8 Press the START key. ● Selected shift amounts and shift direction will return to the initial settings when the MARGIN SHIFT key is pressed again. MAKING COPIES 1 AUDIT CLEAR Margin shift 0/ C INFORMATION ORIGINAL A4 AUTO PAPER SELECT A4R 1. A4 2. A4R 3.
COVERS MAKING COPIES The COVERS mode is used to place covers on the front, back, or both the front and back of multipage documents. ● Front cover sheets can be copied on, but only on the front side even in the 1-sided to 2-sided and 2-sided to 2-sided copy modes. The back side of the original designated as the cover will not be copied. ● Back cover sheets cannot be copied on, either on the front side or on the back side.
COVERS 4 1 2 3 4 5 6 7 8 9 Press key 1 on the 10-key pad. ● The following message will appear. COVERS TO RETURN :PRESS USE 10-KEY PAD TO SELECT COVER PLACEMENT. 0/ MAKING COPIES AUDIT CLEAR C FRONT : PRESS 1 1 2 3 4 5 6 7 8 9 5 AUDIT CLEAR 3 4 5 6 7 8 9 6 If FRONT or FRONT+BACK is selected, the message “PRINT ON FRONT COVER? USE 10-KEY PAD TO SELECT. YES: PRESS 1 NO: PRESS 2” will appear. Select YES or NO by pressing key 1 or 2 on the 10-key pad.
INSERTS INSERTS The INSERTS mode is used to insert sheets as chapter dividers. ● 6 INSERTS ● 5 4 3 6 ● 2 5 1 4 ● 3 2 1 6 5 4 MAKING COPIES 3 ● 2 1 INSERTS 6 INSERTS Some examples of insert sheet placement 5 4 3 5 2 6 3 When 1-sided copies are to be made: 1 2 4 1 Insert sheets can be fed from any of the paper feed stations, but when the manual feed tray is used for cover stock, insert sheets must be fed from another tray.
INSERTS To place insert sheets with printing in the 1-sided copy mode 8 7 INSERTS WITH PRINTING 6 5 4 3 1 Make note of the numerical positions of the original pages which are to be copied onto insert sheets. In the example to the left, these are positions 3 and 6. 2 Place the originals face up in the document feeder tray. 3 Press the COVERS/INSERTS key. 8 2 7 1 6 5 4 3 2 7 1 2 4 1 MARGIN SHIFT USE 10-KEY PAD TO SELECT ORIGINAL TO COPY MODE.
INSERTS 1 2 3 4 5 6 7 8 9 5 MAKING COPIES AUDIT CLEAR 0/ C 1 2 3 4 5 6 7 8 9 ● The following message will appear. INSERTS TO RETURN : PRESS PLEASE INPUT THE NUMBER OF ORIGINALS BY 10-KEY PAD AND THEN PRESS THE KEY. OR 0 PRESS THE KEY FOR AUTO-COUNT. ● 6 PROGRAM CLEAR ALL Inserts ● If only the PROGRAM key is pressed, the number of originals will be counted. When counting is completed, replace the originals in the document feeder tray.
INSERTS 9 M ATION PROGRAM 1 P Enter the remaining positions as in step 8 and then press the PROGRAM key again to end the sequence. ● Enter page numbers in ascending order. ● To correct an entry error, press the SCROLL DISPLAY key. ● The following message will appear. CLEAR ALL 4 INSERTS MAKING COPIES CA TO RETURN :PRESS USE 10-KEY PAD TO INDICATE TRAY FOR INSERT PAPER.
INSERTS To place insert sheets without printing in the 1-sided copy mode 6 INSERTS WITHOUT PRINTING 5 4 3 2 1 Make note of the numerical positions of originals which are to follow blank insert sheets. In the example to the left, these are positions 3 and 5. 2 Place the originals face up in the document feeder tray. 3 Press the COVERS/INSERTS key.
INSERTS 1 2 3 4 5 6 7 8 9 5 2 3 4 5 6 7 8 9 PROGRAM Enter the number of originals using the 10-key pad and then press the PROGRAM key. If the number of originals is not known, press only the PROGRAM key. ● If only the PROGRAM key is pressed, the number of originals will be counted. When counting is completed, replace the originals in the document feeder tray. ● The message “PRINT ON THE CHAPTER PAGES? USE 10KEY PAD TO SELECT. YES: PRESS 1 NO: PRESS 2” will appear.
INSERTS 9 M ATION PROGRAM 1 P Enter the remaining positions as in step 8 and then press the PROGRAM key again to end the sequence. ● Enter page numbers in ascending order. ● To correct an entry error, press the SCROLL DISPLAY key. ● The following message will appear. CLEAR ALL MAKING COPIES CA 4 INSERTS TO RETURN :PRESS USE 10-KEY PAD TO INDICATE TRAY FOR INSERT PAPER.
INSERTS To place insert sheets with printing in the 2-sided copy mode 12 11 10 1 Separate the document into chapters and count the number of pages in each chapter. If a chapter of 1sided originals contains an odd number of pages, make it even by adding a blank sheet at the end. 2 Make note of the numerical positions of the original pages which are to be copied onto insert sheets.
INSERTS COVERS AND INSERTS USE 10-KEY PAD TO SELECT COVERS / INSERTS MODE. MAKING COPIES COVERS : PRESS 1 1 2 3 4 5 6 7 8 9 6 AUDIT CLEAR Inserts 0/ C 1 2 3 4 5 6 7 8 9 PROGRAM The following message will appear. INSERTS TO RETURN : PRESS PLEASE INPUT THE NUMBER OF ORIGINALS BY 10-KEY PAD AND THEN PRESS THE KEY. OR 0 PRESS THE KEY FOR AUTO-COUNT. ● CLEAR ALL ● If only the PROGRAM key is pressed, the number of originals will be counted.
INSERTS 1 2 3 4 5 6 7 8 9 9 PROGRAM P ● The entered number will be displayed on the bottom line of the message display. CA C 10 MATION Enter the remaining positions as in step 9 and then press the PROGRAM key again to end the sequence. PROGRAM ● Enter page numbers in ascending order. P ● To correct an entry error, press the SCROLL DISPLAY key. ● The following message will appear.
INSERTS To place insert sheets without printing in the 2-sided copy mode 10 9 9 10 8 7 6 Separate the document into chapters and count the number of pages in each chapter. If a chapter of 1sided originals contains an odd number of pages, make it even by adding a blank sheet at the end. 2 Make note of the numerical positions of the pages which are to follow blank insert sheets. In the example to the left, these are positions 5 and 9. 3 Place the originals face up in the document feeder tray.
INSERTS 1 2 3 4 5 6 7 8 9 6 0/ C 1 2 3 4 5 6 7 8 9 ● 7 PROGRAM CLEAR ALL 2 3 4 5 6 8 If only the PROGRAM key is pressed, the number of originals will be counted. When counting is completed, replace the originals in the document feeder tray. ● The message “PRINT ON THE CHAPTER PAGES? USE 10KEY PAD TO SELECT. YES: PRESS 1 NO: PRESS 2” will appear. 8 Press key 2 on the 10-key pad to select NO. ● INSERTS PLEASE DESIGNATE ORIGINAL POSITIONS WHICH FOLLOW CHAPTER INSERTS.
INSERTS 10 MATION Enter the remaining positions as in step 9 and then press the PROGRAM key again to end the sequence. PROGRAM ● Enter page numbers in ascending order. P ● To correct an entry error, press the SCROLL DISPLAY key. ● The following message will appear. 1 CLEAR ALL MAKING COPIES CA 4 INSERTS TO RETURN :PRESS USE 10-KEY PAD TO INDICATE TRAY FOR INSERT PAPER.
INSERTS To place covers and insert sheets MARGIN SHIFT Make note of the numerical positions of the pages which are to be copied onto insert sheets or to follow blank insert sheets. 2 Place the originals face up in the document feeder tray. 3 Press the COVERS/INSERTS key. ● ER If the 1/1 mode was previously selected, the following message will appear. Otherwise, the message in step 4 will appear. Inserts USE 10-KEY PAD TO SELECT ORIGINAL TO COPY MODE.
INSERTS 1 2 3 4 5 6 7 8 9 5 MAKING COPIES C 1 2 3 4 5 6 7 8 9 ● 6 PROGRAM CLEAR ALL If you press the SCROLL DISPLAY key, the screen which was displayed before the current screen will appear. Inserts ● If only the PROGRAM key is pressed, the number of originals will be counted. When counting is completed, replace the originals in the document feeder tray. ● The following message will appear. CA C The following message will appear.
INSERTS 9 Follow the steps for insert sheet placement. ● To place insert sheets without printing in the 1-sided copy mode, go to step 7 on page 31. ● To place insert sheets with printing in the 2-sided copy mode, go to step 8 on page 34. ● To place insert sheets without printing in the 2-sided copy mode, go to step 8 on page 37.
INSERTS Examples of positions to be designated for insert sheets in the COVERS/INSERTS mode MODE INSERTS OUTPUT 1-sided copy mode Front cover with printing Insert sheets with printing Front cover without printing Insert sheets with printing MAKING COPIES Front cover with printing Insert sheets without printing Front cover without printing Insert sheets without printing 4 5 6 7 4 5 6 7 2 3 4 5 2 3 4 5 5 7 2 1 3 3, 6 2 1 3 3, 6 1 3, 5 1 3, 5 1-sided to 2-sided copy mode Front
INSERTS TRANSPARENCY FILM WITH INSERT SHEETS When copying onto transparency film, insert sheets can be placed following each transparent sheet. The insert sheets can be processed blank or can be copied with the same image as the transparent sheets. ● This mode can be selected only in the 1-sided to 1-sided and 2sided to 1-sided modes. ● A multiple number of copies cannot be selected in this mode. ● Transparency film must be fed from the manual feed tray.
INSERTS TRANSPARENCY FILM WITH INSERT SHEETS TRANSPARENCY INSERTS PRINT ON THE INSERT SHEETS? USE 10-KEY PAD TO SELECT. 1 1 2 2 YES : PRESS 1 MAKING COPIES 1 2 3 4 5 6 7 8 9 1 2 NO : PRESS 2 3 Press key 1 or key 2 on the 10-key pad. 4 Load transparency film into the manual feed tray. 5 Ensure that the desired tray is selected for insert sheets.
INSERTS JOB MEMORY Frequently used job programs can be stored in one of the nine storage registers. This is convenient for quick job recall without losing time manually reprogramming each aspect of the job.
INSERTS JOB MEMORY Deleting a stored job program 1 2 3 4 5 6 8 7 9 1 Follow steps 1 and 2 in “Storing a job program” on the previous page. (1. Press the PROGRAM key. 2. Press the 0 key.) 2 Press key 2 on the 10-key pad. MAKING COPIES AUDIT CLEAR 0/ 2 3 4 5 6 7 8 9 The following message will appear. TO DELETE A PROGRAM FROM THE STORAGE REGISTER: PRESS ANY KEY FROM 1 TO 9 AND THEN THE START KEY. C 1 ● 3 Enter the storage register number of the program to be deleted.
INSERTS INTERRUPT 1 CA TRAY SELECT Press the INTERRUPT key. ● INTERRUPT AU START 2 When the copier stops, remove the original(s) and set the original(s) for interrupt copying in the document feeder tray or on the document glass. 3 Select the desired available copier functions. 4 Press the START key. 5 When the interrupt copy run is complete, press the INTERRUPT key again to cancel the mode and remove the original used for interrupt copying.
PAPER Types and sizes of copy paper Ordinary paper SUPPLIES ● ● ● ● Paper * Size Weight Capacity (80 g/m2 (21 lb.) paper) Paper tray 1 A4 to A3, 8-1/2" x 11" (8-1/2" x 11" to 11" x 17", A4) 52 to 80 g/m2 (14 lbs. to 21 lbs.) 500 sheets Paper tray 2 A5 to A3, 8-1/2" x 11" (5-1/2" x 8-1/2" to 11" x 17", A4) 52 to 80 g/m2 (14 lbs. to 21 lbs.) 500 sheets Paper tray 3 A4 to A3, 8-1/2" x 11" (8-1/2" x 11" to 11" x 17", A4) 52 to 80 g/m2 (14 lbs. to 21 lbs.
PAPER Loading paper in paper trays 1 to 3 2 Fan the copy paper and insert it into the tray. SUPPLIES 1 Gently lift and pull out the paper tray. Paper ● Maximum height line 3 Each tray holds 500 sheets of paper. Do not load paper above the maximum height line. Push the paper tray firmly back into the copier.
ADDING TONER The message “(TONER SUPPLY IS LOW. PRESS THE KEY FOR INSTRUCTIONS.)” will appear in the message display before the toner supply is completely empty. If copying is continued, copies will gradually become lighter until the copier stops and the message display changes to “ADD TONER. PRESS THE KEY FOR INSTRUCTIONS ON HOW TO ADD TONER.”, indicating that the toner supply is empty. Toner can be added any time after the message “(TONER SUPPLY IS LOW. PRESS THE KEY FOR INSTRUCTIONS.)” appears.
ADDING TONER 4 Slide the toner cartridge along the guides over the toner hopper. 5 Hold the toner cartridge with one hand while pulling on the sealing tape to remove it. 6 Tap on the top of the toner cartridge 5 times to release all toner into the toner hopper. Sealing tape Slide the empty toner cartridge back along the guides and remove it. ● 8 The cartridge opening will be closed as it is moved back along the guides. Close the toner hopper cover . NOTE: Add only one cartridge of toner.
STORAGE OF SUPPLIES Standard SF-2052 supplies replaced by the user include copy paper, toner and staple cartridges for an optional staple sorter. For best copying results, be sure to use only Sharp products. The package of Sharp toner has the Genuine Supplies label. GENUINE SUPPLIES Photoconductive drum SUPPLIES The SF-2052 Copier has advanced process control technology which improves copy quality uniformity.
MISFEED REMOVAL MISFEED REMOVAL When a misfeed occurs, the copier will stop. The message “A MISFEED HAS OCCURRED. CLEAR INDICATED AREA. PRESS THE KEY FOR RECOVERY INSTRUCTIONS.” will appear with a display of paper misfeed locations. Press the INFORMATION and SCROLL DISPLAY keys for more detailed information as necessary. If paper becomes accidentally torn during removal, be sure to remove all pieces. Be careful not to damage the photoconductive drum or the corona wires.
MISFEED REMOVAL Location A (A) Open the feeding roller cover and pull the original gently to the right and out from the document feeder tray. Feeding roller cover ● Be sure to open and close the document feeder cover to cancel the misfeed display. Location B (B) Open the exit roller cover and gently pull the original out. ● Be sure to open and close the document feeder cover to cancel the misfeed display.
MISFEED REMOVAL A MISFEED HAS OCCURRED. CLEAR INDICATED AREA. PRESS THE KEY FOR RECOVERY INSTRUCTIONS. Paper guide Misfeed in a paper tray (trays 1 to 3) 1 Open the right front door. 2 Open the paper guide at the right side of paper trays 1 to 3 and remove any misfed paper. Be careful not to tear the misfed paper during removal. ● Be sure to perform this step before pulling out a paper tray. If this step is not performed first, misfed paper may be torn.
MISFEED REMOVAL Paper guide A MISFEED HAS OCCURRED. CLEAR INDICATED AREA. PRESS THE KEY FOR RECOVERY INSTRUCTIONS. 4 Close the paper guide and gently push back the paper tray. 5 Close the right front door. ● Confirm that the misfeed display is cleared. Misfeed in the manual feed tray COPIER TROUBLE? Misfeed removal 56 1 Pull out the misfed paper. 2 Open the right front door of the copier and then close it to cancel the misfeed display.
MISFEED REMOVAL A MISFEED HAS OCCURRED. CLEAR INDICATED AREA. PRESS THE KEY FOR RECOVERY INSTRUCTIONS. Duplex section Misfeed in the paper feed area 2 Pull out the duplex section. 3 Push the paper guide release button to open the paper guide. 4 Turn the roller rotating knob in the direction of the arrow and remove the misfed paper. COPIER TROUBLE? 1 Open the front doors. Roller rotating knob ● Be careful not to tear the misfed paper during removal.
MISFEED REMOVAL 5 Close the paper guide and gently push back the duplex section. 6 Close the front doors. ● Confirm that the misfeed display is cleared. COPIER TROUBLE? Misfeed removal A MISFEED HAS OCCURRED. CLEAR INDICATED AREA. PRESS THE KEY FOR RECOVERY INSTRUCTIONS. Misfeed in the paper transport area 1 58 Open the front doors of the copier.
MISFEED REMOVAL Transport lever Photoconductive drum 2 Turn the transport lever to the right. 3 Turn the roller rotating knob in the direction of the arrow to remove the misfed paper. Roller rotating knob 5 Close the front doors. ● Confirm that the misfeed display is cleared. 59 Downloaded from: http://www.usersmanualguide.com/ Misfeed removal 4 Turn the transport lever back in the direction of the arrow.
MISFEED REMOVAL A MISFEED HAS OCCURRED. CLEAR INDICATED AREA. PRESS THE KEY FOR RECOVERY INSTRUCTIONS. Misfeed in the fusing and exit area 1 Open the front doors of the copier. 2 Turn the roller rotating knob and remove the paper from the fusing area. ● Turn the knob in both directions to remove the misfed paper. COPIER TROUBLE? Roller rotating knob Misfeed removal 3 If the misfed paper is in the exit area, open the exit area cover carefully.
MISFEED REMOVAL ● Fusing unit tab If the misfed paper is deep in the fusing unit, lift the fusing unit tab and remove any misfed paper. CAUTION The fusing unit is hot. Be sure to touch only the green tab or the green roller rotating knob. 5 Close the exit area cover. 6 Close the front doors. ● Confirm that the misfeed display is cleared.
MISFEED REMOVAL Duplex section 3 Remove the paper on the duplex tray. 4 Open the paper guide under the duplex tray and remove the misfed paper. COPIER TROUBLE? 2 Pull out the duplex section. Misfeed removal Paper guide 62 Downloaded from: http://www.usersmanualguide.
MISFEED REMOVAL 5 6 Close the paper guide and push back the duplex section. ● Close the paper guide securely. ● Push back the duplex section securely into its original position. Close the front doors. ● Confirm that the misfeed display is cleared.
MISFEED REMOVAL TROUBLESHOOTING Always check the message display whenever the copier stops or operation is not possible. The messages will give you easy-to-follow directions. If the messages do not give specific instructions, check the list below. Problem Solution ● Copier plugged in? Plug the copier into a grounded outlet. ● Power switch on? Turn the power switch on. ● Is the message “(REPLACE USED TONER CONTAINER.)” displayed? Toner collecting container is full.
TROUBLESHOOTING MISFEED REMOVAL Problem Solution ● Non-standard paper used? Use standard paper. If using special papers, feed the paper through the manual feed tray. ● Is paper properly installed? See pages 16 and 48. ● Pieces of paper inside copier? Remove all pieces of misfed paper. See page 53. ● Paper curled or damp? Store copy paper flat in the wrapper in a dry location. See page 52. Dust, dirt, smudges appear on copies. ● Document glass or RADF transport belt dirty? Clean regularly.
PART LOCATIONS AND FUNCTIONS Exterior q w er t y u i o !0 !1 !2 !3 !4 !5 !6 !7 !8 !9 q Exit tray (sold separately in some regions) Finished copies are deposited here. w Paper clip tray Place paper clips here. GENERAL INFORMATION e Document feeder indicators Original feed indicator Indicates the originals in the tray will be fed. Original reminder Indicates an original is still on the document glass. r RADF feeding roller cover Open to remove misfed originals.
PART LOCATIONS AND FUNCTIONS Interior @0 @3 @1 @2 @4 @5 @3 Roller rotating knobs Turn as indicated to remove misfed paper. !8 Paper tray 2 Holds 500 sheets of copy paper. @4 Duplex section Duplex copies are inverted here. !9 Paper tray 3 Holds 500 sheets of copy paper. @5 Toner collecting container Used toner is collected here. (Replacement of toner collecting container should only be done by an authorised Sharp service technician.) @0 Fusing unit The fusing area is hot.
PART LOCATIONS AND FUNCTIONS Operation Panel q w e TRANSPARENCY COVERS/ INSERTS INSERTS r MARGIN SHIFT t ERASE y DUAL PAGE COPY u i o !0 AUTO IMAGE READY TO COPY. SORTER SORT ORIGINAL TO COPY 1 REDUCTION ENLARGEMENT 2 1 ORIGINAL 100% (ORIGINALS) A4 EVEN NUMBER LCD contrast control Use the contrast control adjustment to vary the contrast of the message display to best suit the room lighting conditions.
PART LOCATIONS AND FUNCTIONS !1 !2 !3 !5 !4 SCROLL DISPLAY INFORMATION Inch system PROGRAM 1 P 2 3 CLEAR ALL CA INTERRUPT TRAY SELECT ORIGINAL 8 12 x11 START 4 5 6 7 8 9 1. 812 x 11 2. 812 x 14 3. 11 x 17 AUDIT CLEAR 0/ 812x11R AUTO PAPER SELECT C @3 @2 @4 @5 @6 @7 @8 @9 : Two-sided copies from two-sided originals. 1 1 : One-sided copies from two-sided 2 originals. : PRE-COUNT Indicates that the number of ORIGINALS originals will be counted. 2 2 !8 EXPOSURE keys (p.
USER MAINTENANCE The document glass and RADF transport belt must be kept clean to avoid dirty areas from being copied onto the copies. Document glass and RADF transport belt Wipe the document glass and transport belt with a soft, clean cloth. ● GENERAL INFORMATION User maintenance 70 If necessary, dampen the cloth with water. Do not use thinner, benzene, or similar volatile cleaning agents.
MAINTENANCE REQUIRED When the message “READY TO COPY. (MAINTENANCE REQUIRED : )” appears, service by an authorised Sharp Service Technician will be required soon. Contact your Service Centre as soon as possible.
SPECIFICATIONS COPIER GENERAL INFORMATION Specifications 72 Type Console Copy system Dry, electrostatic transfer system Originals Sheets, bound documents Original feed system Reversing automatic document feeder (RADF) Original size Max. A3 (11" x 17") Copy sizes Max. A3 (11" x 17"), min. A6 (5-1/2" x 8-1/2") Image void: Max. 3 mm (1/8") (leading edge) Max. 4 mm (5/32") (trailing edge) Copying speed (at 100% copy ratio) 52 copies/min. (A4, 8-1/2" x 11") 40 copies/min.
SPECIFICATIONS Copier dimensions 750 mm (W) x 660 mm (D) x 1365 mm (H) (29-17/32" (W) x 25-63/64" (D) x 53-3/4" (H)) Operating conditions Temperature: 15°C to 30°C (59°F to 86°F) Humidity: 20% to 85% Optional equipment 20-bin sorter (SF-S16) 20-bin staple sorter (SF-S53N) 20-bin staple sorter (SF-S55N) Large capacity tray (SF-C52/SF-C52N) Card counter (SF-EA11) Auditor (SF-EA12) Counter commander (SF-EA13) Personal counter (SF-71A/71B) Exit tray (sold separately in some regions) REVERSING AUTOMATIC D
MEMO GENERAL INFORMATION 74
OPTIONAL EQUI PM ENT CONTENTS ● ● ● ● Page SYSTEM CONFIGURATION ................................ 76 20-BIN SORTER (SF-S16) .................................. 77 ● Part names ........................................... 77 ● Using the sorter ........................................ 78 ● Sorter capacity ........................................ 79 ● Misfeed removal ....................................... 80 ● Specifications .........................................
SYSTEM CONFIGURATION The options which are available for the SF-2052 are shown below.
20-BIN SORTER (SF-S16) The SF-S16 20-Bin Sorter has two sorter modes for different copying jobs: one sorts copies into sets matching the sequence of the originals and the second groups copies from different originals into separate sort bins. The maximum allowable number of copies varies with the selected mode. The number of copies will be automatically reset to the maximum number allowable for the selected mode when copying begins if this maximum is exceeded.
20-BIN SORTER (SF-S16) Using the sorter SORT GROUP Press the SORTER key to select the desired mode. (The STAPLE SORT mode cannot be selected for the SFS16.) To cancel the mode, press the SORTER key until the SORT, STAPLE SORT, and GROUP indicators all go out.
20-BIN SORTER (SF-S16) SORTER CAPACITY Top bin 100 sheets in the NON-SORT mode Sort bins Up to 50 per bin in the SORT mode Up to 30 per bin in the GROUP mode The limits for the number of originals which can be used and the number of copies that can be set for each paper size are as follows: Mode NONSORT GROUP Min.: A6 (5-1/2" x 8-1/2") Max.: A3 (11" x 17") A4, A4R, B4, A3, 8-1/2" x 11" (8-1/2" x 11", 8-1/2" x 11"R, 8-1/2" x 14", 11" x 17", A4) Max. No. of originals Max. No.
20-BIN SORTER (SF-S16) Misfeed removal A MISFEED HAS OCCURRED. CLEAR INDICATED AREA. PRESS THE KEY FOR RECOVERY INSTRUCTIONS. 20-bin sorter (SF-S16) OPTIONAL EQUIPMENT 80 The copier will stop when a misfeed occurs. The message “A MISFEED HAS OCCURRED. CLEAR INDICATED AREA. PRESS THE KEY FOR RECOVERY INSTRUCTIONS.” will appear with a display of paper misfeed locations. Press the INFORMATION and SCROLL DISPLAY keys for more detailed information as necessary.
20-BIN SORTER (SF-S16) Specifications No. of bins 20 Bin capacity NON-SORT: 100 sheets (top bin) SORT: 50 sheets GROUP: 30 sheets Paper size Top bin: Max. A3 (11" x 17") Min. A6 (5-1/2" x 8-1/2") Sort bins: Max. A3 (11" x 17") Min. A4 (8-1/2" x 11") Power supply Drawn from the copier Weight Approx. 31 kg (68.4 lbs.) Dimensions 500 mm (W) x 520 mm (D) x 883 mm (H) (19-11/16" (W) x 20-31/64" (D) x 34-49/64" (H)) Specifications are subject to change for improvement without notice.
20-BIN STAPLE SORTER (SF-S53N) 20-BIN STAPLE SORTER (SF-S55N) There are two sorter modes for different copying jobs: one sorts copies into sets matching the sequence of the originals and the second groups copies from different originals into separate sort bins. The SF-S53N and the SF-S55N 20-Bin Staple Sorters have, in addition to the above two modes, a STAPLE SORT mode. Sorted copies can be automatically stapled together. The maximum allowable number of copies varies with the selected mode.
20-BIN STAPLE SORTER (SF-S53N)/20-BIN STAPLE SORTER (SF-S55N) Using a staple sorter SORT GROUP Press the SORTER key to select the desired mode. To cancel the mode, press the SORTER key until the SORT, STAPLE SORT and GROUP indicators all go out. SORT 1 2 1 (ORIGINALS) NON-SORT EVEN NUMBER ODD NUMBER STAPLE SORT 2 2 1 2 GROUP SORT 1 PRE-COUNT ORIGINALS 1 2 1 (ORIGINALS) When none of the three sorter modes, SORT, STAPLE SORT or GROUP is selected, the copier is in the NON-SORT mode.
20-BIN STAPLE SORTER (SF-S53N)/20-BIN STAPLE SORTER (SF-S55N) SORTER CAPACITIES SF-S53N Non-sort bin 250 sheets in the NON-SORT mode Bin capacity (max.) A4, A4R, 8-1/2" x 11" (8-1/2" x 11", 8-1/2" x 11"R, A4) B4, A3 (8-1/2" x 14", 11" x 17") Non-sort bin 250 sheets in the NON-SORT mode Sort bins Sort Mode: Sort bins Sort or Staple Sort Mode: Paper size SF-S55N Paper size Bin capacity (max.
20-BIN STAPLE SORTER (SF-S53N)/20-BIN STAPLE SORTER (SF-S55N) Staple sort The STAPLE SORT mode staples copies of A4, A4R, B4, A3, and 8-1/2" x 11" (8-1/2" x 11", 8-1/2" x 11"R, 8-1/2" x 14", 11" x 17", and A4) sizes. For other paper sizes, use the manual stapling mode. See page 88. ● In some regions, 8-1/2" x 11" is indicated as 216 mm x 279 mm and/or 216 mm x 330 mm (8-1/2" x 13") size paper can be used additionally.
20-BIN STAPLE SORTER (SF-S53N)/20-BIN STAPLE SORTER (SF-S55N) Using the document glass 1 Stapling location Set the original on the document glass with the corner to be stapled to the upper right. ● ● ● 1 SORT 2 1 (ORIGINALS) EVEN NUMBER ODD NUMBER STAPLE SORT GROUP 2 2 2 2 1 2 3 4 5 6 7 8 9 Press the SORTER key to select the STAPLE SORT mode. ● Make sure that there is no paper in any sort bin before selecting the STAPLE SORT mode.
20-BIN STAPLE SORTER (SF-S55N) Stapling position adjustment (SF-S55N only) The SF-S55N 20-bin staple sorter has three types of stapling positions. Stapling positions on originals in front view (Selections in the message display) CORNER TWO STAPLE Stapling positions on copies on the sort bins ONE STAPLE A4R A4 A4 A3 B4 A4R A3 B4 CORNER a TWO STAPLE ONE STAPLE A4R A4 A4 A3 B4 A4R A3 B4 The selection can be made as below.
20-BIN STAPLE SORTER (SF-S53N) Manual stapling To use the stapling feature only, without using the STAPLE SORT mode, follow the procedure below. SF-S53N 20-bin staple sorter Copies 1 Align the edges of the copies to be stapled. 2 Place the set of copies into the bin below the non-sort bin, making sure the edges are flush with the inner right corner, as shown in the figure. ● Make sure that there is no paper in the other sort bins. If there is, the manual staple key will not light up.
20-BIN STAPLE SORTER (SF-S55N) SF-S55N 20-bin staple sorter Stapling location TWO STAPLE Copies 1 Align the edges of the copies to be stapled. 2 Place the set of copies into the bin below the non-sort bin, making sure the edges are flush with the inner right corner, as shown in the figure. CORNER POSITION SELECTION HAND-INSERTED 3 ● Make sure that there is no paper in the other sort bins. If there is, the STAPLING START/STOP key will not light up.
20-BIN STAPLE SORTER (SF-S53N) Staple cartridge replacement The message “ADD STAPLES. FOLLOW INSTRUCTIONS INSIDE THE SORTER.” will appear when the staple cartridge is empty. Replace the staple cartridge as follows: SF-S53N 20-bin staple sorter Protector 20-bin staple sorter (SF-S53N) OPTIONAL EQUIPMENT 90 1 Open the stapler cover. 2 Pull the empty staple cartridge up and out to remove it.
20-BIN STAPLE SORTER (SF-S55N) SF-S55N 20-bin staple sorter 1 Open the front cover of the staple sorter. 2 Squeeze the green lever of the grip and hold the grip to pull out the staple unit. 3 Pull the empty staple box up and out to remove it. 4 Push the green button and remove the thick paper from inside the staple box. 5 Insert the new staple cartridge into the box until it clicks in place. Green lever ● Do not remove the staple cartridge unless the message “ADD STAPLES.
20-BIN STAPLE SORTER (SF-S55N) 20-bin staple sorter (SF-S55N) 6 Remove the rear paper and tape from the cartridge. 7 Insert the staple box into the stapler until it clicks in place. 8 Gently push back the staple unit until it clicks. 9 Close the front cover of the staple sorter. OPTIONAL EQUIPMENT 10 92 ● Pull them straight. If they are pulled obliquely, the tape may be torn. Place a sheet of paper into the bin below the non-sort bin.
20-BIN STAPLE SORTER (SF-S53N) Staple jam removal If staples become jammed in the stapler, “REMOVE THE STAPLER AND CHECK IT.” will be displayed. Remove the jammed staples in the manner described below. SF-S53N 20-bin staple sorter Loosen the screw securing the stapler unit. 3 Pull out the stapler unit. 4 Press down and hold the green release lever on top of the stapler unit and slide the green lever on the face of the stapler up to expose the jammed staple.
20-BIN STAPLE SORTER (SF-S53N) Green release lever Green lever 5 Use the tool attached to the inside of the stapler cover to remove jammed staples as shown. 6 Return the green lever on the face of the stapler back down into place. Return the green release lever on top of the stapler unit to its upright position. ● 20-bin staple sorter (SF-S53N) OPTIONAL EQUIPMENT 7 Place the stapler unit back into position. Tighten the stapler unit securing screw. 8 Close the stapler cover and turn on the copier.
20-BIN STAPLE SORTER (SF-S55N) SF-S55N 20-bin staple sorter 1 Open the front cover of the staple sorter. 2 Squeeze the green lever of the grip and hold the grip to pull out the staple unit. 3 Press the green button to unlock the stapler. 4 Unlock the stopper to open the staple cover. 5 Use the tool attached to the inside of the front cover of the staple sorter to remove jammed staples.
20-BIN STAPLE SORTER (SF-S55N) 20-bin staple sorter (SF-S55N) OPTIONAL EQUIPMENT 6 Push down the metal tab to close the staple cover. 7 Gently push back the staple unit until it clicks. 8 Close the front cover of the staple sorter. 9 Following the stapling procedure on page 89, staple a copy to check that the stapler works properly. ● ● 96 Check that the staple cover is locked with the stopper. If it does not, repeat this procedure until it does.
20-BIN STAPLE SORTER (SF-S53N) Misfeed removal A MISFEED HAS OCCURRED. CLEAR INDICATED AREA. PRESS THE KEY FOR RECOVERY INSTRUCTIONS. The copier will stop when a misfeed occurs. The message “A MISFEED HAS OCCURRED. CLEAR INDICATED AREA. PRESS THE KEY FOR RECOVERY INSTRUCTIONS.” will appear with a display of paper misfeed locations. Press the INFORMATION and SCROLL DISPLAY keys for more detailed information as necessary.
20-BIN STAPLE SORTER (SF-S55N) SF-S55N 20-bin staple sorter Paper guide Paper guide 1 Open the front cover of the staple sorter. 2 Lift the top paper guide and remove the misfed paper. 3 Open the paper guides above the staple unit to remove the misfed paper. NOTE: It may not be possible to open the paper guides shown in the figures if paper misfeed occurs when the stapling portion has moved. If so, remove the paper via the bins in accordance with steps 5 and 6 on the next page.
20-BIN STAPLE SORTER (SF-S55N) 4 HAND-INSERTED A4 A3 B4 SORTED A4 5 A3 B4 Close the front cover of the staple sorter. ● Confirm that the misfeed display is cleared. If the message indicating a misfeed is still displayed, remove any remaining misfed paper following the misfeed location indications. ● If any copy is misfed in a sort bin and difficult to remove, proceed to the next step.
20-BIN STAPLE SORTER (SF-S53N)/20-BIN STAPLE SORTER (SF-S55N) Specifications SF-S53N No. of bins 21 (Non-sort bin + 20 sort bins) Bin capacity NON-SORT: 250 sheets for non-sort bin SORT/STAPLE SORT: 50 sheets (A4, A4R, and 8-1/2" x 11" (8-1/2" x 11", 8-1/2" x 11"R, and A4)) 25 sheets (B4 and A3 (8-1/2" x 14" and 11" x 17")) GROUP: 30 sheets (A4 and 8-1/2" x 11" (8-1/2" x 11" and A4)) 25 sheets (A4R, B4, and A3 (8-1/2" x 11"R, 8-1/2" x 14", and 11" x 17")) Paper size Non-sort bin: Max. Min.
LARGE CAPACITY TRAY (SF-C52/SF-C52N) The large capacity tray provides the convenience of increased paper capacity for this copier. This tray holds 3,000 sheets of A4 (8-1/2" x 11") sized paper. PART NAMES Paper tray release button Paper tray release button lamp Large capacity tray (SF-C52/SF-C52N) Specifications A4 (8-1/2" x 11") Paper weight 52 to 80 g/m2 (14 lbs. to 21 lbs.) Paper capacity 3,000 sheets Weight Approx. 25 kg (55.2 lbs.
LARGE CAPACITY TRAY (SF-C52/SF-C52N) Loading copy paper The large capacity tray will automatically lower when the tray runs out of paper. 1 Press the release button on the large capacity tray. 2 When the release button lamp goes out, pull out the paper tray. ● ● Large capacity tray (SF-C52/SF-C52N) Maximum height line Do not pull out the paper tray before the release button lamp goes out. 3 Fan the copy paper. 4 Load it onto the feed table.
LARGE CAPACITY TRAY (SF-C52/SF-C52N) Misfeed removal The copier will stop when a misfeed occurs. The message “A MISFEED HAS OCCURRED. CLEAR KEY FOR RECOVERY INDICATED AREA. PRESS THE INSTRUCTIONS.” will appear with a display of paper misfeed locations. Press the INFORMATION and SCROLL DISPLAY keys for more detailed information as necessary. A MISFEED HAS OCCURRED. CLEAR INDICATED AREA. PRESS THE KEY FOR RECOVERY INSTRUCTIONS.
LARGE CAPACITY TRAY (SF-C52/SF-C52N) 4 Pull out the large capacity tray and remove the misfed paper. ● Large capacity tray (SF-C52/SF-C52N) OPTIONAL EQUIPMENT 104 When pulling out the large capacity tray, be sure to pull it out after the release button lamp goes out. 5 Gently push back the large capacity tray. 6 Open the right front door of the copier and then close it to cancel the misfeed display.
KEY OPERATOR PROGRAMS KEY OPERATOR’S GUIDE This KEY OPERATOR’S GUIDE section contains information on all of the programs used by the key operator. The programs allow the key operator to tailor many functions of the SF-2052 for specific modes of operation. These programs can only be accessed after a key operator code number has been entered. Please familiarise yourself with this section and refer to it for the information you need to keep the SF-2052 operating smoothly.
KEY OPERATOR PROGRAMS KEY OPERATOR CODE NUMBER (P19) A key operator code number must be registered before a key operator program can be used. The key operator must remember this number. Only this registered number will allow access to the key operator programs. Registering the key operator code number AUDIT CLEAR 0/ C INTERRUPT 1 Press the clear ( clear key again. ● ) key, the INTERRUPT key, and the The following message will appear. ENTER KEY OPERATOR CODE.
KEY OPERATOR PROGRAMS KEY OPERATOR PROGRAMS A complete list of all key operator programs is provided below. These programs can only be accessed by first entering the key operator code number. If an optional Card Counter (SF-EA11) or Auditor (SF-EA12) is installed, key operator programs 10, 11, 13, 14, 16 and 18 cannot be accessed by way of the copier keys. In this case, settings for auditing programs must be selected by using an optional Counter Commander (SF-EA13).
KEY OPERATOR PROGRAMS Program Code No. Key operator programs 108 Page No. Program Name Function P27 Erase Width Adjustment Sets the amount of the erase area. 118 P28 Initial Status Setting Sets the copier’s initial settings in the ready condition. 119 P29 Total Copy Count Recalls the total copy counts of the copier, document feeder, duplex section, and staple sorter.
KEY OPERATOR PROGRAMS Program Code No. Page No. Program Name Function P72 Prohibiting of Manual Feed Tray in Duplex Copy Prohibits the use of the manual feed tray during duplex copying. 124 P73 Disabling Deletion of Job Programs Prevents stored programs from being replaced or deleted. 125 P74 Disabling of Document Feeder Prevents the use of the document feeder when it malfunctions.
KEY OPERATOR PROGRAMS Using the key operator programs 1 AUDIT CLEAR 0/ C Press the clear ( clear key again. ● INTERRUPT 1 2 3 4 5 6 7 8 9 ) key, the INTERRUPT key, and the The following message will appear. ENTER KEY OPERATOR CODE. ––––– 2 Enter the key operator code number. 3 Enter the desired 2-digit program code number and press the START key. ● The dashes in the message will change to asterisks.
KEY OPERATOR PROGRAMS P10 Auditing Mode Program P10 is used to enable or disable the basic auditing mode of operation. When disabled, the message in the display will be “READY TO COPY.” Access to copying is open to any operator. When enabled, the message in the display will be “ENTER YOUR ACCOUNT NUMBER. -----”. Copying in this state is limited to operators with an assigned 5-digit account number. A maximum of 50, 5-digit account numbers can be assigned.
KEY OPERATOR PROGRAMS To reset all accounts Press key 1. To reset a single account 1. Press key 2. ● The following message will appear. P13: RESETTING ACCOUNT. INPUT ACCOUNT NUMBER TO BE RESET AND PRESS THE START KEY. ––––– 2. Enter the account number to be reset. 3. Press the START key. 4. Continue with steps 2 and 3 for other account numbers. Press the PROGRAM key to exit the program.
KEY OPERATOR PROGRAMS To delete accounts 1. Press key 2. ● The following message will appear. P14: ACCOUNT NUMBER CONTROL. DELETE ACCOUNT #: 1.ALL ACCOUNTS 2.INDIVIDUAL ACCOUNT 2. To delete all accounts, press key 1. (A message will appear to confirm the selection. Press key 1 to clear all accounts. If you decide not to clear all accounts, press key 2.) To delete an individual account, press key 2 when the message in step 1 is displayed and follow the message instructions. P14: ACCOUNT NUMBER CONTROL.
KEY OPERATOR PROGRAMS To display all registered account numbers 1. Press key 4. ● The following message will appear. P14: ACCOUNT NUMBER CONTROL. ACCOUNT NUMBER DISPLAY (PAGE 1) TO SEE PAGE 2: PRESS THE KEY. 2. If you want to see the next display, press the SCROLL DISPLAY key. Press the PROGRAM key to exit the program. P16 Account Limit Setting Program P16 is used to set the maximum number of copies which can be made against a registered account number.
KEY OPERATOR PROGRAMS To cancel a limit 1. Press key 2. ● The following message will appear. P16: ACCOUNT LIMIT SETTING. CANCEL LIMITS: 1.ALL ACCOUNTS 2.INDIVIDUAL ACCOUNT 2. Press key 2 again. ● The following message will appear. P16: ACCOUNT LIMIT SETTING. ACCOUNT NUMBER. ––––– PRESS THE START KEY TO CANCEL LIMIT. 3. Enter the account number for which the limit is to be cancelled. 4. Press the START key. 5. To cancel other account limits, repeat steps 3 and 4.
KEY OPERATOR PROGRAMS P20 Auto Exposure Adjust Use P20 to lighten or darken copies in the automatic exposure mode. The factory setting is “NORMAL.” When P20 is entered, the following message will appear. P20: AUTO EXPOSURE ADJUST. 1.LIGHTEST 2.LIGHTER 4.DARKER 5.DARKEST 3.NORMAL Select the desired exposure level using the 10-key pad.
KEY OPERATOR PROGRAMS P23 Auto Clear Setting Use P23 to set the time interval to return the copier to the initial settings after the last copy of a run has been completed. The time can be set from 10 to 240 seconds in 10 second increments. When P23 is entered, the following message will appear. P23: AUTO CLEAR SETTING. SET THE TIME FOR AUTO CLEAR (10 TO 240 SECONDS, 0:CANCEL). PRESS THE START KEY AFTER ENTRY. ––0 1. Set the desired time interval using the 10–key pad.
KEY OPERATOR PROGRAMS P26 Initial Margin Shift Setting Set the initial margin shift value with this program. When P26 is entered, the following message will appear. For inch system machines, the margin shift values are: AMOUNT PRESS 0 1 1/8" 2 1/4" 3 3/8" 4 1/2" 5 5/8" 6 P26: INITIAL MARGIN SHIFT SETTING.
KEY OPERATOR PROGRAMS P28 Initial Status Setting The copier will assume the initial settings when it is turned on, when the CLEAR ALL key is pressed, or when the auto clear interval has elapsed after a copy run. Use P28 to establish the initial settings. When P28 is entered, the following message will appear. P28: INITIAL STATUS SETTING. PROGRAM DESIRED INITIAL STATUS AND PRESS THE START KEY. To establish new initial settings The functions indicated below can be set.
KEY OPERATOR PROGRAMS P31 Preheat Mode Setting Preheat mode is a function to control the power consumption by lowering the temperature of the fusing unit to a programmed level once a programmed length of time has elapsed without any copier operation after the last copy of a run is made or power is turned on. This function lowers user’s electricity bill, reduces waste of natural resources, and cuts down on environmental pollution.
KEY OPERATOR PROGRAMS P44 Restrict Storage of Inserts in Job Program Memory Program P44 is used to prevent insert pages from being stored in job memory. When P44 is entered, the following message will appear. P44: RESTRICT STORAGE OF INSERTS IN JOB PROGRAM MEMORY. 1.YES 2.NO To disable storing insert pages, press key 1. To enable storing insert pages, press key 2.
KEY OPERATOR PROGRAMS P47 Stream Feeding Mode Program P47 is used to enable the stream feeding mode of the document feeder. When the stream feeding mode is enabled, additional originals which are set in the document feeder tray within 5 seconds after the previous original was fed will be fed and copied automatically. When P47 is entered, the following message will appear. P47: STREAM FEEDING MODE (DOCUMENT FEEDER). 1.YES 2.NO To enable the stream feeding mode, press key 1.
KEY OPERATOR PROGRAMS P51 Auto Front Access Mode Setting Program P51 is used to enable or disable the automatic front access mode for each of the SORT, STAPLE SORT, and GROUP modes when an optional 20-bin staple sorter (SF-S55N) is installed. If this mode is enabled and A4 or 8-1/2" x 11" paper is used, the copies delivered into the sort bins will automatically move toward the front side of the staple sorter after copying is completed, so that copies can be easily taken out.
KEY OPERATOR PROGRAMS P70 Disabling of Auto Paper Selection Program P70 is used to prevent automatic paper selection. When disabled, the copier will not automatically select a paper tray containing paper that matches the size of the originals placed in the document feeder or on the document glass. When P70 is entered, the following message will appear. P70: DISABLING OF AUTO PAPER SELECTION. 1.YES 2.NO To disable auto paper selection, press key 1. To restore auto paper selection, press key 2.
KEY OPERATOR PROGRAMS P73 Disabling Deletion of Job Programs Program P73 is used to prevent stored programs from being replaced or deleted. When P73 is entered, the following message will appear. P73: DISABLING DELETION OF JOB PROGRAMS. 1.YES 2.NO To prevent job programs stored in memory from being replaced or deleted, press key 1. To allow replacement/deletion, press key 2. P74 Disabling of Document Feeder Program P74 is used to prevent the use of the document feeder when it malfunctions.
KEY OPERATOR PROGRAMS P76 Disabling of Stapler Program P76 is used to enable or disable the stapler of an optional staple sorter. If the stapler malfunctions, it can be disabled to prevent further malfunction or possible damage to the stapler until it is serviced. When P76 is entered, the following message will appear. P76: DISABLING OF STAPLER. 1.YES 2.NO To disable the stapler, press key 1. To enable the stapler, press key 2.
KEY OPERATOR PROGRAMS P90 Display the List of All P Codes Program P90 is used to sequentially display all programs. The programs in which the setting has been changed from the factory default setting are indicated with ●. When P90 is entered, the following message will appear. P90: DISPLAY THE LIST OF ALL P CODES. TO SCROLL DISPLAY: PRESS KEY. TO RUN AN INDICATED PROGRAM: PRESS START. ● P10:AUDITING MODE. P11:NUMBER OF COPIES PER ACCOUNT. P13:RESETTING ACCOUNT. P14:ACCOUNT NUMBER CONTROL.
KEY OPERATOR PROGRAMS KEY OPERATOR ASSISTANCE CALL When the copier is in need of service or care not usually performed by general users, the copier will stop and one of the following messages listed below will appear. Some messages will appear with “PLEASE SEE YOUR KEY OPERATOR FOR ASSISTANCE.”. Message Remedy REMOVE THE STAPLER AND CHECK IT. See page 93 for staple jam removal. If the trouble cannot be easily remedied, use key operator program P76 to prevent the use of the stapler.
KEY OPERATOR PROGRAMS ✂ KEY OPERATOR CODE NUMBER: FACTORY SETTING The following is the factory setting of the Key Operator Code Number, which must be used to access the Key Operator Program. Factory setting = 00000 This number must be entered when accessing the Key Operator Program for the first time. (See page 106.) NOTE: The Key Operator Code Number is an important security number allowing the Key Operator to configure the copier’s functions and auditor’s settings.
MEMO
MEMO
SF-2052 SHARP CORPORATION PRINTED IN JAPAN 97J KS➀ TINSE1595FCZZ