AR5 In some areas, the “POWER" switch positions are marked "1” and * on the copier instead of “ON” and “OFF”. The symbol. (1) " denotes the copier is not completely DE-energized but in a stand-by condition at this “POWER’ switch position. 1f your pacier is so marked, please read “1"" for "ON" and “for CAUTION: For a complete electrical disconnection, pull out the mains plug.
INTRODUCTION r Welcome to the world of the SF-756. This manual provides instructions for installation, operation, and customer maintenance of the SF-755 copier. Before using your copier, please read these instructions carefully to understand its proper use and care, You may also want to consult this manual from time to time, so please keep the manual close at hand. CONTESTS PRECAUTIONS 1. Proper Care for Installation , . 2, Proper Care for Handling .. .. I, NAMES AND FUNCTIONS OF VARIOUS PARTS .. W.
[ PRECAUTIONS PROPER CARE FOR INSTALLATION 1. Avoid installing your copier in areas that are: o damp and humid, e exposed to direct sunlight, e dusty, * subject to rapid temperature or humidity changes {such as near an air conditioner or heater). 2, Place the copier on a firm, horizontal base. 3. Keep the left hand side and rear of the copier about 10 cm {4 inches) from walls, ete. These clearances are necessary for the internal cooling fan to properly function, 4.
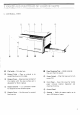
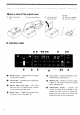
Clip elder — Put clips here. Original Table — Place an original o be copied face down on this table. Original Cover — Ensures proper contact of the original with the glass surface and is adjustable for thick originals. Original St ocker — ls a convenient holder for originals or even finished copies. Cassette Cover — Use this cover for manual feed copying S o~ e Copy Receiving Tray — Holds copies as they exit from the cooler. Power Switch — Flip this lever up to turn power ON.
@ How to take off the original cover Put back {1) Open by horizontal {2} Unlock cover holders. {3) Lift up and back in @ Reinsert in receptacle, rife, order to remove, @ Lock cover holders, B CONTROL PANEL *@ Repeat Lamp — Indicates that the repeat @ Toner Lamp — Indicates insufficient toner. key has been activated. Replenish toner, {See Page 15.) Pause Lamp — Indicates that the pause key @ Misdeed Lamp — Flashes to indicate a paper has been activated, misdeed in the copier.
@ Power Save Button — Pressing this button will put the equipment in the power save mode, resulting in reduced power consumption, Upon depression of the button again, the power save made is released to illuminate the print bunion in about 20 seconds, indicating the copier is ready. However, this function does not work when the alphanumeric display indicates any number other than 0 or when the pause, repeat or misdeed Jap is on. Standby: 0.
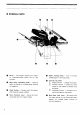
B INTERNAL PARTS Drum — The image is formed on a master {a photo conductive sheet) set on this cylinder, Main Body Open/Shut Slide — Used to pane the copier for misdeed paper removal or inspection. Reset Button — Always push this button after clearing a paper misdeed. Drum Rotation Lever — Using this lever, rotate the drum for master change.
[T} c » Papers acceptable for cassette feeding: Normal bond paper (plain paper) within the sizes of papers: A5 to B4 x to 8-% x 14”). {(Use the manual feed by-pass for papers other than the above. Using the cassette for such paper can cause a paper misdeed} » Use the manual feed by-pass for 2-sided copying. (Using the cassette for such a purpose can cause a paper misdeed) brew Switch | Cassette Cover 1. Turn the power switch on. Flip the lever up to switch ON.
+ How to Position the Original Position the original according to its size, illustrated in the figure at the left. NOTE: An area of the original corresponding to the colored area in the figure at the lee will not be copied. The shaded portion on the scale indicates the width of this void area. VAT 111 shagged Dietitian 1 4.
[B] MANUAL BY-APSE CC e (] Use the manual feed by-pass when making copies on the following types of papers: * Special papers (overhead projector film, label paper, tracing paper) « When copies are produced on both sides of paper, NOTE: A4 (8% x 11“) size is the maximum for paper from 104 to 128 g/m* (28 to 341bs) Cassette Cover Load the AG (41" x 5.8”) and BB (5" x 7.2") size paper in the equipment in the longitudinal direction, 1. Turn the power switch on. 2. Place the original on the original table. 3.
(3] COPYING ONTO CATALOG CARDS When copying on a catalog card, the entire original can be copied. In this case, however, the original setting and paper insertion methods differ, and caution must be observed. * How to set the original: Properly set the original in the position indicated on the original table scale, as illustrated, Stopper plate * How to insert the copy paper: Securely insert the paper along the catalog card guide _.
EXPURGATION |G Use the (&1 (Repeat) key when the same number of copies are desired for different originals. Whiskey eliminates the need for continuous multi copy settings whenever the original is replaced with another, On completion of a multi copying cycle, the same multi copy setting is automatically set again, Example: You want 10 copies each for originals [X] [ and . Place original Set number of copies, :] Press repeat key. :I Press print button. -~ 10 copies produced. :] Repeat these steps .
O 23 [ Moo PAUSE FUNCTION T Use the [:7] (Pause) key when you want to copy another original during a multi copying cycle. This key temporarily interrupts the multi copying cycle and allows for multi copying of another o Example: ]:Place originate [X] . rpm gram number of copes, L[for example, 50] Press print button, be produced is displayed. Crass pause key to interrupt current multi
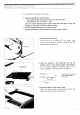
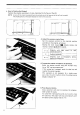
When the cassette runs out of paper and is empty, o additional copying can be performed. Replenish the paper according to the following procedures. NOTE: ® Do not use sheets that are curled or folded, or paper misdeed will result. ® When the cooler is not to be used for a long time, remove the cassette from the copier and store. ( Cassette Size Change-over Method ) There are two kinds of cassettes shown in the illustration below.
Hook Cassette Cover 2. Fan the sheets of paper well, Take about 280 sheets of paper out of the paper package and fan them vertically and horizontally 2 or 3 times, 3. Load the cassette with the paper. First push the sheets against the rear end of the cassette (in the direction of the arrow mark @) Next, lightly press down the corners of the sheets and put them underneath the hooks {arrow marks NOTE: Be sure 0 place both corners of the sheets underneath the cassette hooks, or a paper misfiled will result, 4.
» = ) REPLENISHMENT OF TONER o, The s+ [Toner) lamp when flashing, indicates that the amount of toner in the toner box is insufficient, Replenish the toner in accordance with the procedure given below, NOTE: & Always uss toner designated for this copier. & The toner lamp will remain flashing for some time after the toner has been replenished. It will automatically turn off when the toner is mixed into the developer and reaches the required density, 1.
V HOW TO REMOVE MISSED PAPER In the event of a paper misdeed, the 3’\' {Misdeed} lamp on the control panel will flash and the copier will stop automatically. If this occurs, remove the misdeed paper inside the copier in accordance with one of the procedures given below, Transport and Fusing Paper Feed-Ln Ara, Area, Procedure A Procedure B B PROPER CARE FOR MISSED PAPER REMOVAL e The fusing area Is hot; exercise care when checking in this area.
) Main body lock lever — NG EARL (A) 1. Open the machine’s main body. For this purpose, first move the platen cover to the extreme right and depress the main body open /shut slide. The lock is disengaged and the upper part of the main body can be opened upward. 2. Remove the missed paper. When removing the missed paper, exercise care so as not to stain or damage the master and corona wires, # Fusing Area If the paper is in the fusing area, turn the roller knob clockwise.
B PAPER MISDEED IN PAPER FEED-IN AREA Remove the cassette. Lift the back of the cassette a little and gently pull the cassette away from the copier. 2. Remove the missed paper Carefully remove the paper without tearing it. 3. Press the reset button and close the front panel.
S — A CHANGE When the [ {Master} damp on the control panel is turned on, it may be time to change the master {a photo conductive sheet). To get clean, sharp copies, change the master in accordance with the procedure given below. NOTE: Hold the maser only at the shaded areas shown in the figure atl right. Fingerprints or scratches on the photo conductive surface deteriorate the performance of the master. Photo conductive Surface [colored) Aoy 1, Turn off the power and open up the copier.
4. Take out the master, Disengage the master’s lead edge (plain holes without grommet) from the two pins on the master clamp, then, holding the master’s tail edge {grommet ed holes), gently pull the master. 5. Slightly rotate the drum until the tip of the master lever is positioned as indicated by the arrow on the label. Then secure the lead edge of the new master in place.
O —— 1 T —— Y CARE Your copier must be cleaned as follows from time to time, so that you will always get clean, sharp copies. L CLEANLY ORIGINALITY Always keep the glass surface of the original table and the original cover clean, or stains on them may be copied. — « Wipe with a clean, soft cloth, e |f stains are hard to remove, clean them with a cloth slightly dampened with water or alcohol, NOTE: NEVER use benzine, paint thinner or similar solvents ta clean your copier.
22 B CLEANING OF THE CORONA WIRE #1 When the corona wire becomes dirty, white or black streaks may appear in the image or uneven copy tone will result. NOTE: ® The coronas operate at high voltage, As a safety precaution, always turn off the power switch before cleaning the corona. ® Be sure to insert the corona afl the way into the copier when replacing it after ¢leaning, 1. Open the front panel and pull out the [ charge corona. 2.
if a malfunction is noted, please check your copier in accordance with the following table: Trouble Check/Remedy Refer to Page: Copier has no power Is power cord properly connected to outlet ? * s power turned on 7 Page 7 Power is on, but copying ® Copying is not possible until about 1 Page 7 is not possible minute {warming up period) after initial power an, * Make sure that the cassette is set in Page 7 the machine. Also examine if any paper is in the cassette.
T IX DETERMINING TOTAL NUMBER OF COPIES PRODUCED As long as the (Read-out) key is depressed, a complete total copy display cycle is repeated on the alphanumeric display. One natal copy display cycle consists of thees successive 2-digit display steps, from the most significant digits to the least significant digits. The time interval between every twa cycles is longer than between display steps to distinguish one cycle from another. Example: (Fern Display {Second ) (Third Disputably‘ \Step / \Display Step, \
SF-755's supplies include paper, toner, photo conductive masters, and developer. Please be sure to use supplies designated for the SF-755. L0 HOW TG STORE CUPFUL 1. Do not store the supplies in a place that is: e Damp * Dusty o Exposed io direct sunlight » Hot or extremely cold 2. Do not store the paper in an upright position but horizontally. 3. The remaining sheets of paper should be kept in the wrapper and resealed.
26 e XII SPECIFICATIONS Type: Copying System: Kinds of Originals: Original Sizes: Copy Sizes: Copying Speed: Paper Feed: Multi copy: Light Scarce: Power Source: Power Consumption: Outside Dimensions: Weight: Accessories: Desk-top, Dry, electrostatic transfer method. Sheets, books, 3-dimensional objects. B4 (10" x 14”] max. B4 (107 x 14"} max. Catalog Card Size (75 x 125mm) [3" x 5] min, 10 copies/min. {each size) Automatic feed by cassette {(holds 250 sheets), and manual by-pass.