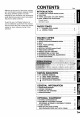
Welcome to the world of two-color copying with the $F-8400 modular designed copier. The Sharp SF-8400 system has been designed to give maximum copy productivity while offering convenient color and editing features for added creativity. To get full use of all Copier features, be sure to familiarize yourself with this manual and the Copley. Be sure to keep this manual nearby for quick reference during Copier operation. CONTENTS INTRODUCTION ® A WORD ON COPIER INSTALLATION . .
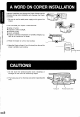
A WORD ON COPIER INSTALLATION Improper installation may damage the Copier. Please note the following during initial installation and whenever the Copier is moved. 1. Be sure to use the rated power supply and 1o ground the Copier. ilia ¥kl y e lel SR Do not install your Copley in areas that are: damp or humid, exposed to direct sunlight, extremely dusty, poorly ventilated, subject to extreme temperature or humidity changes, e.g. near an air conditioner or heater. lessee 3.
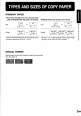
ORDINARY PAPER ® Automatic Feeding From the Cassette, Paper Tray or Manual Feed Tray (max. 50 sheets}) ® Manual Feed Tray (single sheet feed) Size 7 Size “» 17 %474 8127 x11** NS x seed Dos Jo sass pue sad AL . 56 gim? 80 gim? . 52 gfm? 104 g/m? 128 g/m? Weight dibs. Weight 14 1bs. 28 1bs. [ 34 1bs, *With the manual feed tray, the minimum paper size for *A4 x 11%) is the maximum size for paper weigh automatic feeding is A5 x ing from 104 to 128 g/m? (28 to 34 Ibsen.
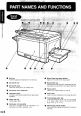
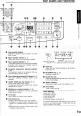
SOJOURN} PUE DRAMBUIE, Exit tray Finished copies are deposited in the exit tray. Document tray Document glass Place the document to be cooled here. Document cover (optional} Operation panel Al copier controls are located here for easy copier operation, Paper clip tray Voids paper clips. Developer unit assembly Pull out to change the toner cartridge or to exchange the color developer units. Manual feed tray paper guides Adjust to the width of the copy paper.
PART NAMES AND FUNCTIONS Lila ity lilo AR} SUZHOU) PUE SEUSS Ugy @ Handles @ Roller rotating knobs Turn to remove missed paper. (® Side paper cassette Holds 500 sheets of paper. @ Transport lever Turn o open the transport section. @ Photo conductive drum Copy images are formed on the photo conductive & Toner collecting container cum. Used toner is collected sere. Replace when the indicator blinks. @ Corona unit The unit is used to charge the photo conductive Accessories drum. Paper casserole. tray .
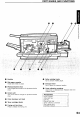
Operation panel EDITING SINHALESE 10 RED MARKED ™ BUTLER ORIGINAL Al [ORIGINALS] Ernst OUTSIDE | whomever NUMERATE ALTO = [ ERASE INSIDE | Olmec NUMBER = MANUAL ACCENT COLOR DUPLEX INSIDE MARKS | DUPLEX 3 = [ OUTSIDE MARKS | ~mm; EX B HIGHLIGHT AREA MARKER ELSE MARKED| EXPOSURE EDGE ERASE SORTER key and indicators (p. 52) Use to sequentially select the sorter dames when a sorer is installed. (Sorter is optional ) AREA MARKED key and indicators (p.
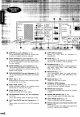
PART NAMES AND FUNCTIONS D VIRGINAL SIZE PAPER} Size 84X 81pXEy: |mm -l @HX 116 EXTRA_ INTERRUPT ‘Nj\LSlZE PAPER} SIZE P e CLEAR ALL \:fig:g READY EXTRA = 71819 = AUTO w Miskito MAGE SZE '_J ?‘J P wer | |oomwe | (040 Copy quantity display Displays the specified copy quantity or the total copy number ® Paper required indicator {p. 8) Lights when there is no copy paper installed. @ Toner required Indicator (p. 10) This indicator will blink when a back goner cartridge is needed.
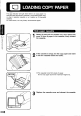
LOADING COPY PAPER ; ' The @ indicator will light when there is no copy paper in a selected paper feed station (cassette or front-loading paper tray}, or when a selected cassette is not installed or is improperly installed. For best results, use only Sharp recommended paper. Side paper cassette Gently lift and pule the cassette out, then remove the cover. [f there is paper in the cassette, firmly reinsert the cassette.
~ Paper size indicator LOADING COPY PAPER 2 3 5 Gently lift and draw out the front-loading paper tray. If there is paper in the tray, firmly reinsert the tray. if the tray is empty, push the pressure plate until it locks into position. Fan the copy paper and insert it into the tray below the hooks. ® The tray holds 250 sheets of paper. Do ot goad paper above the maximum height fine. To load with different size paper, squeeze and slide the two width adjustment plates.
HINOLHIdYd Jag) Bumpy s IR O The S indicator will blink when a black toner cartridge is needed. (During multiple copying, the; ; indicator will light up about 20 copies before it begins to blink.) if the COLOR TONER indicator is also fit, color toner is needed. The Copier will stop after the copy run in progress has been competed. Be sure to supply toner only when the toner required indicator blinks.
ADDING TONER A Check that the COLOR TONER indicator is lit. BIZ e ’ 2 Pull out the developer unit assembly. COLD TONER O/ 3 Open the color toner hopper cover. i Joule} GUPPY shake it four or five times. Match the tabs on the toner hopper edge with the holes of the color toner cartridge, and snap the color toner cartridge into place. 4 Hold the new color toner cartridge horizontally and @ Be sure to add the same color of toner. Do not mix tons colors.
NORMAL COPYING 1 First turn the power switch on. # |t will take about two minutes for the Rapier to warm up. After warm-up, the READY indicator will light, indicating that copying is possible. Place an original face down on the document glass. Align the original with the original size scale and close the document cover. Builds Pusan ® The ORIGINAL SIZE indicator for the detected original size will . ORIGINAL SIZE PAPER SIZE light. E[m] A3 -] A4l v madwoman EXTRA |= AUTO = Select the desired paper size.
AUTO/MANUAL e Ao E COLOR TONER /¢ 4 5 NORMAL COPYING Adjust the copy density. & Copy density adjustment is not required for most originals in the automatic exposure mode. See page 24 to adjust the automatic exposure level. ® For manual copy density adjustment, press the AUTO/MANUAL/PHOTO key and adjust with the LIGHT and DARK keys as desired. For photographs, select PHOTO and then adjust with the LIGHT and DARK keys as desired. Set the copy number. ® A single copy can be made with the initial sifting, i.e.
REDUCTION/ENLARGEMENT/ZOOM Reduction and enlargement ratios can be selected either automatically with the AUTO IMAGE key or manually with the reduction key, enlargement key, or the ZOOM keys. The zoom function enables precise copy ratio selection from 50% to 200%, Set the original on the document glass and close the document cover. Press the PAPER SIZE SELECT key to select the desired e = paper size. EXTRA IMA Press the AUTO IMAGE SIZE key.
REDUCTION/ENLARGEMENT/ZOOM Set the original on the document glass and case the document cover. Press the reduction key, enlargement key, or ZOOM keys to select the desired copy ratio. A. Preset reduction ratios are: AB Inches Preset enlargement ratios are: _AB_ Inches 115% 121% E 122 129 = 141 141 5 200 200 8 @ [f the copy ratio indicator blinks, the selected copy ratio is too % large for the copy paper size. However, if you press the print o button, a copy will be made. C.
Hus The SHIFT feature automatically shifts the text on the copy to increase the left margin by approximately 10 mm allowing more room for binding. | SUPPLE TO DUPLEX [ORIGINAL) e Eve N NUMBED | W (822 e Q2 UMBER ["DUPLEX TO == DUPLEX == SIMPLEX SIMPLEX TO EXPOS -AUTO -MANIA -PHOTO Book ¥ 16 Margin is mace near. 1 Set the original on the document glass. 2 Press the SHIFT key. Normal SHIFT copying The margin on the let side of the copy will increase.
ARt e e CURLER {ORIGINALS) b= 00D NUMBER DUPLEX 70 DUREX SIMPLE X SIMPLEX TO HAY OVERLAY =EVEN NUMBER =PHOTO DUAL PAGE COPY produces individual copies of two documents placed side by side on the document glass. It is especially useful when copying books and other bound documents and can be used with the margin SHIFT feature. This function operates only when A4 x 11") copy paper is used. Place the originals on the document glass with the center of the two pages aligned with the paper size index (A4 or £ ).
pod [ w casein Sb EDGE ERASE 4, The shaded area i3 erased. =PHOTO AUTOMATON PHOTO ) The EDGE ERASE feature will erase dark areas from the copy edges for a neater, cleaner copy. It is specially useful when copying thick documents which might create shadow fines at their edges. 1 Place the original on the document glass. 2 Press the EDGE ERASE key. 3 Set the copy number.
'SPECIAL PAPERS (manual feed) The manual feed tray is used to copy onto OHP transparencies, labels, tracing paper, and other special purpose papers. The manual feed tray is automatically selected when paper is placed on it. The paper size is also detected, INTERRUPT (1 ]2]s F=]) AR ALL [(4T5T6 ] READY (7T8]9 Set the manual feed tray guides to the copy paper width. Insert the copy paper all the way into the manual feed tray.
TWO-SIDED COPYING Two-sided copies can be made on the SF-8400 using the manual feed tray. 4 "\ Place the first original on the document glass and make a copy. ® The first side of the copy can be made using any of the paper fad stations. i $31d0D ONION Replace the first original with the second original. ® Make sure the first and second originals are oriented the same way on the document glass. Bushido paps-OmL Turn the first copy over side to side and place it on the manual feed tray.
SINGLE COLOR COPYING Sharp color copy kits and color developer units {sold separately) can be installed o copy one color at a time. Multiple colors can be copied onto the same page by changing the color developer units. For automatic two-color copying, see COLOR EDITING. Install the desired color developer unit. ® See the next page. Press the COLOR TONER key. # The COLOR TONER indicator on the operation panel will fight. Set the original, select the desired Copier functions, and press the print button.
SINGLE COLOR COPYING Replacing the color developer unit 1 Pull out the developer unit assembly. Lift and remove the color developer unit. Bulldogs Joaquin graffiti 3 Install the new color developer unit into place. 4 Push the developer unit assembly back into place.
INTERRUPTING A COPY RUN INTERRUPT is used fo interrupt a long copy run so that another job can be done. INTERRUPT does not function during overlay, duplex or coloratura copying. Also note that overlay, duplex and two-color copies cannot be made during the INTERRUPT mode. Press the INTERRUPT key. When the Copier stops, set the new original. Select the desired Copier functions. Set the copy number. Press the print button.
AUTOMATIC EXPOSURE ADJUSTMENT The automatic exposure level can be adjusted 1o suit your copying needs. AUTO ANNUAL BOTCH 1 Check that the Copier is in the AUTO exposure mode. L= Enroll ) /1 2 Q Open the front cover. 3 seconds. juniper insole onerously 3 Press the AUTO/MANUAL/PHOTO key for approximately =MANUAL 5 photo EXPOSURE indicator will light. 2 Press the LIGHT or DARK key to lighten or darken the automatic exposure level, RUTO/MANUAL PHOTO = [ Close the grant cover.
This mode reduces toner consumption, increasing cost effectiveness, with only a slight loss in copy density. Follow the procedure below for setting the toning level. AUTO MANUAL PHOTO e RUTO/MANUAL — PHOTO Press the AUTO/MANUAL/PHOTQO key to select the PHOTO mode. 2 Open the front cover. 3 Press the AUTO/MANUAL/PHOTOQ key for approximately 3 seconds. ® The “3” EXPOSURE indicator will light.
COLOR EDITING The SF-8400 has two developer units, black and red, as standard equipment, and a red-color detection feature ta allow a range of copy editing. The red developer unit can be replaced with optional color developer units in blue, brown, or green. The editing features are controlled by red marks applied to the originals to be edited. The SF-8400 reads the red marks and will erase either inside or outside the red marks as selected on the operation panel.
COLOR EDITING When an optional duplex unit is installed, the editing features are expanded to include accent color copying and highlight color copying. The SF-8400 uses the duplex unit to automatically provide two copying operations for a single marked original — one for the black portion of the copy and one for the accented or highlighted portion of the copy.
LIGATION Bugging nose) FY(2] COLOR EDITING mim (13164”) i, (3647 | min, (13/64") ¢ min. 28 n MARKING THE EDITING AREAS The editing areas can be marked in one of two ways: AREA MARKED and EDGE MARKED. Read the instructions below to obtain a properly edited copy. Notes on the originals to be used The following types of originals may be either difficult to mark or may not copy properly. & Originals with a colored background or yellowed original. # Shiny originals which cannot be marked with the pen.
COLOR EDITING 3/64°) min. 5 mm (13/84°) min. passed fin. I Edge marked o % ‘ Mark either side and either the top or bottom edge of a specific area 1o be edited. ® The marking lines must be parallel to the paper edges. #® The width of the marking lines must be at least 2 mm and must not exceed 4 mm o be effective. Finer markings may be ignored. ® The marking line must be more than 5 mm (13/647) long and about 2 mm longer than the area to be edited.
G Xd0D Bump somnolent COLOR EDITING Copying red marked originals Mark the areas to be changed on the original as shown an the previous page. Example: ERASE INSIDE (Masking) A B cCD R 3 Set the original on the document glass. If the editing area is EDGE MARKED, set the original so that the marked edge is next to the original size scale. if using the accent color feature, ensure that the desired color developer unit is installed.
W MISDEED REMOVAL The Copier will stop when a misted occurs, The misdeed indicator will light, and blinking red misdeed indicators will indicate the general problem location, After removing the misdeed, open and close the front cover and ensure that all the misdeed indicators have gone out. If paper becomes accidentally torn during removal, be sure to remove all pieces. Be careful not {v damage the photo conductive drum or the corona wires. First confirm the misdeed location.
SNIVELS Waller Pads I /\l.g MISDEED REMOVAL Transport area i 1 Open the front cover. 2 Turn the transport lever to the left. Turn the roller rotating knobs in the indicated direction and remove the paper. @ Press down on the green paper guide lever and make sure there is no missed paper. . # When a misdeed occurs while feeding from the front-loading paper tray, remove the missed paper from the right side of the machine. Gently lift and pull out the side paper cassette.
MISDEED REMOVAL Open the front cover. Turn the transport lever to the left. the green roller rotating knob. rotating knob until the fusing unit stops. paper from the fusing roller. If the missed paper is in the fusing unit, press down on the fusing unit lock fever and pull slowly on the roller Pull the roller rotating knob outward and turn it in the direction of the arrow to remove the paper from the fusee. The fusing unit is hot.
[BAGFUL SERBIA /\,8 MISDEED REMOVAL 6 Return the fusing unit into place. 7 Turn the transport lever back and close the grant cover. 1 Lift the exit paper guide to remove the missed paper. @ lithe paper is not visible from the exit side it must be removed by opening the front cover and lifting the paper guide to the left of the fusing unit, or pressing down the other paper guide. Open and close the front cover to cancel the misdeed indicator.
The is full. indicator will blink when the toner collecting container The Copier will stop and will not operate until a new container has been installed. 1 Open the front cover. Push down the toner collecting container, press the catch release and remove the toner collecting container. # Toner cannot be recycled. Do not transfer used toner to the toner hopper. ® Remove the cap from a new toner collecting container and cover the full toner collecting container with the new cap.
developer REQUIRED When the indicator lights, the developer should be replaced. DEVELOPER REPLACEMENT SHOULD ONLY BE DONE BY AN AUTHORIZED SHARP SERVICE TECHNICIAN. Contact your Service Center as soon as possible. o PN When the |k ) indicator lights, service by an authorized Sharp Service Technician is required. Contact your Service Center as soon as possible.
Proper care is essential for clean, sharp copes. Please take a few minutes to regularly clean your SF-8400 Copier. Stains on the document glass or document cover will also be copied. Wipe the document glass and document cover with a soft, clean cloth. @ If necessary, dampen the cloth with water. Do not use thinner, benzene, or similar volatile cleaning agents.
agrarian dose Shanty COPIER TROUBLE? Symptoms Copier does not operate. ® Copier plugged in? Plug the Copier into a grounded outlet. ® Power switch ON? Turn the power switch ON. Ca pies are too dark or foa light. « Copy density properly adjusted? See pages 13 and 24, Blank copies. & [s the original placed face down? Place the original face down on the document glass. Copies smear if rubbed. ® Paper too heavy? Use copy paper within the specified range. See page 3. ® Paper damp? Replace with dry copy paper.
COPIER TROUBLE? Symptoms Remedy Paper. chickenfeed frequently, ¢ ® Non-standard paper used? Use standard paper. If using special papers, feed the paper through the manual feed tray. See pages 3 and 19. ® Cassette and front-loading paper tray properly installed? Make sure the cassette and tray are firmly installed. See page 8. @ Pieces of paper inside Copier? Remove all pieces of missed paper. See page 31. @ Paper curled or damp? Store copy paper flat in the wrapper in a dry location.
COPIER TROUBLE? Symptoms e ® Is the READY Indicator oft? Copier is still warming up. Wait a few : minutes. oo Copy paper is needed. See page 8, @ (s the | [T] | indicator on? LOADING COPY PAPER. Power on but copying is not o Toner is required. See page 10, o , possible. ¢ ls the indicator blinking?| G TONER. . s the indicator blinking? See page 31, Toner collecting container is full. @ (s the indicator blinking?! See page 35, USED TONER DISPOSAL. \. s > .l..
~ SUPPLIES AND STORAGE Standard SF-8400 supplies replaced by the user include copy paper, toner, and toner collecting container. For jest copying results, be sure to use only Sharp products. Store SF-8400 supplies where it is ® dry, ® an even temperature, ® not exposed to direct sunlight. # clean. Store copy paper in the wrapper and lying flat. ® Paper stored in packages standing on end or out of the wrapper may curl or get damp, resulting in paper misreads.
SPECIFICATIONS Type Desktop Copy system Dry, electrostatic transfer system Originals Sheets, bound documents Original size Max. A3 (117 x17") Copy sizes Max. A3 (11” x 177}, min. AB x 25 simpleminded. A4 x 117} 16 minifloppies. B4 (8-1/2 x 147) 14 completeness. A3 (11" x17%) Copying speed (at 100% copy ratio) Continuous copy Max. 89 copies; subtraction counter First copy time (Single color 65 sec. copying) Warm-up time Approx. 2 min.
SPECIFICATIONS Power supply Local voltage £10% Power consumption Max. 1.5 kW Weight (optional document cover Approx. 77 kg (169.8 Abs) SF-CV12) Copier dimensions {optional HOTFOOT) x 620{D) x 492(H} mm document cover (W) x (D} % (M)} SF.
SYSTEM CONFIGURATION A number of options are available for the SF-8400 Copier to create a cooler system to meet your needs.
'~ AUTOMATIC DOCUMENT FEEDER (SF-A11) The ADF or RAD tray holds up to 50 originals for automatic feeding. With the RAD, two-sided originals can be copied automatically without having to turn them over. Used together with the optional duplex unit duplex capes of two-sided originals ean be made.
4avBH0Y Wd BRADFORD NORMAL COPYING Set the original guides to the width of the original, and set the original(s) on the BRADFORD tray face down with the last page on top. # Different size originals with the same width can be placed on the BRADFORD tray and automatically copied onto their respective size pacy paper. #® Be sure to remove any staples or paper clips from the originals. ( _Maxima atty 2 Select the desired paper size.
BRADFORD Set the two-sided original(s) facing down on the RAD tray with the last page on top, and adjust the original guides. 2 Press the DUPLEX/OVERLAY key. & Select SIMPLEX to make single-sided copies. @ Seismic DUPLEX to make duplex copies when the optional EDGE EH duplex unit is installed. [-UGH | simplex 0 OVERLAY SEDGE MARKED —— 7 EXTRA_ |= W 3 Select the desired paper size. AUTO -AUTO ZHIVAGO] SPARE SIZE = SELECT AUTO MAG = i Set the copy number and press the print button.
BRADFORD MISDEED REMOVAL A paper misted may occur at one of three locations: (A) in the HEADFIRST tray (B) under the transport belt, or (C) in the exit or RAD roller. w4 BRADFORD (A) Press the BRADFORD release bunion and pull the origin U} release bullion nal gently to the right and out from the BRADFORD tray. (B) Simply open the BRADFORD cover and remove the original. (C) Pull the original gently to the right. In the case of the RAD, open the RAD roller cover and gently pull the original out.
BRADFORD Hesiod o (N (eyg (o] SF-A11 Weight: 50 to 120 g/m? (13 to 32 Abs} Size: A5 to A3 1o 117 x17%) Up to 50 sheets, provided the total final aggregate thickness does not exceed 85 mm Power supply Drawn from the copier. SF-A51 Weight: 50 to 120 g/m? (13 to 32 Abs) Size: A5 to A3 ta 11" x 17"} ?fic?npibla Up to 50 sheets, provided the total g aggregate thickness does not exceed 85 mm Power supply Drawn from the copier.
15-BIN SORTER (SF-S11) There are two sorter modes for different copying jobs: one sorts by sets cf originals and the second groups by original, The maximum number of copies varies with the selected mode. The copy number will be automatically reset to the maximum copy number allowable for the selected mode when copying begins i this maximum is exceeded.
15-BIN SORTER When neither of the two sorter modes, SORT or GROUP, is selected, the Copier is in the NON-SORT mode. All copies are deposited in the top bin. Up to 99 copies can be selected in the NON-SORT mode {maximum 30 copies in the DUPLEX copying mode when an optional duplex unit is installed). Press the SORTER key to select the SORT mode. SORT is used for automatic document collating. in the SORT mode, up to 15 sets each of 50 originals can be made.
15-BIN SORTER bins 15 . N 150 sheets in the NON-SORT mode. Bin capacity 50 shabbiness in the SORT mode. . Max. A3 (117 x 177) Paper size Min. AS x Power supply Optional power supply unit *Specification are subject to change far improvement without CFC.
" DUPLEX UNIT WITH STAND (SF-D13) optional duplex unit allows you to automatically make duplex copies. Duplex copes are first copied on one side and then deposited in the duplex tray. When copying of the other side begins, these are fed from the duplex tray, copied on, and delivered to the exit tray. The maximum number of copes in the duplex mode is 30. If this maximum is exceeded, the copy number will be automatically reset to the maximum copy number when copying begins.
Jodedfxeidng RUE ] DUPLEX UNIT WITH STAND DUPLEX/PAPER FEED UNIT WITH STAND fE BARKS | ms Duplex = SIDE MARKS | -simplex v SIMPLEX TO OVERLAY CaJ PIED MARKS o corncrake __SIMPLEX TO DUPLEX FINAL [ORIGINALS] SHIFT be OUTSIDE | Fem Eve N NUMBER | b v Side | Lemonade NUMBER color DUPLEX TO QUA, £ QUARKS | e DUPLEX = SIMPLEX COPYING FROM THE DOCUMENT LASS (SIMPLEX TO DUPLEX) 1 Set the first original face down on the document glass. NUMBER.
DUPLEX UNIT WITH S NATL DUPLEX/PAPER FEED UNIT WITH STAND 1 Count the number of originals. Set the originals facing down on the ADF or RAD tray, 2 and adjust the original guides. Press the DUPLEX/OVERLAY key to select EVEN NUMBER or ODD NUMBER according to the number of originals. DE MARQUE SIDE MARKS [-LIGHT DUPLEX wm SIMPLEX EDGE H ® Originals are fed from the BRADFORD tray last page first.
DUPLEX UNIT WITH STAND DUPLEX/PAPER FEED UNIT WITH STAND DUPLEX COPYING Set the original(s) with the first page facing down on the RAD tray and adjust the original guides. E MARKS SIDE MARKS H-LIGHT 2 Press the DUPLEX/OVERLAY key to select DUPLEX. SIMPLEX TC OVERLAY EDGE MARKED (L Erma w0 3 Select the desired paper size. AUTO = = AUTO IMAGE] o 3 PAPER SIZE = 5 SELECT AUTO tag H C=dmn_] pubis um pules RUTTED 4 Set the copy number and press the print button.
DUPLEX UNIT WITH STAND DUPLEX/PAPER FEED UNIT WITH STAND SHARD SHARP The OVERLAY feature copies two different originals onto ane side of the copy paper. For instance, this feature can be used to overlay a heading or picture from one original over a caption or the text printed on a second original. Set the original(s) face down on the document glass (or BRADFORD tray). Press the DUPLEX/OVERLAY key to select SIMPLEX TO OVERLAY. US| showpiece 0 epee watchmen OVERLAY EDGE Select the desired paper size.
DUPLEX UNIT WITH STAND DUPLEX/PAPER FEED UNIT WITH STAND LOADING THE PAPER FEED UNIT (SF-D14) The paper feed unit built into the SF-D14 s a rotary paper tray. It can only be loaded with A4 x 117} size paper. The paper orientation will change automatically as necessary, eliminating the need to insert an A4R x 11”R) cassette. 1 Gently lift and pull out the paper feed unit. 2 Fan the copy paper and insert it in the rotary paper tray. @ The tray holds up to 500 sheets of A4 (8-1/2 x 11*) size paper.
DUPLEX UNIT WITHE S RAND DUPLEX/PAPER FEED UNIT WITH STAND A paper misdeed may occur at one of four locations: (A} in the exit area, (B} in the duplex transport area, (C) in the duplex tray area, or (D} in the rotary paper tray area (for SF-D14). (A) Open the front cover and remove the missed paper by pressing down the paper guide on the left side of the fusing unit. {B) Open the side cover and remove any missed paper. [Check section (B) before checking sections (C) and (D).
DUPLEX UNIT WITH STAND DUPLEX/PAPER FEED UNIT WITH STAND (D) Gently lift and pull out the paper feed unit. Remove any missed paper.
LA A WINE BROS A DUPLEX/PAPER FEED UNIT WITH STAND SF-D13 Paper size B5 to A3 (812" x 117 to 11 x 177} Copy number 30 SF-D14 Duplex unit: BS to A3 x 11" t0 Paper size 117 x 177} Paper feed unit: A4 (812" x11") Copy number 30 “Specification are subject 15 sangs for improvement without tonics.