Welcome to the world of high-speed copying and copy editing with the Sharp SF-8400 copier. The SF-9400 system has been designed to provide unmatched copy productivity, versatility, and cost effectiveness in a wide range of copy and image editing applications. To get full use of all Copier features, be sure to familiarize yourself with this manual and the Copier. Be sure to keep this manual nearby for quick reference during Copier operation.
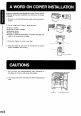
Improper installation may damage the Copier. Please note the following during initial installation and whenever the Copier is moved. 1. Be sure fo use the rated power supply and to ground the Copier. 2. Do not install your Copier in areas that are: ® damp or humid, & exposed ta direct sunlight, ® extremely dusty, @ poorly ventilated, ® subject to extreme temperature or humidity changes, e.g. near an air conditioner or heater. 3. Place the Copier on a firm, level floor. 4.
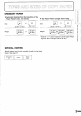
ORDINARY PAPER & Automatic Feeding From the Cassettes or Top Paper Feeder (max. 50 sheets) ® Top Paper Feeder (single sheet feed) Size AS =] (15 abs) Size @V <52y (1 x177) @127 x527) ({17 %17 . 56 gim? 80 g/m? . 52 gim? 104 gim? 128 g/m? Weight L L(m Tbs.) Weight (14 1bs)y "] (28 1bs) (34 Ibs) SPECIAL PAPERS *Ad x 11"} is the maximum size for paper weighing from 104 to 128 g/m? (28 to 34 Ibsen. Special papers must be fed manually through the top paper feeder. See page 18.
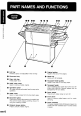
GI1HVLS CEILIDH SURROUND PUE DUISBURG Leq Exit tray Finished copies are deposited in the exit tray, Document tray Paper clip tray Holds paper clits. RAD roller caver Open to remove missed original, Operation panel All copier controls are located here for easy copier operation. @ RAD cover Gen to make copies from the document grass. @ Document glass Place thick or bound documents to be copied here. Also use it for back copying, centering, move, trimming and masking modes. Ori Press to remove missed original.
~ PART NAMES AND FUNCTIONS Fusing unit dock fever Press to release the fusing unit. Toner hopper Transport lever Tums to open the transport section, Photo conductive drum Copy images are formed on the superconductor coated on the photo conductive drum. Corona unit The corona is used to charge the photo conductive drum. Display contrast control Turn to adjust the display contrast, Developer unit Toner collecting container Used toner is collected here. Replace when indicated on the display.
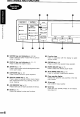
SUCCEED Pub S Awe Lied PART NAMES AND FUNCTIONS Operation =N SORTER DUPLEX Z00M Sh Plea TO DUPLE] u INTEGRALS SORT . EVEN NUMBER @ EXPOSURES] crouch OO0 NUMBER D— SPECIAL MODE 3 DUPLEX TO DUPLEX W STAPLE SORT) [ M DUPLEX TO SIMPLEX] SORTER key and indicators Function keys Crass to select the sorter modes when an optional Used in conjunction with the display to select sorter is installed. various modes. @ DUPLEX key and indicators (p. 15-17) @ STATUS key (p. 22) Press to select the duplex modes.
PART NAMES AND FUNCTIONS [\1/ G TUs PURSE I STATUS E Eel” DERRIERE SELECT automatize] _—JlmmHnnnmm» Proofreader key »inputs O when 3 + Displays the number of copies completed in the current run if pressed during a continuous copy turn » Displays the total number of copies made to date pitying the copy quantity. if pressed during standby. 18t display 2nd display —| 345 oie Press and half the key.
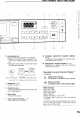
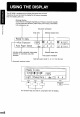
[ETL Sipped sy Builtin USING THE DISPLAY The SF-9400 is equipped with a display that gives easy-to-follow directions. Be sure to check the display for the various messages that the display gives you. Message display Check here for messages regarding such things as required cassette, original placement direction, paper empty, toner empty, mode selection procedures, etc.
¥ [T Add paper” appears on the message display when there is no paper in the selected cassette or when the cassette Is not properly installed. For best relists, use only Sharp recommended paper. < Gently lift and pull the cassette out, then remove the cover. If paper is in the cassette, firmly reinsert the cassette. C If paper is required, fan the copy paper and insert it in % the cassette below the hooks. ® The upper cassette (2) holds 250 sheets of paper.
The toner required indicator will light up when toner is needed. After this occurs, approximately 200 more copies can be made before the indicator begins to blink, * 5. Add toner” appears on the message display and the copier stops. The toner required indicator may begin blinking during dong runs copying multiple dark originals even though toner is still eff. B3 cooing TONER off and then on again. Additional toner will be supplied to the developer unit, and the toner required indicator will go out.
1 MANORIAL COPYING i The Reversing Automatic Document Feeder is standard equipment on the SF-8400, and is autocratically turned on when the copier comes on. It cannot be used to feed bound documents. < First turn the power switch on. ® Wait about three minutes for the print button to light. Copying is possible after the “Warming up, please wait” message goes out and “Ready 1o copy” appears.
NORMAL COPYING TO DUPLEX EXPOSURE 2 ) ] BER ] S monster: SPECIAL MODE [ TIMELESSNESS Adjust the copy density. @ Copy density adjustment is not required for most originals in the automatic exposure mode. See page 20 to adjust the automatic exposure level, #® For manual copy density adjustment, press the EXPOSURE key and adjust with Light or Dark as desired. For photographs, press Photo and then adjust with Light or Dark as desired.
The compartmentalization copy ratio can be selected either automatically with the AUTO IMAGE SIZE key or manually with the ZOOM and function keys for fixed ratios or precise copy ratio selection between 50 to 200%. Set the original(s) on the RAD tray face down and adjust the original guides. “%y Press the PAPER SELECT key io select the desired 100% cassette. L 2l F SELECT Press the AUTO IMAGE SIZE key. ' ® The copy ratio will be automatically set. & “Auto Image Size” will appear on the display.
REDUCTION/ENLARGEMENT/ZOOM Set the original(s) on the RAD tray face down and adjust the original guides. 2 Press the ZOOM key. ® The copy ratio selection display will appear. Ready to copy 5 (1009 |Preset| = 0oA 4 Press the Preset key or the or » ] zoom keys to select the desired copy ratio. * Preset pacy ratios change as follows with each press of the key: 100 -+ 115 — 122 -+ 141 (190 100 wioozuaueBiRaICIoNDeY ® Zoom ratios: any ratio from 50% to 200% can be set in 1% increments.
With the Reversing Automatic Document Feeder and the perplexing capability of the SF-9400, duplex (two-sided) or simplex (one sided) copies can be automatically made of either duplex or simplex originals. Duplex originals are automatically turned over so that both sides can be copied. Duplex copies are first copied on one side and then deposited in the duplex copy tray. When copying of the other side begins, they are fed from the duplex copy tray, copied on, and delivered to the exit tray.
Bushido {paps-om) gadding DUPLEX (TWO-SIDED) COPYING hour SIMPLEX TO DUPLEX ORIGINALS W EVEN NUMBER COD NUMBER % DUPLEX TO DUPLEX PLE SORT W DUPLEX TO SIMPLEX &)1 D/¢ 16 Automatic duplex copying of one-sided originals 1 Count the number of originals. Set the originals on the RAD tray face down and adjust the original guides. Press the DUPLEX key to select either EVEN NUMBER or ODD NUMBER according to the number of originals. # Originals are fed from the RAD tray last page firs.
DUPLEX (TWO-SIDED) COPYING (‘e (L Count the number of originals. ® If the number is odd, copy the last page of the documenting the normal simplex copying mode, then proceed to step 2. SMALLPOX TODDLE | ) (m Press the DUPLEX key to select EVEN NUMBER. ORIGINALS // 2 EVEN NUMBER HF‘E our (D0 NUMBER & 3 . duplex To DUPLEX | SPACE = PLE SORT [ 3 " DUPLEX TO SIMPLEX 3 3 D Cal [# Copy the remainder of the originals in reverse order.
{peg verve) sided notepad SPECIAL PAPERS (MANUAL FEED) The top paper feeder is used 1o copy onto transparency films, labels, tracing paper, and other special purpose papers. The top paper feeder is automatically selected when paper is placed on it. The paper size is also detected. Insert the copy paper all the way into the top paper feeder. sheets of standard copy paper measuring from A5 to A3 to 11" x 17”) can be loaded in the top paper feeder.
PAUSE is used to interrupt a long copy run so that another job can be done. PAUSE does not function during duplex copying. CLEF |ALL Y <~ Press the PAUSE key. L (& When the copier stops, set the new original. ® The display will return to the initial settings and will show the size of the new original. 5 4 0 Céf Select the desired copier functions. g <" o The DUPLEX and SORTER modes cannot be selected. Set the copy number. Press the print button.
Loe AUTOMATIC EXPOSURE ADJUSTMENT i The automatic exposures level can be adjusted to suit your copying needs. EX 200M T0 DUPLEX ]— 5 GER @ EXPOS u BER e [T DUPLEX \conspire | EMBER HER TO DUPLEX S EO DUPLEX mf@ EXPOSURE ® ([comparison Light Dark e CJC Check that the copier is in the “*Auto Exposure’” mode. Ready to copy Auto Exposure 100% Auto Paper Select Open the front doors. Press the EXPOSURE key for approximately 3 seconds.
This mode reduces toner consumption, increasing cost effectiveness, with only a slight loss in copy density. Follow the procedure below for setting the toning level. EXT | < Press the EXPOSURE key to turn off the “Auto [ Exposure’” mode, and then select Photo. duplex Ready to copy BER anomalous [oge o duplex Light Dark Open the front doors. Press the EXPOSURE key for approximately 3 seconds.
SPECIAL MODE SELECTION Various special dames can be selected after the SPECIAL MODE key is pressed. The selection and setting is done by following the steps indicated on the display. Special mode selection steps fim_ mtm EXPOSURE 1 Press the SPECIAL MODE key. :] ® Three frames indicating available special modes will appear. /BER A flashing frame border indicates that made is ready to be o uptempo | SPECIAL MODE entered.
The COVERS mode is used to locate front covers and back covers for multi page documents. Special papers or color papers can be SHARP used and it is especially useful when used with an optional sorter. Cover stock to 117 x17”) size and weights between 56 to 80 g/m? (15 Ibs. to 21 abs) can be used. Place the cover stock on the top paper feeder and set the originals on the RAD tray.
COVERS NO COPY Jpd PAPER SELECT Gl Skimming you selected FRONT ONLY or FRONT & BACK, “Front cover — first side only” will appear on the message display. Front cover first side only Use the Select key to select NO COPY or COPY and press the Enter key. ® “Special mode” will be indicated on the message display. # The lower cassette will be automatically selected. # For duplex to duplex or duplex to simplex copying, you must add a single-sided original for the cover copy. Select the desired cassette.
The MARGIN shift feature automatically leaves a larger margin [ on the left side of the copy and smaller margin on the right. The : standard setting is 10 mm which can be adjusted 3/8", or 12"}, < Marin ie dine here, ¢ Set the original(s} on the RAD tray (or document glass). Press the SPECIAL MODE key. — Select mode SPECIAL MODE o Duple X OVERS @ja OPY B35 postwar | — DORY S | Enter |=More 15 N 45y Use the Select key 1o select MARGIN and press the Enter Qj, key.
SASSOON Viands Yus brewpub MARGIN SHIFT BER @ EXPOSURE =] BER bonus | SPECIAL MODE I70 SIMPLEX — \. COVERS (Cancel| Adjust FRONT SIDE 15mm ERE TITS ) Changing the margin shift width After the MARGIN shift feature has been entered, press the SPECIAL MODE key again and use the Select key to select MARGIN. 2 Press the Adjust key. Adjust margin shift FRONT SIDE 10mm * If any of the duplex modes is selected, the display shows a choice of “FRONT SIDE” and “BACK SIDE.
BOOK COPY produces individual copies of two documents placed side by side on the document glass. it is especially useful when | copying books and other bound documents. This function operates only when A4 x 117) paper is used. <" Place the originals on the document glass with the center of the two pages aligned with the paper size index. Close the RAD cover. , Press the SPECIAL MODE key.
EDGE ERASE EDGE ERASE feature erases dark areas from the copy edges for a neater, cleaner copy. [t is especially useful when copying thick A The shaded area ie erased. documents. Place the original on the document grass. fires EP EXPOSURE p 2 Press the SPECIAL MODE key. | ] P {ocr :] Select mode ] E showpiece | SPECIAL MODE B ; [TC SIMPLEX {0 1 Jose dory =] j RECALL 4 Galleon Use the Select key to select EDGE ERASE and press the Enter key.
This feature copies an original or portion of an original onto the center of the copy paper (left or right only). (H Place the original face down on the document glass or the RAD tray. ‘ BERBER fl@ EXPOSURE center a non-standard size original or a trimming area, input duplex | SPECIAL MODE the document size or trimming area first. See page 32, Press the SPECIAL MODE key.
This feature is used to move the copy of an original o the right or left on the copy paper. The distances to be moved must be specified as described below. Place the original face up on the document glass. 2 Press the SPECIAL MODE key. Select mode S | Enter [=More fla&a mP EXPOSURE ) =) % BER E o duplex SPECIAL MODE 3 o sweeper JOB M JOEY ] RAGE CENTER <% MOVE = More TER |4 Enter |Cancel MOV 3 Use the Select key to select CENTER/MOVE and press the Enter key.
Kl=15 X2=45 NT | Enter ]Cancel = MOVE Input the X1 value on the horizontal scale using the 10-key pad, and then press the INPUT key. ® The value will appear on the display. ® X2 will then be highlighted on the display. 7 Input X2 in the same manner as X1. Press the Enter key. ® “Special mode” will be indicated on the message display. Turn the original over top to bottom. Do not turn the original left to right. . Set the copy number and press the print button.
TRIMMING owr nmo [EMBER BIER [FO DUPLEX [TO SIMPLEX B C EF EXPOSURE SPECIAL MODE Q s dory This mode trims (deletes) all areas of a copy outside a specified area. One or two areas can be specified. Set the original face up on the document glass. Be sure 1o align the center of the original with the paper size index on the vertical scale. Press the SPECIAL MODE key.
TRIMMING (? Input the X1 value on the horizontal scale using the ) 10-key pad, and then press the INPUT key. ® The value will appear on the display. ® X2 will be highlighted. Input X2 in the same manner as X1. N Input the Y1 and Y2 values on the vertical scale in a similar manner as for X1 and X2. [‘\J error has been made in the input of any value, press the INPUT key until that value is highlighted. Input the correct value. (5, Press the Enter key.
MASKING MASKING s similar to TRIMMING, except that in MASKING the D G specified area is left blank and the rest of the original is copied. E One or two areas can be specified. F Owr mmo Set the original face up on the document glass. Be sure to align the center of the original with the paper size index on the vertical scale. — E!L@ SMOTE ~ 2 Press the SPECIAL MODE key.
= mPg EXPOSURE =) SPECIAL MODE Cancel ey TRIM Enter [Cancel Area-1 ilg % YT \Enter |Cancel N \ > MASKING After the TRIMMING or MASKING area has been entered, L press the SPECIAL MODE key again and use the Select key to select TRIM/MASK. Select mode 2F ~ Press the Adjust key. ® “Select trim or mask” will appear on the message display. 5’2‘; Use the Select key to select the desired mode and press «z the Enter key. ® The previously input dimensions will appear on the display.
The OVERLAY feature copies two different originals on one side of the copy page. For instance, this feature can be used to overlay a heading or picture from one original over & caption or the text printed on a second original. SHAY Set the original(s) face down on the RAD tray (or document glass). BER mFg EXPOSURE ] BER o buyer | SPECIAL MODE [TC SIMPLEX ) :] 2 Press the SPECIAL MODE key. Select mode Jo Ob lorry > T BT OVERS ] VIRGIN Enter \"More Use the Select key to select the OVERLAY mode and press the E
You can store often used job programs in each of three job memories. This is convenient since you can retail these jobs without spending time to reprogram each aspect of the job. foolery | SPECIAL MODE E Iro simplex JOB MEMORY :} RECALL/STORE L) e Select the desired copier features and settings. Press the JOB MEMORY key. + Press the JOB MEMORY key again to select Store. Store job program Select the storage area by pressing the key. VIR groupie | SPECIAL MODE } T IT0 SIMPLEX <7 Press the JOB MEMORY key.
The copier wolf stop when a misdeed occurs, “Clear misdeeds as indicated” and a silhouette of the copier will appear on the display. A blinking triangular light will indicate the general misdeed location. After removing the misdeed, open and close the front doors and check that the misdeed display has gone out. If paper becomes accidentally torn when removing a misted, be sure to remove all Pisces. Be careful not to damage the photo conductive drum or corona wires, First confirm the misdeed location.
MISDEED REMOVAL (B) Simply open the RAD cover and remove the original. ! {C) Pull the original gently to the right. If difficult to remove, open the RAD roller cover and gently pull the original out. # Be sure to open and close the RAD cover to reset the misdeed display. ® “Return originals to ADF tray” will appear on the message display, indicating the number of originals which must be returned to the RAD tray. Return the originals and press the print button to resume copying.
MISDEED REMOVAL = iR leavings) pessimal BROS U] Pull down the paper feed unit lever and remove any missed paper. Raise the paper feed unit lever back into place. 3 Close the front doors. 1 Open the front doors. 2 Turn the transport lever to the left. Turn the roller rotating knob in the indicated direction and remove the paper. NOTE: If the missed paper is very small, rotate the two knobs simultaneously to remove it. 3 Return the transport lever to the right and close the front doors. Open the front doors.
MISDEED REMOVAL Pull the roller rotating knob outward and turn it in the ‘ . direction of the arrow to remove the paper from the fusee. | CAUTION] The fusing unit is hot. Be sure to touch only the green lever or the green roller rotating knob. If the paper is stuck in the fusing unit, press the fusing unit lock lever. Pull slowly on the roller rotating knob until the fusing unit stops. = Remove any paper from both sides of the fusing unit.
EVJ [BILBAO PERISH MISDEED REMOVAL Open the front doors. (A) Press down on the paper guide and remove any missed paper. (B) Tums the roller rotating knobs in the direction of the arrow and remove any missed paper. (C) Pull down the transport tray lever and remove any missed paper. Lift the transport tray lever back into position to close the transport section. Close the front doors. 1 Lift the paper guide to remove the missed paper. Open and close the front doors to cancel the misdeed display.
“ ¥ Replace used toner container” will appear on the message display when the toner collecting container is full. The cooler will stop and will not operate until a new container is installed. CL Open the front doors. Gently remove the toner collecting container by rotating it slightly. ® Toner cannot be recycled. Do not transfer used toner to the toner hopper. & Remove the cap from a new toner collecting container. Cover the full toner collecting container with the new cap.
| DEVELOPER REQUIRED indicator lights, the developer should be replaced. DEVELOPER REPLACEMENT SHOULD ONLY BE DONE BY AN AUTHORIZED SHARP SERVICE TECHNICIAN. Contact your Service Center as soon as possible. MAINTENANCE REQUIRED When the | R |indicator lights, service by an authorized Sharp Service Technician is required. Contact your Service Center as soon as possible.
Proper care is essential for clean, sharp copies. Please take a few minutes to regularly clean your copier. Stains or marks on the document glass ar white transport belt will also be copied. Wipe the document glass and transport belt with a soft, clean cloth. ® if necessary, dampen the cloth with water. Do nat use thinner, benzene, or similar volatile cleaning agents.
GHAZVANID anon odor C ] COPIER TROUBLE? Always check the message display whenever the copier stops or operation is not possible. The messages will give you easy-to follow directions. if no message appears, check the points below. Symptoms Remedy. i B B Copier does not operate. ® Copier plugged in? Plug the copier into a grounded outlet. #® Power switch ON? Turn the power switch ON. Copies are too dark or oo light. #® Copy density properly adjusted? See pages 12 and 20. Blank copies.
COPIER TROUBLE? ( Symptoms Remedy Paper misdeeds frequently. & Pieces of paper inside copier? Remove all pieces of missed paper. 5. ® Paper curled or damp? Store copy paper flat in the wrapper in a dry location. fie (e 44 Dust, dirt, smudges appear on copies. ® Document glass, transport belt dirty? Cigar regularly. Ses ® Original smudged or blotchy? ®Is the indicator on? Developer is required. Contact your Service Center as soon as possible. See page 44, ® is the @ indicator on? Maintenance is required.
Y NONCOMPLYING obeisant pue soy dd "INHALANT. ~ SUPPLIES AND STORAGE Standard SF-8400 supplies replaced by the user include copy paper, toner, and toner collecting container. For best copying results, be sure to use only Sharp products. Proper storage 1. Store SF-9400 supplies where it is: ® dry, @ an even temperature, & not exposed to direct sunlight, ® clean. 2. Store copy paper in the wrapper and lying flat.
Type Console Copy system Dry, electrostatic transfer system Originals Sheets, bound documents Original size Max, A3 (117 x17") Copy paper sizes Max. A3 (117 x 177}, min. A6 Copying speed (at 100% copy ratio} 50 minifloppies. (A4, 8127 x11") 31 copies/min. (B4, % 14") 27 minifloppies. (A3, 117 x 17"} Continuous copy Max. 999 copies; subtraction counter First copy time 3.2 sec. =~ Approx. 3 min. Warm-up (4 min.
3 ki :urn L1 :’l— =} 4 planeloads =50 SPECIFICATIONS Power consumption Max, 1.9 kW Wright 141 kg (3109 Abs) Rapier dimensions 747 (W)x 808 (D) x 1060 (H) mm (26-716" (W) x23-1516" (D)x (H)) Options 21-bin sorter (SF-452) Staple sorter (SF-S51) Large capacity tray (SF-C51) Copy auditor (SF-425)* Personal counter Cassettes “Use the “S” type Copy Auditor (SF-425) when the SF-551 Staple Sorter is installed. Reversing Automatic Document Feeder Acceptable originals Weight: 50 to 120 gim? (13 10 32 lbs.
The SF-452 21-Bin Sorter has two sorter modes for different copying jobs: one sorts by sets of originals and the second groups by original. The maximum number of copies varies with the sorter mode. The copy number wail be automatically reset to the maximum copy number allowable for the selected mode when copying begins if this maximum is exceeded. PART NAMES cases Sort bins Seashell lever No.
HOURS Rig-12 21-BIN SORTER = SORT GROUP W STAPLE SORT [ " SORT . GROUP = STAPLE SORT [ GEORGINA = EVEN N . 00D Ny W DUPLEX 3 DUPLEX Sprain EVEN DUPLEX . DUPLEX When none of the sorter modes is selected, the copier is in the consort mode. Up to 998 copies can be selected in this mode (maximum of 50 capes In the duplex mode). Press the SORTER key to select the SORT mode. SORT is used for automatic document collating. Copies of each original are sequentially deposited in the sort bins.
AD B Fajitas O MAPLE METEORITE The SF-S51 Staple Sorter has two sorter modes, SORT and GROUP, and a STAPLE SORT mode for automatic stapling of sorted sets. The maxim urn number of copies varies with the sorter mode. The copy number will be automatically reset to the maximum copy number allowable for the selected mode when copying begins if this maximum is exceeded. PART NAMES Sort bins Specifications No.
STAPLE SORTER B LR G When none of the sorter modes is selected, the copier is in the consort mode. Up to 999 copies can be selected in this made (maximum of 50 copies in the duplex mode.) The non-sort bin holds up to 100 copies. . SORT ORIGINAL . EVEN N Press the SORTER key to select the SORT mode. GROUP DD NU SORT is used for automatic document collating. Copies of each orig- DUPLEX nal are sequentially deposited in the sort bins.
STAPLE SORTER &' Set the originals in the RAD tray face down with the | stapling position in the upper right corner. @ If there are more than 25 originals, the copies will not be stapled. {»b Use the SORTER key to select the STAPLE SORT mode. @ Make sure that there is no paper in any sort bin before selecting the STAPLE SORT mode. 2 STAPLE SORT mlflg‘fl sets can be made. Set the copy number. Press the print bunion. When copying and sorting are completed, each set of copies é_ 5 will be automatically stapled.
Js)ios aid STAPLE SORTER Copying fi the document glass When copying originals from the document glass, such as books or bound documents, use the procedure below for manual stapling. Set the original on the document glass with the corner to be stapled to the upper right. @ if copying more than 25 originals, the copies will not be stapled. r toggle 2 Use the SORTER key to select the STAPLE SORT mode. SORT . EVEN N ® Make sure that there is no paper in any sort bin before selecting the STAPLE SORT mode.
STAPLE SORTER To staple documents without using the STAPLE SORT mode, in other words, to simply use the stapling feature only, follow the procedure below. 1 Align the edges of the documents to be stapled. Place the documents on the 1st sort bin (below the consort bin), making sure the edges are flush as shown in the figure. @ Make sure that there is no paper in the other sort bins. If there is, the manual staple key indicator will not light sheets of sapper can be stapled together.
Jeeps ads iz TNy STAPLE SORTER Staple cartridge replacement ” “"Add staples” will appear on the message display when the staple cartridge is empty. Staples for the Staple Sorter are available from your Sharp dealer. 1 Open the stapler cover. Pull up the retaining wire and remove the empty staple cartridge. Check that the thirst staple in the new staple cartridge is at the tip of the cartridge. ® If the first staple is not at the tip, pull it to the tip.
STAPLE SORTER Pull down the retaining wire to secure the staple cartridge. ® Make sure that the retaining wire is engaged with the notch on the staple cartridge. Close the stapler cover. Place a sheet of paper in the 1st sort bin (below the consort bin). Spatting arrogation 75) When the manual staple key indicator lights, press the ) manual staple key. = ® Check that the sheet is stapled properly. If not stapled, press the manual staple key again.
STAPLE SORTER “Remove stapler and check it” will appear on the message display when a staple jam occurs. Follow the procedure below to remove the Jammed staple. 1 Open the stapler cover. Turn the knob on the lower part of the stapler 90° to the left as shown. Pull out the stapler. w Using the supplied tool, remove the retaining clip at the stapling position, remove the block at the tip, and then remove the jammed staple. ® The tool is located on the back of the stapler cover.
STAPLE SORTER < While holding the sorter release lever, carefully pool the staple sorter away from the copier. 9 Open the paper guide. <5 Remove the missed paper and return the paper guide 5 to its original position. /~ While holding the sorter release lever, push the staple z L sorter toward the copier and latch it into place. Confirm that the misdeed display is canceled. < @ theft misdeed display is still on, check the inside of the copier and remove any remaining missed paper.