MUSIC SYSTEM FOR iPod & iPhone Thank you for purchasing this SHARP product. To obtain the best performance from this product, please read this manual carefully. It will guide you in operating your SHARP product. MODEL DK-CL8PH(BK) DK-CL8PH(GR) DK-CL8PH(PK) OPERATION MANUAL iPhone, iPod, iPod classic, iPod nano, and iPod touch are trademarks of Apple Inc., registered in the U.S. and other countries.
Important Instruction DK-CL8PH(BK) DK-CL8PH(GR) DK-CL8PH(PK) Special notes Warning: ● When the ON/STAND-BY button is set at STAND-BY position, mains voltage is still present inside the unit. When the ON/STAND-BY button is set at STAND-BY position, the unit may be brought into operation by the timer mode or remote control. ● This unit contains no user serviceable parts. Never remove covers unless qualified to do so.
Accessories DK-CL8PH(BK) DK-CL8PH(GR) DK-CL8PH(PK) Please confirm that only the following accessories are included. Contents Page Page ■ General Information Precautions . . . . . . . . . . . . . . . . . . . . . . . . . . . . . . . 4 Controls and indicators . . . . . . . . . . . . . . . . . . .5 - 6 ■ Radio Listening to the radio . . . . . . . . . . . . . . . . . . 13 - 14 ■ Preparation for Use System connections . . . . . . . . . . . . . . . . . . . . .7 - 8 ■ Advanced Features Alarm operation . . .
DK-CL8PH(BK) DK-CL8PH(GR) DK-CL8PH(PK) Precautions ■ General ● Hold the AC/DC adaptor by the ● Please ensure that the equipment is positioned in a well-ventilated area and ensure that there is at least 10 cm (4") of free space along the sides, top and back of the equipment. 10 cm (4") 10 cm (4") ● Use the unit on a firm, level General Information surface free from vibration. head when removing it from the wall socket, as pulling the lead can damage internal wires.
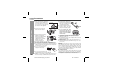
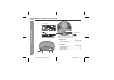
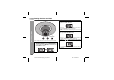
Controls and indicators ■ Top panel Reference page iPod and iPhone Dock . . . . . . . . . . . . . . . . . . . . 11, 12 Volume Up Button . . . . . . . . . . . . . . . . . . . . . . . . . . . 9 Volume Down Button . . . . . . . . . . . . . . . . . . . . . . . . . 9 Alarm 2 Button . . . . . . . . . . . . . . . . . . . . . . . . . . . 14, 15 Play / Pause Button . . . . . . . . . . . . . . . . . . . . . . . 14, 15 Preset / Track Up Button . . . . . . . . . . . . . . . . . . 10, 12 SNOOZE / DIMMER Button . . . .
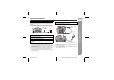
DK-CL8PH(BK) DK-CL8PH(GR) DK-CL8PH(PK) Controls and indicators (continued) General Information The spec label (*) 1 The iPod rating mark 1A The spec label illustration may be different from the actual label used. (*) Label is located at the bottom of the unit. ■ Bottom view Reference page 1. Battery Compartment . . . . . . . . . . . . . . . . . . . . . . . . 8 ■ Rear panel 1. 2. 3. 4. 1 4 2 Reference page FM Aerial Wire (fixed) . . . . . . . . . . . . . . . . . . . . . . . . 16 DC Input Socket .
System connections Make sure to unplug the AC/DC adaptor before making any connections. ■ Connecting iPod or iPhone to TV Video files from iPod or iPhone can be viewed by connecting the system to TV/monitor. If the TV/monitor has a video input, connect it to the VIDEO OUT socket at the back of the unit and set the TV Out on the iPod unit to “oN” position. Video cable (not supplied) ■ Watching videos on a TV connected to iPod Press the FUNC. button to select the iPod function.
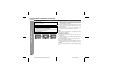
DK-CL8PH(BK) DK-CL8PH(GR) DK-CL8PH(PK) System connections (continued) ■ Install/Replace batteries Preparation for Use For Backup battery: Use 2 “AAA” size batteries (UM-4, R03, HP-16 or similar). Batteries are not included. 1 2 Open the battery cover. 3 Close the cover. Insert the batteries according to the direction indicated in the battery compartment. When inserting or removing the batteries, push them towards the – battery terminal.
General control ■ Display brightness control (DIMMER) DK-CL8PH(BK) DK-CL8PH(GR) DK-CL8PH(PK) Dimmer 1 (Display is dim) Dimmer 2 (Display gets dimmer) Dimmer off (Display is bright) ■ Volume auto set in If you turn off and on the unit with the volume set to 17 or higher, the volume starts at 16. ON/STAND-BY ALARM RESET VOLUME ■ Volume control Press the Volume button (VOLUME –) to decrease volume and (VOLUME +) to increase volume.
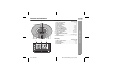
DK-CL8PH(BK) DK-CL8PH(GR) DK-CL8PH(PK) Setting the time and date 2 Press the ( or ) button to adjust the hour and then press the CLOCK/MEM. button. PM Basic Operation Press the ( or ) button once to advance the time by 1 hour. Hold it down to advance continuously. “AM” or “PM” indicator will interchange after each 12 hour cyclic. 3 Press the ( or ) button to adjust the minutes and then press the CLOCK/MEM. button. PM TUNING PLAY/PAUSE Press the ( or ) button once to advance the time by 1 minute.
Listening to the iPod or iPhone Caution: ● Please update your iPod unit to the latest software version before using it. Please visit Apple’s homepage to download the latest version for your iPod. Notes: ● Once the iPod or iPhone is connected to the unit it will begin charging. ● If you have an iPod or iPhone that does not have an iPod 30 Pin connector, you can use an auxillary cable to connect it to the AUDIO IN socket.
DK-CL8PH(BK) DK-CL8PH(GR) DK-CL8PH(PK) Listening to the iPod or iPhone (continued) ■ iPod or iPhone playback 1 2 Press the ON/STAND-BY button to turn the power on. 3 Insert iPod or iPhone unit into the dock. Press the FUNC. button repeatedly to select the iPod function iPod and iPhone iPhone ■ Various iPod or iPhone functions Function Play Pause Press the PLAY/PAUSE button to start playback. For iPod touch and iPhone, playback will automatically start once the desired file is selected.
Listening to the radio ● This product can receive FM Stereo amd FM Monaural broadcast. DK-CL8PH(BK) DK-CL8PH(GR) DK-CL8PH(PK) ■ Programming a station You can store 40 FM stations in memory. Perform steps 1 - 3 “Tuning” on page 13. 3 Within 30 seconds, press the or button to select the preset channel number. Store the stations in memory, in order, starting with preset channel 1. 4 Within 30 seconds, press the CLOCK/MEM. button to store that station in memory.
DK-CL8PH(BK) DK-CL8PH(GR) DK-CL8PH(PK) Listening to the radio (continued) Note: The batteries system protects the programmed stations should there be a power failure or the AC/DC adaptor becomes disconnected. If the backup batteries are drain off, the programmed stations will be erased. Radio / Advanced Features ■ To recall a programmed station Press CLOCK/MEM. button then press or repeatedly to select the desired programmed station.
3 Press the ( or ) button to adjust the minutes and then press the AL 1 button. Note: If wake up source is set to iPod, and iPod is not present, the alarm source will change to default Buzzer. DK-CL8PH(BK) DK-CL8PH(GR) DK-CL8PH(PK) ■ Activate and deactivate the alarm 1 In stand-by mode, press AL 1 or AL 2 button once to deactivate current alarm times and wake up source. 2 Press AL 1 or AL 2 button again to activate the alarm function.
DK-CL8PH(BK) DK-CL8PH(GR) DK-CL8PH(PK) Enhancing your system The auxiliary cable is not included. Purchase a separate auxiliary cable as shown below. Portable audio player ■ Listening to the audio/video sounds from portable audio player, computer etc. 1 Use the auxiliary cable to connect the portable audio player, computer etc. to the AUDIO IN socket. Advanced Features When using video equipment, connect the audio output to this unit and the video output to a television.
Troubleshooting chart Symptom to the correct time. ● When a button is pressed, the unit does not respond. Symptom Possible cause ● No sound is produced. Possible cause ● ● Did a power failure occur? Reset the clock. (Refer to page 10) ● ● Set the unit to the power stand-by ● mode and then turn it back on. ● If the unit still malfunctions, reset it. ● (Refer to page 18) ● No sound is heard.
DK-CL8PH(BK) DK-CL8PH(GR) DK-CL8PH(PK) Troubleshooting chart (continued) ■ Condensation ■ Clearing all the memory (reset) Sudden temperature changes, storage or operation in an extremely humid environment may cause condensation inside the cabinet. Condensation can cause the unit to malfunction. If this happens, leave the power on until normal playback is possible (about 1 hour). In Audio In (AU) function, press button then press and hold / button for 5 seconds.
Maintenance Specifications ■ Cleaning the unit As part of our policy of continuous improvement, SHARP reserves the right to make design and specification changes for product improvement without prior not ice. The performance specification figures indicated are nominal values of production units. There may be some deviations from these values in individual units. Caution: ● Do not use chemicals for cleaning (petrol, paint thinner, etc.). It may damage the unit finishing.
DK-CL8PH(BK) DK-CL8PH(GR) DK-CL8PH(PK) Specifications (continued) Input terminals Auxiliary (audio signal): 500 mV/47 k ohms Dimensions Width: 265 mm Height: 138 mm Depth: 183 mm Weight 1.18 kg (2.60 lbs.) ■ Tuner FM: 87.5 - 108.0 MHz References Frequency range 20 DK-CL8PH ENAUS_A6_p01-p20.
MEMO
MEMO
FOR LOCATION ENQUIRIES WITHIN AUSTRALIA REGARDING YOUR LOCAL SHARP APPROVED SERVICE CENTRE VISIT OUR WEBSITE AT www.sharp.net.au OR CALL SHARP CUSTOMER CARE 1300 135 022 (LOCAL CALL COSTS APPLY WITHIN AUSTRALIA) SHARP CORPORATION OF AUSTRALIA PTY LTD FOR LOCATION ENQUIRIES WITHIN NEW ZEALAND REGARDING YOUR LOCAL SHARP APPROVED SERVICE CENTRE VISIT OUR WEBSITE AT www.sharp.net.
WARRANTY Consumer Electronic Products Congratulations on Your Purchase! This Sharp product is warranted against faults in material and manufacture for the period as stated in the table below. If service is required during the warranty period, please contact your nearest Sharp Approved Service Centre. These repairs would be carried out at no charge to the owner, subject to the conditions specified herein.